I’ve read all the reports about using expensive wood to construct your benchwork. I suppose there’s some advantage to that. But I prefer to spend my money on top of the layout where I can see it!
Now, granted, there are some tricks to making cheap lumber work. And I dare say, the ripped plywood method is about as economical as you can get, provided you have a table saw and a couple of friends to help with the cutting.
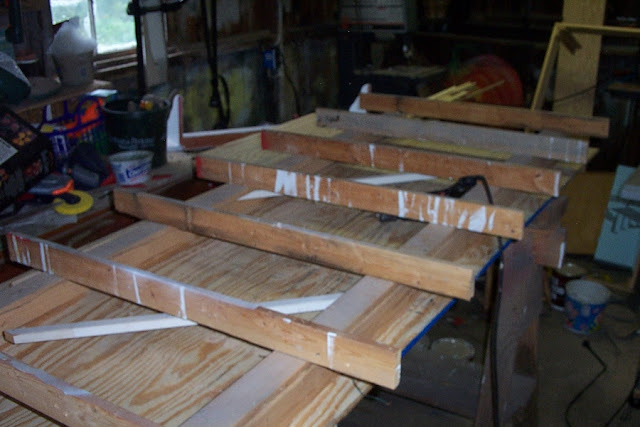
But I built the frame you see above out of cheap white pine 1x3 about 20 years ago. It’s a very simple L-girder design, with one 1x3 vertical screwed and glued to another that’s horizontal. These are the main pieces you have to worry about. If you’re selective, you can find 4 good straight ones in a bundle to use for your L girders. Once they’re glued and screwed together, they’re going to resist twisting. That’s not to say that it can’t happen, but if you get the frame together, then let it sit for a couple of weeks to dry out, you should be able to keep it pretty straight. Once the moisture content is eliminated, the wood will be more or less stable.
The main problem with these is the moisture content. One of the tricks is to buy a bundle, and leave it banded up out in the garage for a month or so. That way it can dry out some more, and the bands hold them in a semi straight condition. Yes, it saves time to buy the expensive stuff, but time I have!
The frame you see above is currently employed holding all of this together.
I have a small HO layout that is built from pine 1x2 s. I did this to make it lightweight and portable. Not the scrappy furring strips but the better quality 1x2s, hand selected. (I have made a lot of things out of 1x2s, such as bunk bed ladders, and railings, mirror frames, LOL) I have not had the warping issues of others mentioned so, maybe I have been lucky? Or we get quality lumber here? Or maybe I just have an eye to select good lumber?
Anyway, for the layout, the legs are 1x2 L girder with plywood gussets. The open grid is 24" with diagonal cross bracing at the corners, glued and screwed. This makes the total thickness of the grid work, an actual 1 3/4". The vertical topography of the layout is limited to 30" so I can carry the layout through a 30" door opening. To keep the “frame” from twisting, there is some vertical webbing made of 1/4" or 3/8" plywood which supports some of the cookie cutter plywood sub roadbed (the third dimension). Most of the sub road bed is supported by 1x2 risers (conventional). The rest is lots of cardboard profiles which has been plenty rigid enough to support the scenery, buildings and actually makes the layout fairly strong. No warping or breaks for 13 years but I don’t climb or sit on the layout! My original thoughts years ago was to make the entire layout of cardboard. I have seen cars driven over cardboard bridges. I wasn’t brave enough so I kind of compromised, combined the traditional way but using 1x2s, some plywood, and lots of cardboard.
So in the end, I think if you go with 1x2 or 1x3, be sure to brace (triangulate) in all three dimensions.
I made mine from 3/4" plywood, reinforced with 2x4. I know, the 2x4 may be overkill, but I also have a utility truck bench vise attached at one end and a bench sander at the other. I also strung wire from the electrical service panel (don’t worry, one of my “careers” in my youth was an electrician). I have 4 square metal boxes wired to each end. I also made a mounting for my magnifying light that reaches past the front of the bench. Mine is also anchored to the wall and has 2x4s for legs. I tried using sawhorses, but the legs were in the way.
If you don’t have access to some healthy hands (friends) to help you cut the plywood, the store will cut it down to your final size for a small fee.
I also attached a raised edge all the way around using some 1/8" strips. This keeps things from rolling off the top. The ONLY thing different I would have done would have added a chemical proof top.
I guess that I could salvage as much of the 1x4’s as I can, however my new layout will be twice the size of my “current” one. I like the idea of using 2x2’s, as these can be stronger than 1x’s. I guess I’ll have to take a look at the local lumberyard and see what they have.
I have been using steel stud benchwork for more than 8 years, using a method I first saw in the April 2000 issue of Model Railroader by Jonathan Miner. I have found it to be inexpensive, lightweight, strong, and absolutely stable. My layout is what I consider a large roomsize, built in sections with some of the sections 3’ by 10’. There is very little mess, no need for a metal cutting chop saw, just tin snips, framing square, and drill driver and self-drilling screws. The panels may seem flimsy at first, but when mounted to the leg supports it is very stable and strong. I have sat on the middle of an 8’ panel supported only at the ends and my 185# weight didn’t bend it! One does have to use ordinary care because of possible sharp edges but no more than watching out for slivers.
My supporting framework is wood, sealed and painted, and all risers and cleats are plywood 3/4" with 5/8" sub-roadbed.
Again, I am absolutely satisfied with my choice of steel stud benchwork over the years. Summers here are humid with very dry conditions indoors in the Winter and I am impressed with the stability this methods affords.
Well, I found some deck boards from an old deck we tore down years ago. They are 5.5"x1"x12’. I figured I could rip those down into 1x3’s or x4’s and use them. Plus it gets them out of my barn.
Speaking from hard learned experience, don’t use furring strips. If you have a Lowe’s near you, they carry a grade called Top Choice which I what I now use. The one and only time I tried to save a few pennies by using furring strips resulted in warped joists which all ended up in the bonfire for roasting marshmallows.
The “white board” from Lowes/Home Depot works well even in 1x2 or 1x3. Good selection in all pre-cut lengths and they are relatively cheap. I’ve seen -0- warpage here in my damp midwestern basement. The 2x2’s are a whole different story though.
I am also prefer to work with steel studs for bench work construction. On top of the steel open framework I add a base of 2" extruded foam and use Woodland Scenics foam risers for sub-roadbed. I use foam struts to support old-fashioned chicken wire forms covered with plaster gauze for my scenery. I have a photo album on my website which illustrates my experience with this materials and techniques.
I used furring strip on my first layout with some success. It is very hard to get straight furring strip lumber, therefore I used a solid plywood deck to straighten out the frame. Even with bracing, it is very hard to get the table stable, unless one end has been bolted into the wall. The other issue was splitting, eventually wherever you had connectors (screws or nails) you later developed cracks. For my last layout I have ripped plywood into strips and built the layout that way. It was a little more expensive but it is very stable and very forgiving.