I have deleted a post that was a complete copy-and-paste from another website that’s clearly marked as being copyrighted. Posting copyrighted material without permission from the copyright holder is both illegal and against the rules of this Forum. Please do not post copyrighted material on this Forum again.
Sorry about that posting. I did not take notice of that.
Cheap Methods for Manual Turnout Control
So here is how they said to make reference to that discussion,…
Manual Turnout Control For Model Railroad Layouts
Is that correct? I did it as they instructed.
Or like this?
https://www.model-railroad-infoguy.com/manual-turnout-control.html
http://sullivanproducts.com/about/
A 36" (.032") Metal Cable Gold-N-Rod Push Rod System from Sullivan.
Key Features Stranded stainless steel cables combine high strength with maximum flexibility Cables are plated for easy soldering to connectors Made to tight tolerances to insure smooth operation with minimum friction Excellent for throttle control - all control surfaces on small to medium size aircraft
| FEATURES |
|---|
Stranded stainless steel cables combine high strength with maximum
flexibility.
Cables are plated for easy soldering to connectors.
Each brass plated Gold-N-Clevis is constructed of tempered steel
with an interlocking collar, welded pin and an exclusive steel
retaining clip to prevent accidental opening.
Excellent for throttle control, all control surfaces on small to
medium size aircraft, retracts and double cable installations.
Good for medium duty control systems in cars, boats and helicopters
Detailed installation instructions.
Used to connect servo arms in the model to the model’s control
surfaces.
Made to tight tolerances to insure smooth operation with minimum
friction.
Comes complete with Gold-N-Clevises and other installation hardware
in standard thread sizes.
| INCLUDES |
|---|
1 Pushcable
1 Pushrod Cover
All Necessary Hardware
| SPECIF |
|---|
Bullfrog Control Rod Kit
Appears as though their source for the control rod is Sulivan’s
what linkage do you plan on using between the cable and throw bars?
can the push/pull cable/rod reach that linkage at any angle? if so, may be little need for anything flexible
Dave:
I still have problems making the link text ‘linkable’. Software on this forum just works opposite of intuition.
GregC:
I’m hoping to just line up the wire/tube-within-a-tube with one end of the throwbar of the turnout, anchor that end of the cable in place, and have the inner wire/tube slide in and out,…all at ‘ground level’ rather than under the deck. Then use ground cover to camouflage the cable.
The reason I am thinking of ‘ground level’ control is to avoid all that under deck apparatus that many of the different control shemes want to utilize,…but all that apparatus interferes with underdeck storage, and is suseptible to damage.
If I am going to utilize such a cable system in my freight yard, then it likely needs to be flexible enough to snake thru a number of different tracks to reach those turnouts on-the-far-side.
Those turnouts in the peninsula area of staging will likely need some sort of 90 degree device such as a ‘bellcrank’ to operate those turnout throwbars via a cable running back to head of the aisle-way on the right hand side of the layout.


To make the link to a website outside of the forums work, all I do is highlight the link address that you posted and right click on it. Then click on the ‘Go to…’ option in the pop up box. That takes me to the website where I copy the address. Next, I start a new post and paste the address into the post. So far so good, but there is one little step that isn’t obvious. After pasting you must hit the enter button to go to the next line down. Otherwise the link won’t work.
If you are linking to a thread inside the forums, you must add ’ [ url ] ’ before the link and ‘[ /url ]’ after the link. No spaces, no apostrophies.
I made the link to this thread clickable on your other thread too.
Dave
Brian, If you’re going to use surface level tubes, it pretty much rules out the use of sheet cork for roadbed, and you’ll need to use standard height roadbed everywhere.
I assume you’ll have leave gaps in the roadbed so the tubes will slide under adjacent track, then cover the tubes with a fairly tall layer of ground cover.
the linkage in the diagram I posted earlier can be made just the thickness of the benchwork and would require no more than the thickness of a cable housing stapled to the underside of the benchwork or 1/16 wooden dowel with just a couple guides.
part of putting this stuff under the benchwork is to avoid all the above deck apparatus, allowing trackwork and control to be independently located.
You are correct Gregc, I need to take a closer look at that.
Dave,
Here is what I do. I’m composing a posting, and I run across a link I want to make. I’ve copied that link onto my mouse, and I paste it in my posting. Then I go to that ‘link icon’ above and I get a pop up window that ask me for the text I want to select as a link, then the url of the link, which I insert,…and I think I am done? At first it-hi ites my link like I did it correctly, but subsequently it does NOT make the link?
At one time I thought the mistake I was making was not providing info in that 3rd box labeled “target”, which appears by default to say “none”. So I tried pasteing the url in that box. I’ve forgotten exactly what did or did not work, but it seems I remember that this did not help either. Whoever wrote this software worked in a different universe that most the other forums I participate on.
Did I explain it correctly??
Gregc
I’m thinking that under-the-deck control would work well on all the ‘upper decks’ (main deck & the upper deck) of my layout, and particularly the freight yard/steel mill area.
On the staging deck I could probably modify it just a little and put the DPDT switch on the top surface of the staging deck.
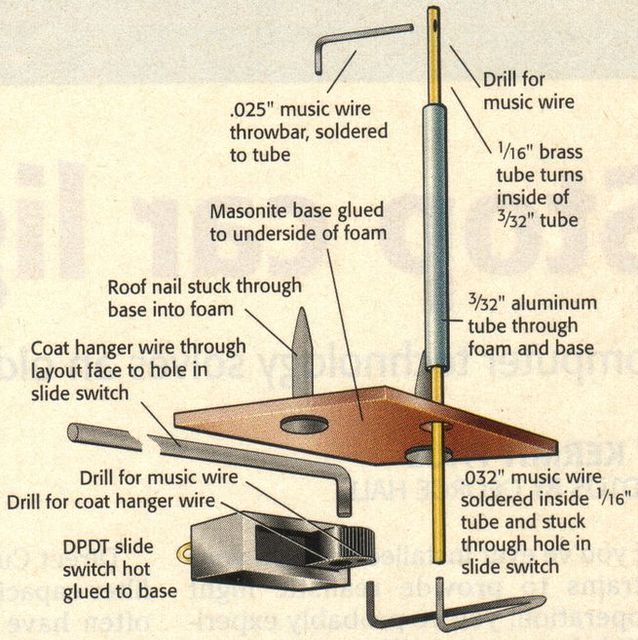
Here is one discussion I just ran across that looks like an even simplier installation?
http://www.railroad-line.com/forum/topic.asp?TOPIC_ID=23644


And another site for manual control with a few intersting variations for the ends of the flex cable
http://www.trainboard.com/highball/index.php?threads/manual-turnout-control-with-rc-airplane-cables.23654
Speaking of simplified,…
The simplest remote control I’ve seen was done using monofilament fishing line and sinkers. This guy had a 1 oz sinker hanging under the turnout that would hold the turnout in the normal position and a 1/2 oz sinker on the reversed side. He had another line running to a lever on the fascia that would lift the 1 oz sinker to throw the turnout. The levers were attached to the line so they would move past center and the sinker would hold the lever in the thrown position. Loops in the line were made with the crimp connectors intended for making steel leaders to avoid having to tie precise knots.
He even had a few levers attached to multiple sinkers so he could throw turnouts in groups.
The best thing about the arrangement was almost zero precision was required to put it together.
Fishing Line Control
Now that is unique !!
Joe Fugate on his Siskiyou Line has been using that method for years. The free-end of the fishing line was attached to a simple door deadbolt. He even set microswitches to them to power signals and turnouts.
Lots of methods out there to get the job done. I have a few places where I use the Humpyard levers. They look nice, are simple to operate and get the job done.
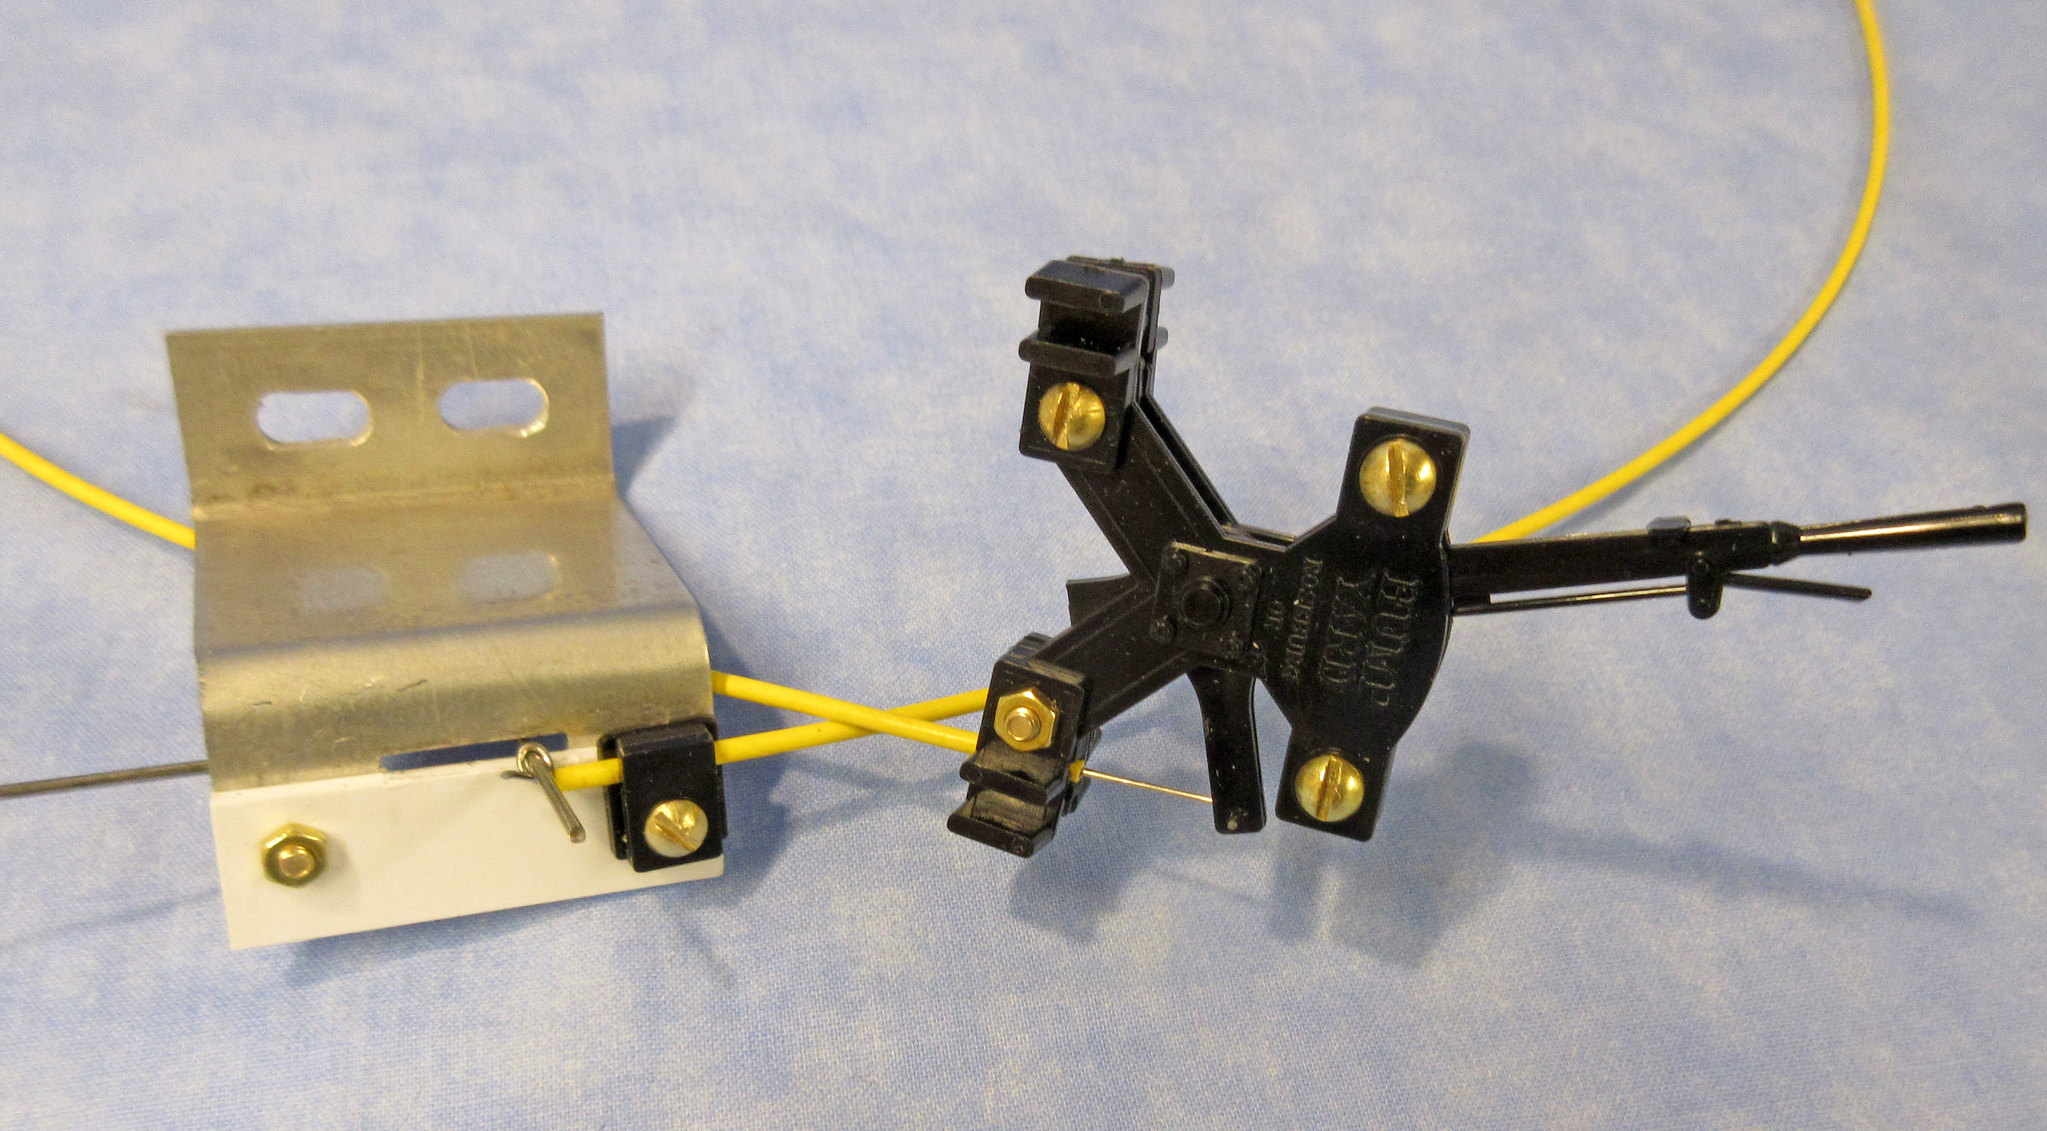 car_stop4 by Edmund, on Flickr
I bought enough to keep me supplied for the near future. I don’t know how easy they are to find anymore. They come with enough throttle cable and hardware to make different configurations.
Good Luck, Ed
I was wondering what the Humpyard gear looked like. I’ve seen reference to it, but no photos till now
The fishing line and sinker method is indeed super simple and cheap, but kind of defeats the purpose of nothing hanging down under the layout.
–Randy