I would second this suggestion. The one I bought on ebay had already been upgraded with metal wheels. Just eyeballing them, they appear to be 33" wheels. I think 36" wheels might rub against the brake pads. I believe the trucks were original. They even had the truck mounted horn hook couplers. The metal wheels in the original truck roll fairly smoothly. I just had it out for the first test spin and it did OK. I have to adjust the height of the body mounted KD couplers. I also added 1.5 oz of weight. Once I get it worked out I think this will be a good addition to my fleet.
@JohnNYBW, I didn’t hear you mention anything about your car listing to one side. Is that not an issue with yours? I imagine they’re the same model. Mine has the McHenry knucklers, so either someone upgraded (wish they’d gone with Kadees) or maybe they are of different eras, since someone here said that the production ran for a long time.
Nonprototype wheelsize bothers me not a farthing, and it sounds like switching sizes could lead to headaches, so I think I’ll put in metal wheels of the same diameter.
Still waiting for rrebell to weigh in on how he added plastic to one of the bolsters.
-Matt
Here’s the latest report from the front. I was trying to envision how I would add something in between the bolster and the car frame to keep the car centered, and I see these two little bumps on the frame (see yellow arrows in image)…
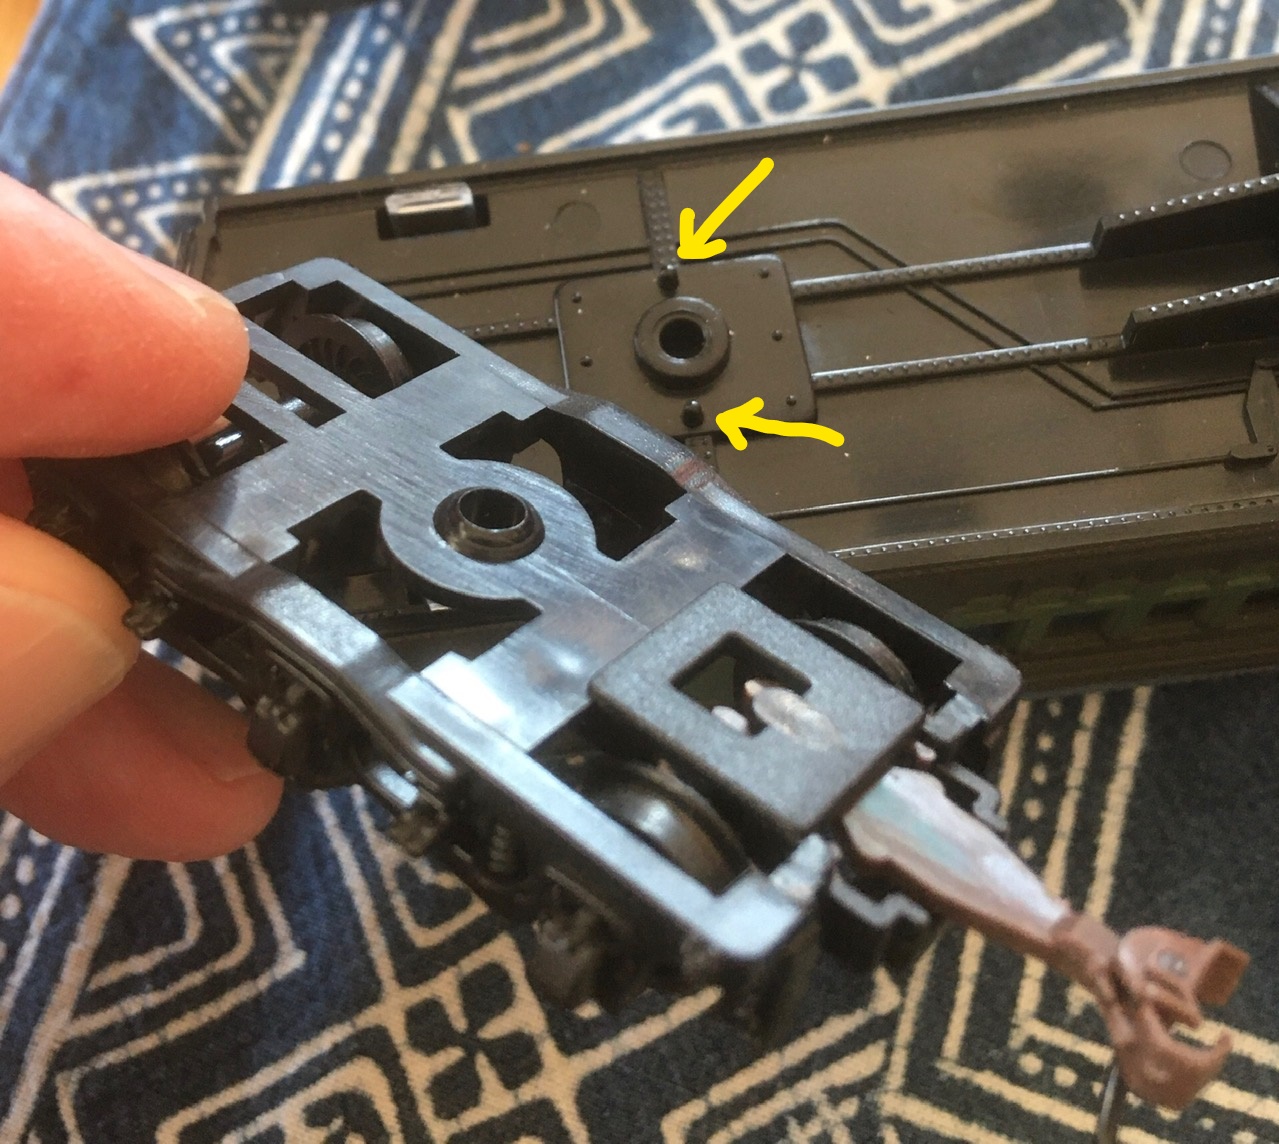
Several weird things about these little knobs. 1) They only exist at one end of the car. The other end doesn’t have them. That hardly seems to matter because 2) the truck never can tilt enough to touch them. I had thought maybe they were there to prevent the listing but with the truck back in place I can rock it back and forth and it never engages the knobs.
So… more mysteries. Why are there do-nothing knobs under just one truck?
I might be able to slip a thin piece of styrene (cut from a plant pot tag from a garden supply) athwart the car frame between it and the truck, but I suspect this would make the truck-fastening pin too short to reach in and click into place, so I would have to shave an equal amount off of the ring around the hole in the truck that I’m holding in the picture. This seems like an un-undoable and potentially disastrous action to take.
The theory behind this is the same as in three-point equalization on locomotives. Here, one truck has the equivalent of side bearings, to hold the stiff carbody level, while the other one has a little play to let it twist and keep its wheels on the track while still holding up the weight. The side-bearings are ‘nubs’ to minimize the contact friction as the model truck swivels to go around sharp curves.
Of course the immediate problem with this ‘design’ is that it presumes the trucks themselves provide adequate leveling support to the frame. If the axle points actually engaged the centers of the recesses a la conical bearings, this might be achievable. But if there is lateral slop it is easy to see where lateral unbalance might cause the car to tilt from ‘edge to edge’ if the unbalance is enough to lift the ‘off side’ truck frame high enough off the cone that the ‘other side’ of the taper gets engaged…
The snarky suggestion would be ‘replace the trucks with better ones’. In practice, use a truck tuner carefully and then spec your replacement wheelsets with the longest axle that fits without ‘bottoming’ in the tuned-out journal openings.
Weight the car as close to the centerline and as low down in the underframe as you can; it might make sense to carry more weight toward the ‘nubbed’ end.
The big point of importance is going to be nub mods. I’d make new ones as scale-appearing ‘side bearings’ as far out toward the sides as will still bear on the truck frame, and have a little Delrin or similar ball or point set in the end. I would make this on slides with a screw so it could be fine-adjusted with the chassis on the track.
Then make up an arc of a circle from thin material and glue it on each side of the truck frame, jigging as necessary to get it perfectly level to where the truck rides with the wheelset points all properly engaged and tracking. Wh
I used the Kadee 33" #520 smooth-backed wheel with good results:
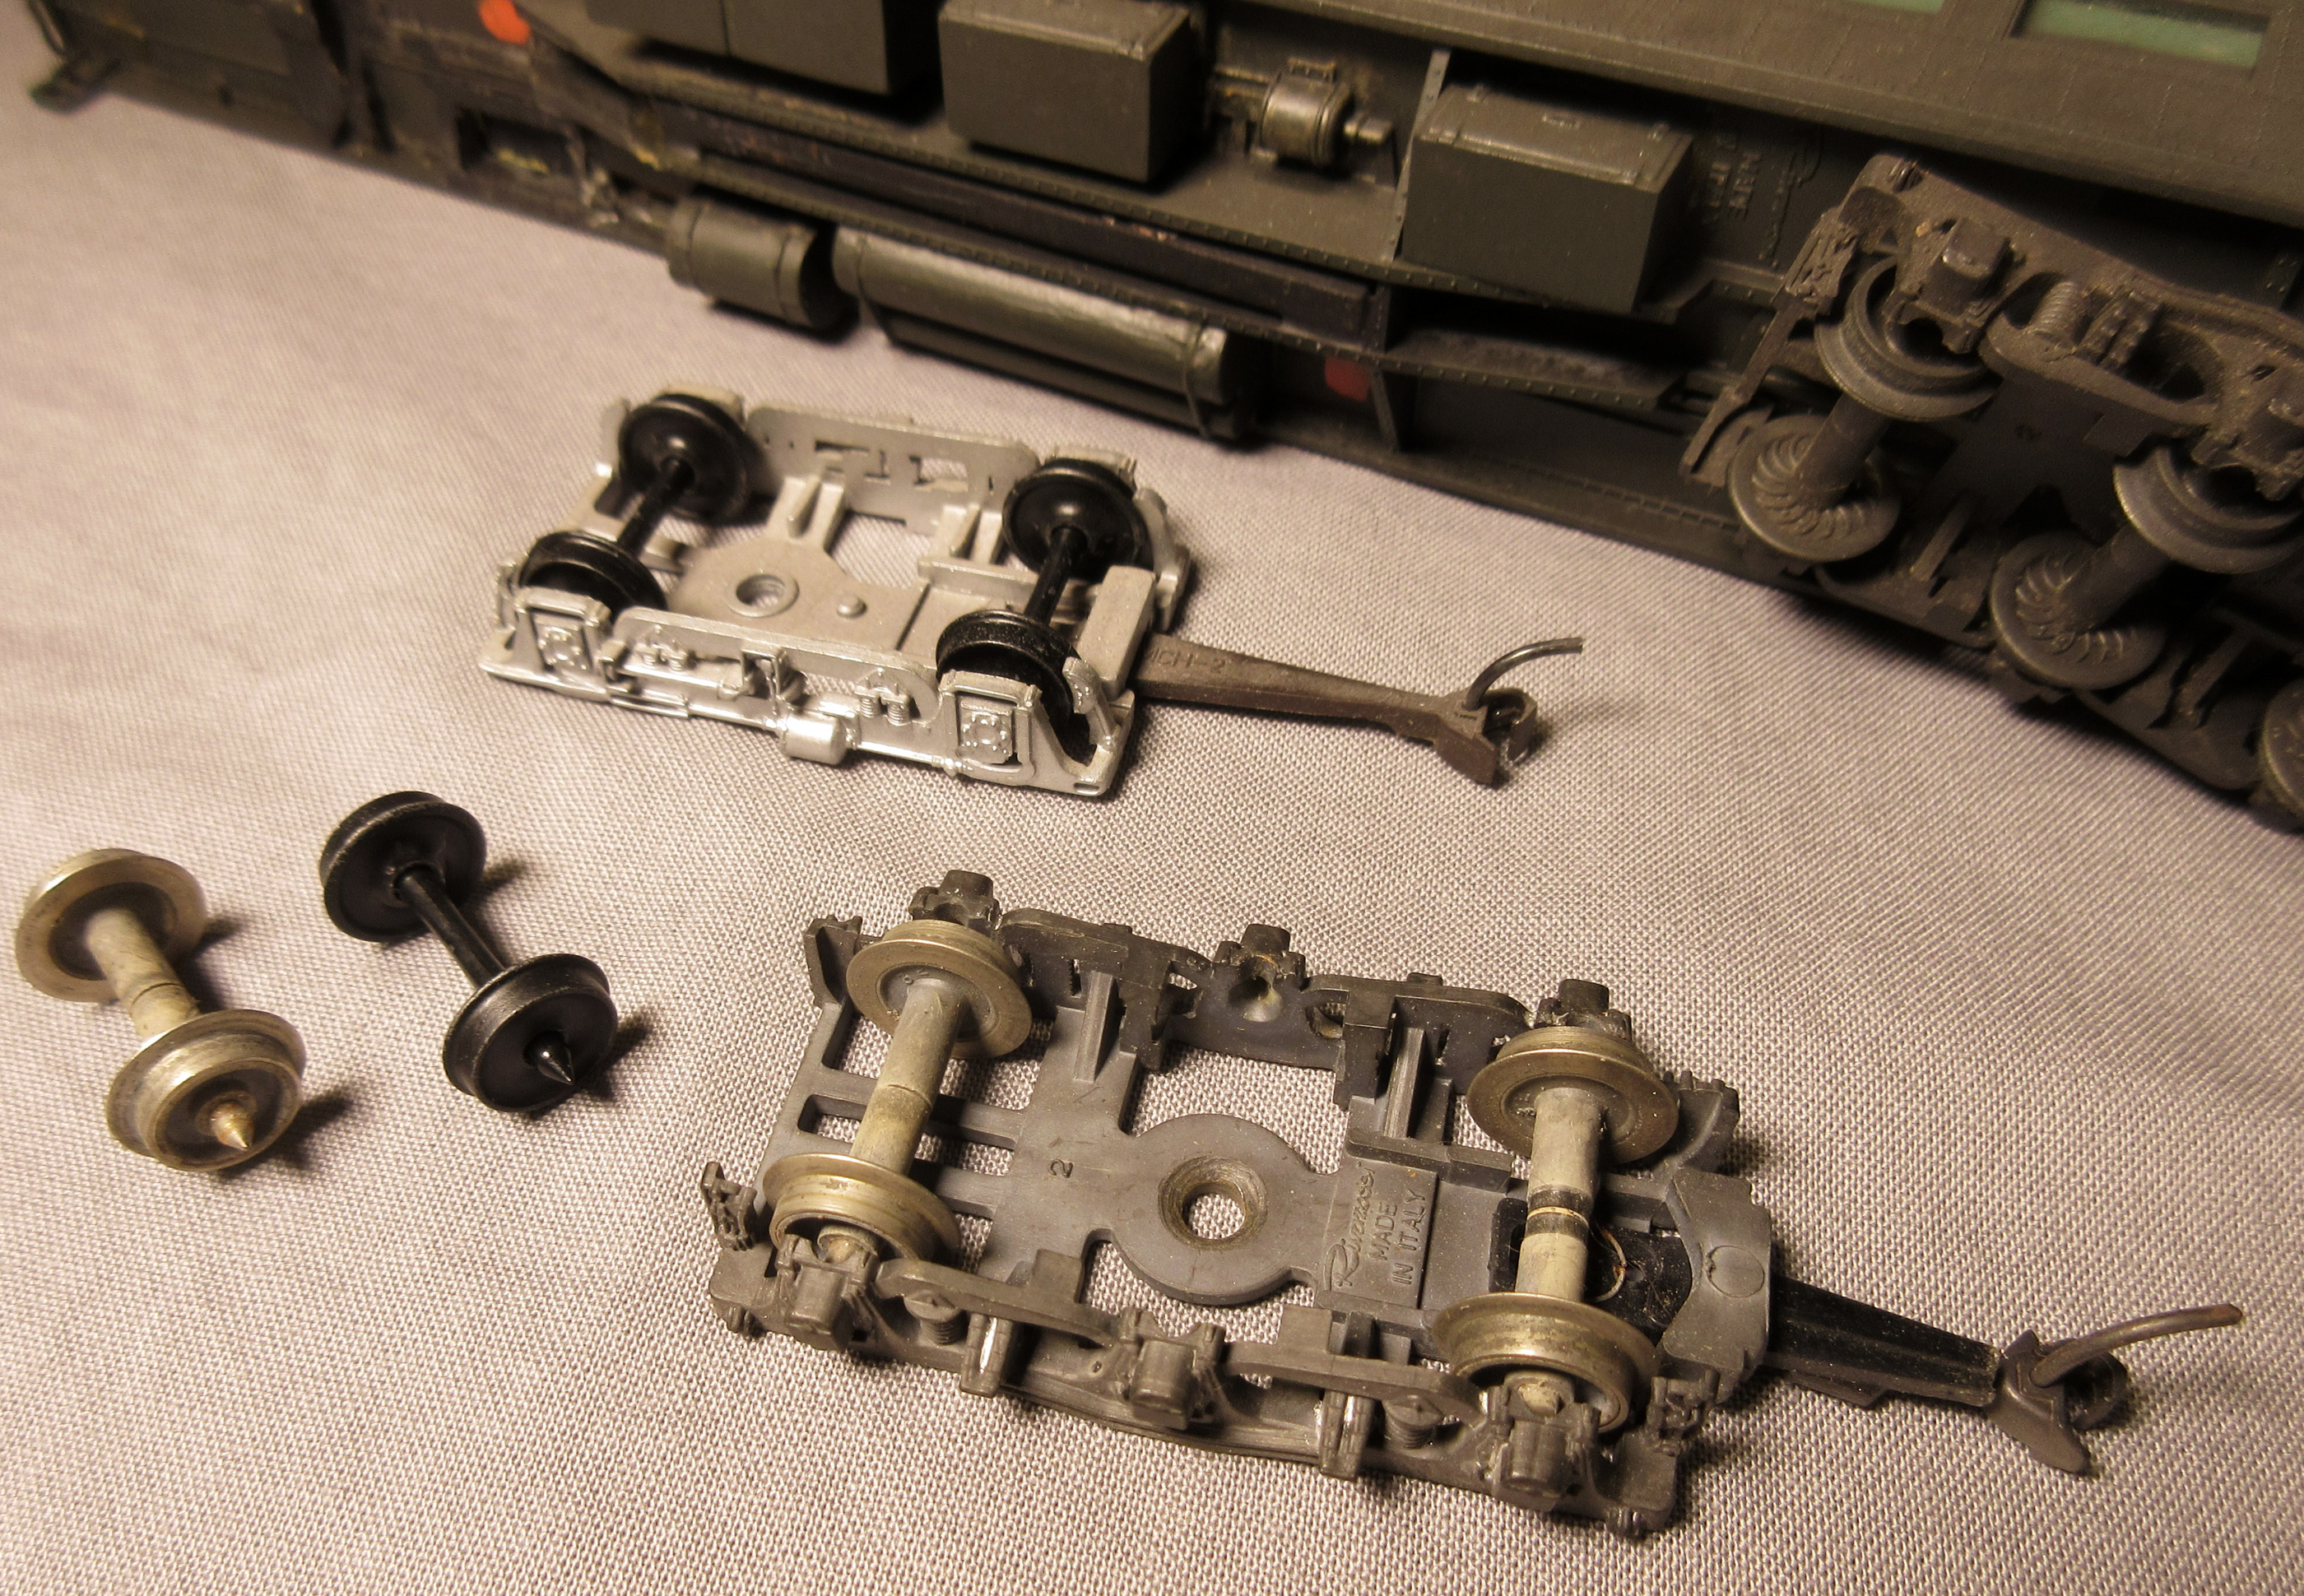 Rivarossi-truck by Edmund, on Flickr
YMMV. Ed
Astonishingly, I can actually picture all of this, and I think I just recently read about this principle somewhere – maybe in an earlier post by you. And it makes sense that all of this would be going on at prototype level, but in an eleven-inch model I think it’s clear the nubs aren’t ever going to come into play, so that still leaves me with no clear path forward.
-Matt
Go back and read the stuff I added. Kalmbach randomly deletes anything in the composition box every few minutes so I have to type in fits and starts.
Replace or supplant the nubs with adjustable side bearings, and make a contact track on the truck frame that ensures ‘level’ lateral on it for any required degree of truck rotation.
Then modify the ‘other end’ so it swivels easily and stays precisely at ride height but can tilt in any direction. Grease this so it doesn’t just flap when it moves…
Glue some shims on the truck bolster where the nubs will contact them. Maybe try some tape first to determine the needed thickness.
Renember to ‘pad’ the whole area corresponding to truck swing, or (if all you care about is straight running) provide gentle ‘ramps’ at each end of the pad so the nubs won’t hang up if the truck swivels too far.
You could also pad the underframe at the other end of the car and put nubs on the bolster, but that isn’t as good on curves… however you might get away with putting a couple of screws in the bolster to get an adjustable ride height cheap…
Ed, thanks for this. That near truck is virtually identical to mine but it looks like metal, eh? Or else your weathering skills are out of this world.
@Overmod. Okay, I see you’ve thought this solution through carefully. I’ve read it several times through and I think I get it. When I think of the tiny tools it might require to manufacture such little Delrin parts and “make this on a slider” for example, I’m thinking the obvious intial answer of ‘replace the trucks with better ones’ doesn’t seem so snarky.
Thanks guys. Looks like there is at least one solution I can pursue here.
Also, I knew “listing” probably originated as a nautical term (and I was punning on the biblical phrase ‘the wind bloweth where it listeth’, which is a different word entirely meaning it blows wherever it wants to [c.f. German “Lust”]) but it never occurred to me that “catch my drift” may also be nautical in origin.
-Matt
Gee, I thought it was an Ebay created word.
Real estate agents stole it first.
Cheers, Ed
@mvlandsw, before Overmod’s blueprint emerged, this was what I was working toward. But unless it were very very thick, such a shim would still never touch the existing nubs, so – as Overmod prescribed – I’ll still have to raise the nubs.
-Matt
A shot in the dark…but since the nubs don’t contact the truck, and the other end of the car doesn’t have them…is it possible that the other truck is made slightly differently and the trucks got swapped end for end?
Santa Claus is waaaayyy ahead of youz.
I wondered about that when I was upgrading my version of the same car but the trucks are identical. I have no idea why one end has the nubs and the other doesn’t. At first I thought they must have been broken off on one end but closer examination proved that to be false.
No, I do not have a listing problem. If I understand, you haven’t yet opened up the car by removing the roof/glass assembly. I’m wondering if weight was added to the interior of the car and maybe has come loose and is throwing the balance off. I think you said it would list to one side or the other. That might be an indication a weight is sliding around inside. Just a guess. Removing the roof isn’t easy but I was able to do it by working the tabs at one end first, then working to the middle tabs, and then the opposite end. I did break off one of the tabs in the process but the other five hold it in place.
One problem I ran into when converting to body mounted KD couplers is that when I positioned the coupler box where I wanted for close coupling, it interferred with the swing of the truck. I had to move it about 3/16" farther forward. The screw hole I drilled comes up in the middle of the vestibule. I’ll need to add rubber diaphragms to get an acceptable distance between cars. I also discovered that mounting the coupler box directly to the underside of the body results in too high a coupler. I think I need to add about a 1/16" spacer to get the correct coupler height.
In my experience with the IHC passenger cars, adding weight is not a solution to the listing. The problem seems to be the design of the car underbody. The point where the truck connects to the frame acts as sort of a fulcrum, if I am using the term correctly.
Rich
You probably missed it since these replies have come so fast, but Overmod explained earlier why nubs at only one end would make sense, at least on prototype rail cars and I guess locomotives, too. That said, I can only surmise that the nubs on the IHC model are meant to be decorative, to add realistic detail, because the truck will never touch them no matter how much the car lists, no way no how.
Rich, I believe you are absolutely correct about this, and it seemed worth it to try to just take some of the crum out of the fulcrum, so to speak. I cut a little square of very thin plastic in the shape of the yellow outline below, with a hole in the middle so it would sit around that built up collar in the center of the truck.

I’m not exactly sure why, but it worked like a charm. The car now rides straight up and down. Maybe the plastic is contacting the nubs, but I didn’t think they stood out that tall; it’s difficult to see in there when the truck is back on. I did follow Overmod’s suggestion of treating only the “nub-end”, and that may be why the car still wiggles a lot, like it’s anxious about something or giggling. It’s a jumpy little car. I may eventually try adding some weight, but for now it’s fine. I also need to see how the plastic does in there just freely rotating. I didn’t glue it to the underframe because it was just a hare-brained swag. And since it works, I’ve left it alone. I may need to affix it more solidly.
@John, your cautionary tale about changing out couplers to install Kadees is noted. I may leave the couplers alone. I don’t like the McHenrys but they work. And to answer your question, no… there’s not a weight or anything else inside the car moving around.
-Matt