I’m glad to hear that you got yours to work, even if it developed issues later. I’m impressed with your patience.
I knew I was in trouble when the truck assembly instructions said “you just have to fiddle with it.” There are really just two things I expect from a kit: All the parts and materials and instructions that tell me how to assemble the kit. “Fiddle with it” is not instructions. I fiddled for 2 days on one truck and I was getting nowhere; it had stopped being fun, so I packed it in. I can still assemble the Keystone kit as a static model, and I’ll eventually get around to that (I’ll paint it and put it on a walnut base, and use it as a decoration for my office).
The Cheyenne coal bunker kit I started is the same way.I am attempting to put together two Walthers
double track truss bridge kits, but the instructions seem to lack for clarity.I am trying to figure out now just how piece number 5 goes into place.
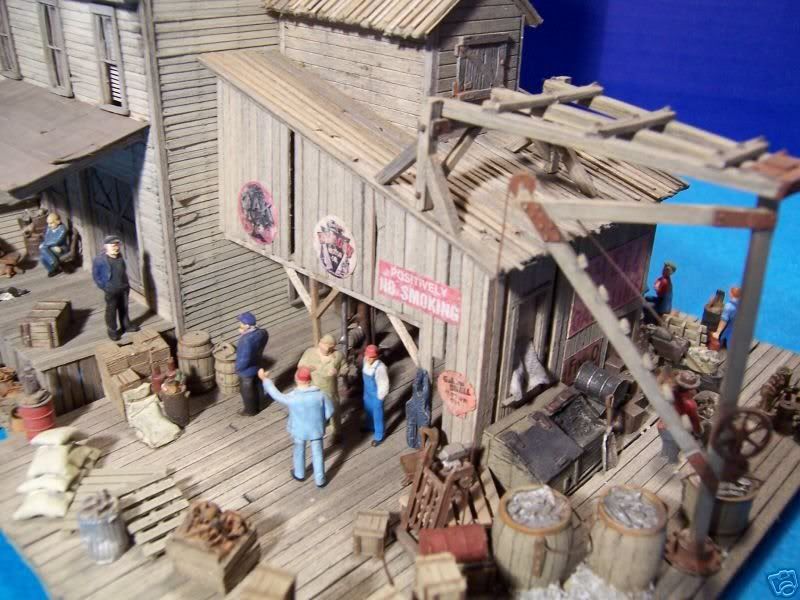
Walthers makes nice kits, but the time ittakes to make these things I could use elsewhere.I wish this is one structure they’d offer assembled and ready to use.
It is interesting how two different people can have different opinions, or maybe I should say different frustration levels, with the same thing. I’ve built at least a half-dozen of the P2K covered hoppers (the original kits, not the time saver) and had no problems. My opinion of these is that they are one of the few well thought out plastic kits where everything fits correctly. Best of all you can find them at train shows for around $6 because nobody else wants them. On the other hand, I built one of the Intermountain covered hoppers and was a lot more frustrated. I think the difference has to do with the level of detailing…there were a lot more of the miniature parts that I though would have been better served to have been cast on. I also built a number of those reefers that Long’s Hardware used to sell for a friend. I think these were also Intermountain. Boy, what a pain in the posterior those were.
Now, the P2K tank cars were another story. I built a bunch of them for another friend. These were not easy, primarily because some of the grab irons and rails could not be glued from the inside. One of these days I’ll master the task of getting the solvent cement to flow from the minature brush tip to the joint, rather than up the handle.
For me it was the Westerfield kits with the graphite castings. The castings were very brittle and easily damaged. I also found the Westerfield instructions very difficult to follow. Fortunately Westerfield provided photos of different phases of assembly which help me figure the kit out. Westerfield decided to cast the parts in resin which is less prone to damage.
I am extremly glad that a stuck it out with the Westerfield kits. I have 100 Westerfield freight cars and I am very please with how they looked. I also found it very fullfilling to assemble these fine kits.
My advice to anyone who has given up on Westerfield kits is keep trying, they become easier to assemble as time goes on.
Same for me, Keystone 2 truck Shay in HOn30… AAAARRRRGGGHHH!!!
Anyone who thinks the old MDC/Roundhouse Shay kit was a PITA to put together hasnt got a clue to the true meaning of that phrase. Imagine building the easy by comparison MDC Shay, only its in white metal, and getting all the white metal parts to stick togetherm then getting all the metal moving parts together without sticking, then while your trying to unstick those stuck moving parts, having all the parts that are supposed to stick together not…AAACCCKK!!!
I think this model was the straw that broke the camels back for me in HOn30, I walked away from this scale in frustration a short time after putting all this POS kit back into the closet.
I can’t quite remember the company that put this devilish little piece out but it is/was a caboose kit that has wires that you had to form into stirrups, handrails and such----I got the thing together and I put it away----far far away in my storage closet—the handrails look like they’ve been put into knots and straightened a few too many times-----[soapbox]
FINE SCALE MINATURES Emporium Seafood Co. It took me 5 months to complete. Of all the FSM kits I have built that was the most challenging. never again. It got to the point that I wanted to give it away when it was done.
No one has mentioned the Roundhouse “TankTrain” tank cars. I can’t even get the handrailsnout of the support sprues in one piece. [banghead] Anyone know the secret to building these things?
The P2K covered hoppers are fine by me. They need a really flat work surface (I use a sheet of plate glass), good light, good music and time but they make a great model… and, as has been said, you can get them really cheap because people are scared of them.
I built a MDC 2 truck Shay, and a MDC 3 truck Shay. These were kind of fun to build and tweek them just right to get them to run good. I did purchase a a Keystone a few years back off ebay, don’t ask what I paid for it. It included the powering kit and I was eager to get moving on it once I sat at the work bench. After about 10 hours of pulling my hair out over the trucks, I gave in and put everything back in the box. When I am feeling bored I dig out this kit and tinker with it. It is a tough one!
Do they even make the Keystone Shay with the powering kit still?
The John English Yard Bird engine kit was not so bad, but the valve gear kit was a challenge and the superdetailing kit was a bit much and putting a sound and an engine decoder in it with lights was also too much. It still awaits a paint job, but it runs. I started this in 1950 and finished it last month. I will not get another one finished.
For me it was the JL Innovative water tower. The legs are made from strip-wood. Each of the little cross members was cut by hand. This was before I had invested in a Chopper II. Some months after I completed this I met Chris from JL at a trains show and mentioned that I had built this. He said that they discontinued the kit years ago because everyone complained about the complexity. His words were “You actually built that?” in a somewhat incredulous tone.
Perhaps it was because I was relatively new back into the hobby, but assembly of a Mantua 2-6-6-2 logger steam engine was my most frustrating kit so far. This is way back in the later 1980’s and I didn’t have a whole lot of money to spend on the hobby. So instead of paying $65.00 for an assembled engine, I chose to “save” $10.00 by buying the $55.00 kit. Big mistake!
The instructions were bad, and confusing. Some steps/parts weren’t correct. There was a small bag of screws/bolts/washers/rivets/etc. that were to be used in assembling the engine. These little parts were not identified. So when the instructions said to use screw #ASM3/4 (or something like that), I had to figure out which one they meant. I made the wrong guess a few times, and had to go back and remove previously assembled parts to get the proper fitting.
I had to assemble the complicated valve train for the 2-6-6-2 - this meant four sets! The moving parts had to be fitted together with the supplied rivets. They had to be gently hammered together not too tightly or the moving pieces would bind. That was fun!
I did manage to get the loco together, but after running it for a while, it stopped working. Had to take it apart, and discovered one of the segments of the motor armature had actually fallen out! I sent away for a replacement motor and got one, all marked and scratched up as if it had been kicked around the floor for a while. But it worked OK.
To add insult to injury, I was peeved that my finished model did not look like the model shown in their ads promoting the kit. Many of the parts were not included, and many of the parts were a lot heavier than those on the model. Really strange. A year or so later I read in one of the magazines that the model wasn’t ready when they needed advertising photos, so they used a brass version!
Ahah! Now I’ve found out how I can reach the Absolute Pinnacle of Frustration: I will get a Keystone Shay, the NWSL parts to power it, and build a bunch of Proto 2000 boxcars for it to haul, LOL!
The assembly task I dread the most is stringing the cables on scale model crane kits, such as the Kibri Leibherr Litronic, Kibri Menck dragline, and the Walthers American MOW crane . It’s like I need 4 hands to do the job, yet the thread is so tiny I can’t use my Helping Hands™ alligator clips to hold it. The MOW crane uses two separate, side-by-side spools for raising and lowering the boom, but somehow I ended up wrapping the thread tighter on one of them - one side is always too loose when the boom is down, but if I try to cut it I won’t be able to raise the boom to its full height! [banghead]
I think I agree with a lot of folks on the shay kit. But something interesting to me is I also do a bit of scratch building structures. In many cases I’ve found it easier to start from balsa and paper to make a finished model than assemble the kit. The Walters Cornerstone kits make nice models when finished, but are difficult to put together. I don’t think it’s the number of parts, since I’ve done model cars and scratch built as well. Rather it seems two fold – minimal instructions which means a lot of “I think this is the part,” and parts that don’t quite match where they’re supposed to. Don’t know if it’s the case for RTR models, but I wonder if they first build a set of assembly jigs and fixtures so the kit will go together the same way everytime. Whereas we’re looking at an exploded drawing showing 40 zillion parts all pointing to the same place and it really does matter which part goes in first.
You hit the nail on the head about Walthers kits, I would pay extra, say 5 to 10 dollars more if the kit came with a DVD video showing a Walthers guy building the kit, so it’s more like “monkey see, monkey do!” LOL!
It wouldn’t be a bad idea sure ould be better than paper illustrations.
just think of them as educational toys for adults. some kits do prepare you for life. no matter what you do, it just won’t work out. as Homer Simpson said “trying is the first step on the road to failure” i remember years ago when i wanted a fleet of 40’ box cars. I bought up a bunch of Walthers kits in the IC paint scheme and figured on renumbering them. it was a small issue but all the roofwalks were warped and were about twice as thick on one end as the other. not a big deal since i could file or shave them down but you would thing someone somewhere would have noticed that all these plastic castings were coming out screwed up and caught it before they sent thousands of them out. just like the local drive through fast food places, order more than 3 items and they will get something wrong. guess we should be glad these people are making model kits and flipping burgers instead of building aircraft or working in a pharmacy where they could kill you.
let’s take this in a positive direction. what kits have you been happiest with? i particularly like most of the American made Bowser stuff. they have decent detail for the price and build up into a good looking model that operates well.
The first was a Boyd Models Green Bay & Western 2-6-0 kit. It was way over my head at the time. I would be able to handle all the drilling & soldering required now but when I got it back in 1972 I had few real usable modeling skills.
The second was a R.Robb Ltd (Grandt Line) D&RGW drop bottom gon. I tried and tried and it never made it to completion. It was a well made kit but there were too many fine detail parts for me.
On the other side of this discussion I’d have to say my Gould (Tichy) crane kit was the most fun kit I’ve ever built. Everything went together just as designed and it looks great.