thanks, Freind has a cabinet shop. lots of scraps. FREE. Those corbals are made from two pieces of 3/4 oak ply glued and nailed together with a 1 1/2 inch oak strip glued down the front. overkill for my layout but I wanted the oak look. On top of the corbel sits 1/8 masonite wth a 2 inch foam board on top of that. no weight.
Do you have a website or link where we can see more of your superb work? Looks incredible to these old eyes. Craftsmanship is always a delight to examine in detail.
Assuming your wall studs are on 16" centers, I think you could mount the wall supports on every other wall stud, i.e., on 32" centers. This is the spacing Jeff Wilson suggests in his book, “Basic Model Railroad Benchwork” He suggests 24" to 32" centers. Some non-supporting walls have their wall studs on 24" centers. I think putting them on every wall stud on 16" centers would be overkill for supporting 24" wide modules, assuming your modules are built from 1 x 3 or larger lumber.
I have used many of the methods mentioned in this thread. One that has not been mentioned is making your own supports out of plywoog. This can be performed by determining how far out and down you need to go. One you have this on a piece of plywood draw out your two lines using a framing sqaure. Then take a bucket and draw a curve inside of the two lines.Once you have the two support marked out cut the straight sections first . Then cut the curve with a jig saw , scroll or what ever you have.Attach a 1x2 to the top and back by screwing it to the sides of the plywoob. Mount to the wall by nailing/screing thru the face of the 1x2.
This type of bracket has several advantages.1) It is very strong 2) flexible in size and design , fits your system not fitting shelf to the bracket brackets 3) the curve on the inside removes those annoying knee or head nocking that you have with "angled braces 4) relatively inexpensive 5) paint to match existing wall so that it blends in and does not draw your eye away from the lay out …
Not to be hijacking this thread but no sir I don,t have a website or link to my layout. I will post more pictures soon on my own thread.
Glenn
Bagman, Whatever you end up with remember, make sure you can reach far enough in to get to the back. corners will be the farthest . And make it high enough so you don,t get a backache when you working on it. Any remember you have to work under it as well. I have a camping world foot step I use that folds up and is very stable. Important!! make sure it is stable. nothing like having the stool kick out on you when you are reaching for the most delicate and most expensive train you have. murphys law. good luck and post pictures when you start.
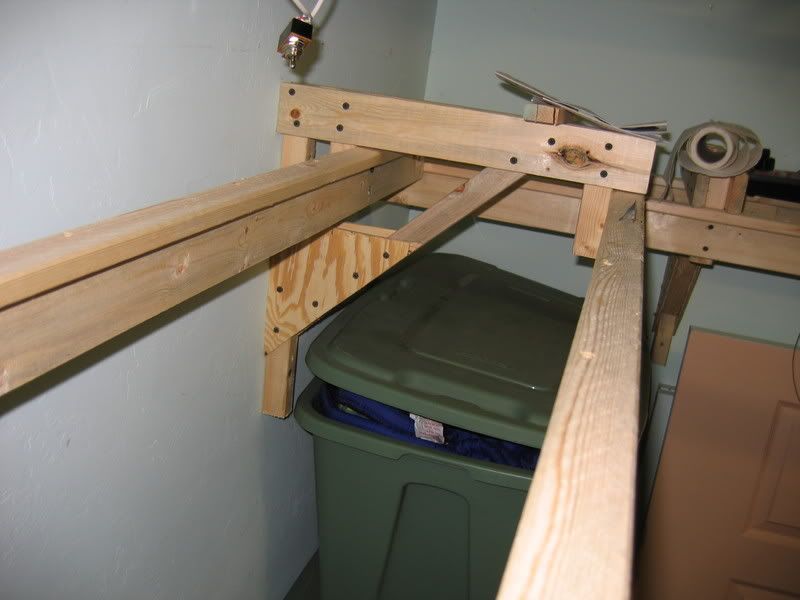
I had to do some rework in my layout this week end, in the area where I had build some substantial wall mounted benchwork. At this point, I’m going to be avoiding wall hanging benchwork entirely in favor of individual 2x2 legs for the following reasons:
It is not very portable
It is not as easily adjustable like screws in the bottom of 2x2’s are
More complex to build
The brackes and braces are almost as big an obstruction as the legs are
Messes up the walls needlessly
Nearly Impossible to get behind it and do some maintenance on the wall side
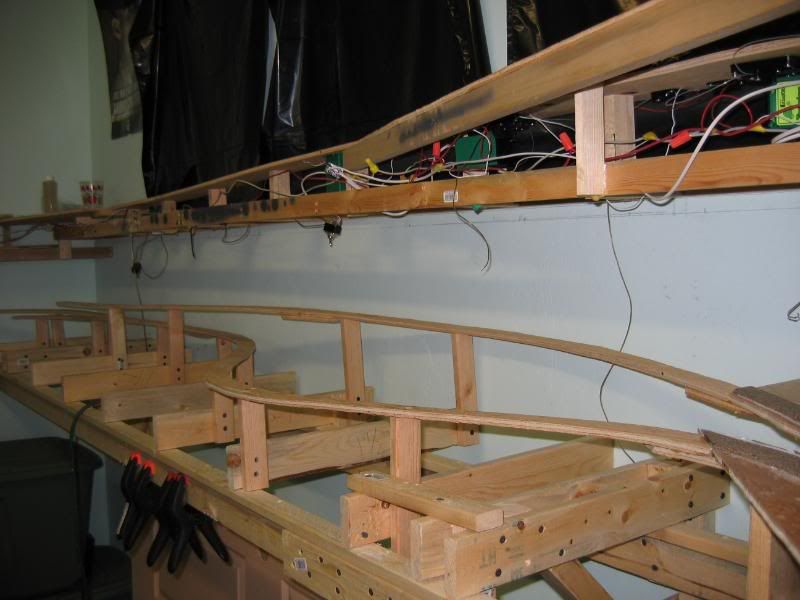
As is clear now, there are a lot of good ways. I used two methods. For the top level, which is only 8" wide, I just screwed at open frame of 1x3s to the wall:
Not a great shot, but you can figure it out.
For the lower level, I used brackets out of Wescott’s book:
It’s 18 inches deep (could have been deeper) and is real sturdy, has no legs, and is really cheap.
Thats some good rock solid benchwork. Are you doing any lighting under the upper level? I put in some of those costco undercabinet low voltage touch lamps , only problem I don,t turn them on when operating. The Digitrax ur91 and lamps don,t like each other. I only use them when working under the layout. I wonder how a rope light would work tucked up under that upper shelf? post more pics as you progress
I haven’t decided about lighting. Ideally, the answer would be yes, but with only a eight inch overhang and not a huge amount of vertical clearance I might not do it. I think I’ll wait and see how it looks. I have a feeling that lighting is going to be one of the shortcomings of this layout, but if we can run trains and it looks something like it is supposed to I’ll be happy. There is a little progress posted on this thread:
I’ll probably add to it for a while, and then start another.
One of the big advantages to this type of benchwork is that it is pretty cheap, and doesn’t require any real special tools. I found that reasonably straight 1x2s and 1x3s would pull themselves straight when we made up the l-girders. The only thing that I keep trying to get away with, and then go back to is drilling pilot holes. That stuff will split if you look at it crosseyed!