What is the best way to make dirt roads?

Got my dirt from my father-in-law’s gravel pit on the way back from the dump. Took it from the pile he had screened down to 5/8 inch (nothing bigger than 5/8 in the mix).

I’m not worried about the color either, since I’m loosely modelling my area as well.

bravo! nicely done.

im in the school of using dirt mixed with the woodland scenics to give a nice blend of coloration,

http://www.pacificcoastairlinerr.com/roads/

http://www.pacificcoastairlinerr.com/scenery/clods/

Thanks for the links. They’ll be useful.

I started this road about Monday of this week.

It used to be just mountain, but I needed a way to get from one valley over to the next, which covers a new drop leaf I added for staging.

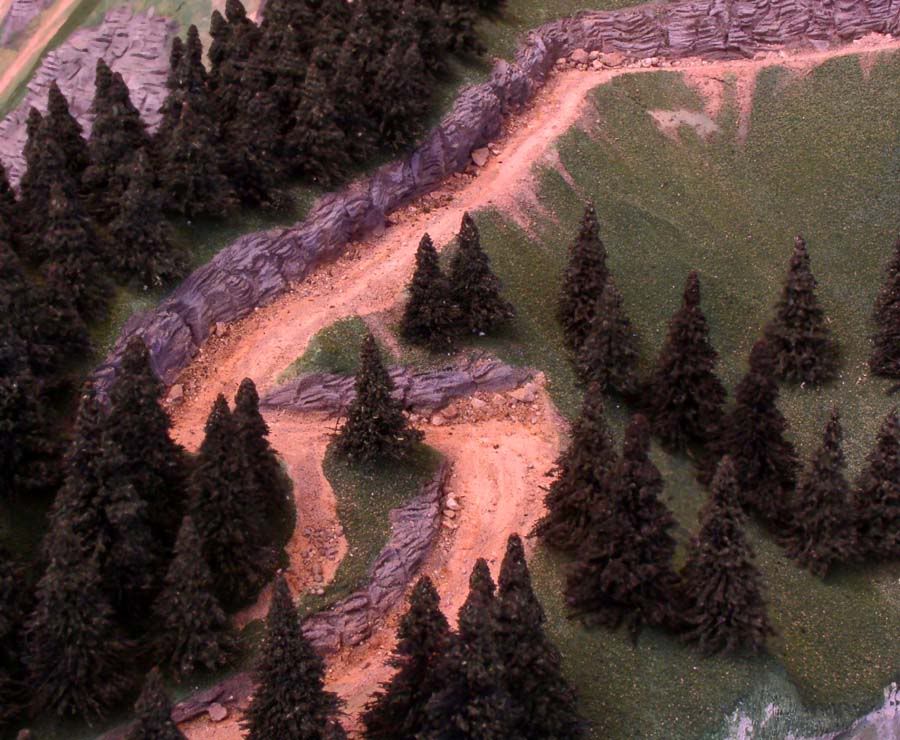
First I cut the hardshell with a steak knife, one vertical cut, one horizontal, and cleared out all the scrap.

Next, I troweled lightweight spackling compound on for the road surface and smoothed it with a one inch putty knife. You don’t have to get the road surface perfectly flat, but if you want to position figures on it without having to glue them, the flatter the better. Pockets and bubbles I smoothed out with some additional spackle and my fingers.

Next, I finger daubed in spackle for the rock walls, and spread it and carved it with a butter knife. You have to sort of finger tamp it down to get it to stick well on vertical surfaces.

Then I painted the road surface with my standard “dry dirt” shade, mixed with Wal-mart acrylics. While it was wet, I sprinkled variable sized sand on the paint, covering the whole surface. I got the sand from a bad spot on my dad’s driveway. I’ve used playground sand before and was unhappy with it. Much to even and didn’t look real at all. Concrete spall makes good modelling dirt because the pieces are more angular than WS talus, which doesn’t look like Rocky Mountain talus at all. Pebbles that were too big I weeded out when pinching up the sand with my fingers, prior to sprinkling.

Once it dried, I hit the whole road with the dustbuster to suck up anything that the paint didn’t stick down. Then I repainted and sand sprinkled a few small areas where there were sand gaps and let that dry too.

Then I painted the rock, dark gray first, them medium gray, then highlights in near white.

Then I took a regular pencil and used the eraser to wear in two wheel ruts along the length of the road. At the switchbacks I took m

Stop Wasting Energy!

The critters you can kill in an oven in 2 hours can be killed just as easily in a microwave in 10 minutes.[:)]

Hi Joe,

As always, you’ve got some great ideas and I’d like to take advantage of this one. I just went on-line and bought the Crayola color pigments you suggested (Blick.com was out of black so I bought it from MisterArt.com). I wondered if you ever tried to mix them with joint compound, which I have used for roads and terrain. The reason I’d like to use this stuff is it doesn’t dry as fast as Plaster of Paris and therefore can be worked a little longer.

Thanks you,

Mondo

You might like to think about what season you are modelling.

High summer on a dirt road usually means dust, Fall, winter and spring mean mud, mud , mud and more mud.

Dust gets everywhere into/onto vehicles, structures and foliage. Mud covers everything it can reach.

Jeff

I notice your in Leesville, I’m up by Shreveport, have you ever visited Longleaf? If not, highly recommend if your at all interested in logging, sawmills, steam, old equipment.

http://www.forestheritagemuseum.org/sfhm.htm[](http://www.forestheritagemuseum.org/sfhm.htm)

Royal: I have tried them all, real dirt, but you have to clean it up, dry it out, etc. Fine grain sand with colors mixed in, even like Dave Frary, paints the roads with texture. But I have found a way and it will make a lot of roads; swimming pool filtration powder and Crayola Paint powder, you can get the pool filtration powder at Lowe’s or Home Depot and the Crayola Paint Powder at Hobby Lobby, Wal-Mart. Get brown, white, black, mix colors with the pool stuff and spread your roads. make any color you want, then use spray matt medium, (White glue and water) and let it dry.
For concrete roads, styrene, cut up foam trays (the stuff meats come on), and paint it concrete, it is the right thickness, runs right up to the track for crossings, and for tar roads, I have used the roofing felt, it is black and it looks like tar. Just cut up the material and glue down for the road.
Yard Foreman,
WTRR

Does anyone know if the alcohol that you apply prior to glue will kill the organisms?

Sue

Possibly, but not necessarily, Sue. Your best bet is 30 minutes @350 deg in an oven, or 5 mins on “high” in a microwave. Either of those will cause a great deal of grief to anything that can divide, copulate, or regrow legs.

If you are worried about molds, mildew, or bacteria, potassium meta-bisulphite (the white powder used to mix with water to sterilize wine and beer making paraphernalia). Mix a couple of liters, then splash it over the material and let it soak. Rinse in about 10 minutes, and let dry. Or, just let it dry and leave the residue in place. Shouldn’t hurt anything.

hey some nice roads there

but after the glue I dont think much can live glued like a rock to the board

LOL

K-

The alcohol won’t necessarily kill them but if you put the dirt on a tray and place the tray at a fairly steep angle the bugs will all end up in a heap at the bottom…[(-D]

Flee old boy, you’re my hero. heh.

Well, Jon’s actions speak volumes and his pics of his dirt road ARE worth a thousand words. THAT is one great looking dirt road, but then I’ve been making dirt roads this way for years. AND it works for making dirt parking lots as well. Just add a few weeds around the edges. AND you can almost hear that pickup groan when that guy drops that pipe in the bed.

Thanks Marlon.

I’m on with ‘planting’ grass and weeds around that area at the moment. I’ll post a pic when it’s done.

Jon

NO! Don’t microwave your dirt. You may find in a spectacular display of indoor lightning that there are ferrous (i.e., metalic) particles in your dirt… at the expense of your microwave and personal safety.

So, NO! Bad dog! No dirt in microwave.

Should be fine in a plastic microwave-safe container…with a vent, natch.

Marlon, as promised, here are a couple of new pics - the weeds seem to have sprung up overnight (don’t you just hate that)

Jon