I might have pictures of Howard Zane’s workbench, but I didn’t ask him if I could publish it, nor would I. To suffice to say it’s a room, not a bench.
I agree. I would also add that the top should be at least a 30 degree angle from horizontal. That helps prevent any extraneous junk from collecting on top of it.
I previously used what used to be my computer desk. It had a pull out keyboard shelf that I put some tolls on that would be hidden away when closed.
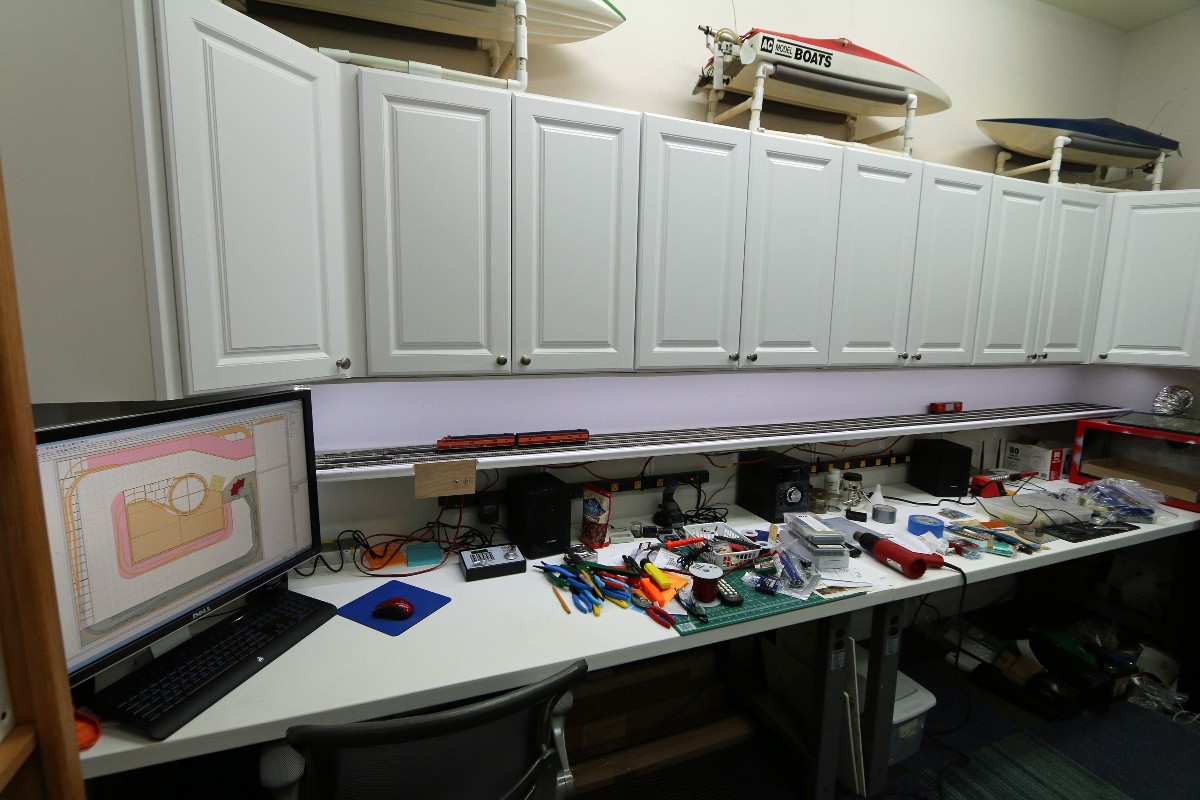
Since I moved, I built my own bench. It’s a bit overkill, but it has a 2x4 frame and a solid core door for a top. Picture is of the first half, for electronics, but before I put the monitor on an arm and added the anti static mat. New part for models is the sme and comes out forming an L shape on the right hand side. But doors have multiple coats of clear satin poly. All I need to finish the model side is a large cutting mat.

It’s also not even close to looking this clean even though I just cleaned it all up yesterday. The shelves have a lot more gear - once you get one, you just can’t stop, there is another power supply and another benchtop multimeter, plus boxes of components. And we ripped out the carpet to expose the hardwood floors.
–Randy
I built my workbench from 2x4s, plywood and masonite. It is 32" x 72" and it is a mess. The actual open working space is about 20" x 36" including space for the soldering irons to sit.
The problem is that I don’t have enough organized storage to hold the stuff that sits on the workbench. My suggestion would be to go with a smaller work surface, maybe 30" deep x 36" wide max, and spend most of your money on storage drawers and shelves. The extra 10" at the back will provide space for a tool rack, and 36" is just long enough to hold a piece of test track when needed.
Consider getting something like this tool holder:
I also have four plastic storage units that are full to the brim with parts, paints, building materials, wire, turnouts and larger tools. I need another couple of units so I can spread the stuff out to make it easier to sort through, but I don’t have space for them. These are the sort of units that I am using (the castors are useless - throw them away):
I built my workbenches using 30"x80" solid core doors that I painted white (for keeping track of tiny pieces/parts) and mounted on steel work table legs.
I think the most important thing for a modeling workbench is having a nice sized piece of (tempered) glass to work on when needed. The glass surface will be perfectly flat and easy to clean paint/glue off of. I had two pieces of 18"x24" tempered glass made by the local glass/window company.
Another helpful infrastructure items is outlet strips. I have two 48" outlet strips mounted on the wall behind/above the workbenches.
A very old photo of my workbench setup. It’s much messier now. ![]()
I am with Randy on this one, I used an old solid core door for my workbench, it is large and has room for my parts bins along with being able to add various lights, power bars etc.
This was after I moved and finally got the workbench set up, it is a lot more cluttered right now with various projects being worked on.
Rick Jesionowski
I used old kitchen island for a workbench. It works and quite sturdy. NO shame getting it destoryed.
Additionally, I got a tupaware drawer set where I keep various supplies. Each drawer is categorized by type of things–electronics, scenery, etc. It was a cheap investment to avoid getting the workbench cluttered.
All you need is a small folding table. There is no minimum specification for a workbench.
If you want a dream workbench specification, that will vary by personal tastes. I have three model workbenches, on for painting, one for messy work, and one for assembly.
My model assembly workbench is actually the most expensive piece of furniture in my house.
It is a steel industrial workbench made by Edsal. The work surface is solid maple butcher block. It has an electrical riser shelf, extra shelf, lower shelf, and is fully wired for AC.
-Kevin
I’ve got 2 of those in the garage. Same legs and all. One was there when I bought the palce, and one was at work and they were going to get rid of it so I took it apart and hauled it home. Can never have too many workbenches.
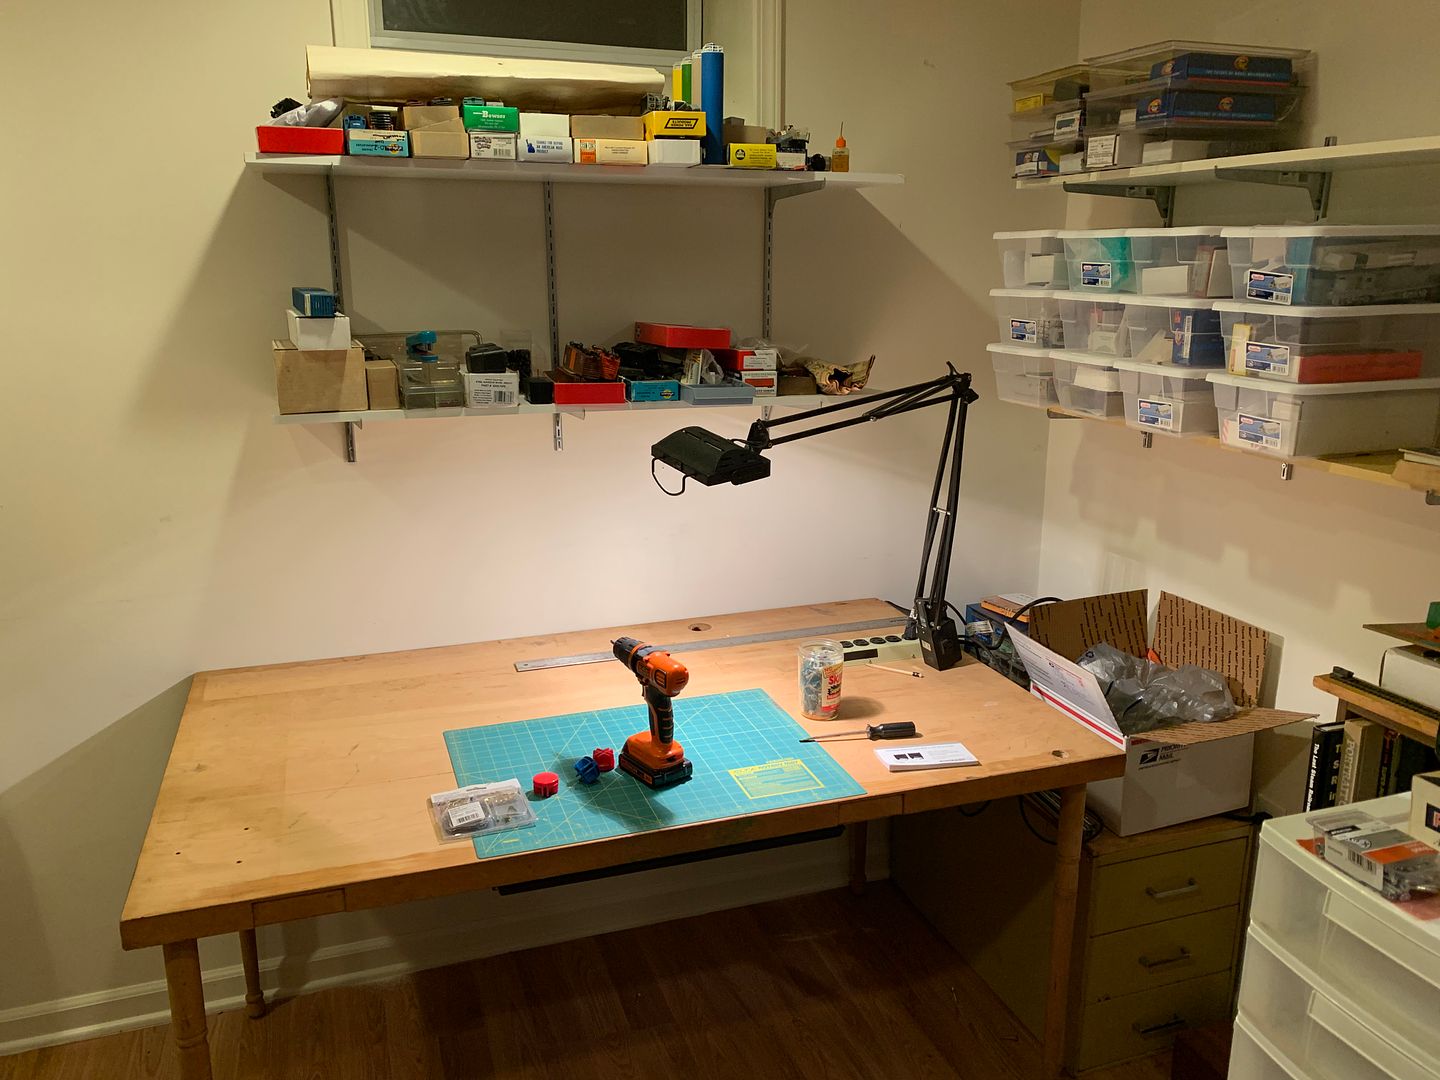
My inside L shaped one - those aren’t old solid core doors, they are brand new. However, they were priced more like hollow core doors. I’m willing to bet if I cut them open it will be more like particle board inside, but they are heavy and very sold. I used some small 90 degreee angle pieces to screw the top to the frame, and the screws held quite well. I got them at Lowes - and they no longer have that one, the cheapest solid door they have now is more than 2x the price I paid for these. Fastest design I came up with - I was going to make just one, as shown in the picture, but with the price for the door (under $45) and the fact that they had 2 in stock, I quiuckly came up with another idea, hoped it would fit, and bought both.
–Randy
I don’t have permanent workbench/workspace for working on things, due to space limitations.
When I need to work on something like assembling a building kit, I usually plop my stuff on the kitchen table with a large paper towel underneath. There’s adaquete lighting and a stable surface to work on.
I also used those same legs under my workbench in the garage, and they will be used on my layout. I have them all ready to go.
My garage workbench is ancient. It dates back to at least the 1950s, and the hardwood surface is beautifully worn. Unfortunately the only picture I have of it has a protective coating over the surface, and it is burind in the garage now.

I love Edsal industrial steel products. They are truly heavy duty, and will last lifetimes in residential usage.
-Kevin
Random,
See “Build a Modular Workshop Cabinet” in the April 2002 issue of Model Railroader.
Tom
I modified a glasstop computer desk by gluing some old small drawers to the sliding keyboard tray for tool storage. I have a file cabinet mounted on sliders under my layout for storage. And a few bins.
Engi1487 (it would help if you used your name),
Living in an apartment or condo, I have moved seven times over the past 30 years, so a long time ago I designed a “workshop” in a cabinet similar to an amoire, allowing me to close the doors and hide everything. It was made from different sizes of hollow-core doors, some plywood, and cheap plastic parts cabinets and held together with bolts and screws so it could be disassembled for moving. It housed my workbench, a Unimat lathe, micro drill press, Minicraft table saw and disc sander, small bench grinder, and even a fold-away spray booth. Photos and plans are in the April 2002 Model Railroader. (Photo below)
One important part of the workshop was/is a portable work tray, allowing me to take projects to other parts of the house. [Groups.io link removed]
We have since moved to Hawaii where I am building a new layout which I have elevated to allow placing a workbench under the layout. It was built using two knock-down rolling drawer units from Amazon, bridged by a plywood workbench shelf sized to accomdate my portable work tray and backed by a pegboard panel. Below the plywood workbench in the kneehole is a shlf on drawer guides where my disc sander, table saw, and cut-off saw reside. The entire unit can be rolled out from under the layout. See Nov-Dec 2020 N Scale Magazine (Photo below)
Oops - seems I cannot insert photos in this posting. See the above references.
Tom K. MMR#101
I have about 35 linear feet of work bench, since the bottom of the benchwork of my around the room layout is 51 inches from the floor. It gets messy, but I clean it up regularly. Usually VERY clean.
Perhaps something to keep in mind, building this way if possible gives you as much work area as layout area.
The work benches consist of two desks, one of which is metal; an old rectangular table, 3 different doors (one heavy) supported by short cabinets similar to filing cabinets. I see similar items to all the above on craigslist free all the time. Lotsa drawers for materials storage, plenty of bench space for tool chests, stereo underneath, power tools, etc. And a hot air corn popper!
Dan
I’m using an old kitchen table.
Just anything with a nice solid flat surface.
I use a folding plastic table about 5’ wide about 24" deep. I have a couple cardboard boxes for tools of different types and one of those plastic multi-drawer organizers on top that I’d had since I was in high school to put things like wheels, couplers, spare parts, detail parts, etc. I have a couple cutting matts on the table too, one about 18" by 18".
Regardless of the space:
Keep it clean!
Put things away when done, clean up spilled paint or weathering powders.
Keep a trash can handy.
My workbench is mainly used for assembly, disassembly, and I keep a test track elsewhere. As well as a place to work on painting. Though with the weather so warm I set up and paint outside more often.
Alvie
Well, its been a year or so since the OP posted his query. I wonder if he decided on anything, and actually got it in operation…