I too would prefer not to use Masonite for backdrop or fascia. What radius do you think this “underlayment” could achieve? Down here if you ask for underlayment they’ll give you Luan plywood (which I’m sure would be unsatisfactory). Does the material you’re talking about have any other names?
I do have access to some nice 1/8" baltic birch, but I’m afraid it wouldn’t be bendy enough.
I try to make clear that my meager contribution to this forum is simply showing/explaining what I have done. I’m fully aware that every situation is different.
Yes, masonite is not underlayment; nor is it drywall nor plywood nor tongue-and-groove pecky cypress. What I am saying is that masonite is a perfectly appropriate and suitable material. As long as its properties and limitations are recognized.
In my case . . . the glued scarf joints appear to be holding. The nails are holding. I will monitor them for the next 15 years or so and post photos every once in a while, and if the appearance/performance falls below my standards I will dutifully report it.
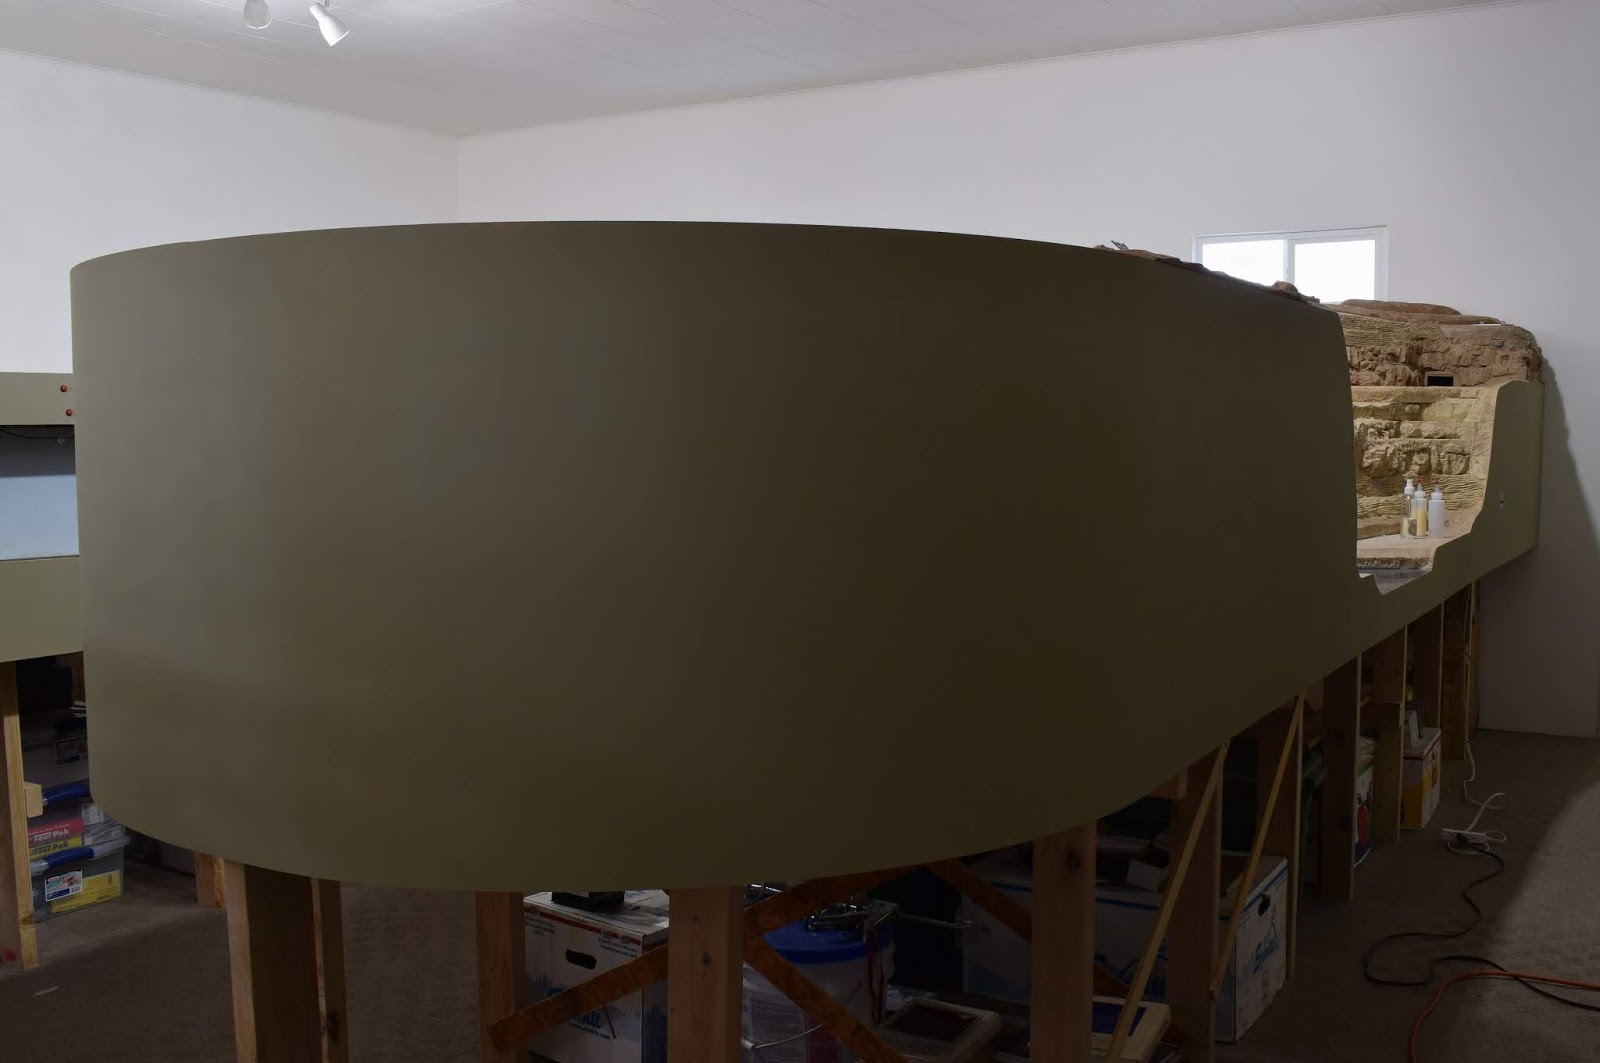
Most of the fascia is about 5 or 6 inches deep, but there are areas (up to about 12 unbroken linear feet in length, and around a curve) where the fascia is 27 inches deep. No open joints or stress or buckling there as well. Yet.
In fairness, I live in the high desert of Wyoming and the humidity is ridiculously low and constant. The range of temperature in the layout room does not exceed 5 degrees per year. That is 5 degrees total variance, or 2.5 degrees from the yearly average. But even so, my philosophy is that the coefficient of expansion for the artificial wood product (masonite hardboard) is similar to the coefficients for the lumber and plywood underlying substrate.
I apologize for the buggy ride. Please carry on.
Robert
EDIT
There are photos of the fascia on my layout build thread, but I’m adding this additional view from another angle:
The fascia in this area was installed about two years ago and it was painted about one year ago. This photo was taken about 15 minutes ago. The radius around the end of this peninsula is 30 inches.
Earlier Randy and someone else mentioned the Kreg attachment. They have at least two designs, 1 a straight track on which the saw rides in what people call a sled, the other 2 a lateral extension to the sled that rides on the outside of the material that is being cut.
Both have mixed reviews in that there is too much play in the track-sled interface or the saw isn’t held consistently.
What do you have and why do suppose it doesn’t get consistently good reviews…
I have the Kreg Rip-Cut, it’s the one that slides along the edge of the material.
I haven’t tried it yet. Seems to have mostly positve reviews on Lowes. I can see where someone who tries to hurry and push the saw through too fast will get poor results, same thing happens when sawing freehand. My miter saw cuts just fine - but if I try to rush something and maybe not clamp down the piece but hold it by hand, the wuality fo cut goes way down. Like any other tool, use it properly, and you get good results. As soon as you shortcut - you’re going to get sub-par results.
I also have a high quality repalcement blade to use on my circular saw, designed to cut plywood, instead of the dubious quality general purpose blade the saw comes with, so I’m sure that will help make better cuts as well.
Doesn’t matter which way I cut my 3/4 ply, it comes in 5x5 sheets, not 4x8. Since both surface veneers run the grain the same way, i will cut to minimize chipping out just so the pieces are easier to handle.
There’s also a trick of using a piece of hardboard under the shoe to make a zero-clearance insert for a circular saw, but I’m not sure that will work with the attachment of the Kreg jig.
And I may have a use for the leftover extruded foam pieces I have - instead of trying to steady these sheets on sawhorses, I can lay them on the ground on top of the foam to cut.
Here in the humid summers of the Mid Atlantic, Masonite does not always fair as well…for much of anything. I used some masonite based paneling for the interior of a pool house changing room - what a mistake, buckled from humidity and temperature extreems.
Because, most lumber expansion and contraction is a function of moisture content, not temperature.
I have always had my layouts in reasonably well controlled environments, but not as tightly controlled as yours. You are fortunate.
The drilling, nailing, stapling and screwing properties of Masonite are one of the reasons I don’t care for the product.
I have known lots of modelers over the last 50 years who have used it for layout fascias, and in this climate, the upholstery washer/screw method remains most reliable long term.
Layouts in this region are generally in basements, temperatures are easily kept steady, humidity not always.
Personally, I have never been a fan of the free form fascia, so I have never needed to use something flexible like Masonite. But I am considering some curved fascia sections on my new layout. Thin plywood like underlayment will work fine.
I don’t have a table saw, or room to use one for full sheets - not to mention carrying and supporting full sheets of plywood - 3/4 is heavy.
There seems to be little setup with this tool. I don’t trust built-in markings, but really I need all 3" wide strips so once I have the slide with the saw blade the right distance from the piece that slides along the edge, it’s just cut, cut, cut. It’s just a lever clamp that attaches the adjustable part to the slider and arm, so there’s very little setup for this tool. Kreg seems to have a bunch of other fancier tools to use with table saws.
Moving right along, along to the back wall of the alcome. And got some of the blocks attached to the verticals. Set a piece of the underlayment in place. I was able to get it to bend even more than it is here, but with nothing to hold the end in place (not ready to actually attach it yet), this is the best I can do with something to wedge it in place on both ends. I think it will work fine.
I’m more worried about the other end, where it will have to form a convex curve. I don;t think it will bend tight enough, although some water may help. Or I may bave to notch in a different material to make the curve.
THese little blocks are a pain, I can line them all up nicely thanks to my laser level, but as the screw bites, they want to spin. That’s WITH pilot holes drilled. Though I guess I don;t really need to try and be so precise with the placement, the roadbed will be supported on rises, and so long as the roadbed is level, or on an eevn grade with no dips and humps, it should be fine. They can’t be too willy-nilly, or the backdrop pieces won’t fit between the decks. But trying to get them all perfectly aligned on a laser straight line may be more effort than is required.
ANd I will soon be out of 2x4s again. Guess I should buy more than 8 at a time, but it takes long enough to pick through the pile of what is supposed to be the premium quality ones to get 8 at a time. Top Choice? I’m thinking Total and a different C word.
The Irwin Quick-Grip clamps placed so the faces of the clamp are on both sides of both the 2x4 on the wall and the block will hold the blocks tight enough so the screws won’t spin them.
This, or start one just into the second layer, but don’t drive it home. Then run your second one all the way. The first screw will help prevent the block from rotating. Drive it the rest of the way once the second screw is in.
Before you get too far along, I would put a couple coats of paint on the backdrop material and see if you like the way it looks. It would be a shame to put in 200 ft of backdrop and then find out you can see the plywood grain in the “sky” and don’t like the effect.
They’re also supporting the whole layout. I really wanted to use dimensional lumber cut from 3/4 plywood, but after testing various options, none of them allowed for a nice sturdy attachment with no wobble. The extra 3/4" thickness doesn’t negatively impact my track plan, and the extra depth will make it easier to run wires down behind the backdrop - power supplies for the LED strip lights, accessory power, , etc.
I was mostly worried about how tightly I could curve this stuff, but the first corner test seems to indicate no problem. Masonite still has to be primed to prevent bleed through, and I still think drywall mud will adhere better to wood than masonite. In fact that’s one option I’ve seen for hiding plywood grain - skim coat the whole thing then sand. That is probably too much work. If the shellac-based primer can hide oak grain, it can hide this light stuff.
Just a word on grid for layout. I used steel studs for my gridwork. Used a crimper to hold together and only screws used were to fasten back to wall. Less than a day to cut and assemble. My entire layout has no legs in front nor braces on back. My longest run is 14’. This is topped by 2" to 4" of pink foam. I used steel because my layout room is subject to various temperature and humidity swings. It has stood up wonderfully and resisted movement.
Well if that has held up, with just steel stud horizontals, and frames screwed to the wall studs, but no legs and no braces - I’m not sure why people think what I’m doing is going to sag. Once there’s layers of scenery on it, it would even take a LOT of water to mage the plywood soggy - if that ever happens, I have more serious issues than the layout sagging.The test piece I build - most every time I walk past it, I hang off the end - so far nothing has moved.
Update - this afternoon the governor announced shelter in place requirements for my county now as well. So it was off for a last minute run to Lowes to get supplies - even if I wasn’t actually working from home during the week, I now have enough wood to completely finish the area where the the yard and town go, and either start on the moveable section in front of the furnace, or the base of the helix (if I can get to the old legs from my previous layout). Even finish the backdrop in that area - I got a wood sealer/primer and plenty of sandpaper for my littler sander. Even some spare tools - like extra drillbits of the size I am using for my pilot holes, in case I break one. Even got a gallon of sky blue color - some Valspar “Carolina Sky” which looked good under lights the same color I plan to use (I took the sample down to the lighting department to make sure). Hard to see here but I clipped the sample to the backdrop:
Positives on underlayment backdrop (so far): It’s cheap. It’s smooth.
Cons on underlayment backdrop (so far): It’s much harder to get small radius curves than hardboard
It may end up being a scarifice, but I actually screwed in place th first piece of backdrop around the inside corner. Luckily the screws I used use a Torx head, so I can load one on the drill and it doesn’t fall out while I wrestle the piece of underlayment in place. It bent to a sharp enough radius (I did wet some shop towels and dampen the back side - I don’t know if I actually got it damp enough to matter or not though). The force it was trying to push itself back out straight though - I wasn;t sure screws would even hold, but at one end, the joint is right in the middle of a 2x4, at the other end it’s just about even with the 2x4, so I may have to cut it off somehow. One one side of the curve, two studs have screws in them, on the other side, it’s flat against 3, but I only screwed it to two. The two corner ones, the backdrop is curves an dnot attached. It does come inside the support blocks that are on each vertical to extend the attachment area for th eplywood ribs, so I’m going to consider that a tight enough radius. Big test will be to check the staytus tomorrow and see if it’s ripping out the screws (the unerlayment will tear, not the 2x4) or if it snaps. It wasn;t making any ominous noises when I shoved it into place.
There are only more 3 inside curves (that are 90 degrees) around the entire layout, so thus far I’ll say it’s more positive than negative. There are 2 right angle outside curves - that may be an issue.