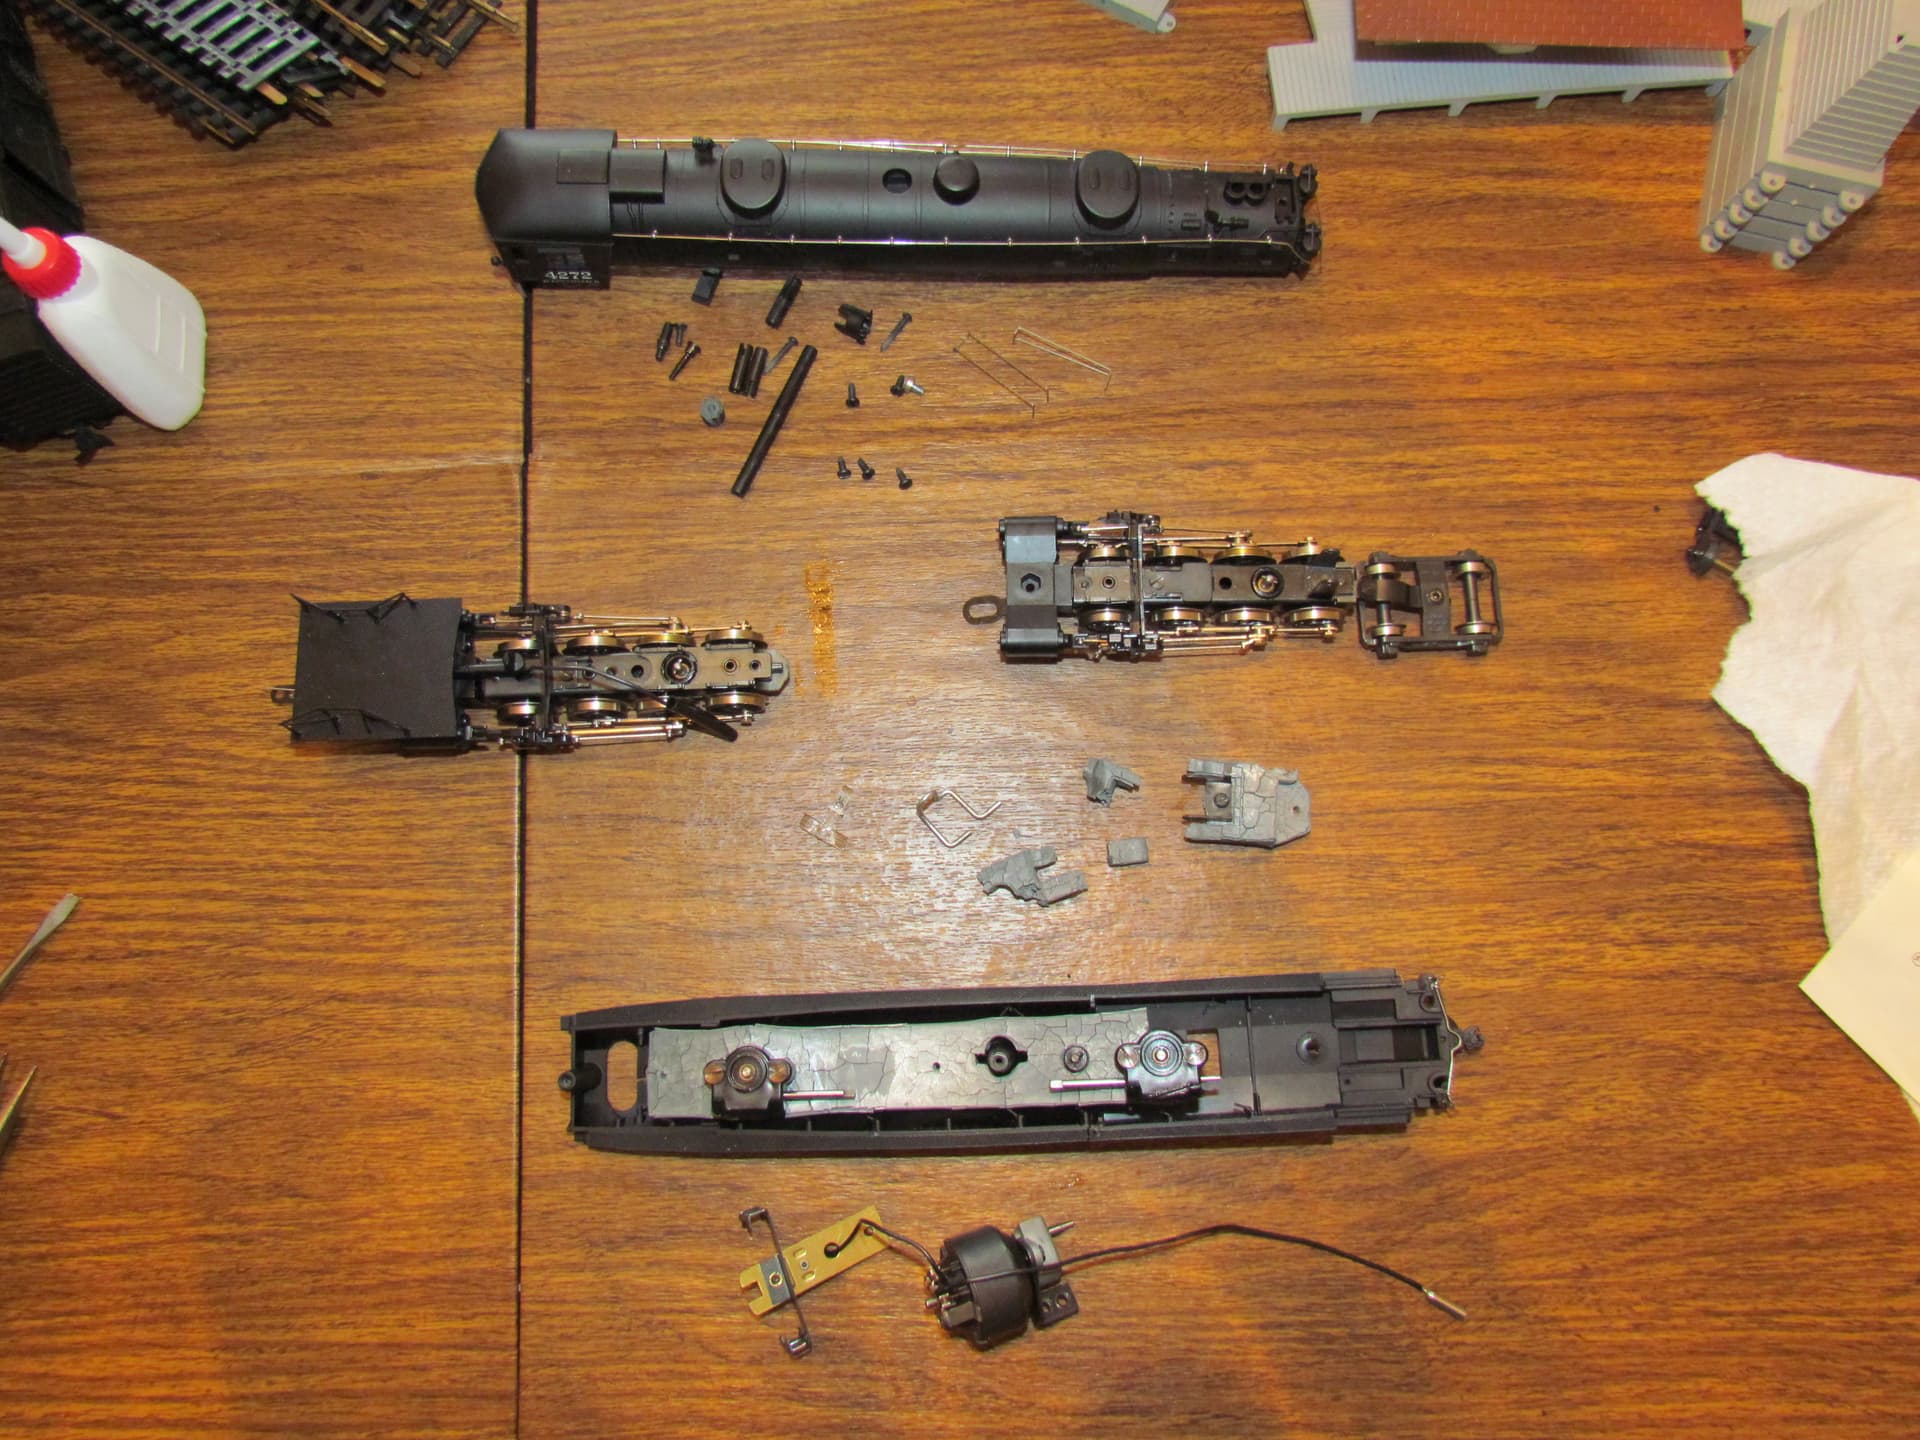
Hello, I have an AHM Cab Forward. The internal pot metal frame has deteriorated rendering the engine inoperable. Is there a source for a replacement? Has anybody made a 3D printing copy? An idea on age? Any info would be appreciated. Thanks.
Mel Perry (may he RIP) has described in detail on these forums how to reinforce and improve frames in these locomotives. The posts are, or were at the time he was posting, lavishly illustrated.
This was after late 2014 when he first started actively posting here. I can’t get any joy out of the new community search tool, and I have to worry that valuable material may have been truncated and lost when the posts were moved to Discourse. If anyone remembers the post with the asymmetrical motor and driveline design… there’s frame repair in that thread.
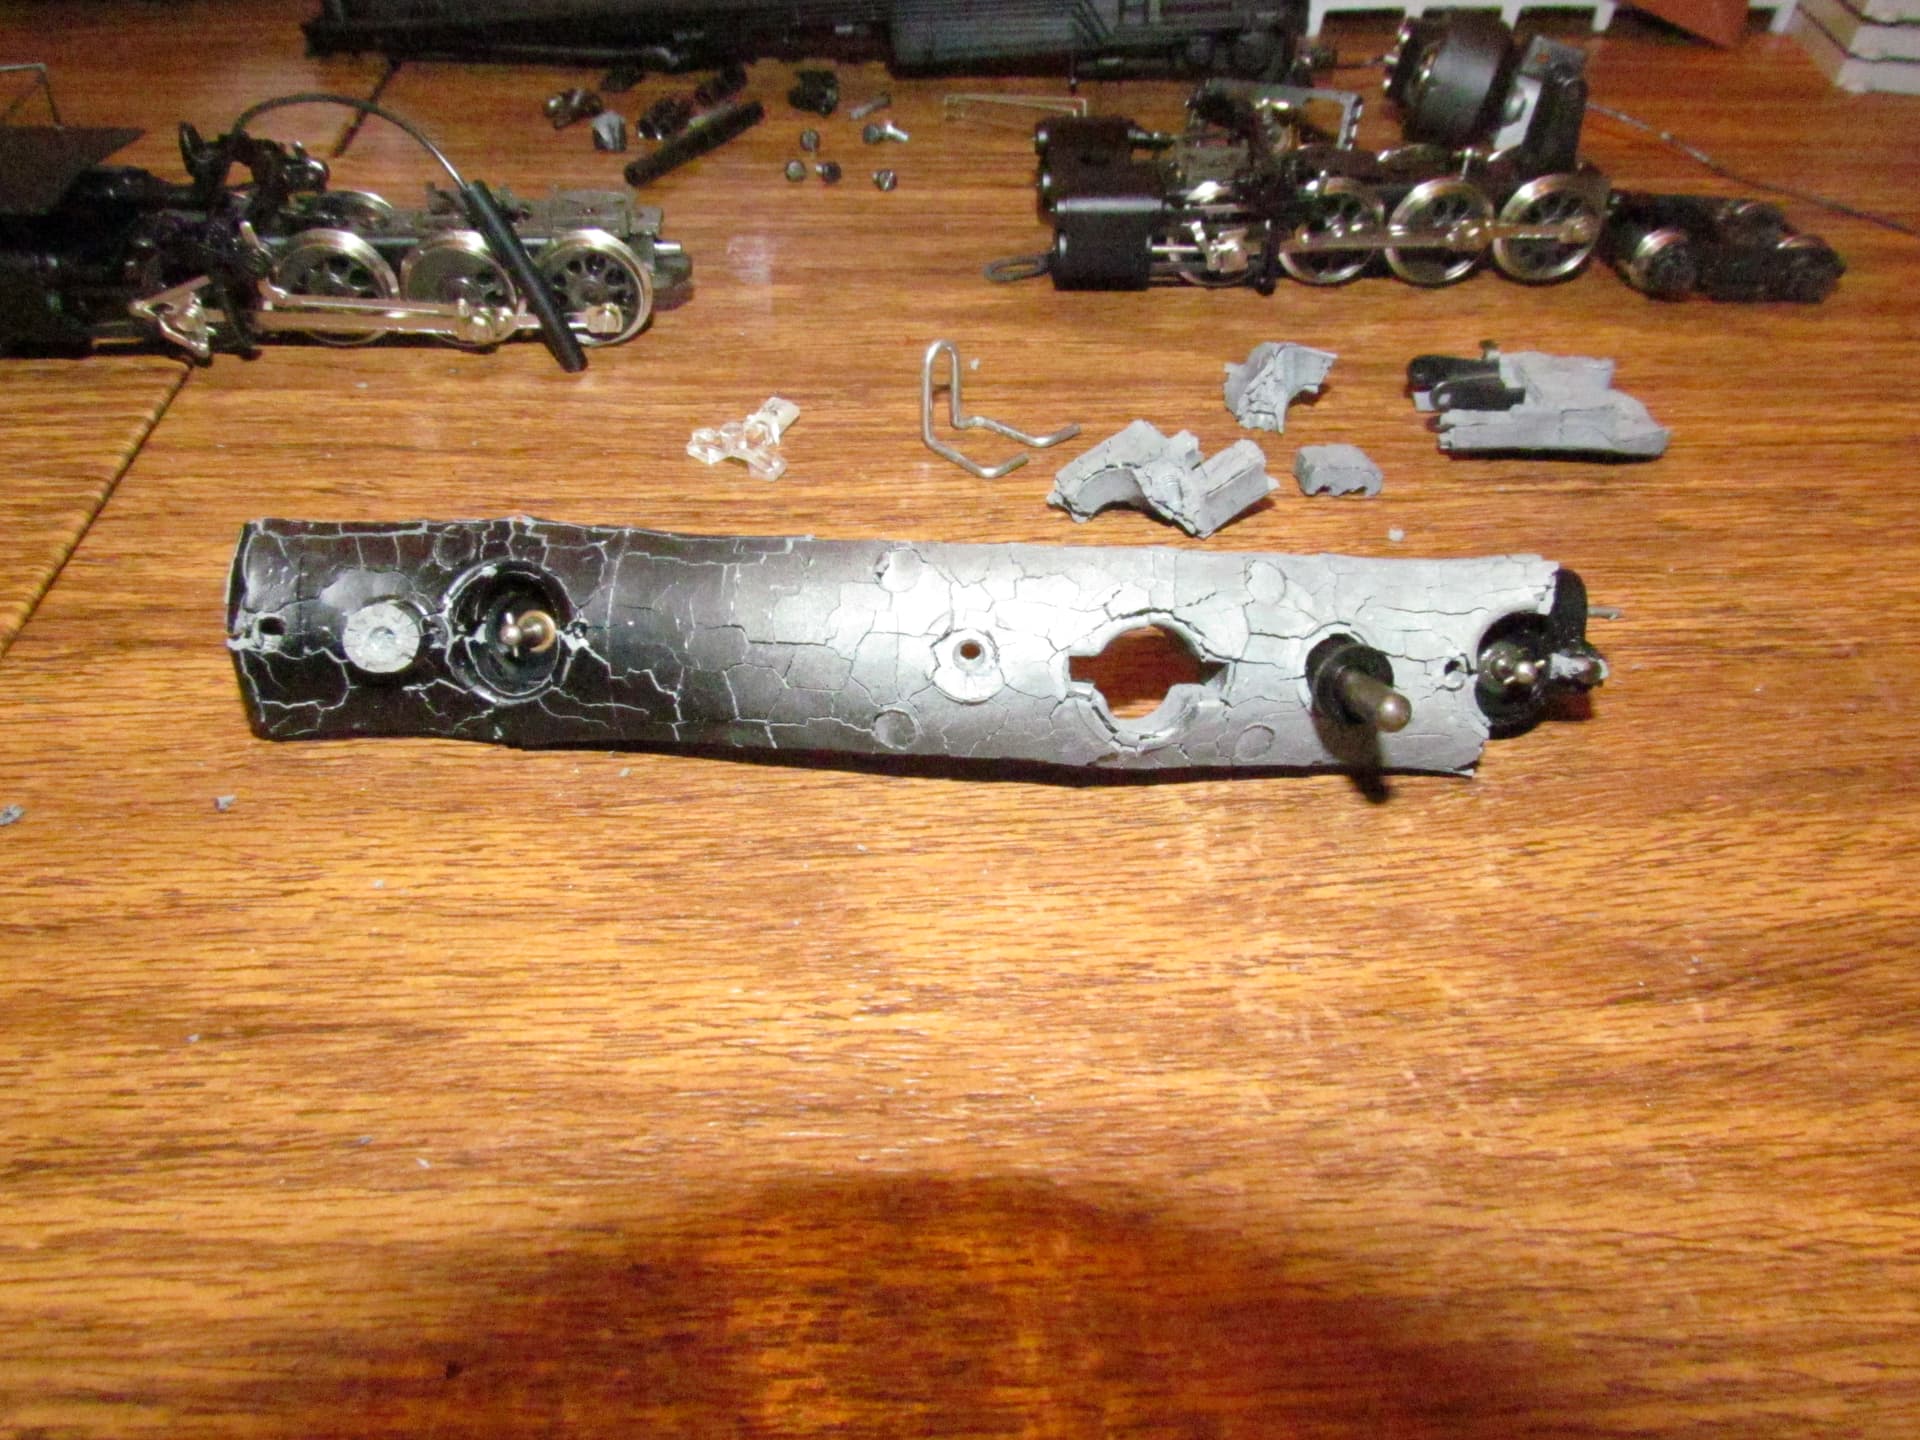
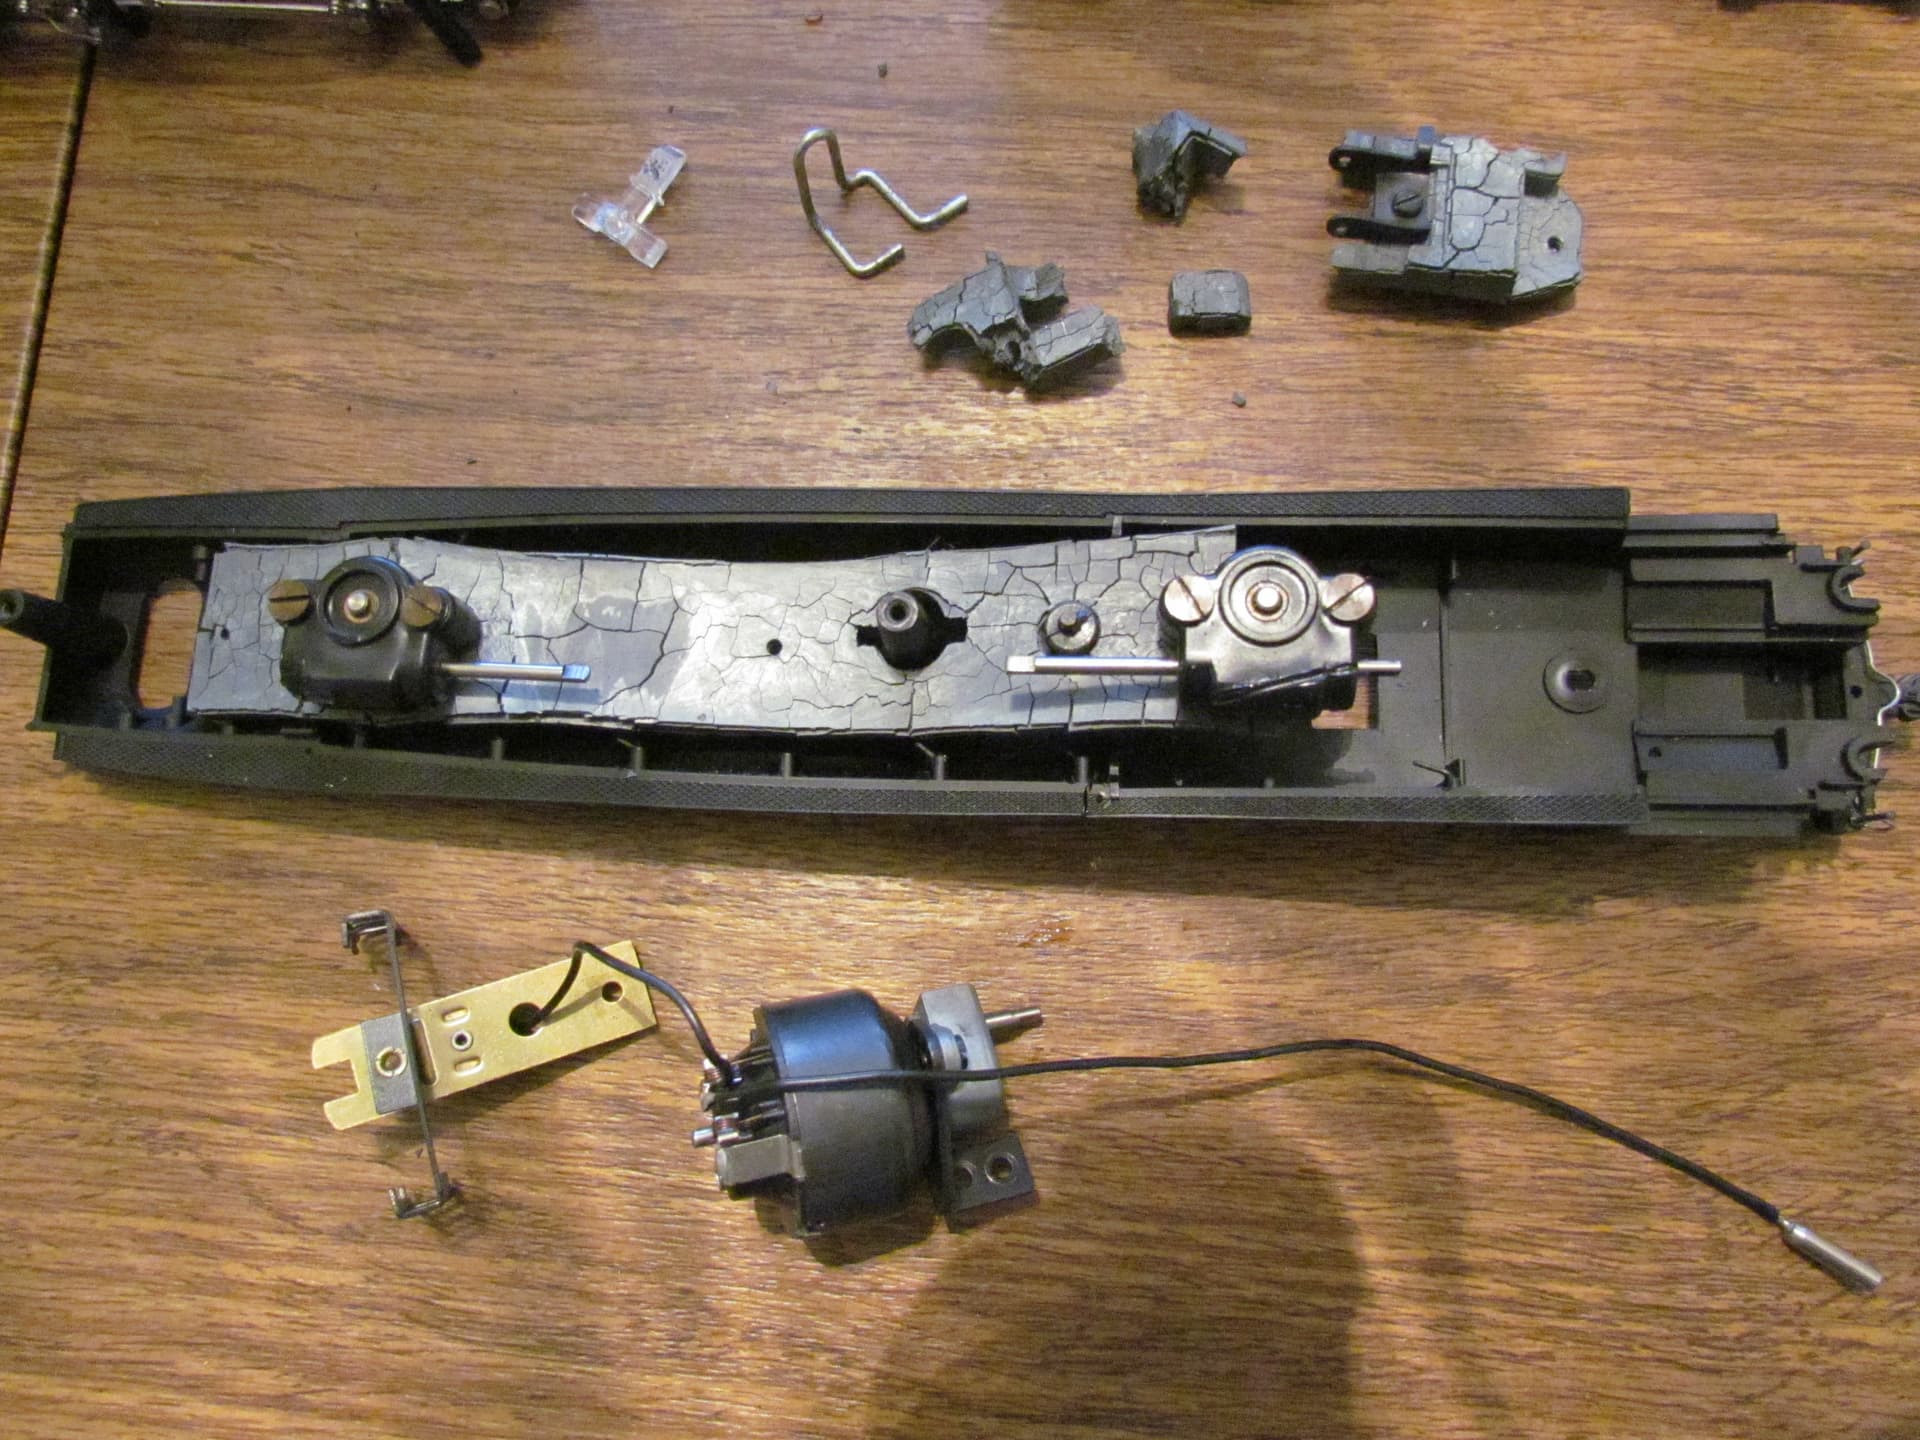
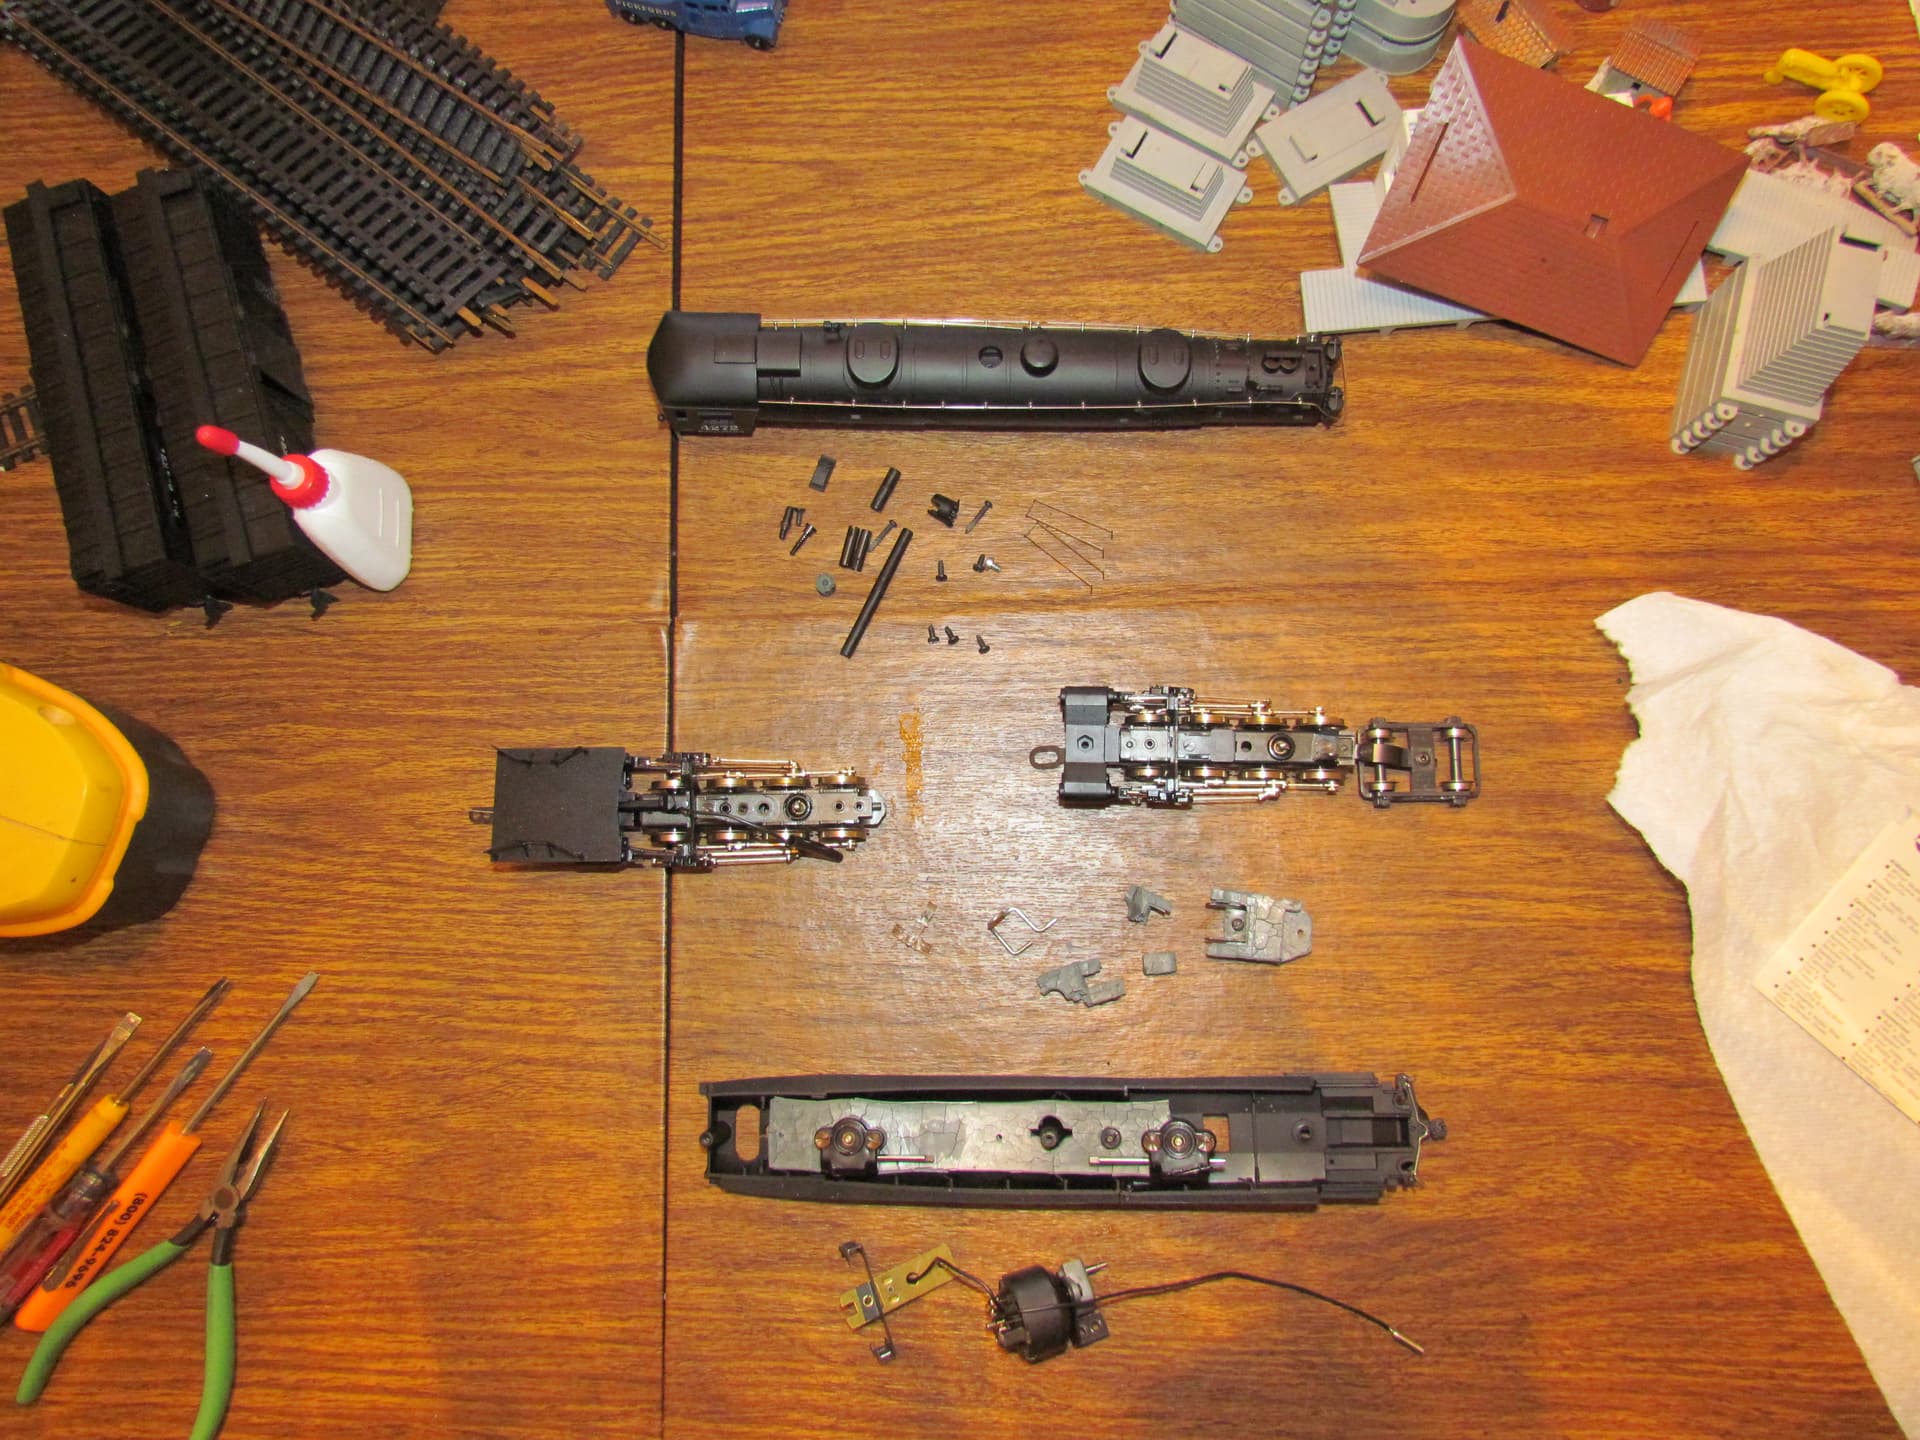
Thanks for the reply. This frame is beyond repairing. My only hope is a replacement or someone with a Cab Forward being sold for parts that has a good frame with the motor mounted at the front. Another Pic:
Good Lord that looks terrible. Almost looks like zinc rot. It’s a beautiful locomotive and I hope you can figure out a solution to get this thing running again.
The more posts you make, the higher your ‘trust level’, and at somewhere around 7 posts you will ‘unlock’ the ability to put more than one image in a post. So keep the discussion ‘lively’!
Could the official name of that piece be ‘boiler weight’?
Looks like a classic example of temperature-related crystallization. That is not “corrosion”, it’s an allotropic change in the material causing localized stress. Did you store this locomotive where the temperature got below freezing for part of the time?
One thing Mel did was use larger can motors, angling them (and their drivelines) to get the result to fit in the space between the towers. I think this may have resulted in a new frame to replace at least the top of the ‘weight’, and you might be able to make up a plain rectangle enclosing the two gear towers at correct spacing, and then cast a lower curved section from something like epoxy resin charged with tungsten powder to work as traction weight. The analogue to ‘lost foam’ used to make ducts for EDF model aircraft might be a useful technique here.
It hasn’t been stored below freezing since I have had it, but I don’t know about before that. It was my father’s, and he bought it “way back” because he used to chase trains for photos back in the mid to late 40s and 50s out west in California and one of the pictures was of a Cab Forward. I think he was very impressed with the real thing!
As far as remaking the “boiler plate” (works for me), the process you describe is beyond my skill level.. AND I would need something to use as a pattern. The pieces are distorted and separated to the extent that you couldn’t make a piece with the correct dimensions and locations for screws etc.
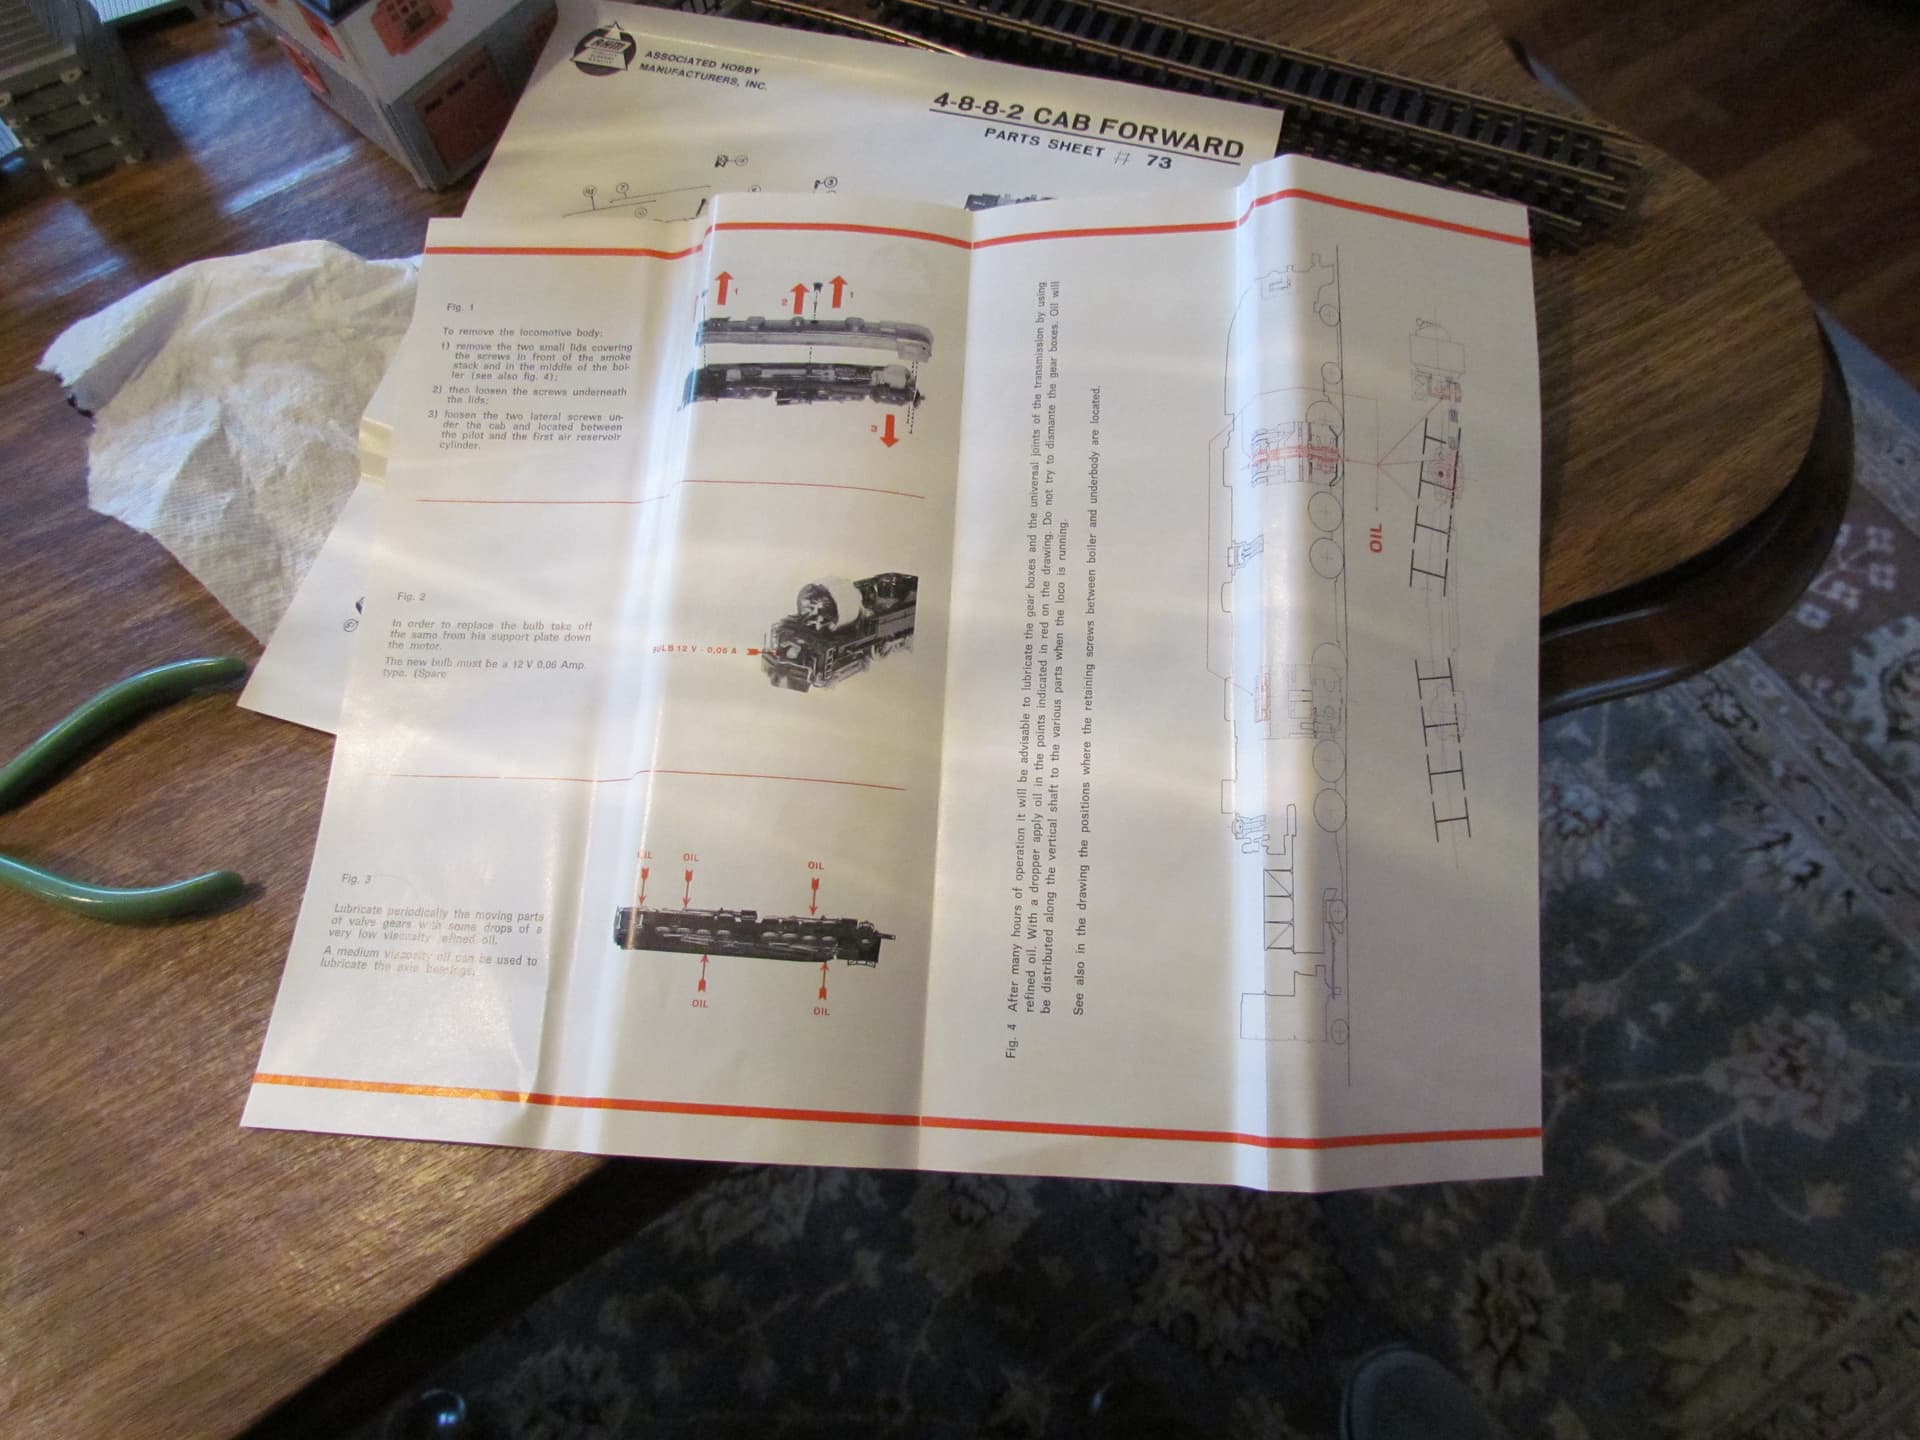
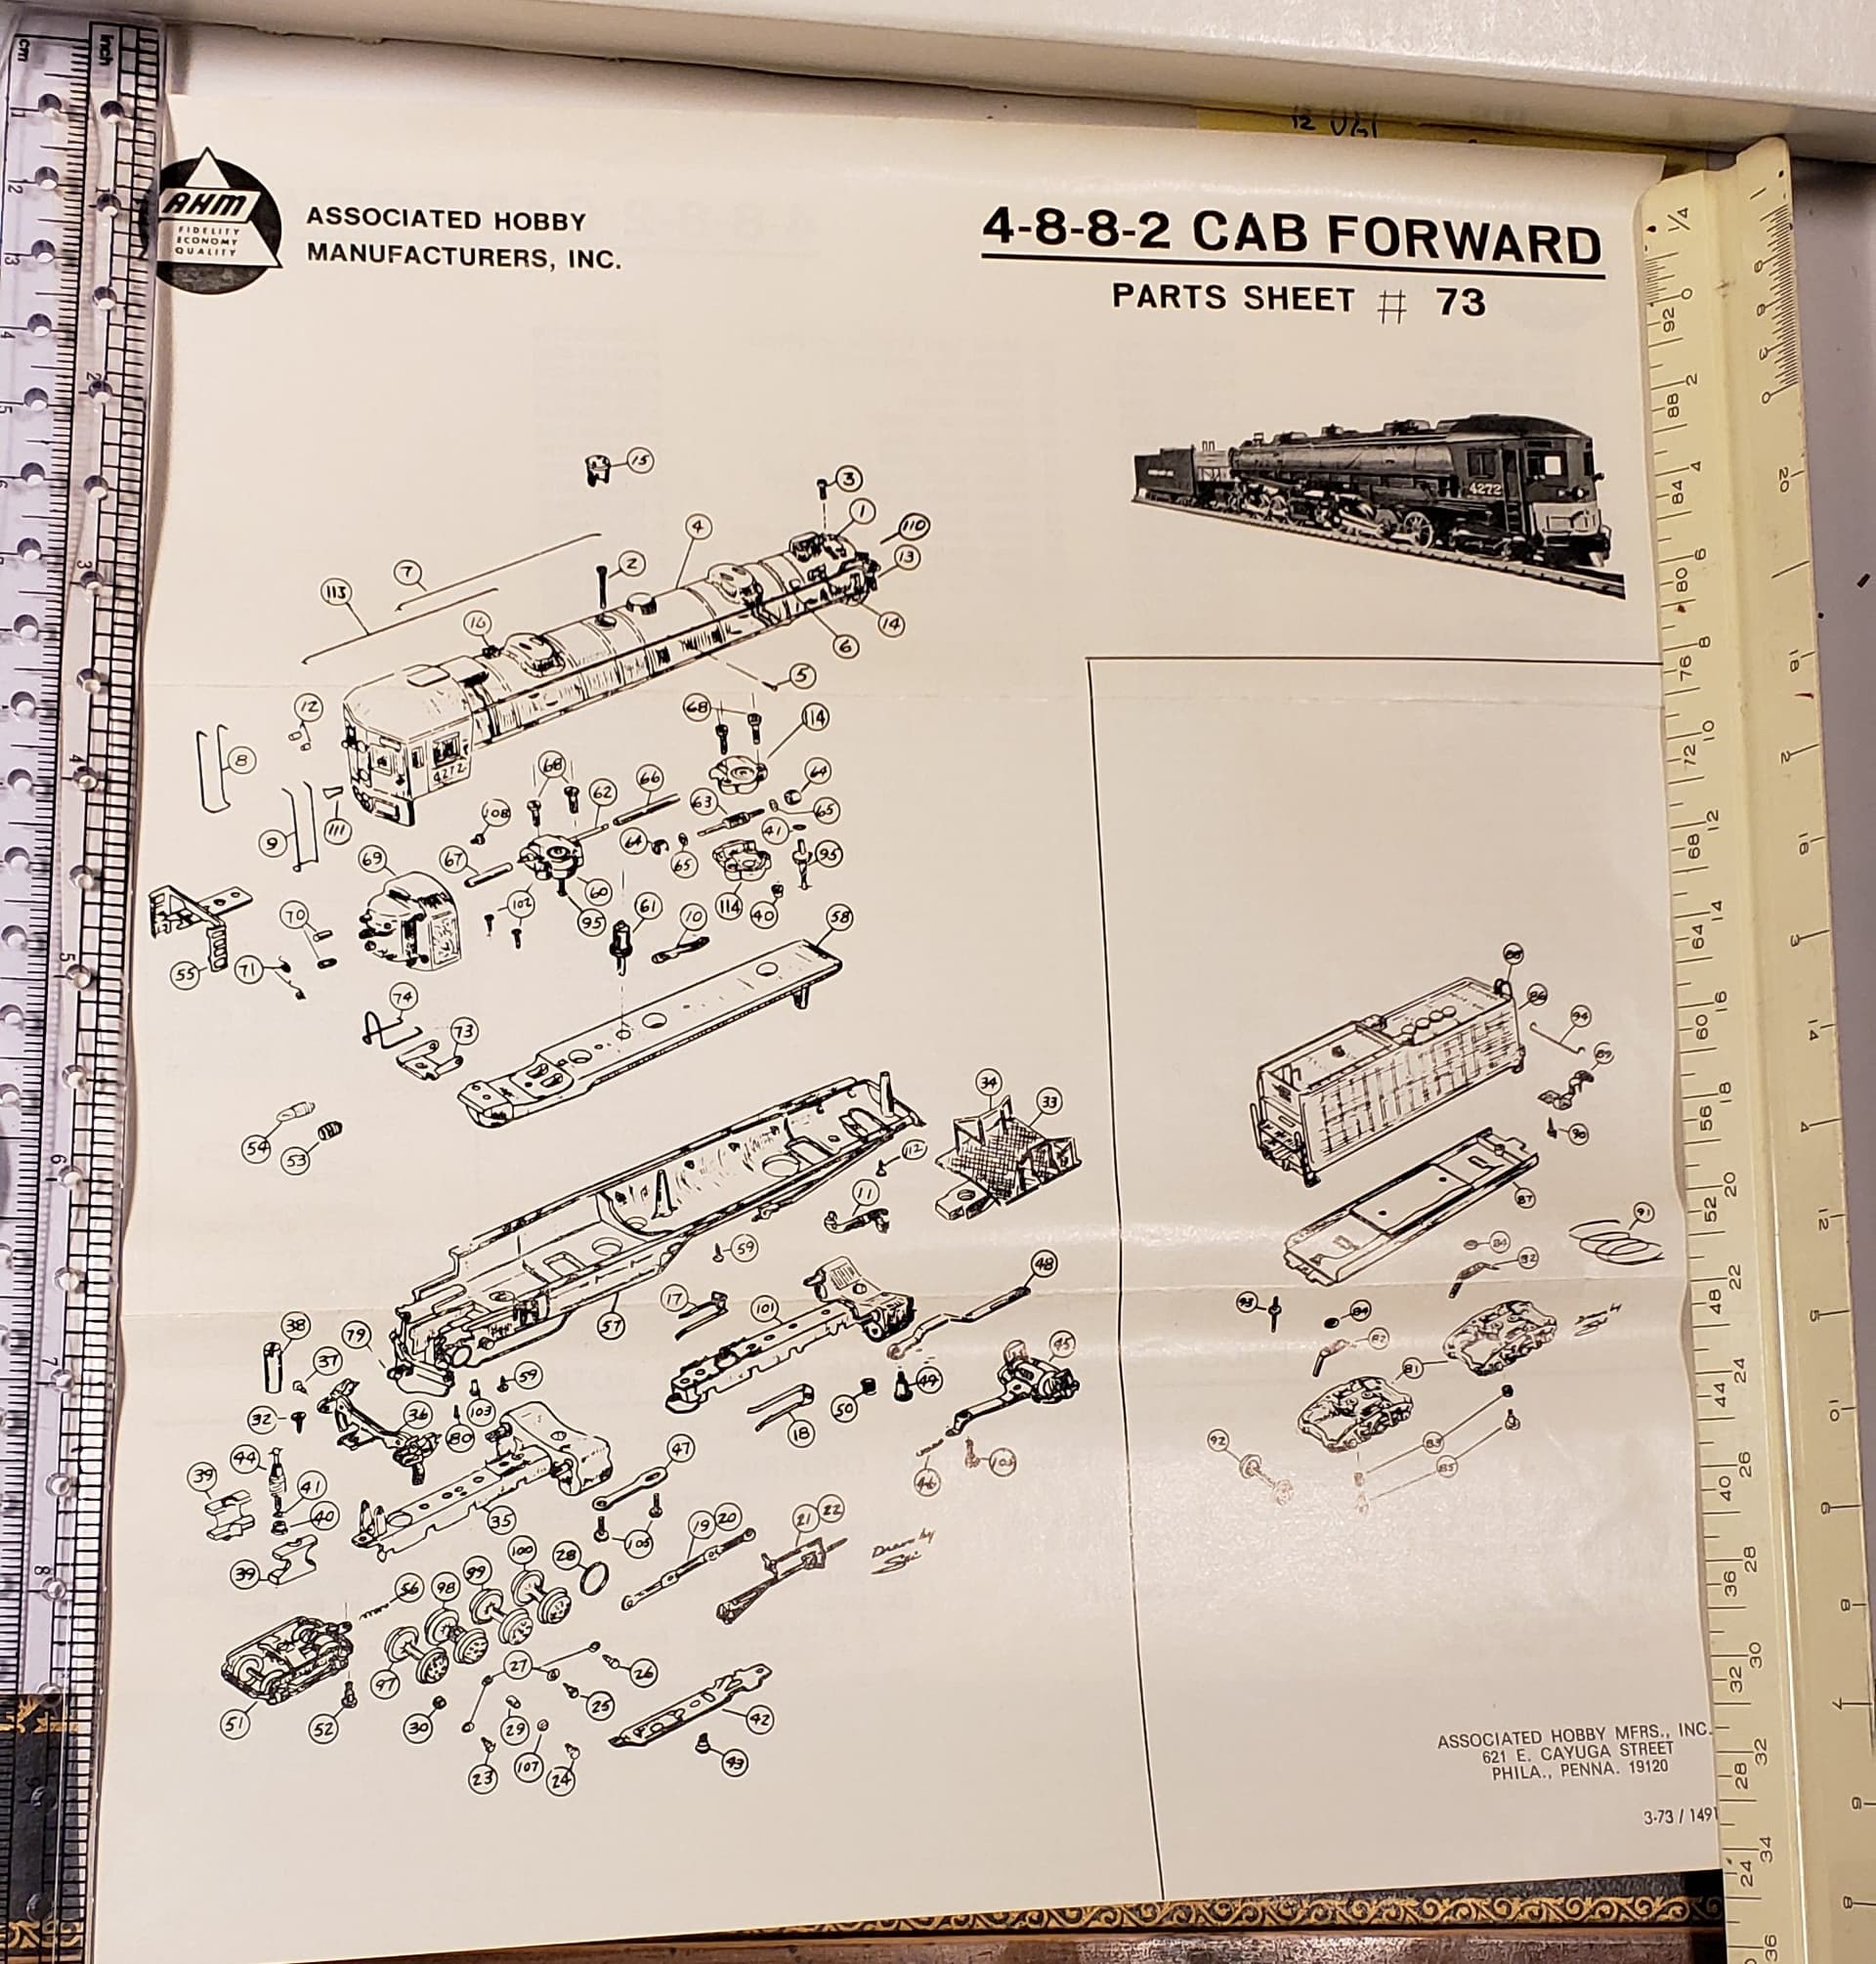
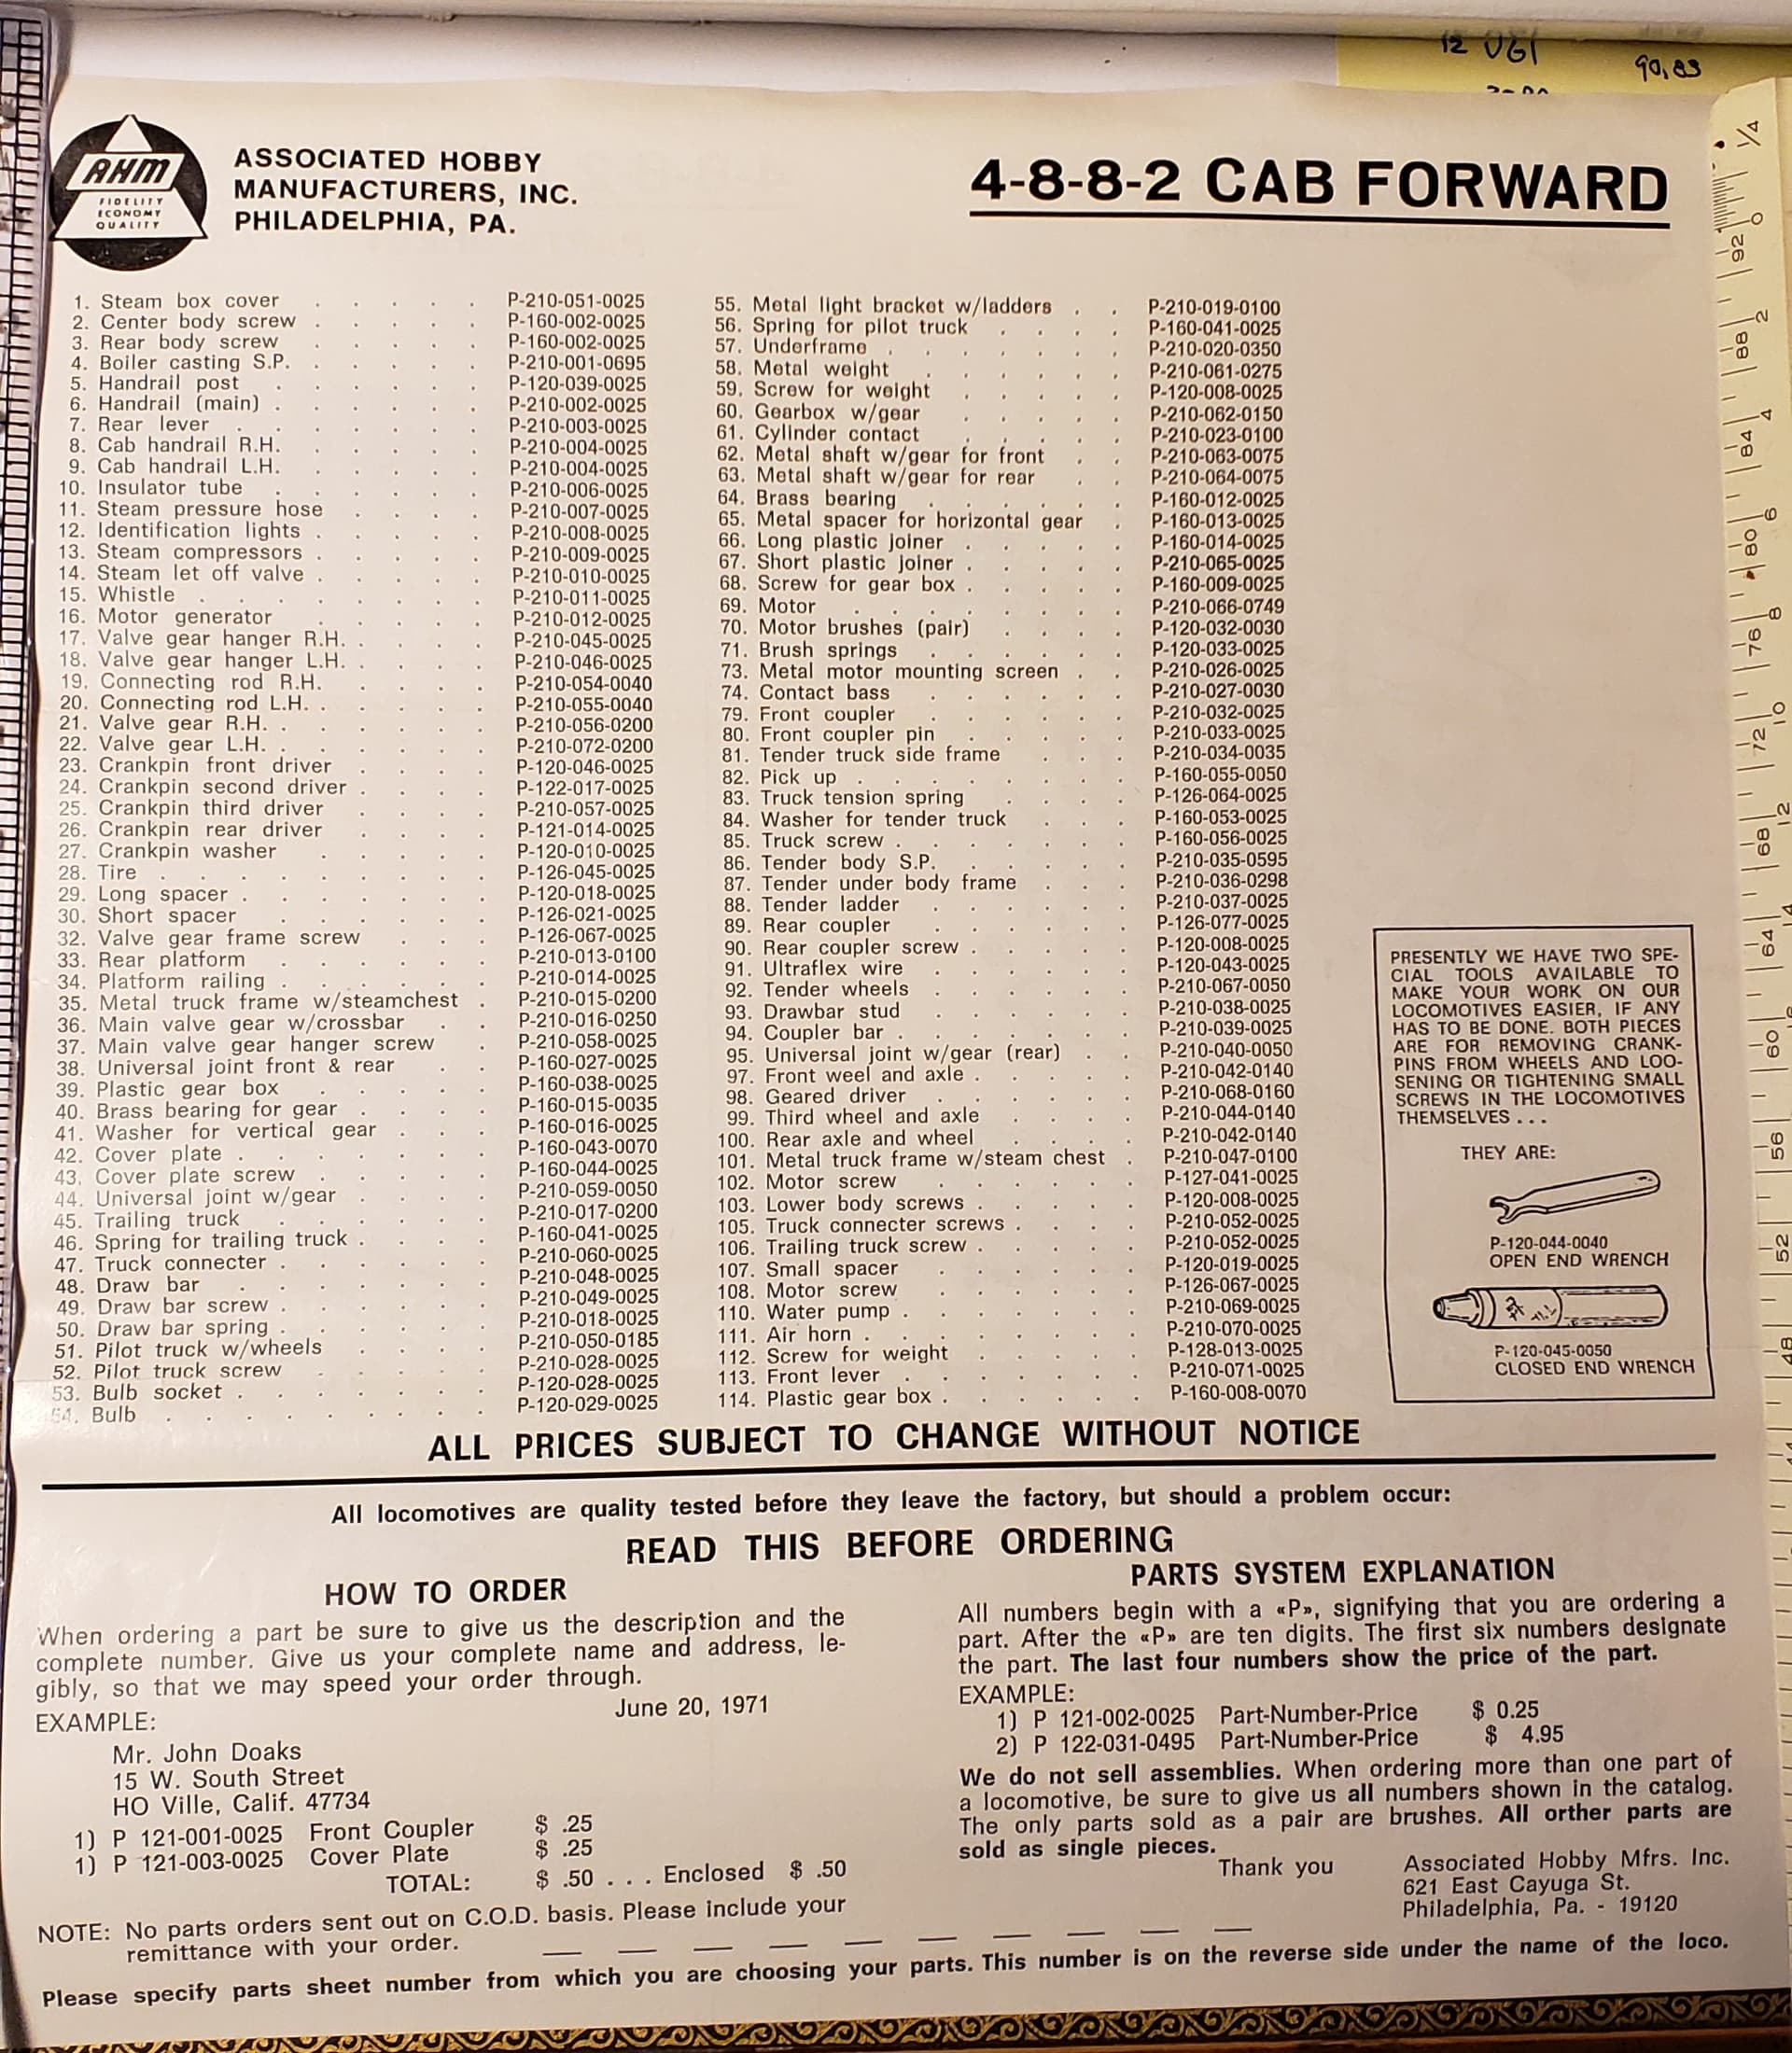
OOPS!!! That sheet was stuck up inside the box! There is a parts list.
It’s called “metal weight” (good grief, I liked boiler weight better), part no P-210-061-0275.
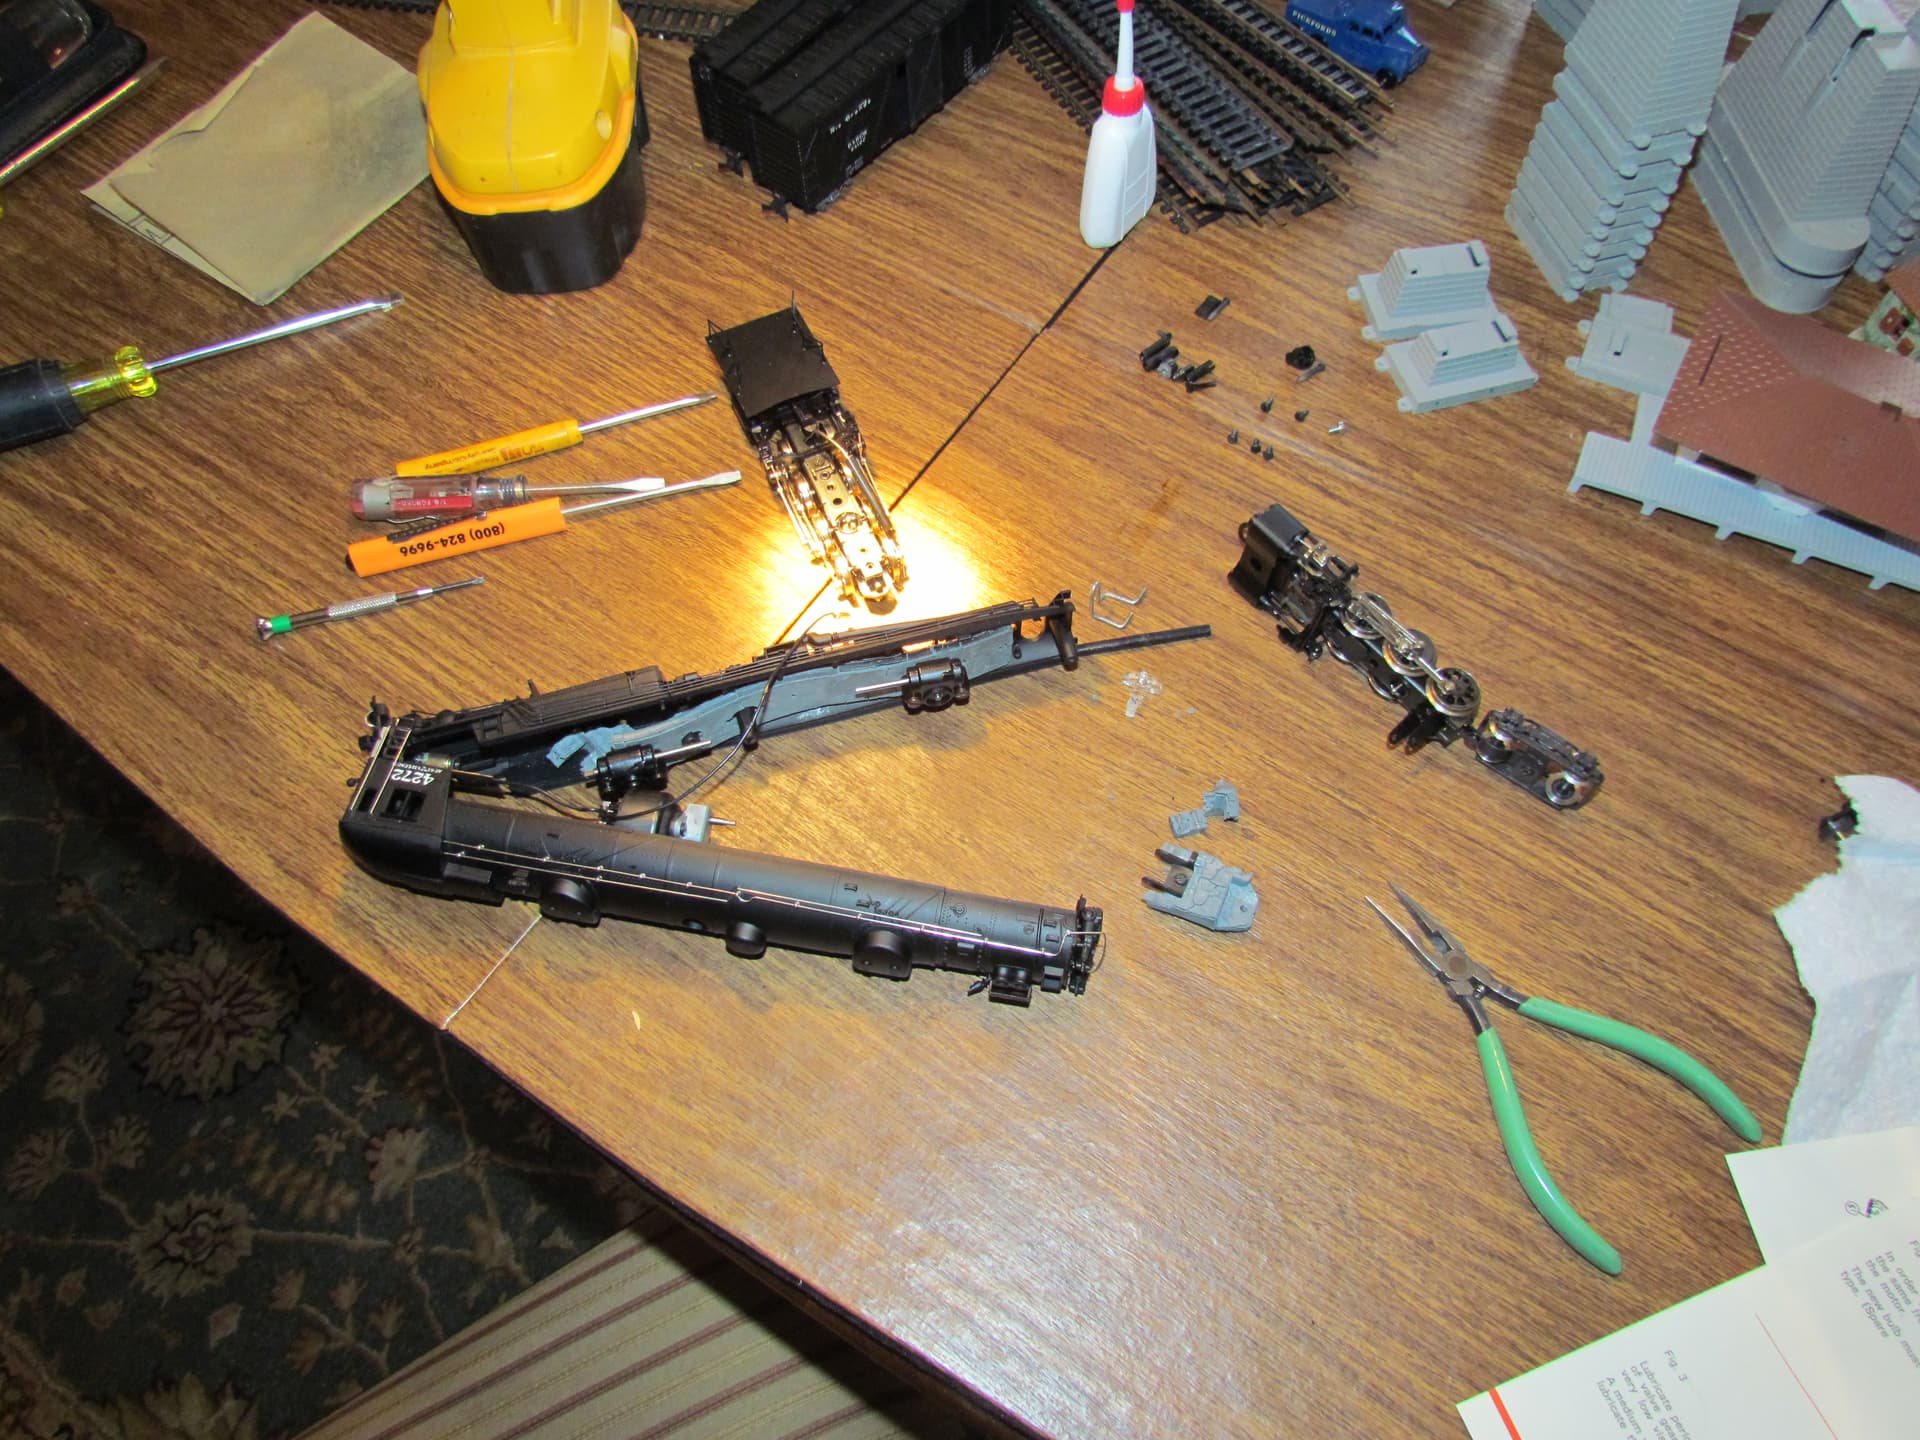
These pictures date from 2017 when I first was thinking about trying to fix it and get it running. Sorry about that.
Everything except the metal weight is in like new, never used condition.
Reading further: the last 4 digits of the part number are actually the price. This part would have been 0275 = $2.75. Today with inflation that would be over $400… if you could find it.
You know, I hate to say this, but there’s a guy in Methuen on eBay selling one of these, shipped, for under $110. Buy it, disassemble it to cast a replacement (or measure dimensions to fabricate something) and put it together again to resell.
Of course there’s some guy with a BLI version sitting at $103, which does you no good at all but will be interesting to watch three days from now when it ends…
I suspect that this would be a fine opportunity to learn the art of Clouser-style resin casting if you don’t know it yet.
I believe Mel Perry has described the situation in detail in some of the references mentioned above.
The ‘weight’ aligns and holds the motors and gearboxes, and aligns the ‘gearbox’ universals in both spacing and height above the two engines. It is a critical component.
A fabricated replacement would need to fit the curve of the bottom boiler shell, position the output shafts of the gearboxes in three dimensions, and support the motors used. This will not be an easy exercise without an original part as a ‘template’ – and that original part has distorted so badly that it could not be used effectively even if all the driveline parts were still installed in ‘factory’ alignment.
From what I’ve seen of Mel’s approach, the only critical ‘control dimension’ is the position of the two universal heads. He moved the drivelines to an angle to fit larger motors and reported no problem with operation or balance, and it might be possible to use something like PC-7 putty to form the curved base part of the ‘weight’ if a flat chassis were made of plastic or brass.
It would be highly useful, no matter what, to have an original Rivarossi part to ‘consult’ or at least use as a pattern and gage. If budget permits, it may be worthwhile to buy a used locomotive with known-good weight, use that weight to cast a replacement in weighted epoxy (or as a reference for other construction), and then either reassemble the used locomotive as a second cab-forward or resell it to recover at least a substantial fraction of the original ‘investment’.
Well, I can agree with Woke_Hoagland’s assessment. I would like to try to duplicate the disintegrated part. It is the only possible way to restore this engine.
Would ANY AHM HO version of the cab forward be the same as mine? Are they all “motor in front”? Would the design of the “motor weight” be consistent through all the years of production?
And of course finding one for sale for parts only at a reasonable price.
Thanks again for all the input.
Some pics of the paperwork included with the AHM Cab Forward for anyone interested:
Oops, still limited to one at a time.