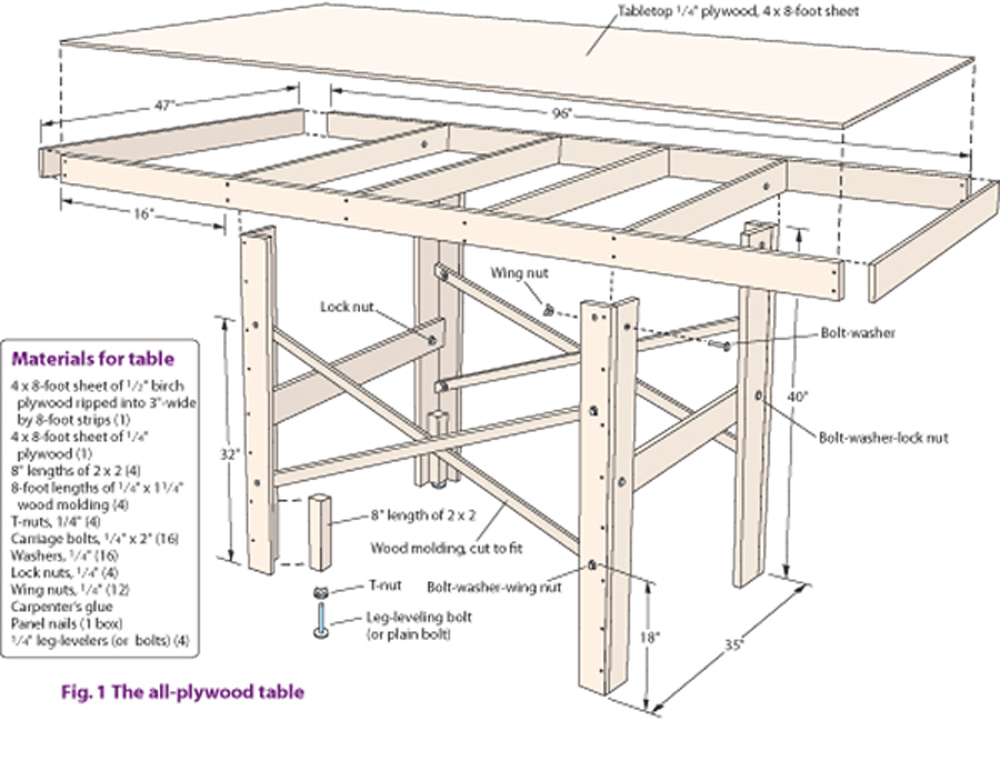
i need to build supports for a layout with cross braced legs (see below). i’m curious how others have assembled them, keeping them square and with the desired width. presumably using some sorta jig
i tried using a bench with back and marks on the side to maintain the width and found that when i flipped it over to do the back brace, it wasn’t square.
i’ll need to make quite a few and would like a simple and quick approach
I’ve built many frames similar to what you’re trying to do. While I’m going with your diagram, and if I’m reading your statement correctly, it seems the legs are not square.
I took your diagram, and added in black marker some supports to keep the legs square. I use 1"x2" pieces of wood and attach them to the frame and each leg. A level is my friend and once you add these, it should help, unless you have other issues.
If your frames are not square, I make one frame with all the cuts and then make cuts from those pieces using a mitre saw (chop saw) so every piece is the same. No jig is needed. Just make all of your cuts first, then assemble.
If I had to change anything in your construction method, I make the legs out of 2"x2" wood (I get them at Home Depot in 8’ lengths). Also, I gather based on you using wing nuts you want to disassemble these sections? Next, I’m not a fan of gluing the sections of wood together and using nails. I would suggest using drywall screws so if need be, you can take them apart. Last, my cross bracing is every 12" for added support because plywood can warp, and, you paint both sides, which I highly recommend…
I’ve built more than a half dozen layouts using my method including a 23’x23’ in the shape of an “E” for a friend. Sturdy as can be, and we had someone lay on it (he weighed more than 250 lbs)
If you need pics of my construction, let me know and I’ll post more…
Neal: wood working screws are superior in strength to drywall screws. You can get them with Philips heads, but being Canadian, I prefer Robertson screws. Robertson uses a square tip driver, and are harder to find in USA.
I’m not so sure about that. I agree with Neal, and I have used drywall screws on all of my layouts. I have often commented that an elephant could stand on my layout, and it would not collapse.
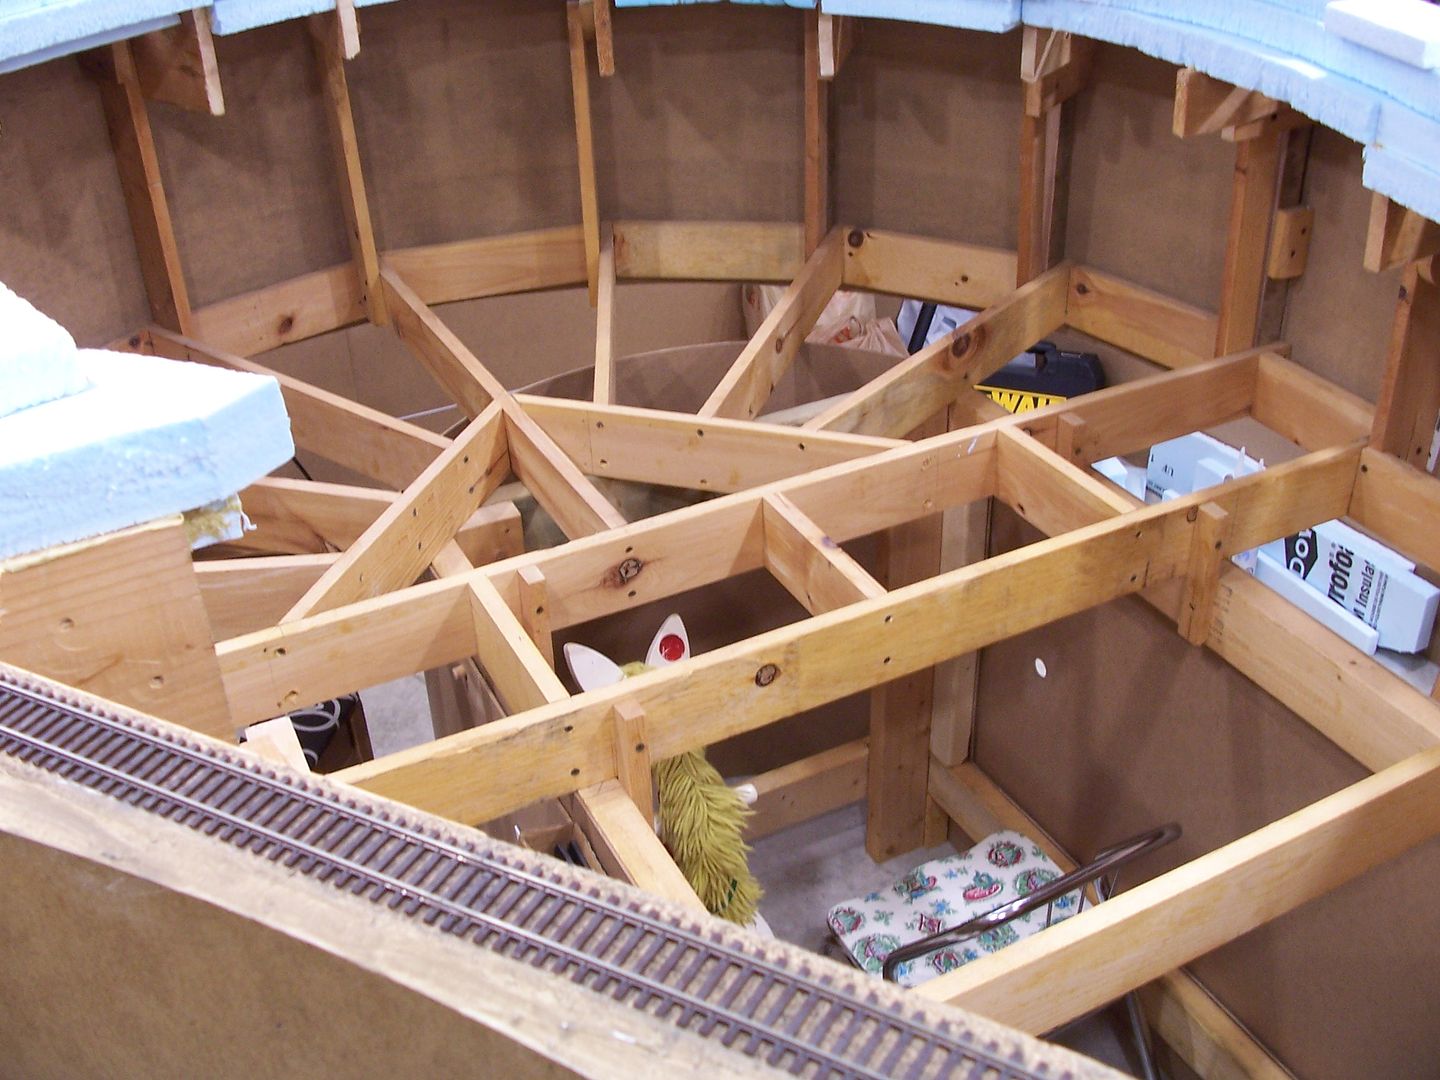
I built my current layout in modular fashion using drywall screws, and I screwed the modules together with drywall screws. I build my layouts with 2x4s, and my cross braces are positioned differently than in greg’s drawing. Here is a photo of one module installed next to my partially demolished prior layout.
Rich
This next photo shows a series of these modules with some of the cross braces yet to be installed and before I screwed the modules together.
Just a note on screws, the black ones are generally drywall and have a very low shear strength and basic construction screws are a golden color where I live and have a much higher shear strength.
I’m going to second the post for 2X2 legs. I also used Simpson bracing components to create a specific moment in the frame corners that eliminates the need for angled bracing. Basically the bracket base wraps the post and a sleave extends along the horizontal member to prevent the frame from wobbling. Before I set up trains on the bench, it supported over 1000 lbs of construction material and equipment. Sometimes I feel the 2x4 benches get a little overbuilt in a manner that makes storing stuff beneath difficult. It’s worth mentioning this since a lot of people have space constraints. It’s really the table that needs to be durable snd stiff so that it doesn’t bend under its own weight
i’m asking about preassembling a support composed of 2 legs and 2 cross pieces. they will need longitudinal cross pieces or gussets when attached to the bench. i need 4+ to get started
i’m guessing that you can use a level to make sure the legs are straight before attaching the cross pieces if already attached to the benchwork
i’m curious about making a jig, even if something temporary on the wall of a garage for rapidly assembling
so far i’ve used some scrap wood that was headed for the fireplace. i’ve ripped some solid and plywood panels to make L-shaped legs and an using slats from oak skids ripped down for cross pieces
^ That’s why I suggested the metal brackets. It will guide, or even automatically align your connection to form near perfect 90 degree corners. They’re designed for decks or floor joists
$5 gets you a steel leg complete with mounting hardware and an adjustable foot for leveling on an uneven surface. Screw them to the underside of your benchtop and you’re done. With the price of lumber these days I don’t think you’d be saving any money by building your own legs, and certainly not saving time
I’m stating the obvious but in carpentry, triangles provide stability while squares and rectangles do not. For your top I would put temporary angle braces on the underside of the grid to hold it square until the plywood is attached to the top. To stabilize the legs you need either angle or cross braces both lengthwise and width wise. The first photo in Rich’s post shows angle braces in the corners that will stabilize the legs.
permanent, but imagine having to shift the layout to access plumbing/electrical in the ceiling. for a 30’ by 32" pennisula. may be different for free standing shelves along walls. looking for lightweight structure supporting foam.
If you have a framing square and some clamps, you should be able to square them up, insert screws or bolts and then remove the clamps. Am I not understanding what is going wrong?
i was hoping to have a jig, i had tried a benchtop where i put the sides in, make sure they line up with marks on either side, screw in the one brace, flip it over, line it up and screw in the 2nd brace.
but i’m doing something wrong and curious what that is
In my old house, my benchwork went right over the input water pipe. The pipe from the city water pipe to my house was rusting and had to be replaced. The city was responsible for the pipe going into the house but I had to remove a section of the layout so they could put the new pipe through the basement wall. I knew I would be moving in a few years and so I never replaced that section. That was the end of my last layout.
Most of my layout’s support structure was done using a carpenter’s square and a lot of 2"x4"s, 4"x4"s and various other 2"-by sizes, amazingly left-over after building my house, most of it put together with suitable wood screws.
There is no diagonal bracing, simply 2"x4" or 4"x4" uprights, joined together front-to-rear with more 2"x4"s top and near the bottom, and at the front and rear, top and again near the bottom, with more 2"x4"s. The rear ones are also attached with wood screws to the wall studs…none of this is going anywhere unless someone has a bulldozer that will fit down the basement steps.
I then made the tabletops to support the roadbed (mostly cut-out 3/4" plywood, on risers). All were open grid, made with clear 1"x4" pine fot the layout’s main level, while the partial upper level used a combination of 1"x4" and 1"x2" clear pine .
The partial upper level is screw-attached to the wall studs, but also supported by welded-together steel angle iron, lag-bolted to the wall studs. It’s sturdy enough that I was able lay atop it to paint the back-side of the rails on the deepest portion, which is about 38" from the wall to the fascia…talk about stuff you wouldn’t want to see on a train layout. [+o(]
Other than the peninsula, shown in the photos above, the under-layout area is about 8" above the floor, with shelving for storage of all sorts of stuff - tools, materials, outdoor furniture, kids’ toys, and model train stuff, too…most of it hidden behind sliding- or lift-off panels.
after some adjustments to my jig and realizing that there’s some springyness to the support, i was able to quickly build 4 supports that all had the required width. not certain about their squareness, but they seem adequate. i think the cross bracing allows them to take a trapzoidal shape, but should be square once they are attached to the bench.
Neal’s suggestion/drawing made me think a bit more about the construction shown in the diagram. in my case, the cross braced legs are across the width of the bench. in the drawing, i wonder why there isn’t similar cross bracing instead of a single board
Yes, construction screws area different steel than drywall screws, but for these purposes either is fine.
I’m not sure I even understand the problem? There is no reliable way to make the legs and braces square (and keep them that way) before the table is applied? If that is what I am reading?
I would never make legs out of plywood strips… surely not 1/2" plywood.
There is so much wrong with the drawing shown, I don’t even know where to start?
Even the best plywood has marginal strength along the edges to build the L legs with screws. 1/2" plywood is not thick enough for any kind of reliable end grain joint with a screw.
Bowing those cross braces around each other is a terrible idea regarding proper adjustement to get the whole thing square.
How square it really needs to be is another question? What is really needed is a level top and “reasonably” perpendicular legs - we are not building the space shuttle here?