The Fastracks point rails needed extra lubrication over the ties and I had Molykote Z on hand, but I think that graphite or Kadee Greas-em would work just fine.
Bibbster, Thanks for the compliment.
Regards, Peter
The Fastracks point rails needed extra lubrication over the ties and I had Molykote Z on hand, but I think that graphite or Kadee Greas-em would work just fine.
Bibbster, Thanks for the compliment.
Regards, Peter
Welcome to the forums.
I agree with Scott, find a textured paint in a rattle can that most nearly matches your ballast. You can still add some ballast to the turnout, but it doesn’t take nearly as much to make it look good.
Good luck,
Richard
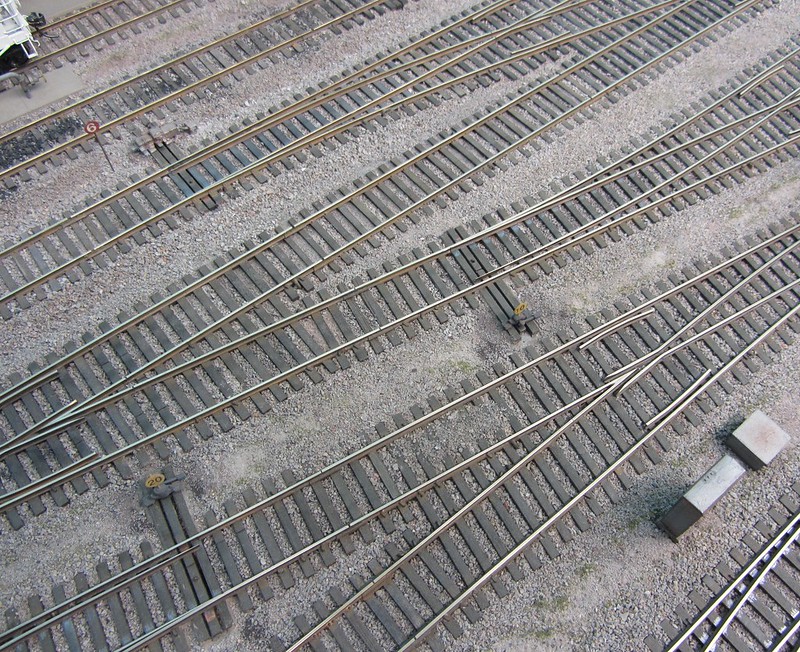
Amazing trackwork, Peter! Is this the mainline or a rail yard?
Thanks Andreas. ISL yard area. All ballast materials and rock powders are Arizona Rock & Mineral Co. products.
Regards, Peter
I’m using their products too (in addition to Scenic Express ballast) - I love to work with them.
Andreas
Andreas,
I’m in awe of your modeling and find your site very inspiring and informative.
I was wondering about Monstermodelworks cracked pavement and yours looks great!
I enjoyed viewing many photos of New York tug & barge operations when planning my carfloat served ISL. Also viewed Tim Warris’s superb trackwork & modeling.
Thanks & regards, Peter
Thank you, Peter. If you like working with the real stuff like wood, plants, and minerals, then MonsterModelWorks products are a great addition. I also use their cobblestone, concrete, and block stone walls extensively and can recommend them. I’m getting off topic now, so will stop here…
Very impressive, sir. Thank you for the additional inspiration!
A thought I had, and I don’t see it mentioned unless I overlooked it, but what about taking a photo of ballast, printing it on cardstock with a color printer, and sliding that under the track? I guess you could even mount it to some balsa that is thick enough to get the photo to the height of the ties and then cut out pieces to fit between the rails. Tedious work but you wouldn’t have to worry about glue and such with a snug press fit.
bibbster:
Thank you for an excellent tutorial on how to safely and properly ballast turnouts.
Dave
Dave, you’re welcome, but it was just an idea I had as I read through the other suggestions.
To add to that, one could theoretically take those same afformentioned photo veneered balsa pieces and glue some ballast on top prior to placing the balsa between the ties. You wouldn’t want to get it to near the edges, but you could add just enough to give it a little texture. I’ve never tried any of that so YMMV.
If you go that route be sure and post pics! My wife and I will have 12 turnouts on our layout so I’ll be giving this a go, but it’ll be a while; we’re still trying to clear out the clutter as we transistion from ‘slot car room’ to ‘railroad room’. lol
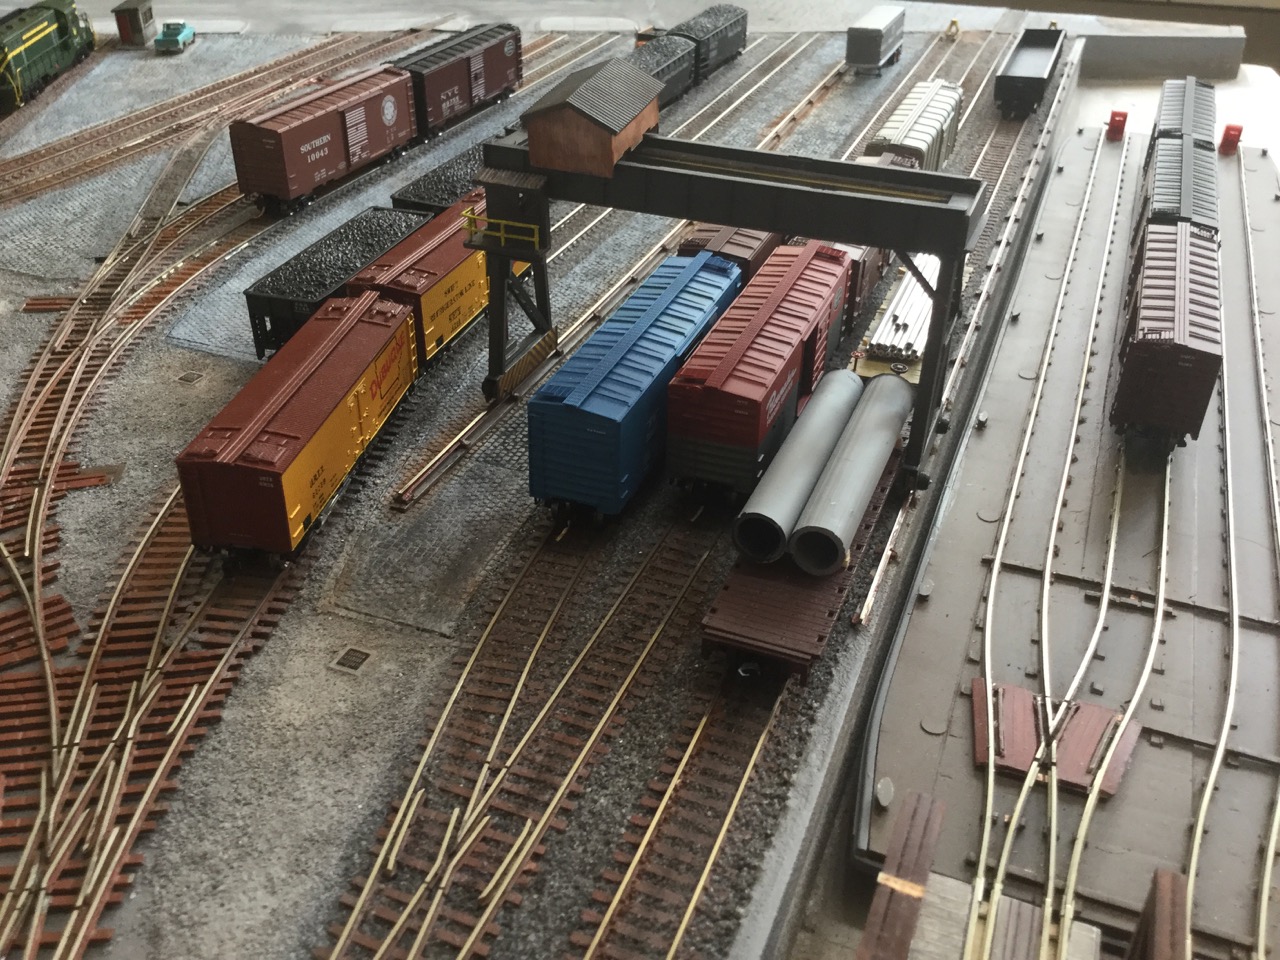
Meanwhile, I have completed the ballasting of my N scale freight yard layout. Here’s a summary of what I did and what I have learned when ballasting hand-laid turnouts and crossovers.
I always worked in small batches – I did one turnout at a time and finished it before proceeding to the next one. In case something goes wrong, you need to focus 100% on that problem and you can’t deal with multiple issues at the same time. I worked carefully and with patience (following Cody Grivno’s advice in his video). I used appropriate tools to apply ballast, isopropyl alcohol, and glue in a very targeted manner (forget the spray bottle!). I always started with the outside of the turnouts, working towards the center. By doing the shoulders first the more delicate parts of the switch get walled off from wandering glue. Perhaps even more critical than controlling the flow of PVA glue is the controlling of the isopropyl alcohol as it acts as a fluxing agent to the glue. The smaller the amount of isopropyl alcohol and diluted PVA glue that your tools can apply, the better. I switched from my syringe to a pipette as it allowed me to better control the amount of alcohol and glue.
I covered painter’s tape to cover the throw-bar and the hinges of the turnout, but only while adding ballast. As soon as began to apply alcohol I removed the tape. You need to see where the stuff flows and you need to be able to step in immediately when alcohol or glue spreads where it shouldn’t! I used a cotton swab and a micro brush to absorb glue and to clean ties and rails that should stay dry.
For the outside of the turnouts and the area between turnouts, I always followed the sequence ballast-alcohol-glue. For ballasting the inside between the rail and ties I switched to the glue-ballast sequence. The amount of ballast that will stick to the roadbed is smaller but that’s okay – it matches the prototype.
After the ballasting procedure, I cl
[quote user=“UES Nscaler”]
Meanwhile, I have completed the ballasting of my N scale freight yard layout. Here’s a summary of what I did and what I have learned when ballasting hand-laid turnouts and crossovers.
I always worked in small batches – I did one turnout at a time and finished it before proceeding to the next one. In case something goes wrong, you need to focus 100% on that problem and you can’t deal with multiple issues at the same time. I worked carefully and with patience (following Cody Grivno’s advice in his video). I used appropriate tools to apply ballast, isopropyl alcohol, and glue in a very targeted manner (forget the spray bottle!). I always started with the outside of the turnouts, working towards the center. By doing the shoulders first the more delicate parts of the switch get walled off from wandering glue. Perhaps even more critical than controlling the flow of PVA glue is the controlling of the isopropyl alcohol as it acts as a fluxing agent to the glue. The smaller the amount of isopropyl alcohol and diluted PVA glue that your tools can apply, the better. I switched from my syringe to a pipette as it allowed me to better control the amount of alcohol and glue.
I covered painter’s tape to cover the throw-bar and the hinges of the turnout, but only while adding ballast. As soon as began to apply alcohol I removed the tape. You need to see where the stuff flows and you need to be able to step in immediately when alcohol or glue spreads where it shouldn’t! I used a cotton swab and a micro brush to absorb glue and to clean ties and rails that should stay dry.
For the outside of the turnouts and the area between turnouts, I always followed the sequence ballast-alcohol-glue. For ballasting the inside between the rail and ties I switched to the glue-ballast sequence. The amount of ballast that will stick to the roadbed is smaller but that’s okay – it matches the prototype.
Thanks, Peter, for your great help. There’s actually one more reason for using Kadee Greas’em graphite sparingly. Every single particle of graphite that ended up on the ballast instead of the PCB tie was very well visible. The little crystals reflect the light in a very irritating (polarized?) way. Better to mask everything that should not get graphite before applying it.
Andreas
Andreas, de nada. I know what you mean about the unnatural shine of the graphite, especially in places where it’s been burnished, and quite noticeable in photos too. The same is true of Molykote Z.
Regards, Peter
Hi,
I know this is late but might be useful to tuck away for a future build. I have mixed dry, powdered wood glue with my ballast. Laid the ballast where I needed it and cleaned off the surplus. After I was sure that everything was working and clear, I misted it with wet water, thus setting the glue. This solution is virtually permanent but works. The glue is a powdered resin wood glue made by a variety of manufacturers.
Anyway, my 1 cents worth.
I just spray them with WD40. Never had a problem.
Sounds like a very smart approach to ballasting critical parts of track. How long does it take to cure?
Andreas
Wow - an N scale version of Bronx Terminal? That is absolutely amazing. I was blown away by the custom trackwork Tim Warris did for an HO version, but to do it in N scale - holy cow! Amazing stuff.
–Randy
Thanks, Randy. Besides building the CNJ Bronx Terminal in HO, Tim Warris also demonstrated that N scale is feasible with his method and tools. His N scale sections are in Code 40, though. I built mine with Code 55 which made it a bit easier.
Andreas