while i am building Southern Pacific SD39’s, you can use this info to build SD39’s from any railroad.
looks like it’s time to get off my butt and start another major project. all these SD39 parts have been taking up too much space on my workbench for too long now.
so, lets first start off with a parts list:
Life-Like P2K SD45 walkway (or the entire locomotive if you want to use the P2K drive)
Kato SD40 shell for the dynamic brake section (or the whole loco if you want a Kato drive)
High-Tech details SD39 sides
If you are doing an early unit, you can use the L window cab front with the Cannon cab, if you want to do a later unit, you will need the rebuilt L window cab front from High-Tech.
Cannon & Company parts:
HN-1103 81" short hood
TC-1502 EMD 35/40 series cab
SB-1201 35/40 series cab sub base
SB-1203 SP split equipment doors (depends on the unit you decide to do)
FH-1353 Internal filter hatches
HD-1008 generator comp. door and plate
TH-1952 EMD turbo hatch
DF-1853 thinwall EMD dynamic fans
RF-1704 EMD radiator fans
HE-1152 EMD 40 series hood ends
FS-1303 internal filter screens
BH-1602 EMD blower housing
HD-1001 hood doors 18x78
HD-1002 hood doors 18x78
HD-1003 hood doors 22x65
HD-1004 hood doors 22x65
HD-1007 hood doors 16 and 17x65
RG-1409 farr radiator grills
HR-1751 emd blank roof stock
other parts:
Detail Associates (DA) SY2217 fan grab
Details West (DW) HB177 brake wheel and gear box.
Sunrise Enterprises H-114 and H-113 for an as delivered unit, or SRE H-112 and H-119 or H-120 for rebuilt units.
then you need drop grabs, straight grabs and lift rings form any manufacturer. I dont know what kind of plow or horn you need yet. hopefully someone can tell me which ones.
there are some other detail parts that you need but we will get to those later on bec
I have discovered one thing, it is going to me MUCH easier to use the Kato chassis and drives. if you want to use the P2K drives, you will either have to completely remove the weight, or do a whole lot of cutting and milling to get it the right length.
now i gotta go buy me another Kato SD40…
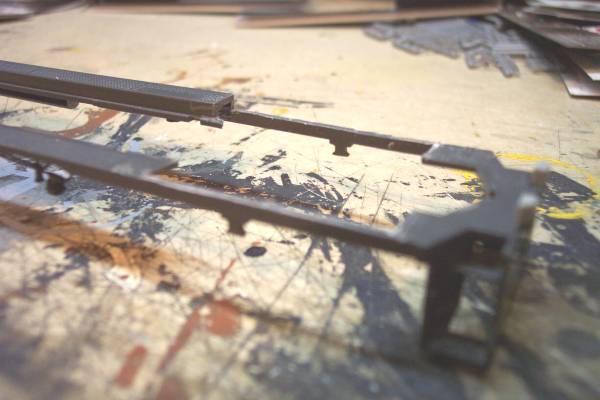
I did get a little work done on the walkways. I cut off the cab base and the small section of the raised walkway. then I added .040" evergreen styrene to fill in the gaps at the front and the rear of the locomotive. first is a shot of the walkway with all the junk cut off:
and here is a shot of the walkway with the styrene added:
I just placed the walkway upside down on the styrene sheet, then traced out what i needed to cut. after cutting i glued the pieces in and let them dry. you will still need to trim a little of the styrene away to clear the truck gear towers. I havent done that yet.
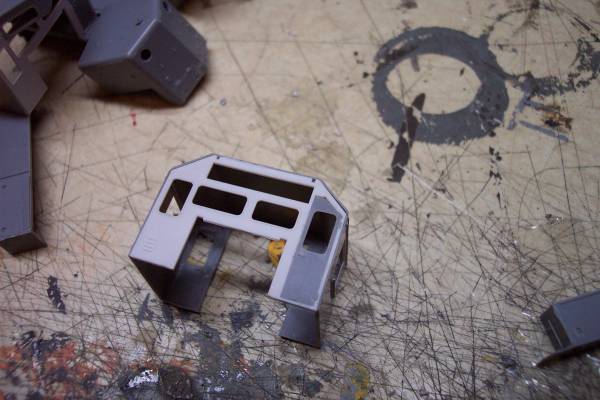
and here is a shot of the Cannon cab with the High-Tech “used to be” L window cab front.
and finally a test fit of most of the parts:
everything seems to be going together really well so far. now i get to chop a hole in the nose for the SP light package. it looks like the hardest part of this project is going to be cutting out the Kato SD40 DB section and getting it to fit on the locomotive. it would be much easier if i had a milling machine, but it looks like it’s going to be a lot more cutting and filing for me.
anyone have a milling machine i can use?[:D]
I have decided to model SP 5300, SP 5316, and SP 5318 as they appeared in the mid 1990’s. 5300 and 5316 have the regular doors on the sub base and th
As I always I enjoy looking at your craftsmanship.
Question: I notice that your cuts and edges are exceptionally neat! I’m kitbashing myself, and am always looking for ways to improve my craftsmanship.
Which cutting and shaping tools are you using that give you those incredibly clean edges in the photos above? I’m sure rotoray blades and hand files are involved, but could you give us types, sizes, and even brand names, please.
actually, all my cuts are done with an x-acto knife and a #11 blade[:D] then i break out the files to shave down the rough spots. for the sheet styrene u use a straight edge like a scale ruler, but cuttign off the parts from the walkway, i just cut freehand. as long as you already have lines molded into the parts, cuttung straight lines is pretty easy.
y’all need to jump in and start a kitbashing project. just 1 year ago i thought i could never do anything like this. all it took was just jumping in on a project to see what would happen. you might mess up one or two, but they are easy to fix with putty and styrene[:D][:D]. the first project i did was adding some flared radiators to some SD70M’s. they turned out pretty bad. but since then it has gotten much easier. the only other kitbashes i did was those 5 SD40T-2’s, a BN GP39E (ex SOU GP30 with a regular EMD cab added) and those 4 new SD70M’s with the flared radiators and new cabs.
If i ever get these 3 SD39’s done, my next project will be scratchbuilding 2 SP TEBU’s(tractive effort booster units)(kinda like a slug). they sit on U25B chassis, but the body will have to be completely scratchbuilt out of styrene.
SO BEAK OUT THE KNIFE AND GET TO HACKING!!! [:D][:D]
What a great project, I’m curious, are the sd-38 and sd-39 similar. I’m not that familar with the Sd-39.
As a missabe fan I have built a couple Sd-38’s from rail power shells and I have to agree they are my favorite projects to date.