This sow’s ear came to me for little to no money. It’s a Bachmann 0-6-0 steam switcher with a slopeback tender. It had been equipped for DCC and decaled for the Boston & Maine.
I got it running again on plain old DC.
So now, what all should I do to this sow’s ear to make it into a silk purse? So far I want to put in a constant brightness headlamp, fix the crumpled foot boards, paint, add an engineer and fireman, put jewels in the tender class lamps, or remove them. Did steam switchers carry class lamps? I have some photos that show they didn’t. Also do something about the backup lamp on the tender to make it look more lamp like.
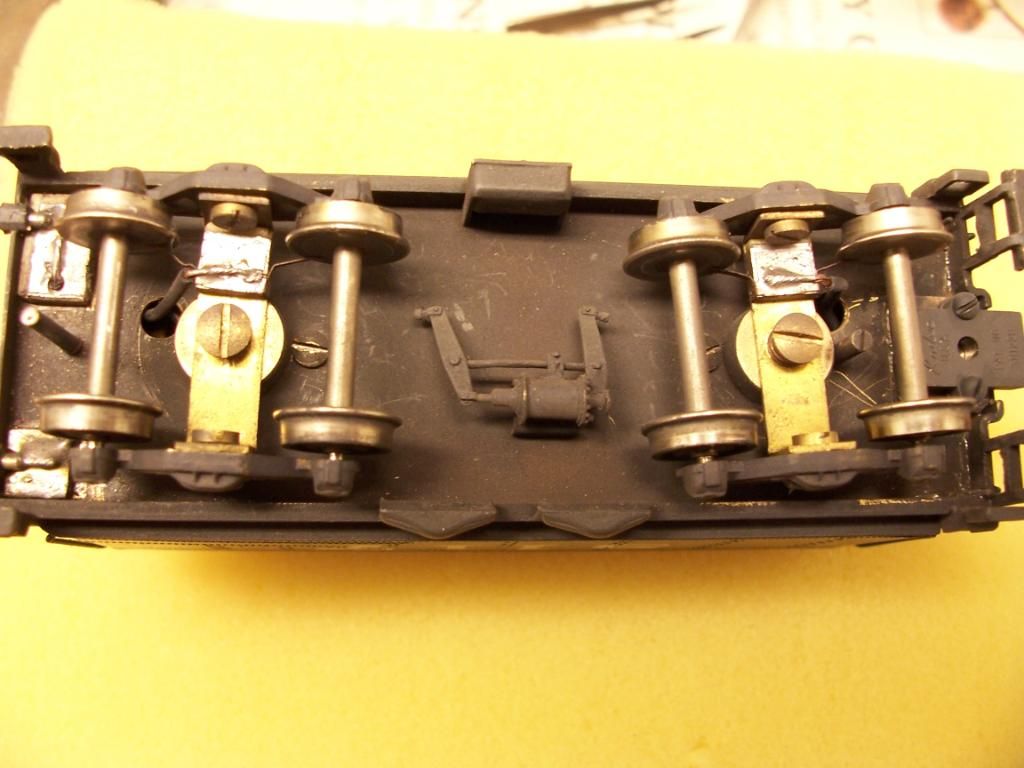
Fix the tender body onto the chassis. Replace the cast plastic handrail with brass wire.
What else?
I wanted a B&M steam switcher for working sidings in Lisbon. This fellow turned up and the price was right (free). I have a few photos of B&M steam switchers, some even with slope back tenders, so this isn’t a fantasy project. Although the pix showed locomotive numbers in the 400 series rather than 200 Some internet searching shows that it is still in production with a street price in around $50.
The first thing I would do is get the tender straightened out. Then get it running smoothly and add weight if you can. Once it is running really good, then start on the cosmetic changes. If you can’t get it running really good, there is not much point in making all the other changes. You would be just wasting your time and money.
I’d also correct the stance of the boiler - from the photos it looks like a submarine in the process of a emergency dive, that tender needs some serious attention, if you can make it mechanically sound it might justify cosmetic upgrades or you could banish that tender to the scrap line as scenery, rust and ding it up a bit and locate a suitable replacement!
On the SP-my road of choice, any power operating outside yard limits had to have classification lights, hence a large percentage of SP steam switchers were equipped with brackets and junction boxes for just such an occasion, when not in use they stowed away in a storage locker on the tender.
Sounds like a fun project. As long as you don’t have to get too much invested in it other than your time, go for it. Even if in the end it looks a little rough, late in the steam era, in a small yard like I presume Lisbon’s would have been, I doubt the loco would have been one of B&M’s premier switchers.
I have no history with this engine, but it seems to me the entire engine shell is tilted upward at the back, the cab end. Perhaps it is not seated properly, or has been modified to accept a different weight or motor, maybe both. Or, the frame is bent somehow. It has the stance of a funny car.
The general detail on the engine and tender seems OK, so this sort of project has the potential for providing a lot of fun, or at least a lot of learning!
Depending on your minimum radius (and once the various other flaws such as listing tender and bronco bucking boiler shell are dealt with) I would try to reduce the gap between locomotive and tender, and perhaps even add the apron - or an approximation - between cab and tender decks. That can go a long way in reducing the toy like aspect of this model and any other train set steam locomtoive, and are things that can probably be done with stuff on hand without investing more money. There is nothing to be done, I assume, about the bulky box below the frame that I assume holds a gear train. But adding some of the under-cab piping and hoses and such might help distract the eye, particularly if they are weathered. Another nice bit of detail might be brake shoes for the drivers.
Chemically blackening the sides of the shiny drivers would also help improve the appearance. A lighter darkening (I can’t believe I just wrote that [^o)] on the drive rods would also downplay the trainset look. Micro Engineering and others sell a chemical patina liquid.
Finding a small but conventional (rather than slope-back) tender would really change the appearance of the engine. You might see the USRA style tender from the old AHM/Rivarossi 0-6-0 at a swap meet for example. If you get really ambitious a different cab could make the engine look entirely different. Years of buying junkers at swap meets created a whole box of “steam parts” that I used to dip into regularly, before I changed eras from transition to late 1960s.
Hmm. Since the drawbar connection on the locomotive end seems to have vanished, I have to do something. How closely did the prototype couple tenders? One foot? 3 feet? I have 22 inch mainline curves and # 4 turnouts on sidings, so I expect an 0-6-0 to be able to negotiate my track work handily. Could I get away with making an apron from just plain styrene sheet (which I have), or does an apron really demand non-skid “steel” sheet (which I would have to order)?
This locomotive picks up current with drivers from both rails. So I don’t have to bring power from the tender up the drawbar. Previous owner did something to the tender trucks, they have axle wipers for current pickup, but the wheels are plastic. Somewhat non-functional. The locomotive has a split frame/ballast/electrical bus that starts just about the railheads and goes right up to the top of the boiler. That accounts for the bulky box below the frame. It’s concealing the frame/ballast assembly. It’s reasonably effective, the locomotive feels heavy enough. I suppose I should weigh it to see how heavy it really is.
First job is a constant brightness headlamp. I picked up a four diode bridge at Radio Shack for same yesterday. I suppose I should bring some wires back to the tender and make the tender mounted backup light illuminate too. Unless I change the tender.
Speaking of which, I sort of like slope back tenders. A slope back tender with a working backup lamp would be nice. I have a photo of a B&M 0-6-0 with a slope back tender so it isn’t a pure fantasy locomotive.
On that Bachmann model tender has a post on the end of the drawbar that hooks under the back of the cab. When the loco shell is straight it will be obvious. Also that model 0-6-0 has a bad habit of cracking axle sleeves.
Since you appear set on slope back tender, might I suggest you locate one made by Roundhouse, you should be able to locate a good used one without too much effort, this of course is dependent on how sucessful you are in restoring the existing. As to the tender apron, Sheet styrene should suffice, who’s going to notice the raised tread detail is missing? I would of course only attend to this bit of detail once I have the drawbar arraignment worked out and you have some numbers to work with. Personally, I have issues with steam locomotives displaying headlights, didn’t happen in the era I model, except after dark, but that’s just me being the proto-police!
You will probably have to mock up several drawbars to see what works best with your curves and turnouts, wish I had a magic bullet answer for you on this one. I’m with the poster who suggested detailing the firebox area to hide that box, you could then disguise that tender wiring as piping.
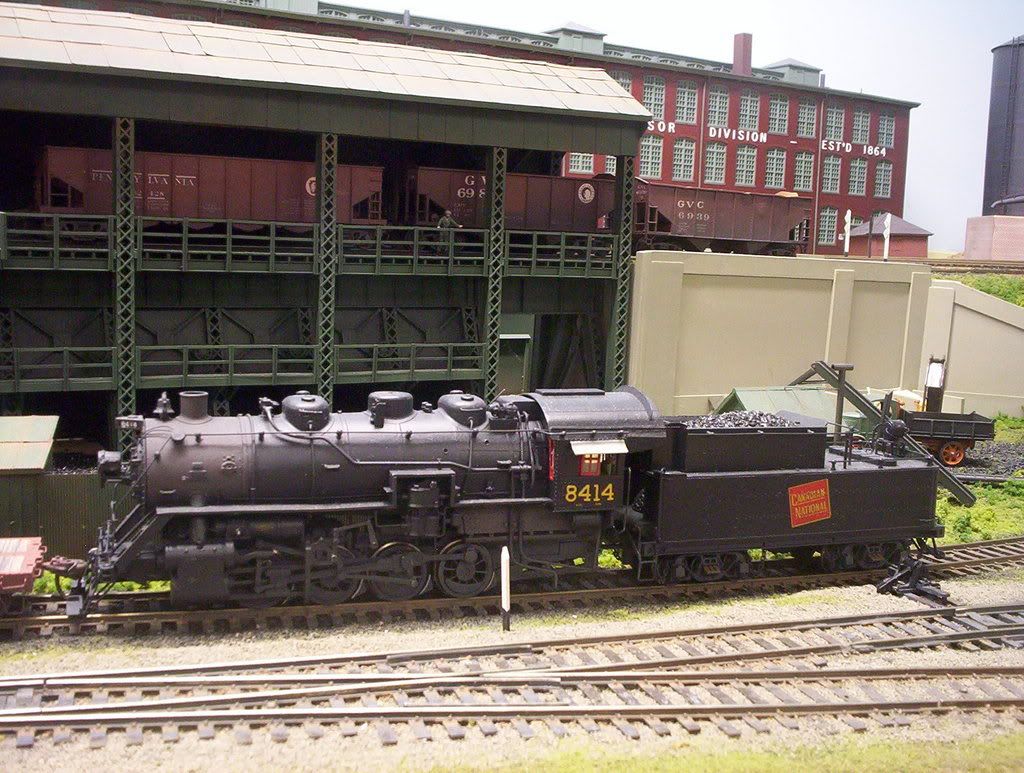
The project is still on the workbench, but we have some progress. I got the constant brightness headlamp working, added some piping under the boiler walks to make it look wider and lower, did some wire handrails on the tender and the cab.
It still needs paint, and at this point it needs new foorboards on the pilot. Warping a Kadee #34 onto the pilot was the last straw, one foot board broke clean off. We are ready for the paint shop. That might happen today it the weather stays good. My spray booth is the railing on my porch, so rain and precip rule out spray painting. I’ll do my usual, a fine coat of dark gray auto primer. I have the boiler shell off, so all I have to mask is the headlamp. And maybe the gold plated bell. The marker lamps are coming off the tender, 'cause I failed to find a single B&M photo of marker maps on a slope back tender.
The old girl certainly looks much better, but I’m wondering why you’d want to spray paint the entire loco, or, if there’s a good reason, why you don’t first simply brush-paint the new details. I would also brush paint the valve gear, siderods, and driver tires.
While your loco is designed to run without electrical assistance from the tender, adding tender pick-up is not too difficult, although you will need insulated metal wheelsets or new trucks equipped with them. I added all-wheel pick-up to a couple of brass steam switchers for a friend, and they’re impossible to stall if there are a couple of wheels on the rails. I also added quite a bit of weight to the tenders, but both locos were quite heavy and could handle the extra load. For your Bachmann loco, a couple of ounces should help to maintain good contact with the track without affecting the pulling ability too much.
If your soldering abilities are reasonable, Detail Associates offer brass bar in various dimensions and you could make-up a set of footboards fairly easily: I detailed mine, for this Proto 0-8-0, to follow CNR practices:
Paint is dark auto primer from a rattle can. Decals are Bishop Graphics, applied right onto the auto primer, no gloss coat. Solvaset to make 'em snuggle down, and DullCote to hide the gloss of the decal film. The 432 number was used by the B&M on a newer 0-6-0 switcher. The 200 series numbers were used on older 0-6-0’s with slide valves. Notice the extra gloss on the cylinders, that’s 'cause only the boiler shell got painted. To keep paint out of moving parts the chassis didn’t get painted at all. The “brass” fittings,. whistle, pop valves and bell got masked before painting because they look so nice in polished brass. All my B&M photos of 0-6-0’s show bell, whistle, and pop valves the same sooty black as the boiler. But heh, it’s my railroad, and I like brass trim.
I like doing such projects, a basket case to one, is another’s prize model.
Rather than re-plate the rods, I would just tone the shiny with some gray paint, a bit of black on the ends where the lube would have splattered. Weathering can be easily overdone, I creep up on the desired effect with very light passes of the airbrush, and even lighter passes with chalks.
Overall, it looks good.
To answer the distance between engine and tender is just far enough! The prototype used dual drawbars, as well as safety chains a deckplate covered the open area between the two. As a wild guess, I would say a scale foot to 18 inches.