What dimension cleats do you guys use to attach your subroadbed to your risers when using open-grid benchwor? When I try to drill my cleats to attach to the risers they split in half. Should I drill pilot holes? Or, should I use thicker dimensions for my cleats? What dimension do other people use that works for them?
Use #6 wood screws and be sure to keep the screw at least 1 inch from the ends of your cleats to help avoid splitting. You may still need to drill a pilot hole though. You can pick up a bit holder that will drill apilot and a countersink for the screw head in one operation.
There are self tapping screws that work except for some pine and cedar. Pilot holes should not be needed, though you will spit a few no mater what you do. I use self tappimg flanged head screws designed for attaching drawer fronts but they can be hard to find. Regular screws that are tapered will split pine unless you use a counter sink. The taper will cause the split. Sheet metal screws with a flat bottom will be better.
After struggling many times with the splitting of wooden cleats I have used metal cleats for years.
I make the cleats from 1 x 1 x 1/8 aluminum angle. Drill holes in each leg to match the width of the riser and easily cut with a hacksaw to a length which matches the roadbed width. I use #6 x 1/2 screws to fasten cleats to risers and roadbed after using an awl to poke a starter hole. I pre-assemble a batch of the cleats to the risers usually with a dab of yellow glue for security and then cut the risers to the correct length after determining their position.
I’m respectfully going to disagree with Art on this one. I build spline roadbed that must be supported by risers. I used clear spruce 3/4"X2" cut to length, and I piloted every single screw hole. I learned fast that I could go pay for, and cut, more wood or I could do it the right way. I simply got used to piloting holes into the spline, using a head-sinking bit to recess the screw head when that last step was taken, and I piloted the hole that the screw would enter atop the risers. I also piloted the screw holes for the 1.5" screws that I used to fasten the risers, themselves, into position on the joists.
It meant more work, but far fewer repetitions and errors. Kept my costs down, too.
As to the question of the width, it depends on the subroadbed. If you will have triple mains on that roadbed, you will need wide enough risers to stabilize it. If it is a single track, and the roadbed is, say, 2" wide, maybe 3", then your risers need be no wider than 2-3". However, and once again, it depends on your scenery type and how it is anchored. In some instances I needed brackets fashioned out of scrap wood, and it made sense to use wider risers in some cases so that secondary risers could support thin brackets on which to hot glue the aluminum window screening I needed as a base for my J. Fugate’s goop.
You’ll very quickly figure it all out as you go along. Just always think two steps ahead so that you don’t paint yourself into a corner.
I would drill even though you find the small pine cleat doesn’t split. Over time, and as the wood continues to dry the possibility of splitting is greater. Do use a decent quality of wood. Many like the properties of poplar just for this. I prefer soft pine. Using one of the reversable phillips bit and pilot drill/ countersinks make life much easier. They are found under the name of Stanley, Makita, Dewalt and Bosch in a 3 and 4 set for #6,8,10 and/ or 12. I will allow at least an inch or so of riser to extend beyond the subroadbed or spline. This aids in scenery attachment or mounting any bases for trackside buildings.
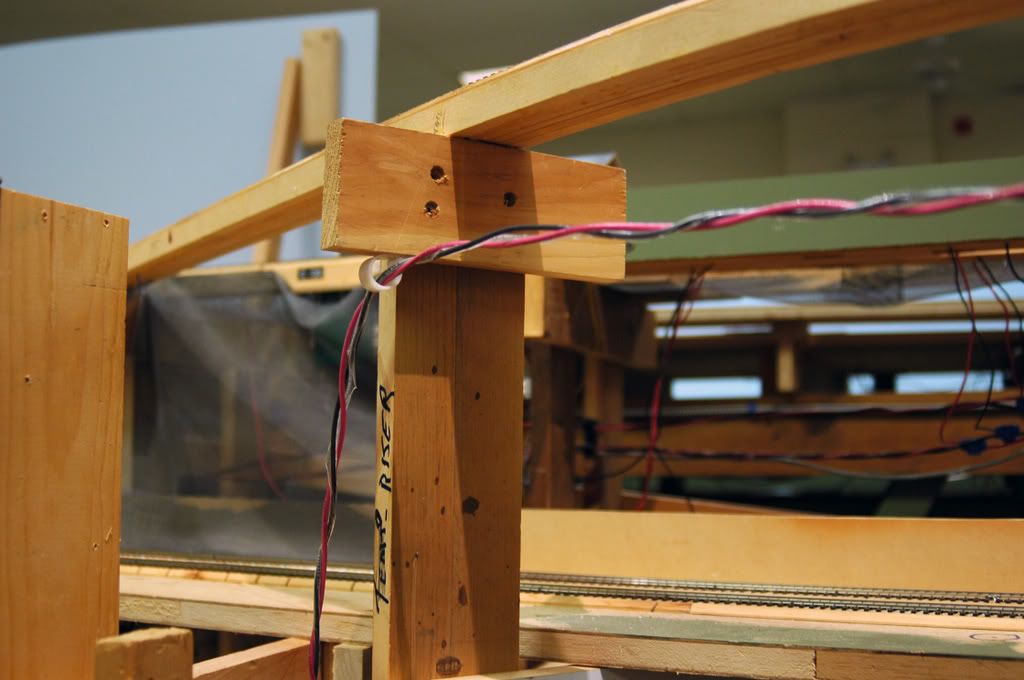
This was just posted in another thread on buss wiring, but shows the use of pine cleats
A good portion of this wood is scrap clear pine I always have left from finish work, the club can always find a home for anything I drop off.
You can see how well the countersink works. This may appear to be way overkill, but much of the stock is on hand.
I use 1x1 cleats (usually marked as “trim” pieces) cut to length. Risers are 1x2, either single or pairs, depending on length. 1-1/4" x 8 wood screws into the risers with an all-in-one bit hole drilled first. Screws into the 1/2" plywood subroadbed are 1" x 8. I use clamps to hold the risers until the plywood is just right. Then, drill and screw (the plywood from underneath).
My experience is that unless using the correct size all-in-one bit (countersink, body, and pilot bit), I will end up splitting a lot of pine pieces - 1x2s are actually the worst in my experience.
I don’t use cleats at all. I simply bend the tops of my risers 90 degrees, predrill the holes for screws that will secure the roadbed, then clamp the riser to the joist and drill buttonhead framing screws through both - no pre-drilling necessary.
Of course, my risers are pieces of steel stud material, not wood. So, for that matter, is the rest of my benchwork. Sure simplifies my life!
Like selector, I use spruce lumber, not pine for benchwork, risers, cleats etc although I use construction grade not clear. Pine would be more costly, not as strong and more likely to split I would think.
Other than that, I sure am glad that the Robertson screw has revolutionized woodworking etc. in Canada. No offence but Phillips screws are garbage. Just my [2c]
[quote]
The legend goes like this: Sometime around the turn of the century, Peter Lymburner Robertson was setting up a street booth from which he planned to sell tools, when the slot-headed screwdriver he was using slipped out of the screw head and slashed open his hand. “There must be a better way,” he mumbled to himself before vowing then and there, the story goes, to create the ultimate driver.
Okay, okay, the tale may sound a little corny, but P. L. Robertson did indeed patent his square-headed driver and screw system in 1908. And not long after, the Fisher Body Company (famous for constructing the Ford Model T) decided to use his invention in its production line. The rest, as they say, is history.
Robertson’s colour-coded screwdrivers—green, red and black from smallest to largest-and square-headed screws have grown to dominate the Canadian fastening market: Fully 85% of the screws sold in Canada use the Robertson head. And after a mere 90 years of production, our American cousins are finally keying onto the fact that Robertso
Steel studs. Interesting. I can see where they would be useful for risers/cleats but I don’t think I would like building benchwork with steel studs. [?]
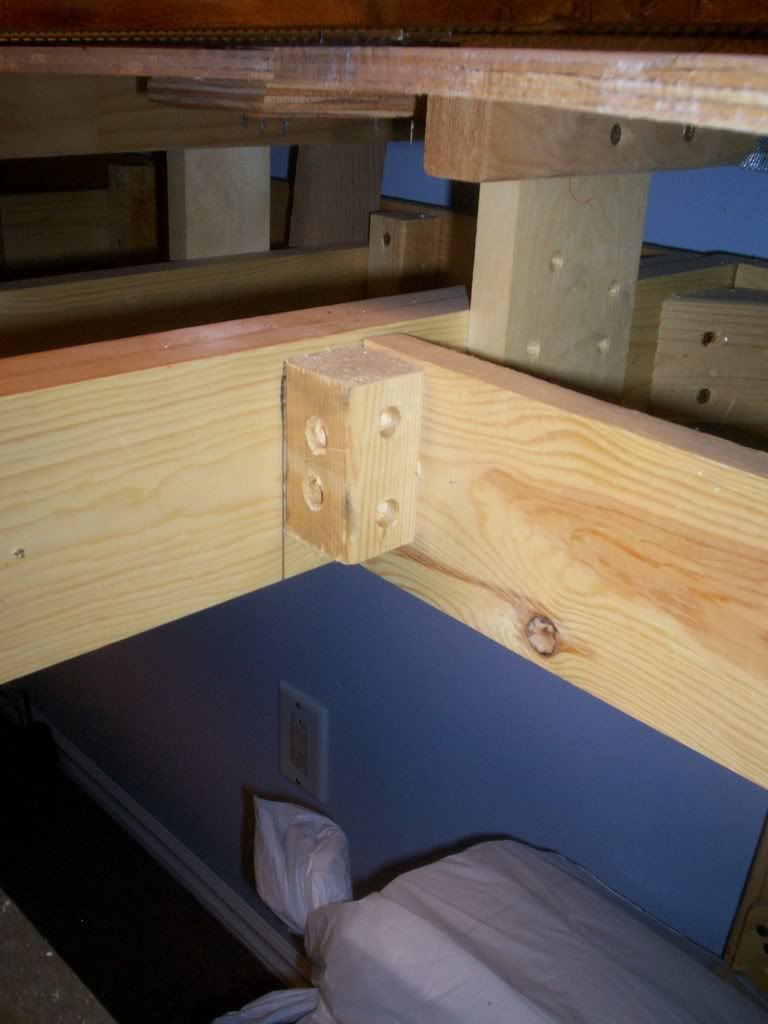
I use various size wood for differnt tasks, all drilled with a countersink drill, all braces, risers, cleates, 45 degree corner stiffiners can be removed, adjusted, or installed from the isle side of the layout, (no screws to the wall side when built) . The 1 and 2x2 blocks are drilled in a vise from two sides. All screws are dry wall type of various lenghts, make this task cheep, quick and strong. Hope the pic helps…John
As a finish carpenter I would recommend the use of a med. hardwood for small blocks as these. Maple, poplar, ash or birch would be perfect in this case. These small fastener blocks are used quite extensivly in cabinet interiors. I find birch or poplar to be my choice. These medium hardwoods have a very tight clean grain and resist splitting. Good clear pine as shown works well in most cases, just throwing this out there for added info for strength of joint and resistance to splits.
I use 1x2, preferably a better grade than the standard stuff from Home Depot, although that will work if it’s all I’ve got. I pre-drill the holes, and then use drywall screws. I use Liquid Nails between the cleat and riser, and then I only use 1 screw per connection.
I use 1x1 for cleates and 1x2 to support the cleat. I pilot drill all holes, and follow with countersink. I use dry wall screws. All seems happy with the results!
The non-threaded top part of the shank is important for pulling the pieces together. Someone at the club tried self-tapping dry wall/ decking type screws (threaded all the way to the head). What a mess. They only worked when the pieces were clamped so they couldn’t pull appart while the dry wall screw went into the second piece. The only thing they are used for anymore is attaching homosote to the sub-roadbed.