Hi all, I’m really into (obsessed) with getting a nice set of HO scale passenger cars. I already have a new Kato Superliner set so looking for something older like santa fe super chief. And I’m all about modeled interiors and lighting.
Anyway my question is: does anyone try simple DIY interior lighting ideas? I’m a newbie but I know basic eletric and have done cool projects with LEDs. My first though its some simple LEDs connected to a small battery with a switch accessible from the outside. I guess I’ve gotta get the exterior cover off first to install the lights.
Dumb idea? I keep thinking about different ways to do this - taking an unlit passenger car and making it light up
Much of my passenger roster is the Walthers Proto cars. These are designed pretty well with the electrical pickup. early-on I was using their lighting inserts. At first they had one for the lightweight cars and another for the heavyweights.
They used three, 5 volt incandescent bulbs. Lately, though, I have been installing my own “keep alive” lighting and, for me anyway, it is cheap, easy and the “stay alive” gives me flicker-free lighting. Later Walthers lighting kits are LEDs but you can do a lot better for a lot cheaper once you get the hang of it.
There are several threads about passenger car lighting so I’ll try to find those and update my reply.
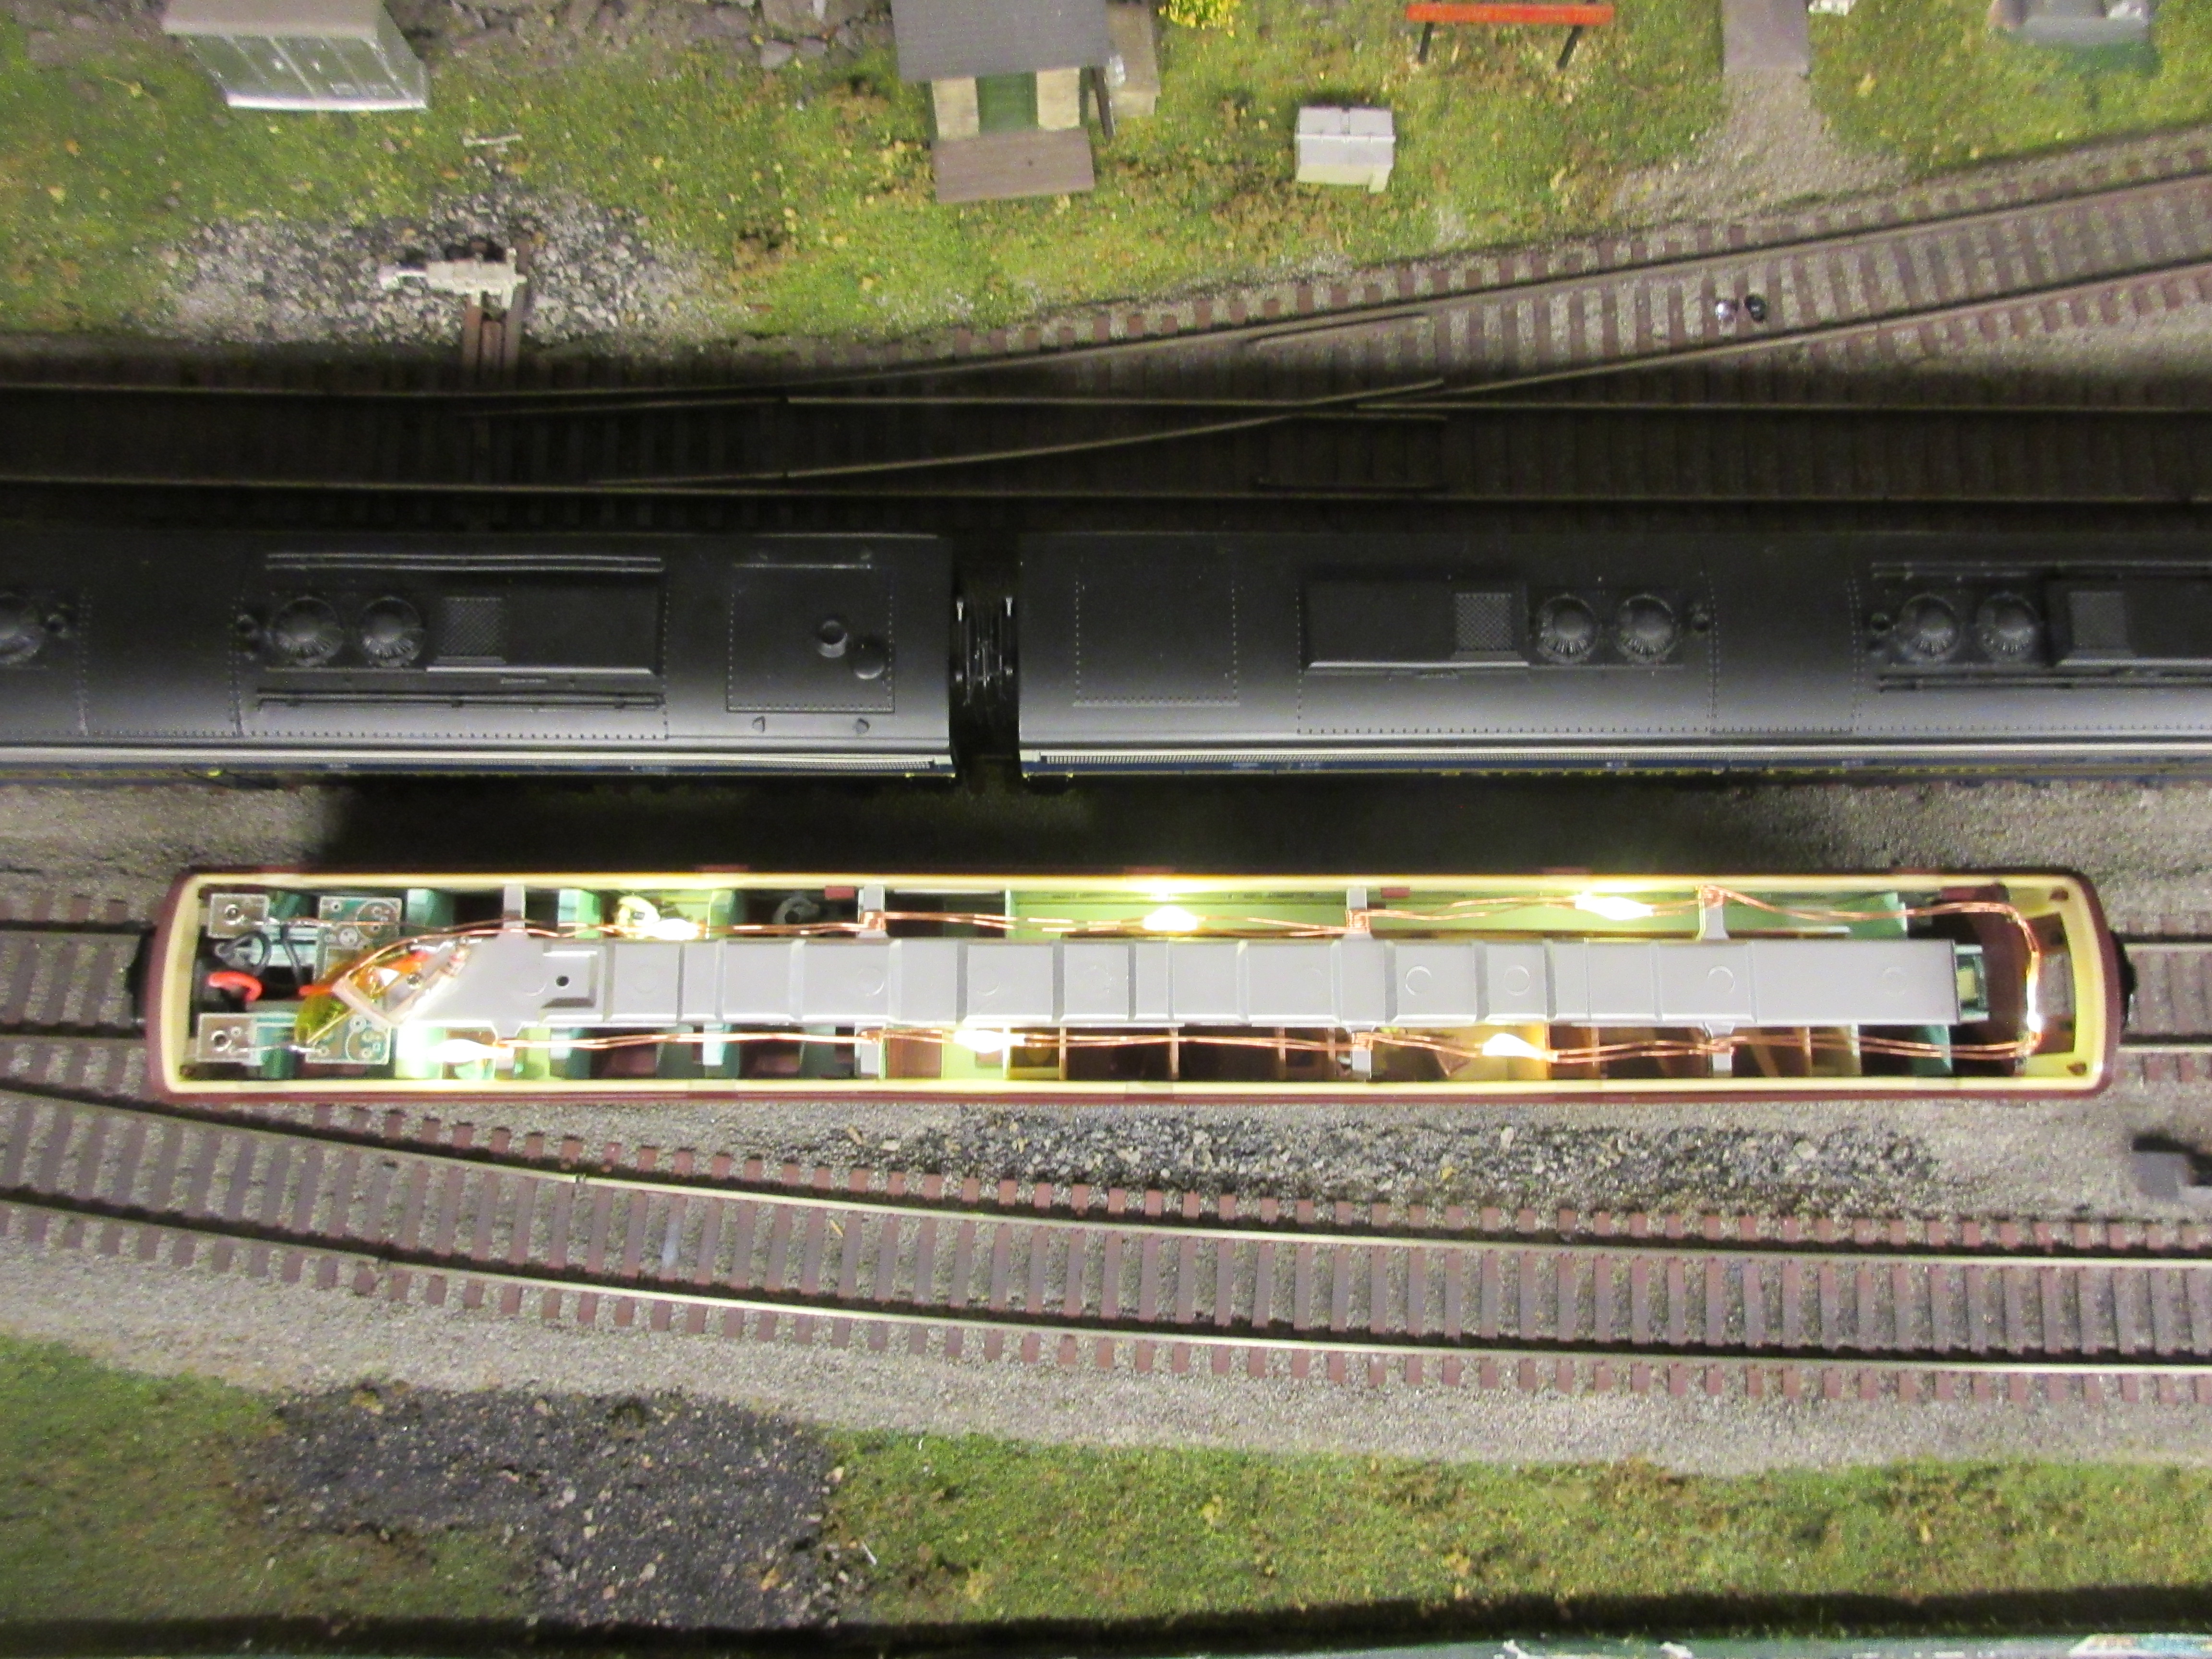
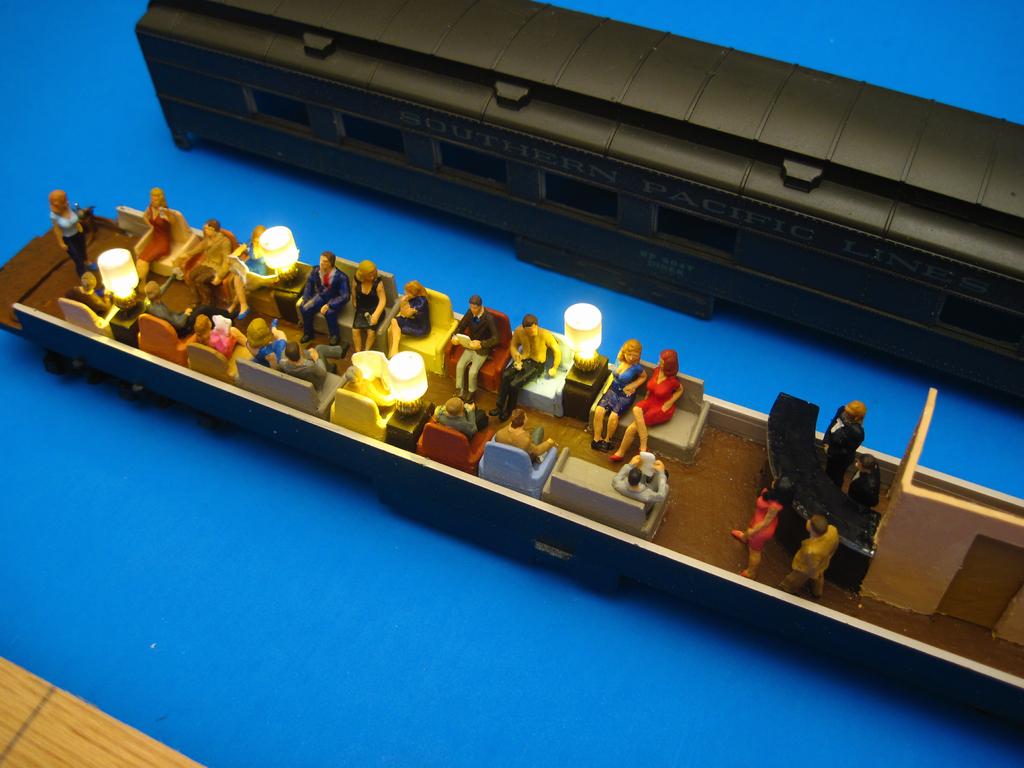
In the photo below I used the Walthers “light bar” to support a string of LEDs that are threaded down one side of the car and up the other with one LED illuminating the vestibule.
One thing the Walthers kits didn’t do well was light the aisle-side of the sleeping cars since their lamps are centered. My setup cures this. A 470 µF cap gives me about fifteen seconds of stay-alive. You can go bigger if you have room.
You didn’t mention if you are using DCC or DC. Capacitors do
I’ve never been a real fan of batteries for lighting passenger cars because you have to remember to turn them off - i.e. albeit a switch or button or physically disconnecting them. And, eventually, you have to change them out. [N] I am, however, a HUGE fan of keep-alive modules ever since I purchased my MTH 20th Century Limited passenger cars back in '13.
It takes approx. 1 minute for the caps to power up to full capacity and 5 min. to discharge. No flicker, no switch, no having to change out batteries. Worth any added expense over the long haul for me.
I cover some DIY car lighting ideas in my Night Scene thread mostly on page 2 which the link takes you to. There are lots of layout lighting ideas in it, but some car lighting is scattered throughout…
I added some extra LED lights (warm white) bought from eBay for the MTH HO PRR Lightweight 5-car train set since the observation lounge was too dim. I just needed to connect the wire to the onboard lighting system. For model cars without lighting kit, there are quite a lot of parts and LED light stripe available online, it was very simple but beware of the heat.
My PRR S1 6100 HO scale brass model came without headlight bulbs but with a Len equipped, so I added a LED light for it, it was fun.[:)]
I scratch built all of my passenger interiors and lighting systems. I’m quite happy with the onboard battery powered (single Lithium Ion cell) LED systems. I power all 10 cars from the lead baggage car using quick disconnect connectors. The between car wiring and connectors are hidden in the diaphragms.
I went with Kadee scale Shelf Couplers to prevent accidental uncoupling.
I installed a DCC function decoder in the baggage car that controls the on/off of the LEDs. One of the things I like the best about my battery systems is I can keep the lights on with out power to the tracks for long periods.
To keep the battery charged I used a single Lithium cell charger in the baggage car powered from the rails.
The decoder operates a small relay on the 4 volt line to the cars. As I also operate in DC mode so I paralleled the relay contacts with a latching magnetic read switch under the center of the baggage car roof to control the on/off of the lighting on DC or no track power.
I have two passenger trains, 10 Heavy Weight and 10 Streamlined, working without a single problem for over a year. Not
I have a set of Rivarossi cars and I added a Walthers light set to each of them. My problem has been power transfer from the trucks to the car body. It’s designed as a metal pad on the car and a screw on top of the trucks. It worked fine at first, but gradually lost contact. I’ve replaced one set of these with a simple wire which works much better.
Rapido’s Osgood-Bradley coaches (New Haven 8200s, 8500s) have LED lighting powered by batteries. The lights are turned on and off by way of a magnetic reed switch. The switch is located under one end of the roof and activated with a magnetic wand that is supplied with each car.
They are on a PC board that can be trimed to fit the car which also includes a capacitor to keep lights on. The only part I did not use was the phosper bronze wire for power pickup; I found the hard wire was wearing a groove in the axle. I used copper strip instead.
This is comparison of how the 2 styles of light look
Matt should really re-do this demonstration, it could use a little “cleaning up”. Seems ironic that we all want flicker-free lighting BUT here ESU is making it flicker on porpoise [:O]
Wow, go away for a few days and didnt realize how many posts came back on this one. Im encouraged while at the same time overwhelmed!! I need to read through alot of the below more and see what might work for me. So great to know there are so many options!!!
[quote user=“gmpullman”]
Hi, PC
Much of my passenger roster is the Walthers Proto cars. These are designed pretty well with the electrical pickup. early-on I was using their lighting inserts. At first they had one for the lightweight cars and another for the heavyweights.
They used three, 5 volt incandescent bulbs. Lately, though, I have been installing my own “keep alive” lighting and, for me anyway, it is cheap, easy and the “stay alive” gives me flicker-free lighting. Later Walthers lighting kits are LEDs but you can do a lot better for a lot cheaper once you get the hang of it.
There are several threads about passenger car lighting so I’ll try to find those and update my reply.
Stretching the thread topic a bit, think about passengers for your cars. Buying pre-painted figures can be expensive. Consider the number you need, and pick up a couple of bull packs of figures. You’ll need to paint them, so get started. You will probably need more than you think.
I operate dual mode on my layout, both DC and DCC. My baggage car power unit works on both DC and DCC. The difference being I can turn on and off the lights with Function 4 in DCC mode. I use a magnet over the roof of the baggage car to operate the magnetic latching reed switch to turn them on and off in DC mode.
The battery charges quickly off either DC or DCC, under 2 minutes. The charger needs a bit over 6 volts to charge the 1000mah battery on DC. My entire 10 car passenger trains only need a little over 50ma at 4 volts for full brightness.
I built a 5 volt regulator to power the onboard USB charger, it puts out the 4 volt charge to the battery at about 6½ volts from track power. Using a bridge rectifier raises the needed track voltage.
They used to have a sickly green LED in them. I do not know if Jason has improved that (you “could” replace them).
[edit] YES, this is a new design. The ones I bought earlier were a slightly different design with a lucite bar and two LEDs. These use multiple SMD LEDs and look like a good solution for your situation. They can be adapted to fit various manufacturer’s cars but be sure you can get to the batteries when replacement time comes around. Many of the Walthers Proto cars are difficult to remove the roof. They use an LR41 battery that you can get locally or from Amazon.
You can buy imported bulk packs of seated figures (painted or unpainted) for chump change online. If simple colors are enough for you then you can do much of the touch up (the crappy painted ones) or painting-from scratch with paint pens and save alot of time.
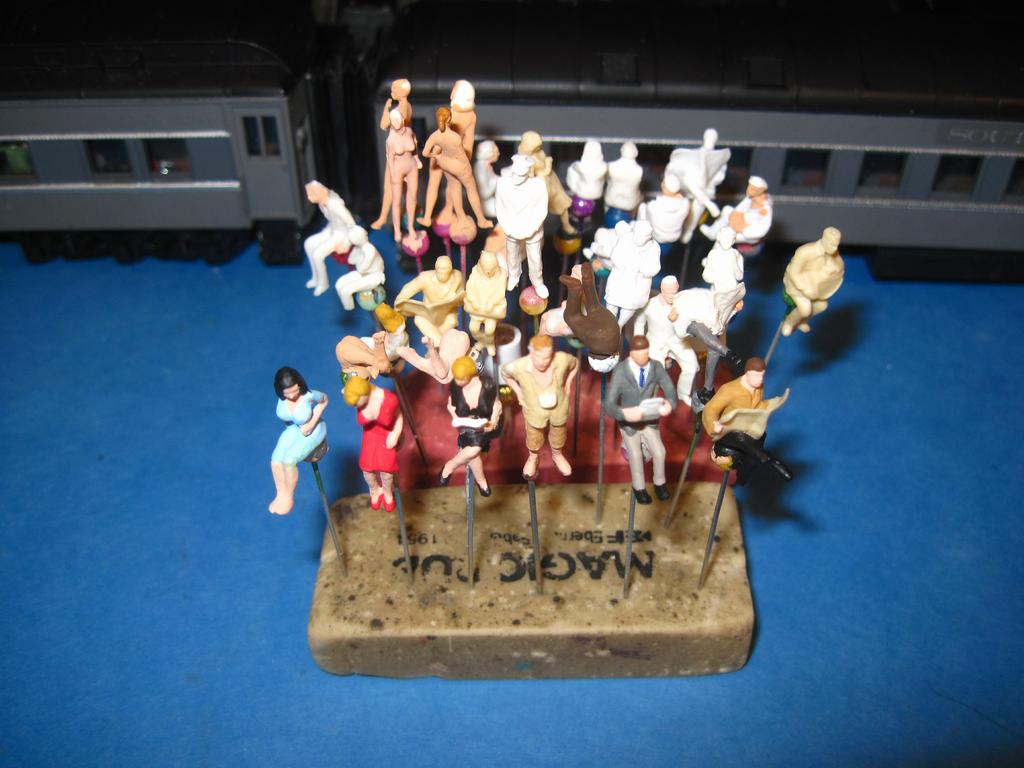
I use unpainted HO male Preiser figures for my passenger cars. I pick out about a dozen that I really like then make molds of them. I don’t chop up the masters. Then I make resin casting and chop them up and reconfigure them in several different poses. When I have several that I want more of I make molds of them.
I haven’t had much luck finding unpainted female figures so I went with a half dozen 1:87 ShapeWays females and used the same process to come up with a couple of dozen molds.
I hand paint all my castings using Crafters Acrylic paints.
Penn Central
Id like to avoid track picksup and avoid flicker. another reason I’m thinking a dedicated onboard battery is my plan. I keep reading about these magnetic reed switches. Ok will do some research.
For a basic “Ready to go” battery/reed switch lighting setup look for some Rapido Trains “Easy Peasey” lighting kits.
They used to have a sickly green LED in them. I do not know if Jason has improved that (you “could” replace them).
[edit] YES, this is a new design. The ones I bought earlier were a slightly different design with a lucite bar and two LEDs. These use multiple SMD LEDs and look like a good solution for your situation. They can be adapted to fit various manufacturer’s cars but be sure you can get to the batteries when replacement time comes around. Many of the Walthers Proto cars are difficult to remove the roof. They use an LR41 battery that you can get locally or from Amazon.