My planned layout features a large car float which I would like to incorporate into the operation of the layout. I don´t mean it to be a static feature, but to make it detachable/movable, in order to simulate the arrival/departure of floats.
If a have a set of floats, they can be used for staging.
This is the layout which is behind the idea:
I have absolutely no idea how I could design this, without sacrificing prototypical look for function. Help is highly appreciated.
First thought out of my head - make the car floats as fairly detailed models, but have the piece of water that they sit in removable. So you aren’t handling a detailed model, nor do you have to make some more crude but also more sturdy float model.
Second thought - instead of making a ‘hollow’ model, use a solid piece of hardwood as the core and attach the detailed bits around it, makign a car float that has all the detail of a fine model but at its heart is a solid chunk of wood that will stand up to handling.
I’m not exactly sure what you’re asking. Are you looking for suggestions on overall layout design, or the mechanics of using multiple car floats as “casettes?”
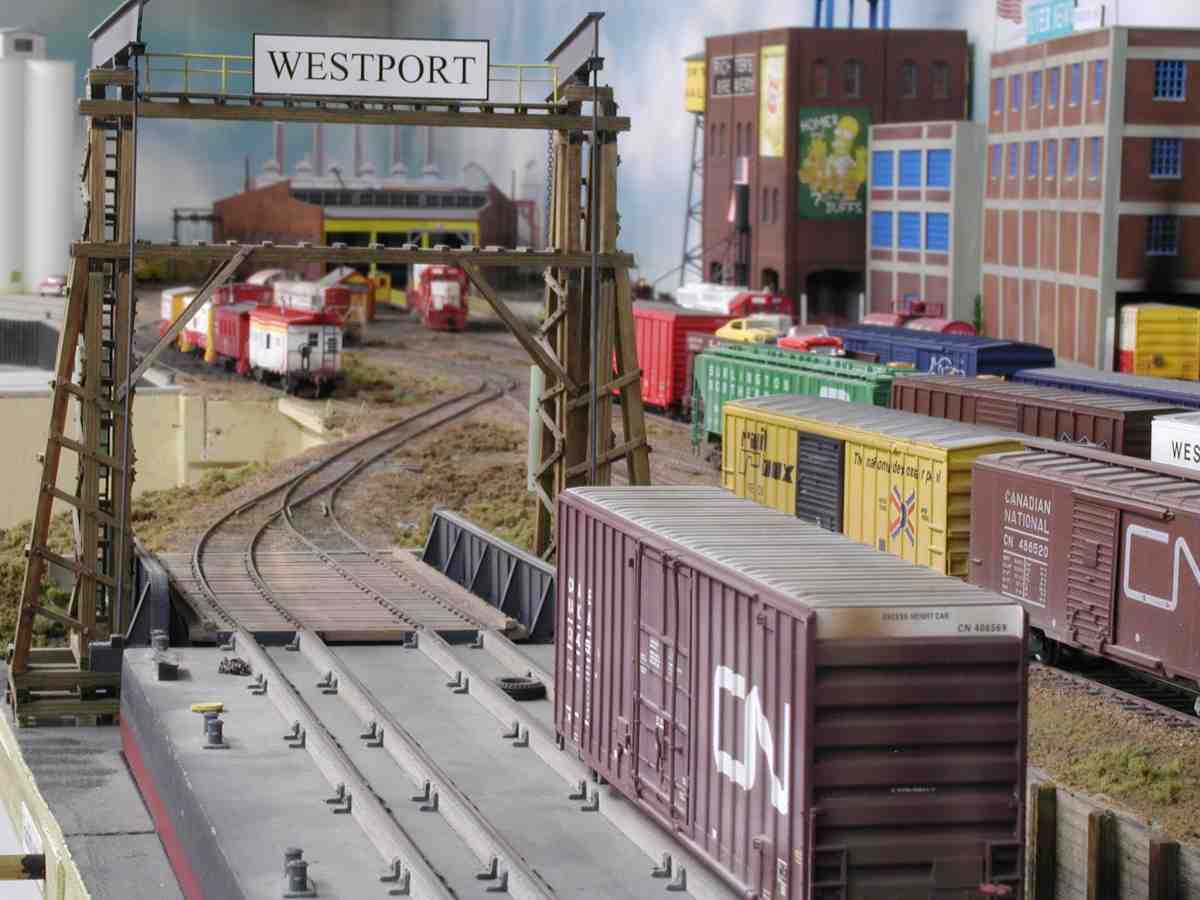
I am planning an extension of my own layout, and a car float terminal is high on my list. I’m planning to use the Walthers car floats and the matching Walthers bridge.
My plan is to have the floats sit inside the “water,” which will be poured Envirotex. I plan to use tape or plastic wrap around the hull when I do the pours, so I can remove the floats after the Envirotex sets. If I do this right, the hull should line up perfectly every time by simply putting it into the opening in the water scenery. Something else I’m considering is making the “water” removeable along with the floats. But, these floats are already quite large, and adding the surrounding water might make them too awkward to carry around.
I would arrange for some sort of restraint on the float to keep the cars from rolling off the ends. This wouldn’t be prototypical, but I think it’s necessary for safely transporting the car floats to and from the layout.
My “imagineering” idea is to build a “floating” platform, supported by springs, that the floats would sit on. This would tilt slightly depending on the weight distribution of the cars on the float, forcing you to consider this when loading and unloading the cars. However, this would also require some flexibility in the bridge, and I’m not sure how well that would work.
That is exactly my intention! I have not yet seen the Walthers car float, but my idea was to drill two or more small holes into the hull to act as sockets holding the hull in place, providing that the car float is a “waterline” model.
As Mister Beasley stated the biggest problem will be keeping the cars on the car float when moving them from storage to the layout. Even with a gate at the end, if the cars are free to roll they will move and derail. Just giving the float a slight bump may derail the cars. With the close track spacing of the float car they will be hard to rerail.
So, there arfe two key issues attached to the problem:
How to “attach” the float to the “water” and
How to hold the cars on the rails while moving the float
Issue no. 1 can be solved if id build the float as a waterline model and have some holes for receptacle pins sticking out of the “water” thus securing the float in position. Securing the cars on the rails - are there any ideas around?
Are you wanting to make them move? I saw a video several years ago about an O scale layout that had ships that moved. The basic design idea was that they had metal plates in the bottoms of the ships and the “water” was a sheet of plexiglass. An HO scale train underneath the water pulled a car with a strong magnet, which pulled the ships along.
I don’t remember the name of the layout or the video.
As you can imagine, the ships sometimes had a herky-jerky motion due to the friction between the ship bottom and plexiglass, and going around corners looked kinka ridiculous…
… not in a sense of the floats “moving” around. Just use them as a cassete for staging, thus simulating arrival/departure of floats at the terminal.
An OP session would then start with putting some cars on the float, putting the float in place at the apron, switch the cars off the float, switch other ones onto the float, take the float away, put another float “cassete” loaded with cars onto the apron …
The single-ended car floats I remember from a half-century ago had steel track bumpers at the ends of the tracks, so the main problem is preventing the cars from rolling off the end where float meets apron. With my cassettes, which are a lot longer than the standard car float, I just make sure that I tip the cassette toward the closed end once I’ve separated it from the end of fixed track.
As for handling the float, the prototypes took quite a beating, evident in the multi-colored paint and rust along the rubbing strakes, especially at the apron end. I recall them having rows of truck tires along that end, to fend off the ‘egg cup’ of pilings that centered them as they approached the apron. Additional tires were hung off the sides where the tug was secured to them when under way.
Those tires just gave me an idea. Perhaps the solution would be a lifting frame something like the ones used for handling containers, a broad, shallow H shape with 6 inch long hooks hanging from each corner. By engaging the hooks in strategically located fender tires you could lift the float untouched by human hands and carry it like a suitcase.
As far as derailing cars, smooth and steady does it. Sudden jolts or too-quick sideways moves cause problems, so make sure that they don’t happen. (I don’t recall ever having a car derail in normal cassette operation, and I’m a long way from having a dancer’s grace of movement.)
Chuck (Native New Yorker modeling Central Japan in September, 1964)
if I add a “bumper” with a coupler at on end of the float (which needs not to be bi-directional) that the cars can couple into would mean at least half of the problem solved. Adding a little moree weight to the cars to make them a a little more “inert” will also help. But then h2 release the coupler …
The idea with the truck tires as fenders dsguising “grips” for a handle is great… thank you!
Make the car float enclosed. Do an internet picture search for Lake Michigan Car Ferry and you will have a general idea. Now design your water level at low tide so a ramp down to the car ferry is needed. One or two cars at a time can handle a fairly steep ramp. Now you have a situation where the back side of the car float only needs to be long enough to give the appearance it is full length except it isn’t. Then cars can be loaded onto the ferry and exit through the back side to a storage track or tracks. Problem solved.
Hard way
Mount the car floats on movable carts and don’t have any water showing in front of them on the viewer side. Roll one out. Roll the new one in having a cut out in the water that the ferry can slip into. this will require all casters to have swivel capability and a smooth floor. You should be able to mount some kind of swinging door to keep the doors on the floats until just before installation when it would be lowered.
Just a wild idea. If you build the ferry terminal behind the transfer crane in combination with hidden staging behind the warehouses you could pull off the old trick. When nobody is looking change the consists. Since i saw KR&DC longtime ago in mrr-magazine, i’ve been puzzling how to change the cars on the ferry. Or just fiddle the cars?
We have/had a modeler in the local area who “does/did” just this on his layout – I haven’t seen him in quite and when he retired from the state he may have moved to other climes. I had seen his layout on a couple of other occasions but on a day a couple of year ago I was invited over to observe an operating session. It was quite interesting to watch and, although I am oriented more to “long train” operation I am faced with the prospect of having to orient my future layout more towards switching operations and I have given cursory thought to incorporating some sort of a rail-to-barge operation.
This particular individual loads one of his “barge modules” at his loading slip and rolls it out of the way atop a cart; he then removes this module and stores it on racks built under his benchwork. He then extracts a full “barge module”, mounts it on his cart, and rolls it into place at the slip where it is unloaded. His switcher – on this particular day he was using a GP38-2 – assembles these cars taken off this “barge module” into a train and runs it down the track into an adjacent bedroom where he has a yard as well as a number of industries for switching. He did not have enough capacity to assemble more than one barge into a train so movements, of necessity, involve short consists.
He is a “lone wolf” operator and he indicated that he usually performs about two of these "barge module
The links get lost for a couple of pages, but then they come back. Just keep hitting “Next Page.” The photo essay gives you a pretty good idea of the size of the Walthers float, and the magnitude of the project.
Thanks again, Tim. It’s great work, and very well presented.
The only engineering help I can offer is that your tug is facing the wrong way in the drawing. The bow should be pointed toward the front end of the barge, and the apron. It is easier to maneuver a barge into a slip if the tug is going forward. If the tug is pulling the barge away, it backs in reverse (astern), so that the bow is still facing forward when it gets to the next dock.
I have a Walthers barge and tug (modified to steam, of course); I like the look of waterline models on shower-door glass (wavy). I hadn’t given much thought to moving the barge; I have lots of staging elsewhere. I’d probably use the old five-finger switcher, and “fiddle” the cars onto the handy shelves below.
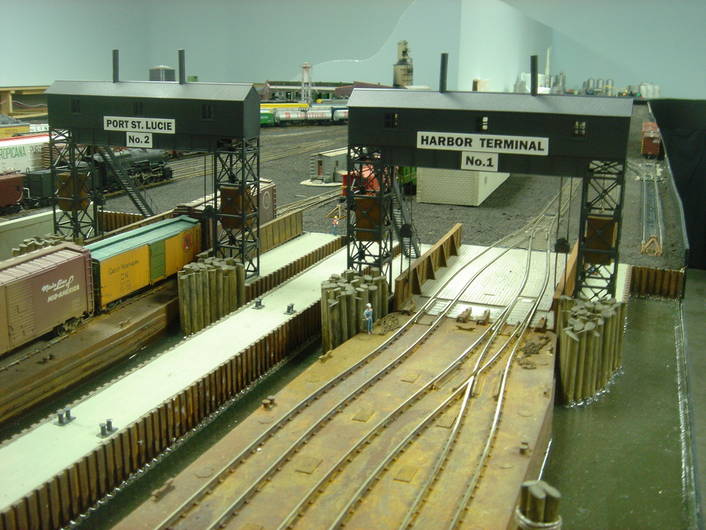
More archives. I took this picture at the Treasure Coast Model Railroad Club in Port St. Lucie, Florida. They have a pair of Walthers car floats with Walthers bridges. I talked with them while they were still planning this, and they had planned to use the floats as casettes. However, when I look at the picture, it looks like the water was probably poured with the floats in place, so they’re not going to come out easily.
I think they did a great job of detailing this scene. The corrugated metal bulkheads and the wood pilings look very realistic, and of course, I love that dirty water.
If I want to have a prototypical look of the barge, I have to go for a static display and use the float as staging facility - probably difficult to put the cars onto the rails there.
If I want to have the barge to be exchangable, I have to compromise looks for security of operation.