Favorite technique(s) for modeling water.

Hello all,

I am getting very close to modeling my water scene on my N scale layout and was wondering what some folks favorite products/techniques/methods are? My scene is a portion of a lake that will run off/end at the layout edge, about the size of an average diner plate. There are so many products available that it is tough to know which way to lean. Also, I will be adding depth to the lake using various shades of blue, as well as painted plaster rocks along the shore line and in a few shallow areas. I read where some products react adversely with certain types of paint, such as acrylic paints. Is this true? What paint brand is your favorite that works well for your chosen water medium?

I appreciate your time, knowledge, and experience.

Many thanks,

Don.

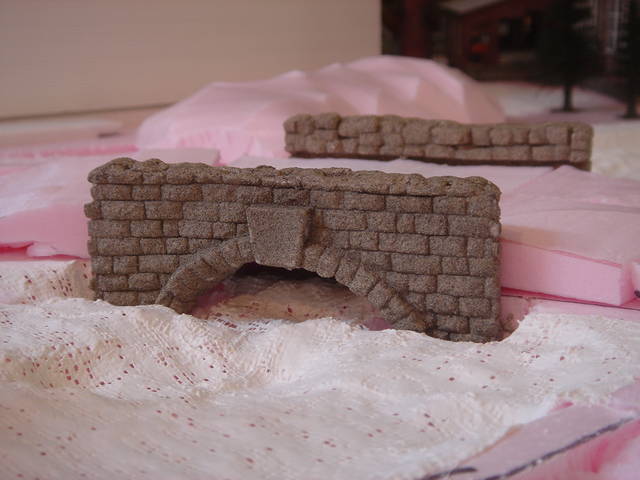
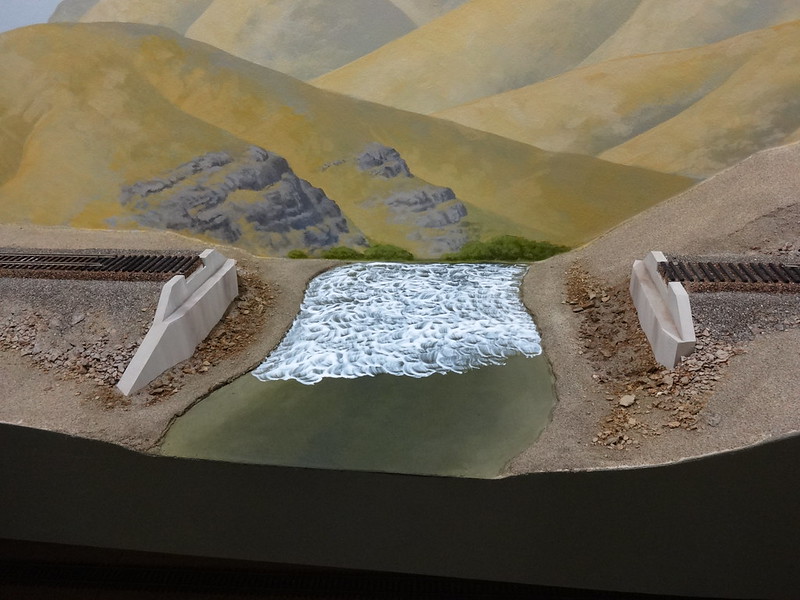
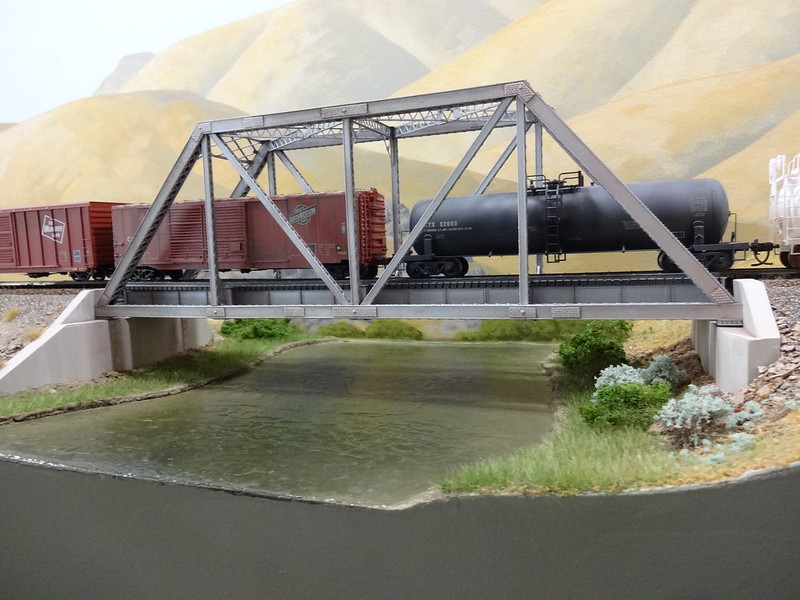
While I have used clear casting resins in the past, the water features on my current layout were all done using Durabond 90 patching plaster. It sets in approximately 90 minutes (hence the “90” in the name) allowing plenty of time to work-in ripples, rapids, waves, etc. The type of such work will depend, of course, on the consistency to which you mix the product. It will, however, set in the stated time whether it’s mixed as stiff as peanut butter or as watery as a bad cream-style soup. [swg] Once fully-cured, it’s tough and permanent - mine has been subject to countless cameras placed upon its surface, with no damage to raised details or scratches or marks on the surface.

The riverbeds, in most cases, are plywood, but I’ve also poured rivers into depressions in the plaster-on-screen landforms. On plywood, the “water” is usually less than 1/8" thick, and is finished with drywall knives. On plaster terrain, the “water” can be over 1" thick and is usually poured into place. Regardless of the thickness used, it doesn’t shrink or crack.

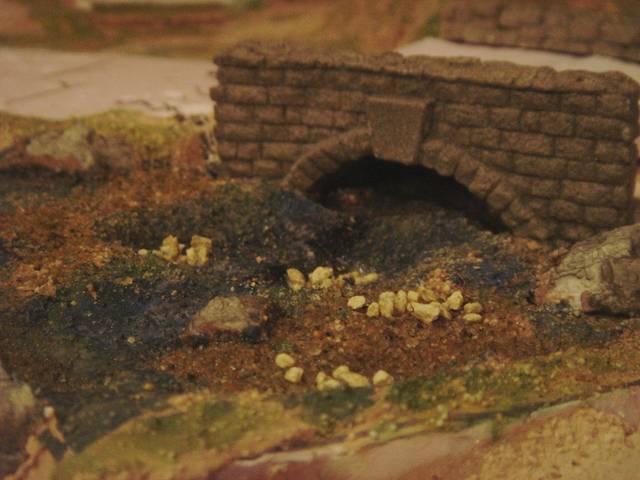
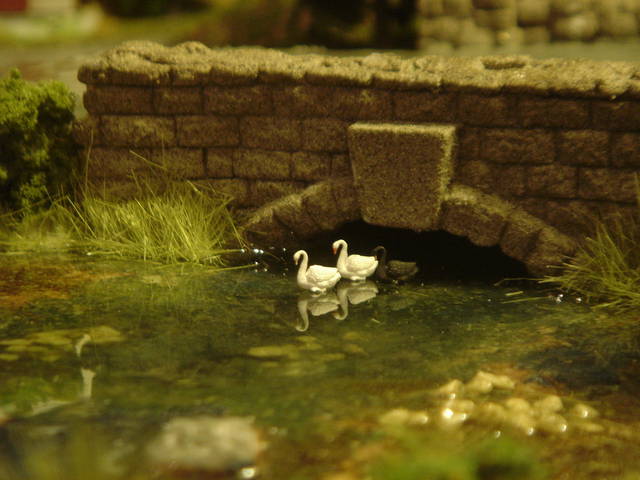
I used flat latex house paint to colour it, applied with a 2" brush. The dirt colour used to represent muddy water is also useful, when thinned with water, as a colouring wash for my plaster-on-screen terrain, prior to adding ground cover. For the water areas, though, it’s applied full-strength. The dark grey/green, used to represent deeper water, is also used on background trees and distant hills.

To make the “water” look wet, it gets three coats of clear, water-based high gloss urethane, applied with a brush and strictly following the manufacturer’s instructions on re-coating times to avoid having to sand between coats - difficult to sand water, especially if it’s not calm and smooth. [swg]

[IMG]http://i23.photobucket.com/albums/b399/doctorwayne/some%20water%20scenes/Foe-toesf

I paint the plywood river bed and then pour banks of plaster or ground goop. When I have dammed the open sides of the vessel that is to be a portion of river or lake, usually just with good quality painters’ tape, I mix and pour over the painted plywood a couple of thin pours of finish quality epoxy. Over the epoxy I smear and stipple a layer of either gloss medium or gel gloss medium.

I’m an Envirotex Lite guy. This is a 2-part epoxy resin. My first hint is to go to www.michaels.com or www.acmoore.com and find the coupon. There is ususally one good for 40% off of one item. Use it to buy Envirotex, as it’s a bit pricy. I’ve found that it has a very long shelf life, even after it’s opened. Mix it thoroughly (stirred, not shaken, as you don’t wan’t bubbles) so it will set properly. Pour it no more than 1/8 thick per pour. Each pour takes about 24 hours to set.

I have a foam base layout, which I typically carve out to form pond beds. I then cover the foam with plaster cloth to get the contours I want.

I seal the plaster cloth with white glue, rubbining it in with my fingers to fill the little holes. Since you’re putting the lake at the edge of the layout, build a dam with styrene or other impermiable material and glue the edges with something like Aileen’s Tacky Glue that will seal the lake bed but still be removeable. Envirotex, like most “water” products, will find small holes and seep through them.

After that, I paint the bed of the pond and add rocks and such.

I use several thin pours. I tint the first pour with a drop or two of dark acrylic craft paint, thoroughly mixed into the Envirotex. This both darkens the base of the water and gives it some “optical depth” which makes that shallow pond bed look much deeper. Subsequent pours (3 or 4 total, usually) get lighter tints, tending more towards green in this case.

Envirotex will “creep” up the sides of the pond and to som

I’ve had very good luck using glossy ModPodge (available in the crafts section at WalMart).

I like both epoxy resin and Mod Podge/gloss medium.

This creek has a couple layers of epoxy resin, tinted with a few drops of Testors olive drab enamel, poured into a watercourse filled with real rock and sand. Rapids were painted on with white acrylic. Since epoxy sets with a smooth surface, I added ripples with gloss Mod Podge.

In this location I didn’t feel I had the depth available to make effective use of epoxy. I painted a smooth plaster base using prototype photos as a guide, and coated it with ModPodge as shown here on the back half of the scene.

The finished river looks like this. For broader streams or lakes, applying gloss over a painted base is easier than messing with resin.

I have had good success with the Magic Water product, which is reasonably easy to mix and use, has no odor, and creates good looking results. I did take the time to fully “scenic” my creek bed with the mosses, rocks, and fallen tree limbs that I knew I wanted, and thus I did not tint the water but left it clear. I had no “creep” effect. I also followed the instructions about lightly blowing on the newly poured surface to draw up any small bubbles left in the water. For actual eddies and swirls and other surface signs of movement I later applied gloss medium and a Woodland Scenics product that creates water effects - perhaps the same stuff.

The one thing to know about Magic Water and other poured products is that you have to fully 100% waterproof your proposed area. My creek goes right to the edge of the fascia so I had to specially take care to create a “dam” using styrene and adhesive caulk that I could remove once the Magic Water had fully hardened. My creek bed was hollowed out of foam with a hot wire tool so it was waterproof (and has resisted movement so no cracks have appeared) but I know of guys who had real problems when they learned their surface was not as waterproof as they thought and the stuff leaked out on their floor. When Magic Water is poured it is just like real water, not viscous and thick.

Some other guys have learned that their water feature is subject to movement and tension perhaps when the layout is bumped and cracks have appeared.

Dave Nelson

Folks this is FANTASTIC insight and information! Top notch. I am learning a great deal. The pictures provided are fabulous and very inspirational…while also being a bit daunting. I have never worked with “water” on my layout before. I know that when done right (as your pictures above illustrate) water affects really bring life to a layout. But when done poorly can detract from an otherwise nice looking layout.

Three questions if you please:

  1. if I used a piece of sheet plastic as my dam on the layout edge and temporarily attached it with Alex Plus latex caulk, would that suffice to hold back the “water” medium until it cures and then remove it afterwards?

  2. would Testors enamel model paint added a drop at a time to achieve my desired depth affect work to tint my water medium without any adverse affects/chemical reaction(s)?

  3. do I need to add my boats (in this case two Woodland Scenics canoes) to the still wet water medium or can I add them after it has cured?

Again gentlemen, many thanks for your time, patience, and knowledge.

Regards,

Don

Don

I used a fairly thick and fairly rigid piece of sheet styrene as my “dam” and applied lots and lots of caulk to hold back the water medium

I liked my scenicking effects so much on the base of the creekbed that I did NOT want to tint the water medium at all. I have no experience with tinting or coloring. Others will have to advise about the how; I guess my only advice is to think long and hard about doing it at all.

The boats would be added (carefully) very soon after the Magic Water was poured. I think they’d sink if the water was super wet, so it needs to be a bit thick but you do not want a bizarre looking bulge of water around them, which would occur if the product has started to set and harden. If added after the water has totally cured you’d want to flatten the bottoms to make them “set” into the water (and gloss medium around the boats would create the wake around them).

I might add that before I poured Magic Water into my creek scene on which I had spent a lot of time and effort (and yeah, some money) I created a miniature scene using white foam hollowed out with the hotwire tool, fully scenicked, and dams on both ends to try out every aspect of the product first. I would advise that in general, and would advise it with your canoes in particular.

Hope this helps.

Dave Nelson

I would use either enamel or water-based paints, but only first as a test…not as something I regretted and had to now figure out how to either remove or to cover. In my case above, I used just a half-drop of Hauder Medium Green acrylic craft paint from Wal Mart and a half-drop of yellow. In order to get some turbidity to the water, I also added about 1/4 teaspoon of plaster of Paris powder. Once mixed very thoroughly, and then poured, you can just let it settle and spread over the next ten to fifteen minutes or so. No longer, though, because you’ll want to go back to see if there are still any tiny bubbles just at or below the surface. They WILL form, but many will rise and disappear on their own. Those that don’t will need help, and you do that by gently blowing through a soda straw at them with the lower end of the straw no closer than an inch from the curing surface.

It takes about 12-18 hours for the hardness to set in, and by then you’ll know that you will need one more batch to cover everything, or even another couple. Your total depth, all pours in place, should rarely be over 3/8". My pours never exceed 1/4" in depth, and that usually means about three mixes poured over bare plywood in total.

You should never mix enough at one time that you cover all you need to, but also at a depth of near 1/2". Most experienced hobbyists say its is much better to tinker with the mix and tint in three pours than to regret your one decision that is now curing at 1/2" deep.

Don’t fret if you grossly underestimate the requirement in that first pour. If it doesn’t spread enough, there’s always another opportunity to add to it, and you can elect to pour it clear or with another very light tint to it…or more turbidity. The second, or maybe the third pour, will spread enough to cover all you need it to, and from there you just add another until you get at or just above that 1/4 - 3/8

If you want a boat to be embedded in the water, you should put it in and then pour around it. Envirotex is very hard, and you aren’t going to be able to cut out a neat opening to put a boat into. Or, you could cut off the bottom of the boat and sand it smooth, creating a “waterline” model like this one:

For this scene, I took a 1:87 beaver from Musket Miniatures and made a “waterline” beaver with a Dremel and a file. I glued that on, and then added the final layer of water around it to get the effect of the almost-submerged beaver swimming in the water. For this swamp, incidentally, I used a lot of green tint to give the water a murky look, I also added paint after the final pour, dipping a toothpick with a bit of paint into the fresh resin and swirling it around to create “pond scum” on top of the water.

And, I too remember that feeling of worry when I was doing it for the first time. That turned out to be the scene with the stone bridge and the swans. It’s not as hard as it might appear.

That’s more than sufficient. I typically use masking tape and back it up with a board clamped in place.

That should be fine. When working with epoxy resin, mixing a small amount of extra hardener (part B) can help guarantee the mixture will set properly. Trying for the exact 50:50 proportions can lead to batches failing to set. The extra hardener may also help overcome anything in coloring agents or the substrate that could adversely affect setting.

Yes, I think we all have had that “feeling” the first time we tried to add a water feature. I used Envirotex and was very pleased. My primary depth was done by painting the plaster lined base before adding any water materials. Since my pond was to represent a somewhat stagnant pond, I added a couple of drops (don’t add much) of olive craft paint to the mix of the first pour. I used less paint in the second pour and none in the top layers. Pouring about 1/8th inch at a time worked well for me, think I ended up with four pours. After each pour I placed a brown paper bag over the area, not touching the water to protect it from unwanted flotsum and jetsum dropping in. It was still water, so I added no rippling, that’s in the works on the next water project.

If you really mess it up you can always remove it and do it over. That’s one of the nice things about this hobby. However, I haven’t heard of many that have done that badly.

Good luck,

Richard

I have had very good results with Woodland Scenics Realistic Water and their Water Effects, very easy to use.

I have used both WS Realistic Water and gloss medium. I get excellent results with both, but I prefer gloss medium, because it’s easier to work with. I tint it, when necessary, with a drop of acrylic paint.

Water effects works very well too, but I’m 99% certain that it’s just relabeled gloss gel, at twice the price. I use both to make waves, ripples, wakes, etc.

I prefer to actually put the boat in the liquid product, because except in really murky water, you can see part of the hull under the water.

Thanks all. I appreciate you sharing your insight and experience and I will put it to good use. This weekend I plan on preparing my lake bottom and shoreline, while also hitting the local craft stores and home improvement stores in search of some of the water mediums suggested above. I hope to start adding my water by mid-week or next weekend. This thread has alleviated a lot of my apprehension for working with “water”.

Thanks again fellas!

Regards,

Don.

If you use Woodland Scenics Realistic Water, apply it in very thin layers, no more than 1/8". Otherwise, it could take months to clear.

Don’t ask me how I know.

I placed a tug boat on top of the water after it had hardened. Not long after, the bottom of the boat stuck firm and hard to the water. That surprised me, but it happened.

Rich

Realistic Water is self healing, which means it never totally hardens. My son set a matchbox car in his pond, and the same thing happened. After we got it out, the scar was there for about a month before it went away.

I don’t have a favorite technique but I have used the 2 part envirotex with very good results. I have heard and seen lots of good things using the modg podge built up on a painted surface. The orange color container.

Modge Podge guys… if one doesn’t tint it does it dry totally clear? Can details like tires, boots, rocks be “clearly” seen through it similar to Magic Water?

I’ve asked around about this plenty, but everyone has tinted and didn’t know.

Thanks, Jim