Why did I use Photoshop to plan my layout? I’m a web designer and have worked as a webdesign teacher as well so it was natural to use it. And I’m glad I did because there is so many great things you can do with it. I will just scratch the surface of possibilities with Photoshop in this tutorial, because it’s VERY complicated. If you want to know more I recommend some of the great sites on the net.
What is Photoshop?
Photoshop is the industri standard when it comes to graphical software. It have been on the market a long time and the version that I use for this is the latest, Adobe Photoshop CS2, also called version 9. But you don’t need the latest version to follow this tutorial. You can use everything from version 5,5 and up. And as Joe Fugate wrote, you can even use the mini version of Photoshop called Elements. I only have the latest version right now, so I may be wrong. If that’s the case, please fill in the missing info.
There are PC and Mac versions. I’m a Mac user, most people in the Graphic world are using Mac. So this tutorial will be written on my Mac but it’s very easy to translate this to a PC. BTW: This is a picture of the Mac I just ordered. iMac G5.
Everything is located inside the 20 inch TFT widescreen. You can see the slot for the double layer DVD burner at the side of the screen. You even have stereo speakers, but you can’t see them, Apple computer always do things like that. My son already have one and it’s incredible. The best computer I have ever seen, period!
[#offtopic] Sorry, on with the show…
Layers
The big thing with Photoshop is the feature called layers. I can honestly say that without layers Photoshop is nothing. It’s that imp
Excellent start. You’ve got me curious. I especially like how you overlayed the layout plan on the actual benchwork. Looks like I will need a bigger printer! [:D]
I look forward to subsequent posts, especially those that don’t require the use of an existing layout diagram to create a new layout.
I had an idea to actually print the whole trackplan on paper in the real size, many small papers taped together. There is software that let you do that. But in the end, everything worked out great without printing anything out at all.
Thanks. The really cool thing is when I measured my benchwork. I know that Photoshop is awesome but I still was a little surprise to see my benchwork come together with mm accurancy. That was really nice and saved me a lot of time.
I appreciate you taking the time to put this together, even though I couldn’t read some of the ‘figures’ in one or two of the screen shots. I’ve used Photoshop for several years and I know what a vast and complicated program it can be, but I’ve never gotten into the measure tool etc. I see that I’m going to have to do that now. I use Photoshop as a digital darkroom for photography mostly, and a lot of it lately as been on pictures like my P2K E6…
Learning about the measure tool and a couple of other things was worth it to me.
Thanks,
Jarrell
Really cool. Of course, several of the software planning tools do all that (layers, reach, benchwork, track, print full size, etc.) plus more (3d explore, run trains on the layout to test switching and what not. Several also have a whole library of buildings from different manufacturers available (and railcars). Don’t see what you want, there are more online and you can also draw your own 3d model in a few minutes (sized correctly to the layout).
They don’t take long to learn. If you run through the tutorials in the manual, you should be able to draw room sized layout fairly quickly. I can do the basics of a 24x36 (space I have available) in about an hour, 2+ levels, tracks and terrain (tunnels too). Not too complicated. If you can cut and paste in MS Word, you can use these programs.
There are many more ways to ballast a track then you ever need. But that’s the cool thing with this forum. It’s all about options. So use whatever suits you best.
I do like the use. It seems great for copying layouts from the mags into the computer for testing and building (That is faster than I can do it now). Also like the projection into realspace.
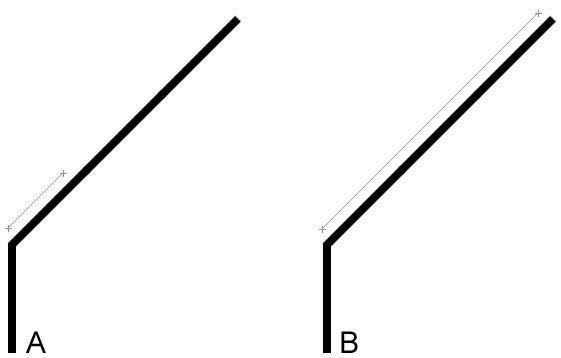
When you are using the Measure Tool to measure angles. Try to set the start and end points like picture B, if you set them as picture A you will not be able to measure with great accurancy. And draw the measure line close to the object you want to measure. I didn’t do that in the picture because it’s hard to see the tool when I’m explaining.
Same thing if you want to rotate a layer, Edit > Transform > Rotate. Do not hold the mouse pointer close to the picture when rotating, hold it far away and you will be able to rotate with more control.
For even more control, use the Zoom Tool so you can set the start and end points for the Measure Tool with pixel accurancy.