As I begin my bench work this month, it’s occurring to me that the Wescott Benchwork book doesn’t clearly show construction approaches to adding under the bench staging areas. How they’re supported/risers/ coming up from below the top bench layer and onto the main layout, etc.
Anyone know of links for how to build this area lst OR adding one after the top/regular layout is finished?
Pics would be great too if someone here is at that building stage…
Most people I know don’t put hidden staging “under” the benchwork. The best way is to layer the benchwork with the benchwork on the bottom, the staging next and then the “layout” the visible layer above it. Doing it that way is more flexible and saves you from having to “tunnel” through your benchwork. It does require you to actually plan your layout and its construction ahead of time.
You could also add a lower level staging yard below the benchwork. It could be concealed by a curtain hung from the fascia, but still easily accessible. That’s my plan, anyway.
The access track will need to be well planned to mate with the rest of the track plan, whether a helix or long grade, etc.
Do you have room for a helix? I have seen lower level staging accessed by a two or three turn, two track helix. That way there was adequate room for wiring above and handling trains below, if required.
But I agree that the lower part should be built first, then the upper scenic’ed portion above it. And for that, you have to plan ahead, as said before.
Sorry, no pics.
If you are talking about a five to eight foot long area or longer, I would build L-girder mounted on 2 x 2 legs. L-girder for the bottom staging level and then L-girder again for the upper level. Make the legs long and use them for supporting both levels. On the lower level, just use plywood directly on the girders, no joists.
EDIT: Oh yea, I built a lower staging area once. It was a four track reverse loop type, and it was an after thought. I was using L-girder benchwork at the time supported by 2 x 2 legs. I added two more lower L-girders and a chip-board surface. I had to install it in pieces. Laying the track on it was a pain, so I hot-glued it down. The turnouts were all mounted on a removable section and the turnouts were laid at the bench, as were the switch machines. The route up was on a linear grade.
Thanks guys. I’m aware that building the staging would best be done lst but I won’t have money for the staging if I’m ever going to get my main track plan laid and running.
After spending several grand, I’ve been “cut off” by the household minister of finance for
quite awhile. I thought about putting the dough into the under the table/bench staging lst, but I’d much rather get the layout built and running with the few trains I’ve got and can afford for now.
I’m also undecided about under the table staging or a cassette/car ferry or off layout/other room solution.
I’m wondering what experiences (ugly ones I’m sure) building an under the layout/table staging yard AFTER the fact. Is it almost impossible, hard enough to make up many new swear words, not that bad if you can bend like a pretzel and take many breaks?
Gandydancer. Thanks. I figured another set of L girders and a sheet of ply would do it,
but wasn’t sure if there were any other ingredients. It surprising that I haven’t seen this
drawn, photographed and explained more often in books.
I may build the shelving/girders in and just try laying the yard track in later or else use
it as a storage shelf for kits, etc.
I’m going to try and come up with a build on the work bench and slide in/under later
scheme. Anyone know of an article or someone who’s done that kind of project?
I also have a car float operation as well as a three track interchange/staging yard. It will be made to look like a rundown yard.
There was an article a few years back in one of the two major MRR mags about a staging yard on drawer slides. The physical location was close to the front edge of the layout and very close to the upper level. Sorry that I can’t remember which issue.
I recall that the layout had a So Cal theme, but, like you, I can’t remember the issue.
IIRC, the traverser was used as a giant transfer table, with one connecting track at each end. Look, Ma, no hidden turnouts.
Were I to try anything similar, the temptation would be to use a hollow-core door for a traverser. My current scheme will also use hollow-core doors, but there will be hidden turnouts. The passenger staging yard will be up between the L girders under my main station, with sections rigged to be removed from below for maintenance and for access to the underside of the visible world. That’s scheduled to be the next step in the construction process.
Trying to fit the staging yard in later ship-in-a-bottle style is going to be a challenge, especially mating it smoothly to the ramps that will bring it to the surface. Not impossible, but a challenge, one that is easily avoided.
The slide-in / slide-out staging yard is best built before it is covered by visible layout. The last article I remember on one of these was John Signor’s fine example in Model Railroader magazine, Dec 2000.
I’d say that avoiding the work and purchase of the track components now is a false economy. Better to leave some of the visible track undone and do the subterranean staging first, diverting already-purchased track components to staging. Saving some dollars or time now and spending a lot more of each later may not be a recipe for enjoyment.
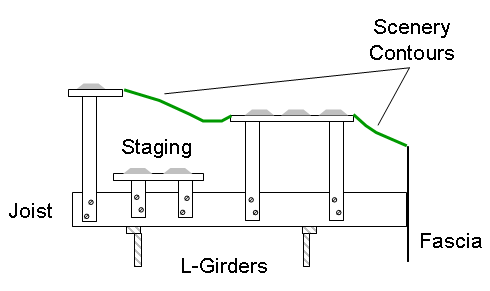
There have been multiple versions of Westcott’s Benchwork book, but the version I have shows some examples of track supported below the main deck height in figure 6-3 (page 29 of the sixth printing of the original version).
The key is to think not of tabletops, but of bridges (the subroadbed) supported by columns (the risers). Then you can have many different heights for subroadbed with scenery smoothing the transitions in between.
Looking at benchwork as tabletops only is often a mistake. Trying to retrofit something underneath the already-built tabletop is even tougher.
Not sure why you would need that much extra material. Here’s an example, assuming screen wire for scenery contours that doesn’t need additional support. But it would be possible with other scenery methods, some of which might need an extra riser here or there to support a scenery former.
This sketch was for a particular client situation where access was easiest from the rear (left on this view), but this also works at the front, behind removable fascia or below the fascia level.
Thanks cuyama. The wire screen/riser method looks interesting and something I might be able to incorporate fairly easily with my track plan. I’ll give this some thought.
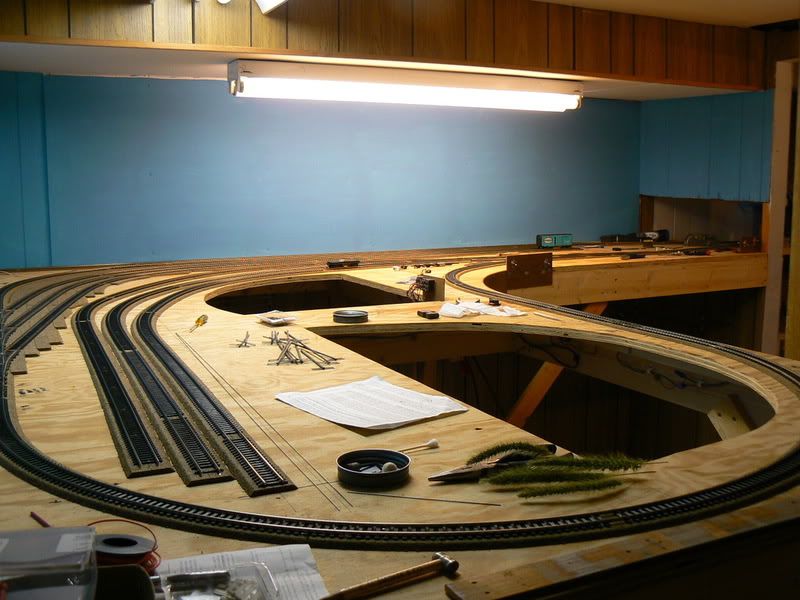
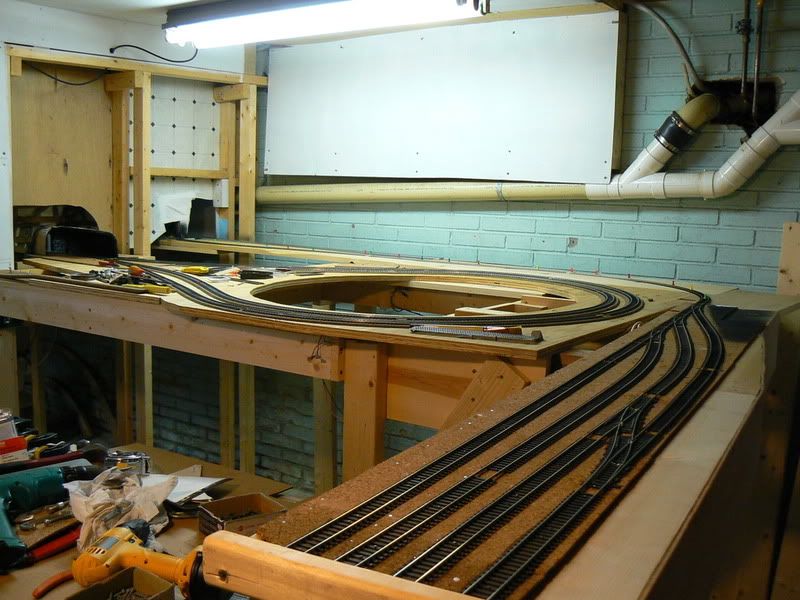
Hi Capt.: IMHO, if you have the space available, go with off the layout staging. Off the layout staging is a joy to work with. I’m blessed with the space, so here’s what mine looks like. This is West staging with a return loop and 6 stub end staging tracks.
This is East staging, double return loop, and stub end staging for Reading branch.
Thanks very much Grampy. Very helpful and your work as usual is lst rate!
Yes, there was a small “box” on pg. 29 of Wescott’s Benchwork Book but they’re not extensive enough to
see/get the “whole picture” for someone without experience. The book is fantastic in every other sense though!
These photos are worth 10,000 words.
Unfortunately I don’t have any other room available to me for a separte staging yard. Once the layout is up and running, I MIGHT be able to convince my wife to agree to a hallway 10’ temporary/portable unhidden
yard. I think that may be my best bet in every way but want to consider the decision vs. the under the table. I have an interchange track that can be extended later to serve either approach.
we’re in the same boat- we limited space for the new layout and have to decide between more operational track or staging. We’re going with comercial benchwork then overlaying with plywood\foam. I’ve been scratching my head on how to take the minimal amount of space to drop down below the layout to do the staging below.
We;ve though about a helix, but that seems to chew up alot of operational space on the layout. We’re going modular since we know we will be moving in the next couple of years, so a long incline around the layout doesn’t quite feel like the right solution either.
My current layout plan (thread here) also calls for staging underneath an upper deck, so I appreciate this thread and the pictures. I was pretty much going to do it as suggested above - the staging tracks directly on the frame with the scenic’d upper deck supported on risers. Thanks for the validation!
I am having second thoughts about this approach, however. In my case, free time is the factor that restricts my progress most. My kids are 11, 5, & 4, and due to work, vacations, home maintenance, school activities, soccer, homework help, and other familial stuff, my layout currently consists of a pile of lumber and hardware lying on the shed floor [:(] Given that the staging level needs to be built and debugged first, it’s going to be a loooooong time before I get to the “fun stuff” on the upper level.
And there’s also the fact that some of the switching I want to do might leave longer trains parked on grades, and avoiding that situation would restrict me to shorter trains and un-prototypical moves. I am building in a 10’x 18’ shed in the middle of the back yard, so there is no additional space to annex and a helix eats up way too much of the available room.
With those things in mind, I am leaning towards building my layout on a single level with no dedicated staging tracks. When I want to operate, I would run one side and use the opposite side for staging, as Koester suggests in his ops book.
I realize I’ll be reducing the level of operations potential quite a bit by doing this, but: 1) the layout will still meet my G&Ds, 2) I’ll be a solo operator 70-80% of the time and can’t handle too many trains anyway, 3) there are large private & club layouts within a reasonable drive that I can operate on, 4) the primary goal for this layout is learning and having fun, and the pile of lumber aint gettin’ that done