Forgive if this is a silly question, but I just don’t know about it…in the prototype, are there ever incline grades within tunnels…say a 2% grade? Or is that verboten and defeating of the very rationale it takes to have a tunnel. Reviewing my new plan, discovered an “oops” in it, and looks like if its to work I need have a grade within a tunnel. Don’t want the credibility of the layout to be utterly compromised, so I thought I’d ask…
The famous spiral tunnels in kicking horse pass are a classic example of two tunnels that climb and then pass over their origins in order to get around a section of track that used to be 4%. I’m not too sure of any other tunnels like this though (this can’t be the only one!?)
I agree. The alps and Peruvian Andes are essentially all graded. Each place has hundreds of tunnels of necessity. Even bridges are built to maintain a grade. So, yes, you could do as you imagine, and even have a shift in grade if the “engineers” deemed it necessary. [:D]
There is a 1.7% grade inside BNSF’s Cascade Tunnel (7.79 miles long) that is approached on either end by 2.2% grades on the rest of the mainline there. BNSF’s Stampede Pass tunnel, was built in the 1880s with ascending grades from either end. The summit of Stampede Pass is literally inside the mountain.
Pretty common, and sometimes hazardous - some tunnels were notorious in the steam era because they were built with a summit inside the tunnel, making it very difficult for smoke to vent if an artificial circulation system was not installed. Stampede Tunnel on NP’s Cascade line was famous for this, as was Alpine Tunnel on the South Park. A red lantern was actually kept hanging from the crossbeams at the summit of Alpine, so that engineers could see it through the haze and would know it was time to stop working steam.
There was a terrible accident in a tunnel outside LA on SP’s Coast Line in 1941 near the summit of Santa Susana Pass. A cab-forward with a heavy train entered the tunnel with a bad oil leak under the firebox. The train was very heavy, and the combination of load and oil on the rails caused the engine to slip her drivers. The stack exhaust was so severe that it damaged the concrete lining of the tunnel roof when the drivers spun, and the train slipped backward. The heat from the firebox ignited the oil pooling beneath the cab, and the headend crew died in the cab.
Shawnee, from the point of view of implementation of this feature into the layout, I would try and avoid transition in and out of grade in the tunnel itself. That way if there is any cause for derailment concern it is easy to get to.
Wise advice, Simon. So many of us have little issues here and there on our layouts that bullet-proofing our hidden and difficult access track is always a good idea.
Thanks everybody. It’s good to know that if I have to do it, I can and there can be some rationale for it. And interesting information on tunnels, too, so thanks.
Simon and Selector, I’m going to also try to follow your advice, and see if I can manage a work around that avoids it. Depends how much incline grade I manage on have that sets up prior to the tunnels and takes up after it. I’d really like to have inside the tunnel a flat grade…guess I’ll see if I can work it out.
Shawnee, I like tunnels…have had them on every layout. I have had only one problem, and that was where I placed a joint halfway through a 6’er. Everything was good until one day I heard funny sounds during a train passage. The train exited, but I didn’t like what I heard one little bit. So, I shut everything down and got on my knees under the tunnel with a flashlight. Couldn’t find anything wrong by touch and with the track above me on the splines inside the tunnel. Crawled back out, perched on a stool and shone the flashlight down the tunnel portal from which the train had just exited. Whoa!! The track had snaked badly at the join. How the train managed is beyond me. The track had actually moved past one another so that the ends were essentially overlapped! D’oh! It was at the start of the heating season, but before I actually got the basement warm and dried out. I think in this case it was a combination of a particularly hot and muggy basement that one day.
Long story short, I had to cut about 1/8" off both ends of one of the rail segments that met there, and realign them with Goop and with some nails. It meant taking off the decorative cladding around the face of the layout to get under the scenery.
So, if you can find a way to lay contiguous (soldered) track sections, or make the tunnel short enough to take a full length of flex nailed down on the outside of the rails every 4" or so, you could save yourself any worries except for mechanical breakdown. Where things can go wrong, they will.
Selector, good advice. Yeah, I have a bunch of tunnels…maybe too many, but it’s the way that I can hide some track, not have it be totally spaghetti, and still have long enough runs in my small space. It’s a level and a half layout, where the track curves around the corners of the room and climbs to a second level. The tunnels are pretty much “in and out” under that climb space. By looking at a C&O line which passes through the Alleghenies, I saw that they had several smaller tunnels leading up to the “grand pass” tunnel (Alleghany Tunnel). So I figured a series of smaller tunnels is ok.
I am keeping most of the tunnels relatively short (including the one with the budding grade issue), except one that goes through the wall into the other room and back out. Hey, it was one way to make the space a bit larger. [(-D] But that tunnel should be ok, the length of it after the portals is fully accessed and open in the other room…basically hidden but accessible. I’m making sure all my tunnels have large enough “guardrails” too, so derailments don’t plunge to the floor.
The other tunnels, I plan to have relatively full access to them underneath the layout. I reckoned about what you said, that things go wrong and I’ll need a way to access them for maintenance. I planning the benchwork around that, with space for me to access with a head and hands and be able to do some light work. I’m building up around them with benchwork.
Do you have any suggestions for realistic tunnel liners? I was thinking of taking plastruct stone sheets, painting them dark and using them for the first 6-8" of each portal. Or carving them from foam…maybe even using Great Stuff to construct them. Do you have any better ideas? My last layout didn’t have tunnel liners and it looked weird. It’s one of those little thin
I don’t line my tunnels. I make sure they are good and dark, though, so that they look natural for about 2" inside them. On the first layout, it was carved foam sprayed flat black, with a nicely painted plaster WS portal in front. Quick, dirty, and looks good. This time, only one portal gets a decent oblique view. The others are at 90 deg from the line of sight, so I just concentrated on making the portals look good. I took the pains to continue the ground goop inside the tube natural portal of the one portal that I can almost see into, if you will, and darkened that with black acrylic paint.
If you are a stickler for details, then I still think carved extruded foam sheets is the way to go, but the rock sheets you mention should also be very nice…maybe cost a bit?
I think in the fullness of time I’m getting to be a stickler for details. [(-D] The plastruct sheets are nice, but getting them and keeping them curved to fit a tunnel seems like it may be a hassle. And like you said, noone is really going to be looking deep into the tunnels, so the detail of the stone might not be worth it. I think I’ll try your suggestion on carving extruded foam, slopping it with a layer of sculptamold and painting it a grimy pitch black. Good note on the ground goop too…I’ll have it lead into the tunnel.
The tunnels and the pass that is the upper level is the central theme for my layout, so I guess I’ll be good at them by the time I’m finished. [:D]
Sorry, I didn’t make myself clear, Shawnee. This is the one tunnel that is ground gooped partway inside because it was not meant to have a portal. The other portals are simply concrete ones (Woodland Scenics). Behind them is black aluminum window screen covered with domed ground goop, so it is very dark immediately behind the portals. Add that these portals are at right angles to me when operating the layout, it just isn’t worth my while to do anything more.
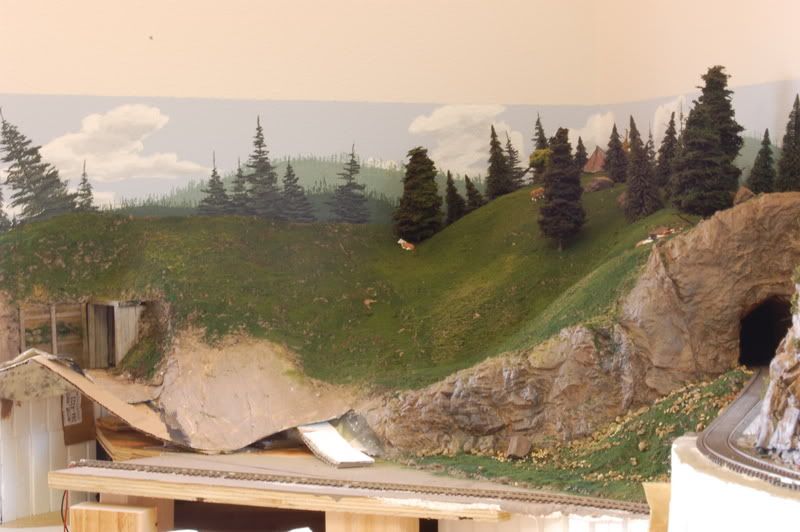
The foam interiors were on my first layout, but with the same concrete portals in front. So, I roughed up and faceted the foam nearest the portal, painted it flat black, and then glued on the portals. It looked quite good, I thought. This one, above, is on the new layout, and was meant to be simply blasted out of limestone and left with no portal. I am not sure you’d ever see such a thing in the real world since limestone is quite soft and not terribly stable.
I have 17 portals in my layout. I used the Woodland scenics tunnel liner mold with sculptamold and a little added color to the mix. This is a cheap and easy way to get the first 6-8" of the tunnel lined. Paint to the desired color. Here is a pix of two of the portals with freshly installed tunnel liners.
Here are the Gallitzin Tunnels at Tunnel Hill between Altoona & Horseshoe Curve and the West Slope & Johnstown that document the current prototype Norfolk Southern mainline which is the former Pennsy mainline:
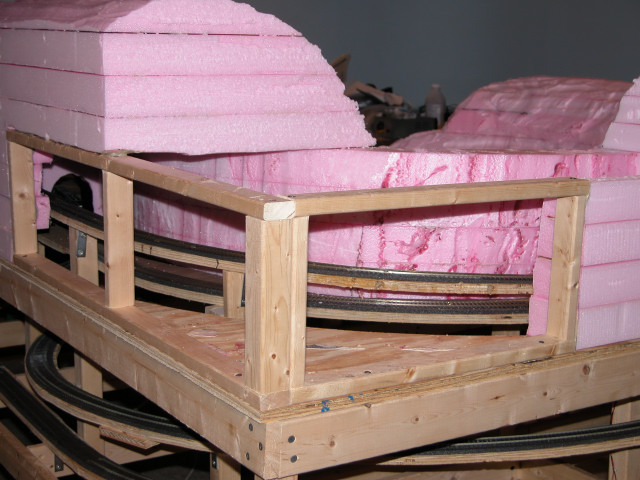
My largest tunnel is actually a mountain with two tracks. One with zero elevation and the other with a 2.5% grade on a 24" radius curve. Here is an early picture with construction underway.
The back is acccesible by removing facia and part of the top is removable.
Selector…oh, I see. Anyway, its looks great. Looks like a pretty good technique to me…esp for ones at an angle, as you said. The screen and goop sounds interesting too. I may give that a try.
TGindy…thanks for the reference pics. That West Portal is really cool, with the abandoned single portal.
We have a tunnel on a 3% grade. We tried to not have joints on the track in places that we could not reach. It seems that keeping the track clean is critical. So far no serious wrecks. There are access holes under the layout, and my arm is small enough that I can reach into the tunnel.
The tunnel portals are about 5 inches deep with everything open and black beyond that. We used geodesic foam hardshell on cardboard strips, which leaves lots of open space inside.


