Yes, griming is a word. If it wasn’t I was using it anyway.[(-D]
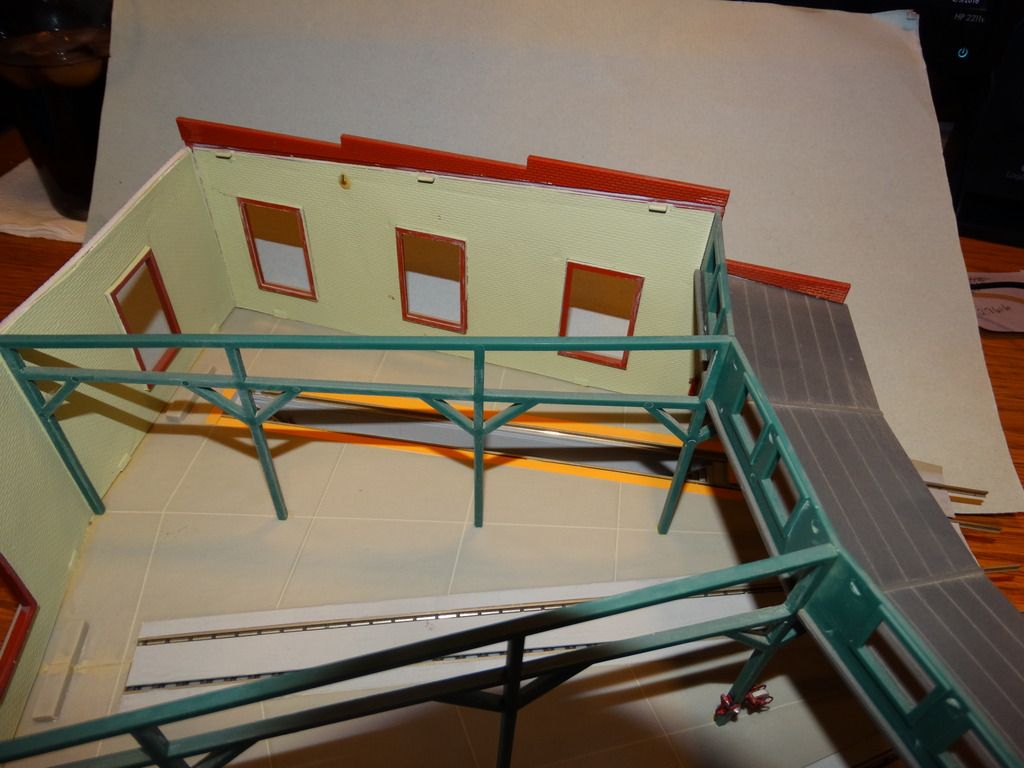
So I am just about to begin construction on my Walthers roundhouse that was a surprise Christmas present[:-^] and I would like to add the dirt and grime to its innards, especially to the floor, while it is sitting out all on its own. Also I would like to fill it with all the various tools that you would see inside the roundhouse.
I would really appreciate a pic. or two and a description of what powders, paint, washes etc. were used and the makers of the inside details such as tools and furniture. Also maybe lighting.
We learn by observing. I would like to observe your (roundhouse) innards.[(-D]
Larry is correct about a roundhouse being clean. As kid I spent a lot of time at the El Paso Southern Pacific roundhouse climbing all over the articulated locomotives and even the pits under the locomotives were not what I would call dirty. The mechanics kept the working area relatively clean. The floor near the tracks were oil stained but well kept.
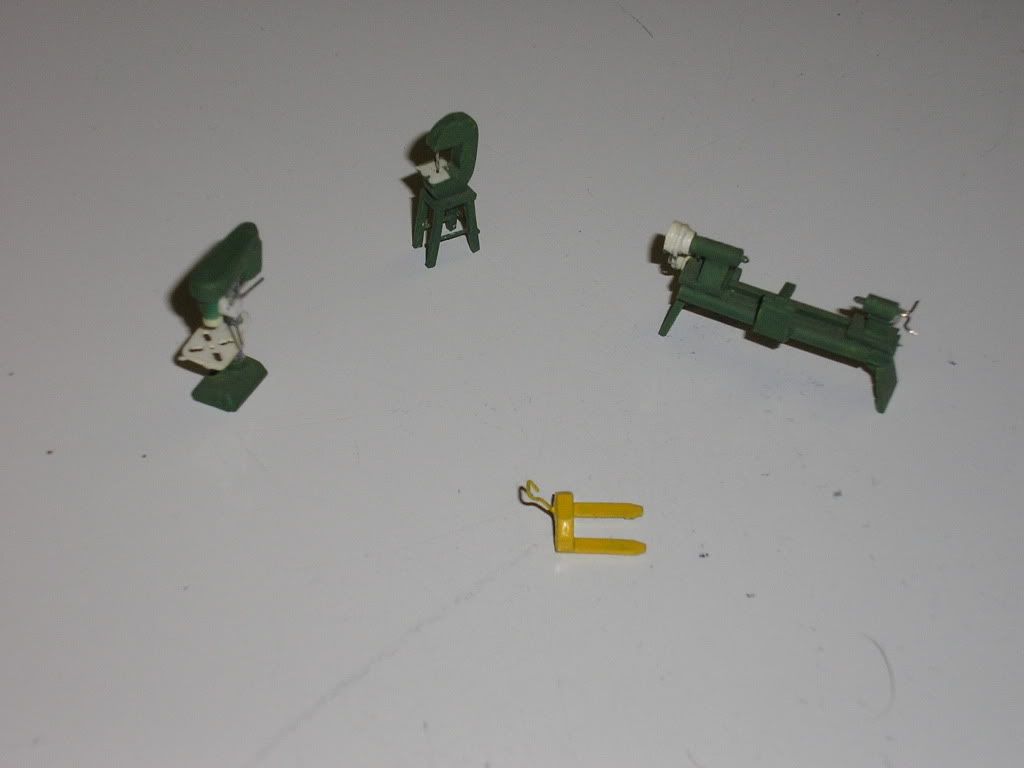
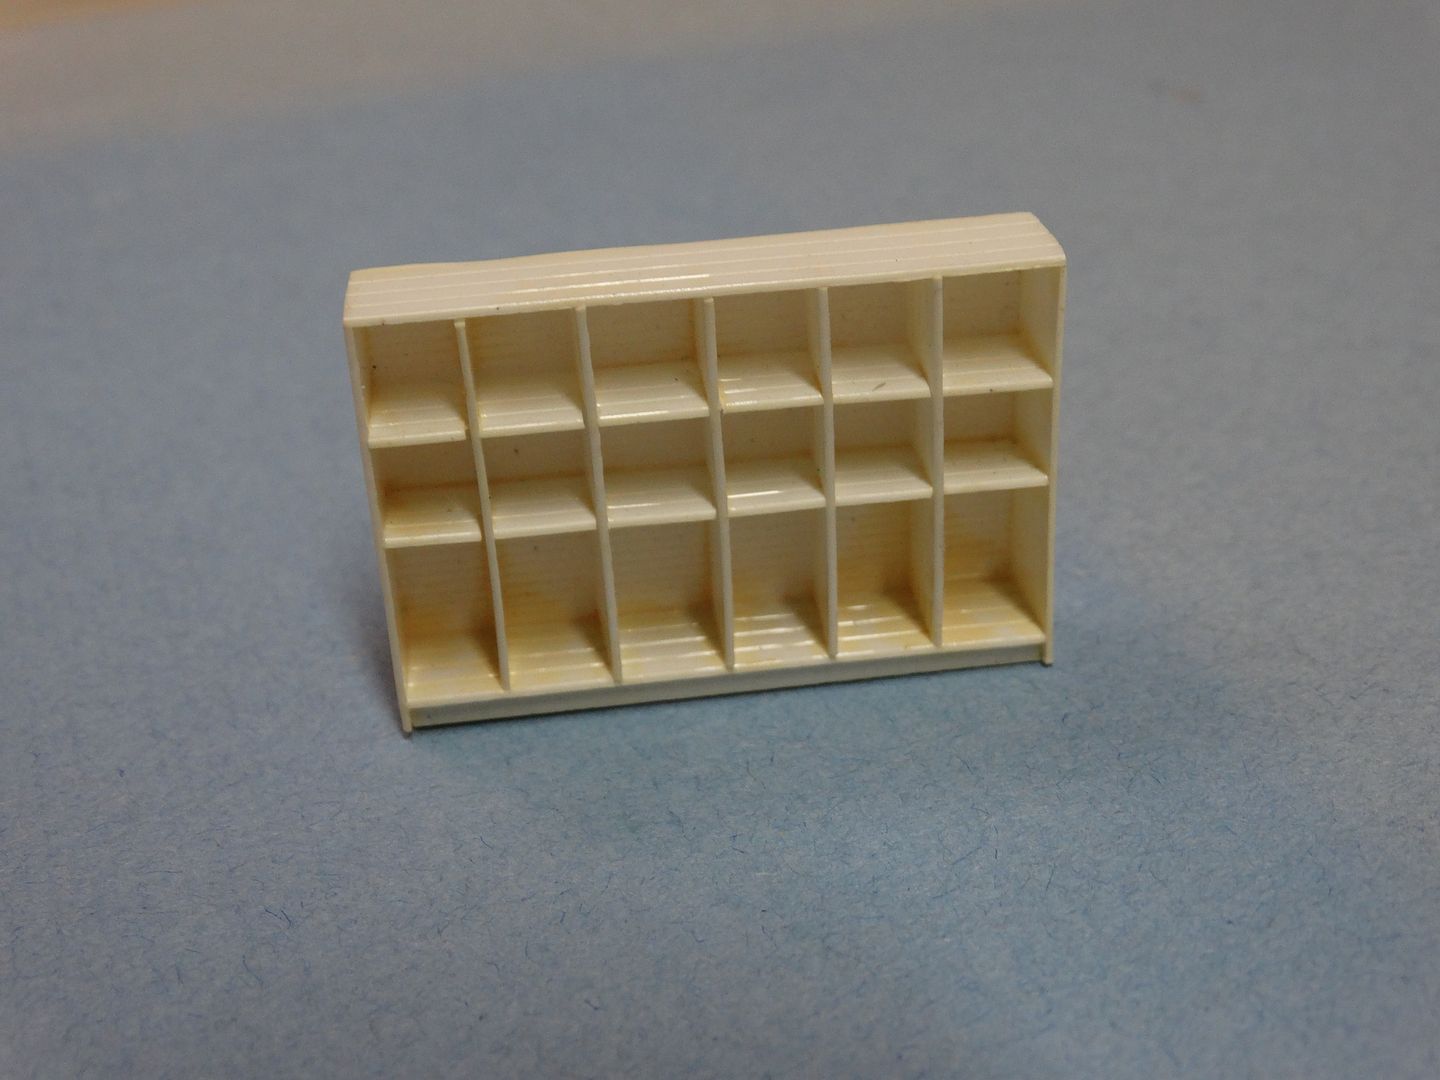
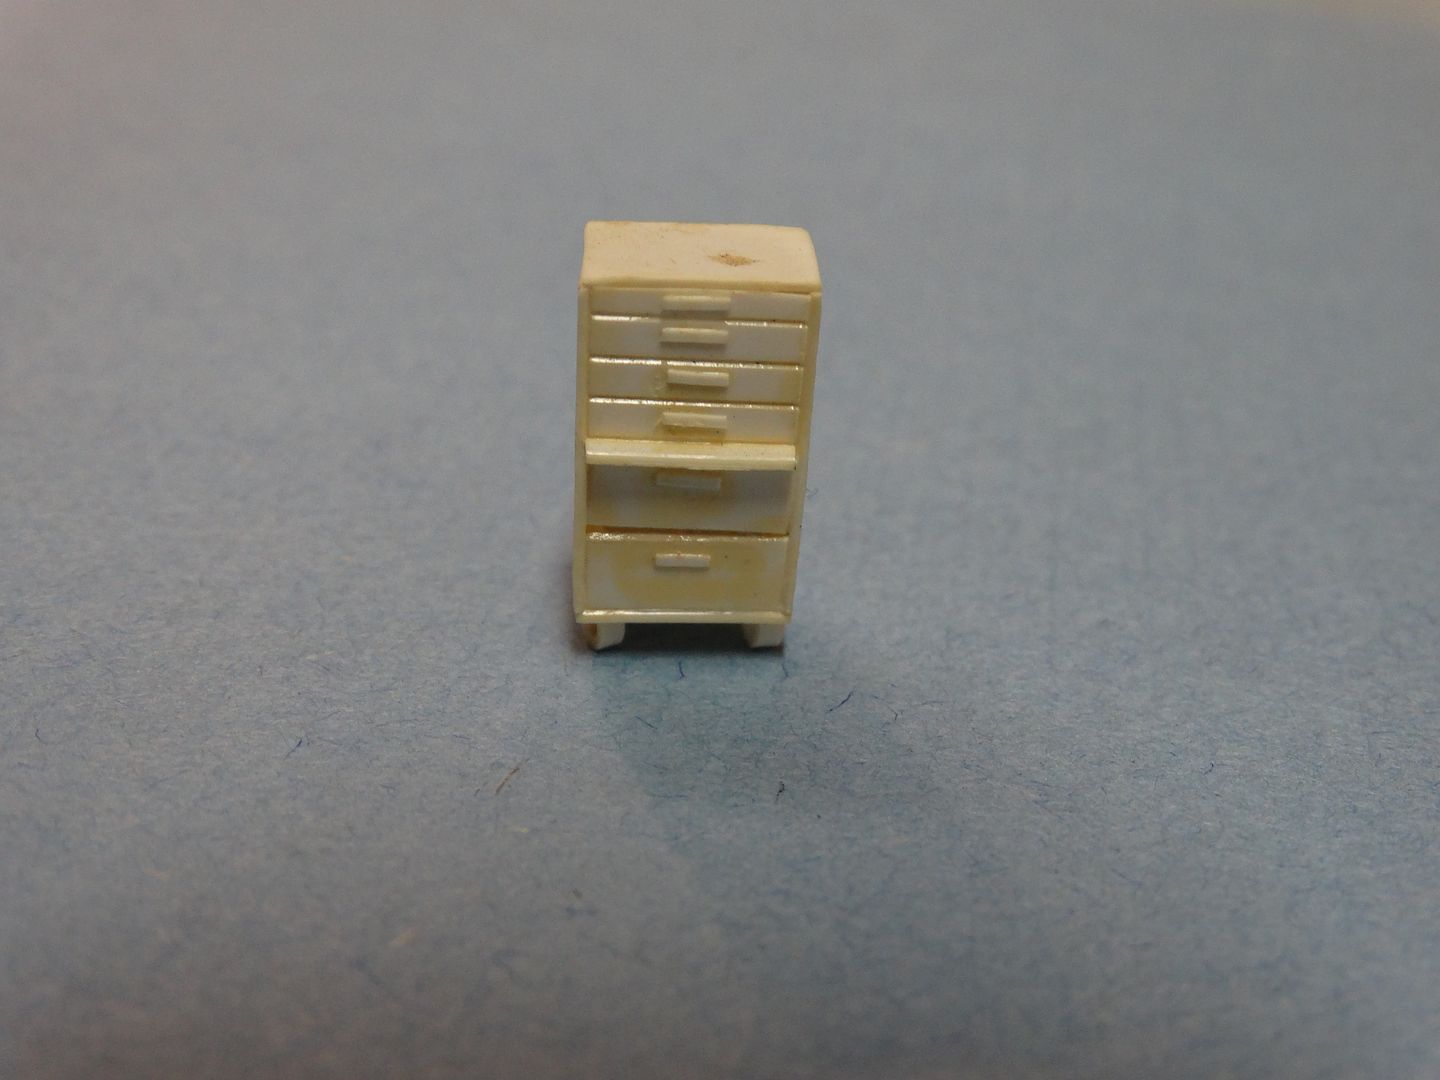
SS LTD has an interior kit, it’s a bit pricy for what you get. Before I painted everything I made molds of the tools and benches so that I could make my own castings to populate other work areas.
I’d agree with Larry that nearly all of the roundhouses I’ve been in, even the few still around in the diesel days were kept pretty clean. I particularly remember touring the western Maryland roundhouse in Hagerstown, back in the early 1970s and being impressed with how spotless it was kept.
Back then you could knock on the foreman’s door and ask for a look around. Sometimes they’d tell you they didn’t have time to mess with you but usually they were glad to show you around or give you a hard hat and tell you to keep away from live tracks and moving equipment, be careful and don’t forget to bring the hard hat back!
Many of the tools, fixtures and scaffolds in the roundhouse were on wheels so the boilermakers and pipefitters could work closer to the engine. Grease and oil wagons, platforms for changing flues, carts for moving arch brick, brake shoes, side rods, bearings, etc would be kept between the stall tracks.
I don’t have too much detail inside my roundhouse since the windows are smaller and the doors are filled with the backsides of tenders. I have more details in my diesel shop.
You could look at Shorpy. There have been quite a few interior shots of roundhouses by Jack Delano and others. Search railroads, shops, roundhouse.
I have twice toured the 1905 Milwaukee Road roundhouse in Janesville WI (currently the Wisconsin & Southern). Obviously it is not a museum or otherwise preserved to resemble what it looked like in days of steam (there is just one exhaust stack for example where in the old days there would have been one over every stall). Even with the end walls replaced by large picture windows for improved interior lighting, it is still a pretty dark place inside. For safety, therefore, for the most part the floors are kept “broom clean” and the tool cribs are an example of a “place for everything and everything in its place.” The tool cribs are nonetheless very interesting, with large wrenches of all sizes, and clearly marked areas for every tool to be returned to. Some portable welding tanks on wheels are a feature. Plenty of fire extinghishers on the support posts. One interesting feature from a “griming” perspective perhaps is that on the track where they were planing a locomotive wheel to return it to a good contour, there was quite a small pile of shiny and long metal shavings which had not yet been swept up and disposed of.
Contact me via message and perhaps I can email some selected photos.
Powdered charcoal can be rubbed onto the concrete to create a kind of “patina” of dirtiness without being too extreme. It works well if you’ve scribed some joints or cracks in the charcoal too. Plus, unlike chalk, you can seal it in with a flat spray like Dullcote.
Thanks for all the great links. That’s just the kind of help I was looking for.
I am doing a double (six stalls) so after all the flash was taken off the floor pieces, I still didn’t like the size of the cracks where they joined, so after some gentle fine sanding the joints are hardly visible. On to the windows, wow there is a lot of flash in all those tiny little windowpanes. I have been scraping it out with the exacto knife and I think I may try a file. What is your favourite tool for that kind of job?
I will airbrush them before removing them from the sprue. I just leave them attached at one point, that makes for less touch up.
I was wondering about how I would paint the inside of the roundhouse. If nothing else I was at least hoping to give it the feel of a CPR facility. The photo’s on this site are mostly B&W, however when wondering what the dark colour on the bottom of the walls and post were, I scrolled down and came across a colour photo of the washroom, it had the same paint skeem. I guess that is CPR brown?
The post and beams appear to be mostly white, with the brown up to the 5’ mark. However on either later or earlier parts of the structure, there appears to be just bare wood.
Lots of good examples of roundhouse furniture, even a washing machine.
Thanks Dave. It looks like I should be able to furnish the joint with a reasonable budget. I may take a crack at building some of my own small machinery as it looks pretty simple. I found some interesting You-Tube videos of old roundhouse power equipment that some have restored.
I am just waiting on some paint so I can airbrush the thing before assembly. My daughter spent some time finding me the perfect colour match for certain parts. She is soooooo picky.[(-D] I wish they could have brick finish on the inside walls as well as the exterior. The roundhouse is one structure that many of us take extra care with on the interior, it is too bad the plastic is not finished better.
I am also trying to get a hold of some rail for the floor. I may just butcher some Walthers flex as it would cost a lot more than destroying Walthers flex to drive into Vancouver to get rail. We went into Vancouver for the the Canucks game the other night, if I wasn’t so old and senile I would have thought of leaving earlier and stopped by Central Hobbies.
I want to leave the roof removable and am going to MacGyver some contacts so I can have lights without a wire leash still connected when I take the roof off.
I ‘bricked’ the inside walls of my Atlas roundhouse with Plastruct brick sheets. They are pretty thin so they were easy to cut to fit. I did have to remove a lot of flash and mold marks. Go easy on the glue!
I also built some smaller shop tools from scratch. It was pretty easy. It wouldn’t be much more difficult to build the larger machines.
Dave, what an inspiration you are. I really like that pallet jack as well as everything else. Thanks for showing me the inside brick work. I think I will do that as well as use some 2" x 8"s on the inside. I have seen photo’s of such combo’s on the inside walls. Rough and ready building didn’t make for fine finishing in those days. Being somewhat maticulous, I have a hard time with banged together. When my wife asked me to build her a new puppy whelping box, instead of banging one together with crappy plywood. I had to go with oak veneer and solid 1" x 2’ solid oak trim. It sure gets a lot of comments from the world wide fleabag community. Apparently I make other husbands look bad.[(-D]
I have a question about laying track into the roundhouse. Do people use one piece of track from the edge of the turntable pit to the back of the Roundhouse, of course removing ties on the part inside, or do they just lay the rails inside and add a small bit in between the RH and pit?