I’m fed up with commercial turnouts so I’m opting to hand lay my own. I’ve been looking around at the Fast Tracks site but when I add everything together the total comes to about $550 for kits and supplies. That’s a lot of money for just 30 turnouts.
Anyway, I’m wondering how hard it would be to do it the old fashioned way. Has anyone every built a turnout with just a few pieces of rail, a few gauges, and some ties? If so, can you please share your experience? I’d like to know the level of difficulty and also what tools and supplies I would need to get started. I’m not looking to build any double slips or crossovers, just standard turnouts. So what do you think? Is it a good money saving idea or should I go a different route? Thanks in advance.
Each switch kit comes with a super detail kit and working switch stand too. They also sell some nice code 81 rail. (yes, 81). I’ve built a couple of diaramas with their stuff.
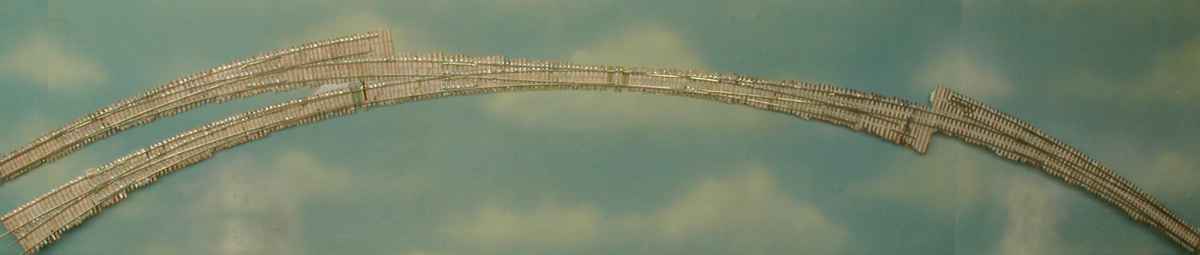
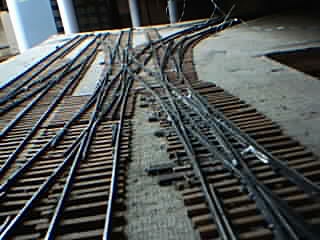
The definitely not patented, jig free technique for building turnouts (or any other specialwork, up to and including multi-double slip switch puzzle palaces.) Dimensions, where given, are for HO and/or HOj.
Establish the routes through the site by laying flex track, checking for minimum radius, S curve problems etc. Mark where the edges of the flex track ties are, for each route. Where the tie-edge lines overlay, you have the site of a turnout (crossing, gantlet?)
Determine the location of the points, and which way you want the headblock ties to extend outside the normal tie line.
Find the line where the distance between outer tie lines is the length of the tie plus 16.5mm. This is the approximate location of the frog point.
Lay out switch ties of appropriate length. Ends must reach or overlap the outer tie lines.
Position and spike down one stock rail.
Shape the frog point rails (I personally use separate rails, but some modelers form both frog point rails end to end, then bend the point together.) and spike the one parallel to the stock rail. Use three point and NMRA flat track gauges! The frog point goes on the line previously determined.
Shape the closure rail that parallels the stock rail and spike it into place.
My method of pivoting points calls for a flathead wire nail placed in a drilled hole for a pivot, and PC board throw bar (made from ‘experiment board’ with pre-drilled holes and non-continuous circuit lines). The shaped point rail is soldered to the pivot nail, and the throw bar connections are formed from bent brass wire passed through holes in the PC board and soldered to the insides of the points (low down to clear flanges.) I do not notch stock rails. Instead, I shape my points like the prototype’s, undercut to ride up on the stock rai
You might like to have a look at the Darling Downs Model Railway Club website - ddmrc.com - there is the start of a turnout building clinic on site, if you get on the Contact Us section and encourage the writer/constructor, he will hopefully get a move on.
His name is Russell, and the turnouts and crossings he has built, is building on the clubs N scale layout are smooth as, econimical and not really all that hard to do, he has some unique ideas that I feel are a bit different to the normal way of construction and utilises hand made jigs and patience.
I used the article “Building a Turnout from Scratch” written by Tony Koester and printed in the Model Railroader book “Trackwork and Lineside Detail”. This method worked great for me, with the only exception I did not ballast until the very end when I did the rest of my track as well.
The method is similar to the one detailed in this thread, but the nice thing is there are pictures for each step in the process. The first turnout goes a little slow, but after a couple it moves much quicker. I think the end results look great, and they work just fine. Hint: be very tight with the gage on both sides of the frog.
Loathar, I should have mentioned that I’m working in N scale. I don’t see anything on that site for N, am I missing something?
Teditor, I couldn’t find anything about building turnouts on that web page, did I overlook it?
Chuck, thank you very much for the how to. I’ve printed it off and I will refer to it often.
Wedudler, very nice site you have there, I’ll be referring to that also.
It looks like it’s fairly easy to hand lay turnouts but there are only a couple things that concern me and they are filing the points and frogs. I understand that they are the most important parts of any turnout so they have to be perfect. I don’t think I have the skills or tools to do a good filing job so I am thinking about getting the Fast Tracks PointForm filing jig.
This jig will allow me to get perfect results every time very quickly (that’s what Fast Tracks is telling me) and for only 40 bucks I think it’s worth it. I’ll need to get both a #6 and a #4.5 so it’ll be $80 in all.
Now for ties. I’m again thinking of ordering from Fast Tracks. I’ll get the PC board ties just to carry electric current and to make the turnouts very sturdy. This will cost about $32.40. Next I will need the wood ties also available from Fast Tracks. That will cost another $40.
I will also need fine solder ($6.40) and Pliobond adhesive ($6.00)
All for a grand total of… $164.80 (works out to about $5.50 per turnout)
So what do you think? Still worth it? Is there anything else I need? Sorry for the long post, I was thinking out loud and sort of babbled on. Thanks for stic
The filing is not as difficult as one might think (at least in HO it wasn’t). If you use Chuck’s method (or any other) to create a template for the rails directly on the roadbed, you file the frog point according to the template. This allows you to use any custom frog angle your heart desires, including curved frogs. The Fast Tracks jigs are going to limit your selection of frog angles. Same with the points.
My recommended article on laying turnouts is by Jack Work in the April 1963 Model Railroader. Kalmbach will sell you a copy of the article for a few dollars.
I don’t understand the need for the Pliobond if you are going to use PC board ties and solder. Normal use of PC Board ties is to use them every 5 ties or so, and solder the rail to them. The rail is not fastened to the wood ties.
Fred, in the Fast Tracks system, the PCB ties number maybe 8-10 per turnout. Thereafter, with the turnout held together by those few ties, you are provided dye-cut wooden tie templates that you are to glue to the nether side of the turnout using, as they suggest, Pliobond. When it is set, you take an X-acto and cut through the minute tabs between the outer planking and the dye/laser-cut ties. Remove the outer plank and you are left with a neat turnout.
People ‘hand lay’ turnouts to get greater accuracy and minimize derailments.
Yes, and about what you pay ($18 per) for a 'Prefab, or a quality Kit.
The non common denomiator is TIME - YOURS or THEIRS?
Turnouts are the cause of most derailments. (They seldom occur on a contiuous loop). Pre fab turnouts are difficult to mass produce - totally in gage. The best are manufactured by Shinohara and Micro-Engineering.
Good Switch Kits are manufactured by Trout Creek Engineering and Central Valley. ‘Fast Tracks’ provides repeatable in-gage forms for build-it-yourself-ers. Pro-87 is dedicated to provide wheels with ‘Scale sized’ flanges. Where do wish the train to stop and let you off?
If you are NOT going for greater accuracy, why bother?
Loathar, I should have mentioned that I’m working in N scale. I don’t see anything on that site for N, am I missing something?
Teditor, I couldn’t find anything about building turnouts on that web page, did I overlook it?
Chuck, thank you very much for the how to. I’ve printed it off and I will refer to it often.
Wedudler, very nice site you have there, I’ll be referring to that also.
It looks like it’s fairly easy to hand lay turnouts but there are only a couple things that concern me and they are filing the points and frogs. I understand that they are the most important parts of any turnout so they have to be perfect. I don’t think I have the skills or tools to do a good filing job so I am thinking about getting the Fast Tracks PointForm filing jig.
This jig will allow me to get perfect results every time very quickly (that’s what Fast Tracks is telling me) and for only 40 bucks I think it’s worth it. I’ll need to get both a #6 and a #4.5 so it’ll be $80 in all.
Now for ties. I’m again thinking of ordering from Fast Tracks. I’ll get the PC board ties just to carry electric current and to make the turnouts very sturdy. This will cost about $32.40. Next I will need the wood ties also available from Fast Tracks. That will cost another $40.
I will also need fine solder ($6.40) and Pliobond adhesive ($6.00)
All for a grand total of… $164.80 (works out to about $5.50 per turnout)
So what do you think? Still worth it? Is there anything else I need? Sorry for the long post, I was thinking out loud and sort of babbled
The club I was in handlaid all the turnouts, that was years ago, they knew the problems and did them right. All rail frogs and points that dont change polarity.
Entire layout used an industrial snap/hold selenoid for the diverging route, routes had a normalized direction, kill the power to the layout and all the machines snapped back to normal position after a run session.
Good fault free running (cross fingers)…it WAS reliable.