Hi,
I’m not making a model railway but thought this would be the best place to come for advice, im making an environment in a light bulb, its going to be a seaside scene, i want to make the sea water look blue, what would be the best combination of water product (i.e. resin) and colourant and would that colourant also work with the product i use to make the waves afterwards,
Thanks in advance for any replies
I have made a number of water scenes using Envirotex Lite epoxy resin.
I’m not sure how it would work for your application, but on a model railroad the key to realistic looking water is surface preparation, including painting. “Depth” is modeled with dark colors, black and dark blue/green, while “shallow” water is done with lighter tan colors. There is only about a half-inch of actual depth here, prior to pouring the resin:
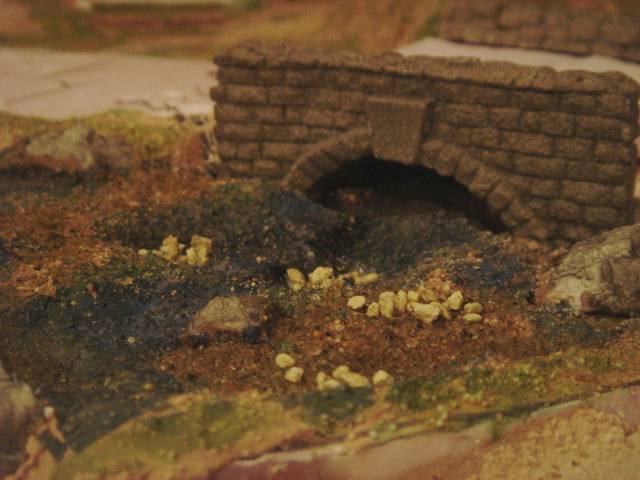
Once I poured the resin in several shallow layers, it looks much deeper.
When using epoxy resin, it is important to do multiple shallow pours, waiting about 24 hours between pours for the resin to cure. If you pour it too deep, gas will be trapped inside and you’ll get visible bubbles.
I use the multiple pours to tint each layer of resin. That lets me add “depth” in this step as well. The first bottom layer gets a dark tint. I use only a drop or two of craft paint in a typical one or two ounce resin pour. For the bottom, I’ll use dark colors. This also adds a “murkiness” and obscures the stream bed, just the effect I’m looking for. Subsequent layers get lighter tints, and I usually use untinted resin for the top layer. This scene was 3, maybe 4 layers. It may sound intimidating, but this particular scene was the first time I ever tried it.
If you want the underwater part of the scene visible through the side of the light bulb, the water should be clear.
.
A couple of years ago a miniature painter won the Golden Sophie award at ReaperCon with a model of a pirate floating on a piece of shipwreck. The underwater scene beneath the pirate was the real showpiece, and it was all encased in clear resin to represent the water.
.
The (reaperminiatures com) website had a tutorial explaining how it was made. If it is still there, that might be all the help you are needing.
.
-Kevin
.
First, I wish you success. Sounds like a real challenge.
Secondly, water isn’t blue. I may appear blue, but only on its surface, and only because the sky is blue above it and is reflected. Water appears grayish, greenish, or simply clear…or turbid and all sorts of colours. Blue only on the surface. It won’t be blue from below, or looking through it underwater at the fish.
I can tell you what I have done: I mix a two-part ‘finish quality’ epoxy such as Swing Paint’s Nu-Lustre 55 ( http://www.swingpaints.com/category/epoxies ) to which I add a tiny quantity, maybe 0.5 ml, of Hauder Green from the craft acrylic paints at WalMart. I add half that quantity of plain old yellow craft paint, and mix well (for turbidity I also add a pinch of dry plaster of Paris powder, but I don’t think you will be keen to do this). Mixing the concoction for about four full minutes, I pour, wait ten minutes, and then blow through a soda straw over the surface to pop the remaining bubbles that haven’t eliminated themselves by then.
Note that I have no idea if an epoxy will behave well inside of a light bulb, particularly one that may be frosted or coated. It might migrate up the side for a ways.
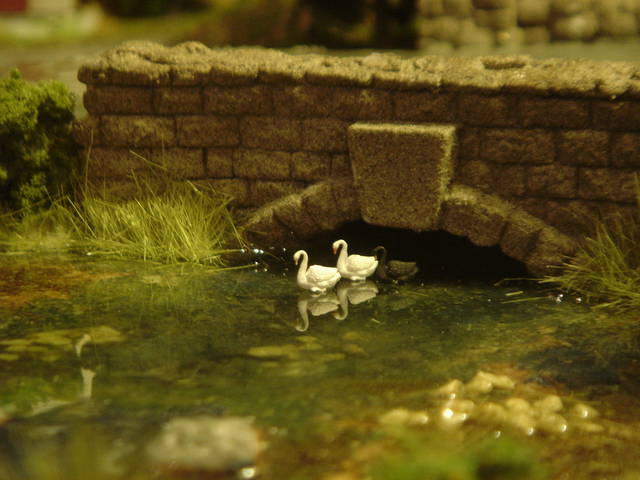
Here is a jpeg of a diorama I made for outdoors use. Note the water, but I did paint the river ‘bottom’ a dark greyish teal first, at least a broad streak of it near the centre of the stream. Also see the reflected blue on the far side of the bridge, where the angle of incidence is just right to reflect the blue sky…and where it is not, closer to the front of the diorama.

Thanks for the replies guys, ill let you know how it goes (probably disastrously)