I need some ideas on how to join flex track together in a curve. I sawcut the rails but it is nearly impossible to get them to line up and stay that way. Can they be soldered before flexing? Oh I’m the economy guy so I bought steel flex track. Also educate me about soldering track together. It is so hard to get the solder to stick. Thanks for any help
Solder the rail joints before bending the track into a curve.
Steel flex track? Are you sure it is not N/S flex? Steel will rust and it is hard to cut, and solder/weld. I use a Xuron rail cutter or a Dremel cutoff disk to cut flex. If it is really steel track - Good Luck.
Jim
If you’re working with code 100 (or smaller) rail, I’d recommend nothing larger than a 45 watt iron. Any larger, you’ll be melting ties all over the place. The key to soldering ANYTHING is that the pieces to be joined are cleaned properly. Buff them off to a good shine. I normally use a typing eraser, the type you sharpen like a pencil. The point of it gets into the web of the rail for a good cleaning. Then use solder flux VERY SPARINGLY. For wire drops between the rail and buss line, I drill a hole between the tie ends and feed the wire down it. Strip and buff the wire end, then put a double bend in it. First bend it 90 degrees so it lays parallel to the rail, then put a small bend in it to push it against the rail when the wire is pulled down into the hole. Add the flux to the joint, tin the tip of the iron, touch it to the joint, and it should solder it fast in a second or two. When the joint cools, use a stiff brush to remove any flux residue.
Two reasons for using solder flux sparingly: 1. It has to completely vaporize before the joint area will be hot enough to melt the solder. 2. The vapor is very irritating, don’t breathe it or let it get in your eyes. An old trick I learned was to exhale slowly across the joint, starting just before you touch the soldering iron to it, and continue until you remove the iron from the joint. The fumes will blow away from you. This should work even with HO scale steel track, although I can’t recall seeing steel flex track.
I’d also ask, how tight of a curve are you putting in the flex track?
I have never soldered steel track, but I have read that you need to use acid flux with it.
You can solder it before bending.
However, I usually install part of it on the curve, even up the rails on the uninstalled part, solder the next section to it, and then continue installing. This works better if I have 2 joints to make in the curve.
Enjoy
Paul
You can solder steel without acid flux, but it HAS to be clean.
I really hope it’s not steel track. If it is, unless the layout is in a completely climate controlled enviroment, it will tend to have issues with rusting sometime in the near future. Usually right after you complete the layout! 
It’s probably in your best interest to STOP RIGHT NOW, and spend a little cash to get nickle silver track for your layout.
Rotor
Take the rail on the flex track that moves, and slide it out a good 6 inches. Then do the same to the other track your connecting. Then take the rail thats out and slide it into the next track. Your joints will be ofset, and have less kinks… Do this all while the track is straight and solder while straight. Once soldered, then bend curve.
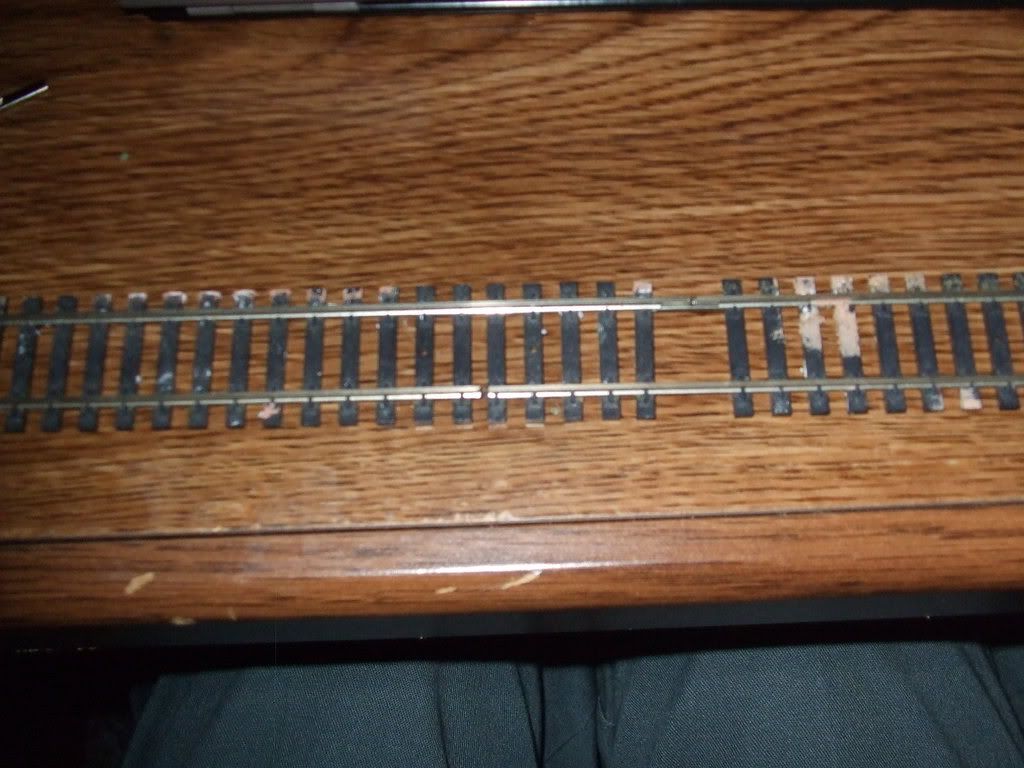 Notice the gaps in the rails where I have offset them.
Mike
Acid flux is corrosive, so don’t use it on any model RR work.
Steel track will not save you money unless you don’t want your trains to run reliably. Check your track with a magnet. Steel track is not very common.
As has been said, steel track is quite hard to solder well. It’s also difficult to keep clean as it has a very nasty habit of rusting. I agree, if it’s steel rail stop now and get nickel silver rail.
PLEASE listen to Gandy dancer and NEVER, NEVER use acid flux on anything that carries electrical current. It will surely corrode and become non conductive and impossible to repair.
Don’t ask me how I came about this information. It was Waaaay before the internet forums[sigh]
Thanks for the info. I found out my flex track is steel and unfortunately soldering steel track is difficult and it won’t hold together.
Thanks for the great info. I do have steel track and it just does not cooperate. My layout is in the house so I don’t have rust issues. But it sure does not want to solder.
If you feel you are committed to (and stuck with) the steel tracks, there is a cure…if not terribly elegant. First draw your intended centreline for the curve you need. Draw it in black or dark marker so that you can see it between the ties when the track segments are over top. Then, use pins or track nails in the ties to make the rail sections conform to the curve you want. Drill some tiny holes in two or three ties close to the join, but on both sides of the join. Using something like a small block of wood, press the joined ends inward toward the radius of the curve. When the tracks are nicely set over your centrline that you drew earlier, use track nails in the ties there, about two per side, and also drive nails or tiny screws into the surface at the outer edges of several ties on either side of the join. The idea is to buttress the joint. Now you should be able to force the rest of those two segments to conform to your curvature. The nails can be hidden with ballast or ground foam and stuff.
It is easy to solder if you do a simple thing like providing heat sinks before the ties so they don’t melt. Some people use large alligator clips to prevent the heat from going farther down the rail. I like Linn Westcott’s method of a wad of wet kleenex at the first tie. It conforms to the rail and prevents damage to the ties.
That the layout is in the house is irrellevant, the house has humidity and your tracks will rust, it only a question of when. I join the several other people here who have recomended that you bite the bullet and get rid of the steel track before you go any further. This is the wrong p[ace to be stingy & stubborn. Model Power nicklesilver code 100 flex track is available for about $1.80 a stick from several internet suppliers. There’s a reason steel track is cheap, it’s virtualy useless. This is definitely one time you should pay attention to what people are telling you. Good Luck.
EG:
If you already have the steel flex track, use it. This is not an airplane. Failure will not result in injuries. At the worst, you’d have to buy flex track and replace it. So just go ahead and use what you’ve got. NS is better, but you’ve already got the steel.
Corrosion may not be a problem. I have a bunch of pieces of Tyco steel track on my layout. It’s very old, and had been stored a long time. It was indeed corroded when I brought it home from the train show, but I cleaned it and Gleamed it and it’s held up for over half a year without any sign of corrosion.
Now for soldering - here’s something you can try. Go to the Radio Shack and buy some paste rosin flux:
http://www.radioshack.com/sm-2-oz-non-spill-rosin-soldering-paste-flux–pi-2049774.html
Clean the steel surface /well/ and apply this flux, then get the rail good and hot, and apply solid wire or rosin-core solder. Wipe away flux residue with a damp rag. The solder needs flux so it can wet the surface, and you may not be getting enough on the steel with just the rosin core.
Again, if you had no track, I’d say buy NS. But you already have this stuff, so go ahead and use it. It will work.
Maybe you can give your diesels Magnetraction by gluing some rare-earth magnets to their fuel tanks. [:)]
True acid core is corrosive, but there are places on the layout where it is fully appropriate. Use acid core when you need maximum strength like when building turnouts. Know that acid core will wick into and under any insulation so using it with wiring is a no no. So long as the acid can be easily flushed and cleaned off, (as in washing with water) it is not a problem.
When all you know how to do is use a hammer, everything tends to look like a nail. . .
I’ve never seen steel track, so the magnet suggestion is a really good one.
Just my 2 cents,
Joe Daddy
Yes, this very close to what I do but not nearly 6". I offset them just enough to have some real ties going between both rails between the offset joints (just two in the specific case shown in the photo below). Usually this is the natural offset caused by the inside rail going around a shorter radius than the outside rail. In otherwords the track naturally produces its own offsets.
That I don’t do. You will have to cut away ties and still have to do something with rails where there are gaps in the ties to keep them in gauge. I get the track lined up in place on the curve. That way there is no huge number of ties missing. In fact there aren’t any ties missing.

Nickle silver track is not that expensive and works very well.