Please tell me your methods for weathering steam locos? I am interested in learning the easiest, but accuarte ways to weather my steam. Any help would be appreciated.
Thanks all
Smitty
Please tell me your methods for weathering steam locos? I am interested in learning the easiest, but accuarte ways to weather my steam. Any help would be appreciated.
Thanks all
Smitty
I just bought Dave Frarys DVDs on weathering from MicroMark. They are very informative.
Whether you use chalks, pastels, washes or an airbrush is nowhere near as important as observing how real steam engines weather. Don’t just copy other peoples models that feature in magazines, as they’re seldom realistic. Get hold of some good quality colour photos of steam locos, and really look at them.
Cheers,
Mark.
I can help you there, go to my website and send me an e-mail. Also check out the section on weathered steam locomotives while you’re there.
No.1 RULE: * m o d e r a t i o n* just like the real thing, no need to exaggerate.
Yes, yes, and yes.
Thanks for the offer, but I am interested in weathering my own models. I am trying to learn how to weather so I can do my own projects. It just won’t feel right if I have someone else do it for me.
Smitty
Hi,
A year or so back I did a photo essay on weathering a steam engine on my old Port Kelsey Ry. weblog.
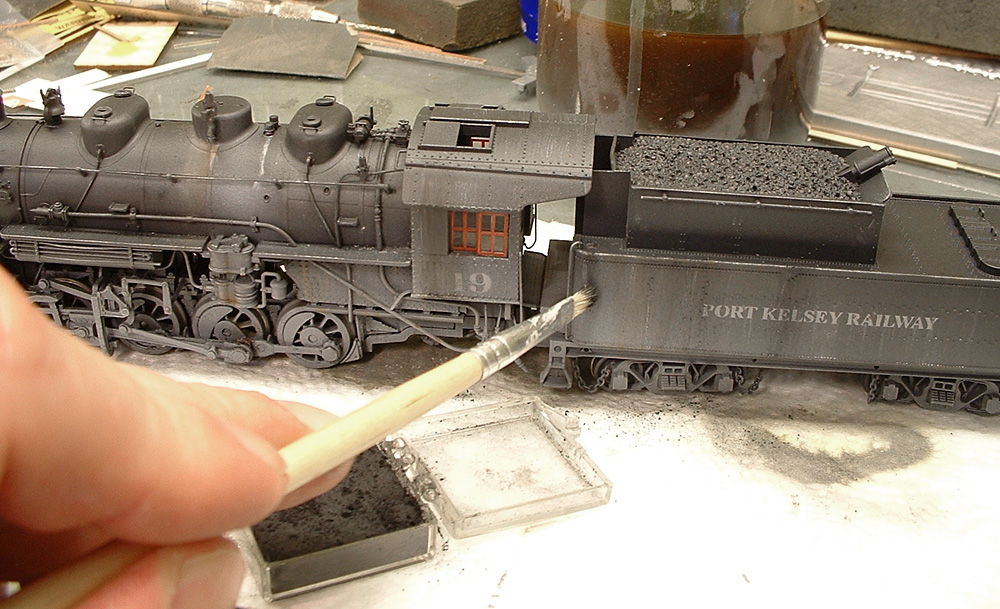
It covers step by step the various techniques I like to use to weather engines.
Hope this is helpful…
The other thing I would suggest is that you take the time to learn a bit about how steam engines work, and what the various appliances are and the functions they perform. A little research before you start will really pay off when you start weathering your models.
How a steam engine weathers is governed by many factors - the service it performs, how well it’s maintained, the terrain in which it operates, how various parts are lubricated, the type of water treatment used, the type of fuel it burns, which way the cylinder drains and injector overflows discharge, the type of blowdown fitted, etc.
(DISCLAIMER: The following comment is intended as an observation only, NOT a criticism, bash or an attempt to start a flame war. Because I have spent most of my railway career working on steam, I tend to look at models with a fairly critical eye. [:)] )
The example shown above is a nice example of what I call artistic weathering. It’s very well executed, but to me it doesn’t look quite right. Even a very dirty and dusty engine will still have areas that are glossy and dirty looking, due to the spillage or loss of lubricants, or minor steam leaks and dribbles. Other areas will be rubbed clean or at least scuffed by the the crew or roundhouse workers climbing or walking on them. Now matter how dirty the engine is, most crews will make the effort to keep the cab handrails clean!
Cheers,
Mark.
Thanks!
One thing you might also consider is exactly how MUCH weathering you choose. And frankly, what ERA of steam you’re modeling. Are you choosing the ‘Golden Age’ when steam ruled, or the ‘transition’ era when they were slowly being replaced by diesel, or the ‘last legs’ as RR’s were running them out before scrapping them? Believe it or not, this can make a difference in the amount of weathering you choose.
Is your loco a coal-burner or an oil-burner? Makes a difference, believe it or not–oil tended to burn a little cleaner, coal left more soot. What kind of terrain did it travel? Remember, steam locos were bought for SPECIFIC jobs and specific areas. They didn’t travel from New York to Oakland or Seattle or Los Angeles like diesels can–and do–today. Most steamers had a limited run on their owning railroads. For instance, out here in California, a Cab-forward steamer might be assigned to the Roseville CA-Sparks NV run over Donner Pass, a distance of only about 130 miles. Locos back East traveled even shorter distances. Locos out West tended to kick up a lot more dust than possibly locos in the East, for example. And one type of loco was changed out for another type during their runs, depending on the terrain.
Some prototypical railroads were known as ‘good housekeepers’, making sure that their locos were washed everytime they were serviced. Other roads just worked the steamers and occasionally cleaned them when they needed to find out what the number of the loco actually was. Mainline RR’s might have been a little more careful about the appearance of their steamers than, say, a short-line with limited funds for cosmetic maintenance.
To answer your question, my MR, the Yuba River Sub is a fairly ‘good housekeeper,’ and the era I model is WWII, when big steam was still ‘King’ on the subdivision. I tend to weather
One addition to Tom’s comments: flat laquers (think Dullcoat) can have very different effects on weathering chalks and powders. The standard Dullcoat (I’m thinking of both Floquil and Tester’s) includes some talc, and it will control a weathering with Bragdon powder very nicely - keeps you from overdoing it. I found when I started experimenting with Scalecoat and its associated laquer that the same rule did NOT apply - the lacquer took off some of the color, but not nearly as much as I expected (result: an exceptionally sooty PFM 2-8-0. Live and learn).
BTW, Tom - I have to tell you - I’m really a convert on Scalecoat. The auto paint I used on that Bowser 2-10-2 took decals well, and I never needed to add the layer of glossy glaze that I used with Floquil, but it doesn’t seem durable - the Dullcoat seems to have weakened the finish, and it scrapes easily.
Unless you’re modelling a very heavily-weathered loco, don’t Dullcoat it after applying the weathering, as all but the dirtiest locos had some places that had varying degrees of gloss to the finish.
I generally start my weathering process when I begin painting the loco. Using Floquil paints, cabs and tender bodies are painted black with a bit of white or grey primer mixed in, while boilers, smokebox fronts, cylinders, pilots, airtanks, and appliances get the same but with more white or grey added to the mix. Frames and running gear, both loco and tender, along with tender decks get the same mix as the boilers, but with some brown and more grey added to the mix, and the smokebox and firebox the same but with even more brown, and perhaps a little red or orange added. I usually use dry transfers for lettering, and apply them directly on the flat paint. For decals, the appropriate areas should be glosscoated first. When the paint and lettering are done, it’s time to clear coat. The cab and tender body get a spray of semi-gloss, tending more towards the “gloss” side of the equation, while the boiler, smokebox front, cylinders, etc. get a less shiny semi-gloss. Running gear and frames generally get a flat or very low sheen finish, and the smokebox and firebox get no clear finish at all. All of this painting and clear coating can be done without masking, although a small sheet of paper can be a useful tool for preventing overspray. To apply further weathering, I place the fully assembled loco and tender on a powered track in the spray booth, apply power, then spray the lower extremities of both loco and tender, all the while restraining the loco with my free hand and pulling it back as required. For any weathering colours, I again use Floquil, but thin it severely: as much as 90%. With both the loco and tender wheels turning, all wheel faces and all visible parts of the valve gear and siderods get equal expo