I may have to seriously consider a drop/lift/gate/bridge on a single or maybe double mainline.
Do any of you have one? Any pics and techniques to share that make them work dependably? I’ve read about cutting the gap on the rails at
an angle but nothing else pertinent.
Thanks.
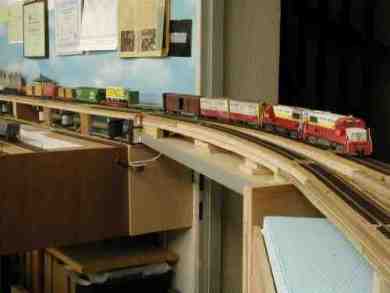
Yep. The BC&SJ has a swing bridge across the room entrance way with a 40" radius curve on it. No problems so far. I drove #4 flat head wood screws into the plywood subroadbed on both sides of the ‘fault lines’ and soldered the rails to them for stability.
It’s been working faithfully for the last three years.
Here’s a photo of the rails crossing the fault zone at the swinging end of the bridge.
Regards,
Charlie Comstock
Mine is a lift-out, rather than a swing bridge, but the track is curved on both sides and through the lift-out, too. Here’s a thread that discusses the issue , and if you follow it through, there are photos of mine and a diagram for wiring it so that trains are prevented from using the approach tracks if the “bridge” is out.
Charlie, your idea of soldering the rails to the screws in order to maintain the track alignment is a good one. [;)]
Wayne
Thanks very much, Charlie and Wayne. Other than cutting the rail gaps at an angle are there any other
special circumstances involving curved track over straight? The pics and link very very helpful!
Hi, Jim, coincidence I found this one this morning. I hope you got my long note. I occasionally operate on a neat 3 level layout here in PT and the one level that is mid-height has a swinging gate that works very well. The top level is a fairly high duckunder and presents no problems even though the owner is about 6’ 3". The gate is well engineered and formed out of cabinet grade plywood. If you send me your address online I will mail you some sketches, OK? Or I can bring them with me to Chilliwack. jc5729 John Colley, Port Townsend, WA
I have two situations where multiple curved tracks cross a fault line at an angle (not gates, but yard throats removable as units for maintenance.) Since the rail joints are offset from each other, I installed guard rails on the inner side, opposite the gap in the outer rail. That seems to have eliminated the few problems I had with some longer cars wanting to climb the (wider than usual gap) outer rail.
Mine are on hidden track. On visible track, I’ll probably put in some kind of roadway to justify the guard rail and help to disguise the fault line.
Chuck (modeling Central Japan in September, 1964)
It’s in a curve and grade:

Wolfgang
Well, kind of… I plan to have one in the very near future, once I actually get some track down.
Obviously, reliability hasn’t been an issue… yet. [:-^]
Peter
I don’t have a curved gate . I tried to avoid it for the nightmare adjustments it would require. So I made a straight gate and followed the recent swing gate instructions I saw on MR.It’s made of 3/4" pine. The ends of the gate top are not solid. There is a space between the top and bottom pine board at the last 1 inche.There was an initial major warpage problem in the beginning from humidity changes. So I use a screw to adjust vertical height. Screw out to lift, screw in to drop. The horizontal adjustment seemed to be more of a challenge.I decided to screw a 90 degree bracket onto the door frame , tapped 2 holes in it and now the 2 hex screws (with soldered levers) can be turned in or out for horizontal alignment. Works like a charm.Of course you have to have a dead accurate alignment at the pivot point of the gate. Otherwise this would be almost impossible to work properly. Good luck on your project.
Tom


FWIW Dept: One tip I found useful is that a modelling razor saw is the thinnest blade you can get, so after you have installed and checked out the gate for swing, lock it in place with a barrel bolt in the closed position, then lay your track all the way across it and extending past the joints. When you have it down pemanently use the razor saw to carefully cut through the track and ties at the two fault lines. Wire the track(s) with flex at the hinge end. jc5729 John Colley, Port Townsend, WA
My new layout will feature a liftout on a curve to allow for display running. I will primarily be running it as a point to point will have the ability to insert the curved lift out to allow for display running during tours or if I just want to watch the trains go round ‘n’ round. [:)]
The initial reason I posted the question (as OP) was that I’ve always heard that curved gates (especially for double tracks) were a nightmare. Are you all finding that it isn’t as “scarey” as everyone makes it out to be?
That is not THAT much harder to keep things aligned than for a straight track (double track) gate?
I’ve been overjoyed to say the least that not only am I getting great info. and pics here that really help, but that it isn’t nearly the uncommon thing I’ve always believed it to be!
I can’t remember having any derailments going on or off my curved (single) track swing bridge since it was installed 3 years ago. Perhaps the 40" radius helps - maybe it would be less reliable with an 18" curve… FWIW
The key is to make sure both ends of the bridge can be securely and accurately locked in place, provide a means of locking down the track at the edge of the chasm (and allow for expansion and contraction on the bridge track - use two pieces of track with an unsoldered joint in the middle).
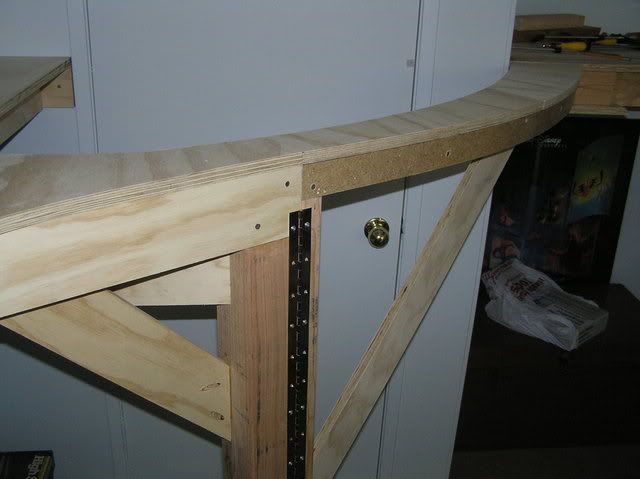
One end of my bridge is located with 3 decent quality door hinges, the other end swings back and forth and rests on a shelf when it’s closed. I made an alignment pin out of brass tube and round stock. After getting the benchwork aligned originally I clamped it and drilled a 1/8" hole through the bridge into the shelf below. Then I drove pieces of 1/8" tubing into both holes. Finally I made a pin out of brass round stock that tightly fits into the tubing.
I could have skipped the tubing but by using it if the pin remove/replace cycles end up weaing the hole I can pull and replace the tubing sections.
I also put a micro-switch below the pin location. This switch turns off track power for a long ways on both sides of the bridge to avoid either driving or backing a train into the gorge of eternal perial (actually the entire Oakhill area adjacent to the bridge loses power when the pin is pulled).
Once the benchwork is swinging nicely, I drove eight 3/4" #4 flat head wood screws into the support wood next to the gaps, one under each rail. The heads were slightly below the bottom of the rail.
Then I laid the rail across the gaps. I glue flex track down with paintable latex caulk. Once the caulk set up I soldered the rail bottoms to those #4 flat head wood screws then I used a cutoff disk in a dremel to gap the rails directly above the gaps in the tectonic plates (benchwork).
I opened it up to make sure everything slid sideways nic
Thanks Charlie! That was a great step by step set of directions. No wonder they made you Superintendent!
The Tectonic Plate thing was pretty funny too ![]()
Not so funny if you lived trackside. The locals complain that every time one of the freakin’ giants the railroad or Hillmovers Construction uses for construction work opens or closes the bridge, all their best china ends up on the floor and half the time the gold fish takes a swim in the dog’s water dish. I dunno if I should believe 'em but there are rumors of a class action suit brewing. The railroad is trying to get the giants to be real gentle-like and slow and easy when operating the bridge but you know how clumsy giants tend to get…
If you like malarky you might find more looking at the South Jackson Gazette
Regards,
Charlie Comstock
Now that’s my brand of malarky! I’ll have to read the “paper” more often! ![]()