I am looking for some ideas to model the streets and concrete sidewalks for my ho town. Has anyone used the commercial pre-formed roadway materials? Are they any good? Some of the building structures come with sidewalk and curb sections but I am having trouble matching these with buildings that don’t have sidewalk.
Hi Ed,
I don’t use the sidewalks that come with some of the structures. I use 1/16" cork sheets I get at the craft stores, and cut them to the size I need for the road, then painted. For the sidewalks I use the heavy mat cardboard that they use for picture framing, and cut it wide enough to fit the buildings on and extend out enough to make the the sidewalks. It works for me.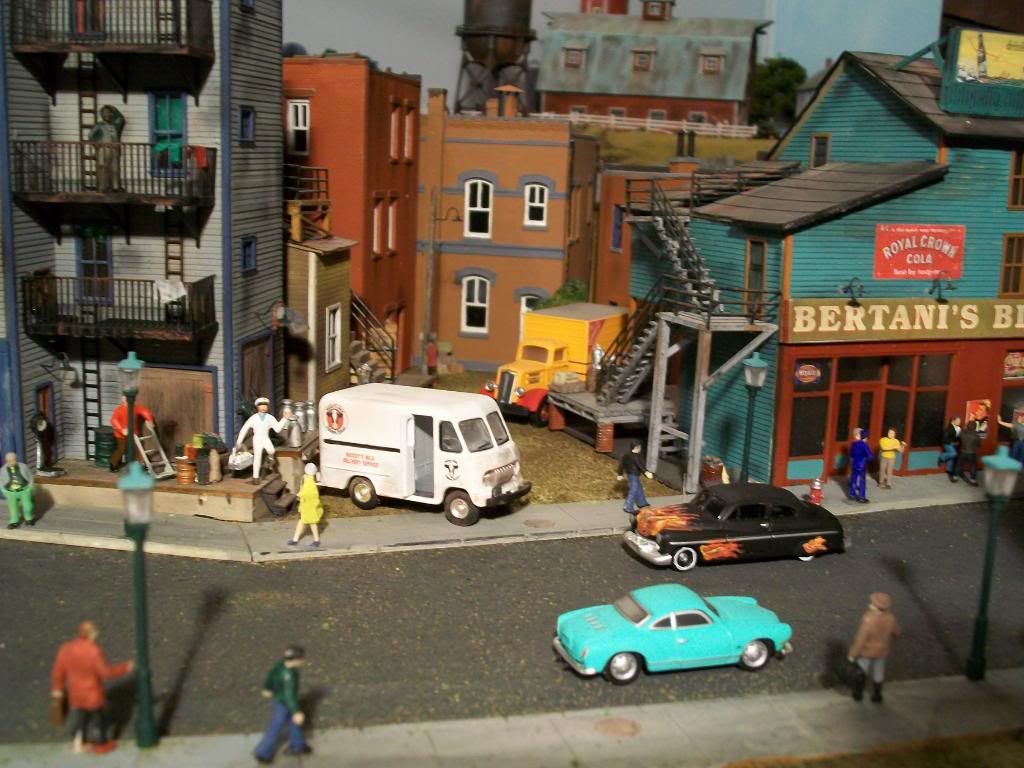
I use joint compound for streets and scribe/paint.
Richard
I’ve started using basswood for streets and sidewalks. It’s available in 1", 3" and 4" widths at crafts and hobby stores, in varying thicknesses. Cut to length, shaped curbs and ramps, and install. Basswood works easily and takes paint well.You can scribe expansion joint lines into it easily, too.
Here’s a pic of platforms and roads around my Durango station. [EDIT: better pic of roads, etc substituted]

You can also cut your own sticks, but pine, etc will often not be as nice and clear as basswood generally is.
I am currently building several major asphalt roadways on my layout and have found the following technique to provide excellent results:
-
I first draw the roadway onto the layout surface keeping in mind the way actual roads are laid out and how vehicles would negotiate them so my roads don’t appear odd to viewers. You don’t want to lay out turns that only a go-kart could negotiate. If in doubt, place a large truck or bus in your problem area and figure out how much room such a vehicle would need to access the area.
-
I next glue 1/4 inch wide strips of .040" styrene along the centerlines of each roadway to create a crown in the final road surface. These strips should meet in a “+” at typical roadway intersections.
-
Next, I cut roadway patterns from cardstock to match my roadway dimensions. Several pieces of cardstock can be taped together into a single pattern for complex roadway shapes.
-
Once my cardstock patterns are complete, I trace their outlines onto .040" styrene sheets. I then carefully cut out the styrene road shapes.
-
Prior to gluing the styrene road shapes into position, I use these pieces as patterns to mark and cut my road surface material. I use a product called “Fun Foam” made by a company called “Creatology”. This dense 2 mm thick foam product can be found at Michael’s in 12" by 18" sheets in various colors (I use black) for under $1 each. The surface of the fun foam has a bit of texture and the occasional bubble (pothole) that fits well with N and HO scales. It can also be roughed up with sandpaper if a bit more texture is desired.
-
Once I have finished using the styrene roadway base pieces as cutting patterns, I glue them down to the layout surface using latex caulking. I run beads of caulking along each roadway edge and atop the central crown strips then press the styrene sheet pi
Once upon a time the LION tried to use roofing shingles as roadways. LION was lazy and never really finished the project. Did it look ok? well, you tell me. I still have tons of scrap shingles to work with.

If I were to try this again, I would use some N scale ballast or maybe fly ash from the boiler to fill in on the road. I would make a thin wash of white glue, and then sooth the fill on to it. As you can see in the photo I did crown the center of the road.
The blocks were made of 1/4" hardboard decorated, and then set in place next to the roads. Some worked better than others. On the left side of the street was my first attempt on the right side of the street were some better city blocks.
The major street that I will yet be building on my layout is 7th Avenue in Manhattan. for that I have about 40 4x8 sheets of 1.5" roofing foam in the warehouse: It is used foam and is quite on even with what might be imprints from the roof stones, and or people walking on the roof. In my minds eye, painted black, this will make the perfect surface for a major New York City avenue.
Now on the picture above, you can see that grade crossing. There is wood between the rails, but between and around the road there is asphalt. I made this my mixing some black paint, some white glue and N scale ballast until it had the consistency of, well, asphalt. This was spread around the tracks and I think it worked well. Your mileage may vary.
ROAR
I don’t use shingles for roads, but I have made a couple of parking lots with them.
Hornblower’s approach sounds like it leads to highly realistic roads, though a lot of work (but then the devil is always in the details).
I was lucky enough that the old Bachmann CityScenes buildings I used came with enough sidewalk to do most of the urban areas. I have used printed sidewalks and road surface form scalescenes. I have also used sidewalks from RIX Smalltown to good effect.
The attic in my new (1938) house has a heavy black paper used as a finish surface over insulation. I am looking into using that for road surfaces.
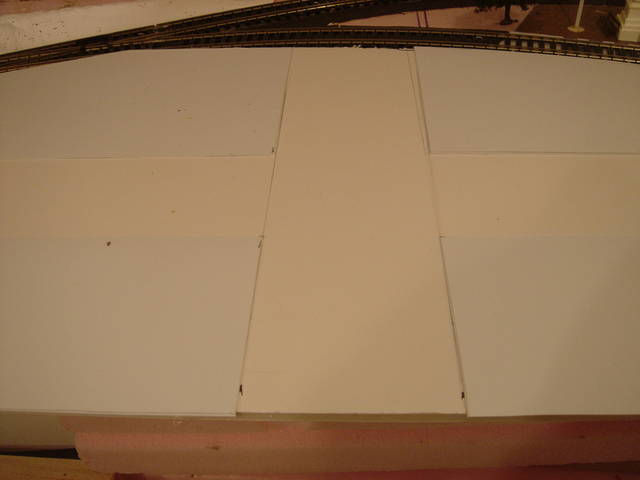
There are a lot of ways to do this, of course. I started here with a sheet of foamboard, because this section is actually a liftoff over my subways. I cut styrene sheet to form the blocks where buildings would go, and glued them to the foamboard. Everything is white here, but the uncovered foamboard forms the cross in the middle.
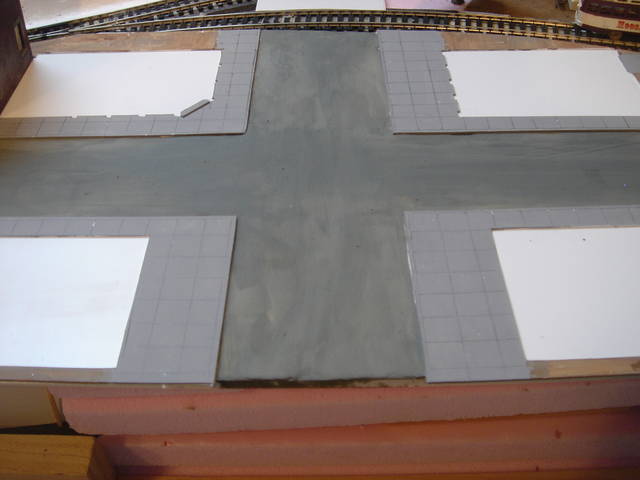
This left a slight depression for the roads. I filled this with Durhams Water Putty, which dries hard. Once dry, it takes a thin wash of gray acrylic paint nicely. The putty forms a durable surface. I filled it just to the same height as the styrene, and here it’s been colored with the wash.

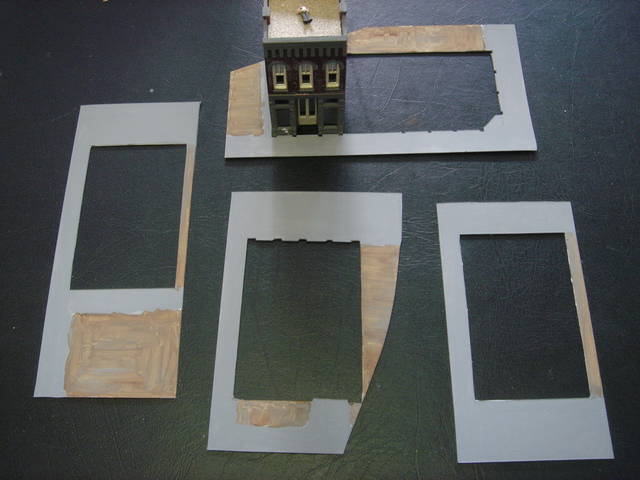
Next, I cut more styrene to match the blocks above. (By the second time I did this, I learned to cut the second pieces at the same time as the first. It’s a lot easier to use one as a template to cut the other.) I cut out the center of each block where the buildings go, so the buildings sit inside these pieces. This gives a finished look to the sidewalks, and also blocks any light from sneaking out under the buildings when they’re lit from inside.
I painted the sidewalks a slightly lighter shade of gray, and scribed sidewalk lines in a 1/2 inch grid using a ruler and a #2 pencil. For these, I used brush-painted acrylic for the sidewalk paint, but I’ve since learned that cheap gray primer is easier, is more durable, and takes the pencil marks better.
The structures came next, and a few cars just for the photo.
Very nice roads, Mr. B.
[D]
This guy has a tutorial for making asphalt roads. Instead of brushing the plaster on, I wonder if it would look better sifting powdered plaster and pigment on (basically Zip texturing.)
http://www.telusplanet.net/public/crowley/ashphalt_roads.htm
As for concrete roads, remember that concrete is as much tan as it is gray. And the more it ages the tanner it gets.
Steve S
I have used the Walthers concrete street system, with sidewalks, and am happy with it. It has the camber of a road more or less built in. I spray paint it with a combination of a couple of neutral gray colors, and use chalks to replicate the oil stain streaks you see on a street.
Follow this link and go to page 5 for a photo of the results:
http://www.mwr-nmra.org/region/waybill/waybill20102summer.pdf
For an asphalt road I used the smooth backside of a roofing material, and smoothed it out a bit more with a foam sanding block as I thought the textures were just too deep for a real asphalt road, which after all is very smooth to walk or drive or bike on.
Dave Nelson
I was on the Walther’s site yesterday (2-17-12) and they only are showing complete street systems for brick pavement. The concrete and asphalt options are for street extensions only (otherwise they are an interesting if expensive approach).
http://www.lancemindheim.com/progress_photos.htm
Lance Mindheim offers his methods through his blog with photos and a short write up