Can someone explain the best method(s) for cutting the bottom/keel area away from a boat or ship kit?
How does one get the waterline correct? I’ve heard about using a block of wood with a razor knife resting atop it but haven’t seen any pics.
Are there other commonly used methods? On a 1:1 scale boat, water levels are used but that doesn’t seem very practical in HO scale.
I have a Lindbergh Diesel Tug kit “Dispatch” that I’d like to use as a waterline model.
Thanks for the help. If you’ve taken pics of your “procedure” I’d love to see 'em.
One of my complaints with available waterline models is that often a bit of “tumblehome” is not shown.
They look TOO flat in the water and slab sided on the hull to my maritime eye. If anyone here agrees
and has addressed that “issue” when they cut their hull down your thoughts would be welcomed.
Cheers
I have no such experience, but I can tell you what I would do (although the razor on a block sounds good).
i would try the razor to etch the hull, or a marker to make a cutting line. Then I would use a cut-off disk to cut off the bottom, but I would try hard to work below the line. Then I would sand the wavy edge on a block with 120 grit sandpaper, maybe a bit finer, toward the line. When it was smooth and even, the boat hull should sit okay on the ‘water’.
Crandell
I think I would get a piece of foam and dig a hole in it deep enough to sink the hull into, them backfill with bits to get the boat to sit at the level / angle that I wanted.
When I was happy with the angle and ride height, I would mark the hull cutline using the flat surface of the foam as a guide, and then cut about 1/8 in bleow the cut line to leave some room to square up the cut, and because you still want to sink it into the water a bit to hide the seam.
It´s real easy actually, you do it like this:
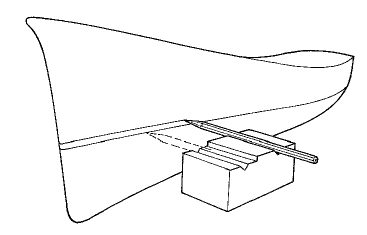
I prefer to turn the hull upside down! [:)]
You adjust the height of the waterline to the height you want it to be + the height of the drawing tool, and then uses a block of wood (or whatever you need) that you attach a pencil to. then you use it to draw the waterline around the hull.
Then its just a matter of cutting the hull with a razor saw or a cutting disc a bit below the actual water line and the use a sand paper on a level surface to sand it down to the line.
I have made it myself on this:
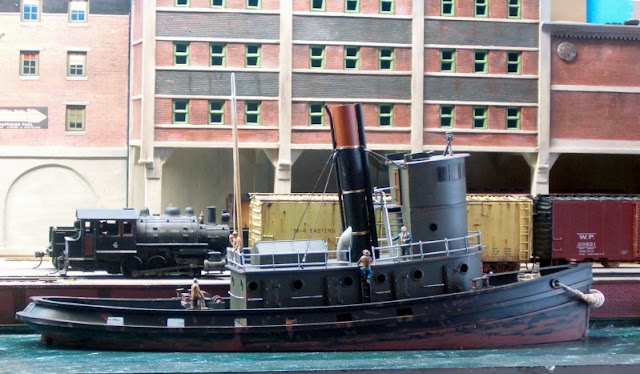
I have also converted it to a steam tug as well.
I will interested in seeing how this goes.
Way back in 1990, I used a Lindberg tuna seiner, small kit was originally 98 cents or so, scale was maybe 1/120, as the basis for an HO small bay/ bait-shrimp trawler. Mostly used the hull and mostly scratched a superstructure, and trawliong rigging soldered together from brass wire. The waterline cutoff was a bit rough.
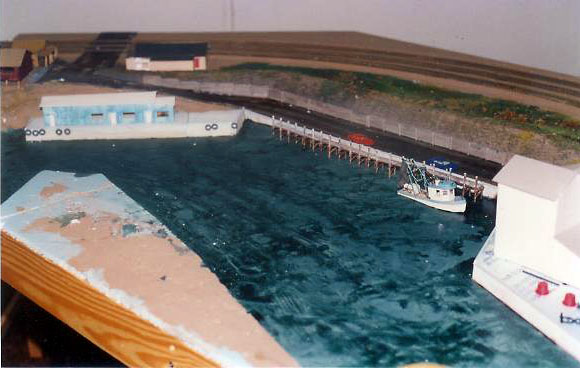
This is a scene selectively compressed from Conn Brown Harbor in Aransas Pass, Texas.
I need to build some more kits to represent shrimpboats for my version of the “Mosquito Fleet” at Galveston. I mocked up the scene with unbuilt kits: 2 Bluejacket #N402 N scale lobster boats to be converted to 32 foot shrimp trawlers (waterline) , Lindberg #72120 kit of 4 small boats (various “scales” : Tow bopat, tug boat, tuna seiner, fire boat) (need to be cut to waterline); and Kibri #9159 8 HO small boats, to be cut at waterline and built with superstructures to make small N scale bait shrimpers. The mockup was the check the background which I needed to do at that time. All but two of the boats with prows facing left are from a photo taken in Fulton, Texas, Photoshopped, printed and glued to the painted background.
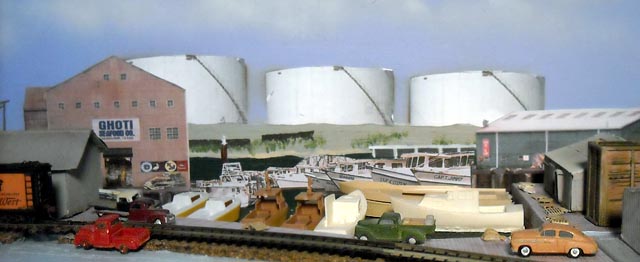
Mocked this up back in March 2010, then took boats and structures out and back in storage. I still have serious tracklaying just out of the picture, and wiring to do before really working on details. You can see track is unpainted, unballasted. (Of course, it will be in planking and pavement through this scene)
I would start by putting the model in real water, and pushing it down until I got the look I wanted. Then I’d mark it at a couple of points and use the wooden block method above to scribe a line all the way around.
Just “floating” the model will probably have it come out unnaturally high. Take a look at photos of real tugs in the water to get a better idea of how low they sit in calm water.
Thanks guys. Graffen thanks fro the pics. Now I get it-The block needs to be notched to hold/steady the razor knife. Are they square saw cut or u shaped routed notches/channels?
Sorry about my own lack of pics. At present my layout is just benchwork and most of the laid track so nothing interesting to see-yet.
The foam idea is a good one too and one I hadn’t see or heard of before.
Graffen, other than a smaller diameter stack and a steam pipe/whistle detail is there anything else to include when converting from diesel to steam? I’m modeling mid-late 1940s so I could keep things simple and retain the diesel aspects.
Thanks again for such quick and detailed responses and ideas.
C.G.
The groove is only there to keep it from wandering, I use a V-grrove myself.
The conversion I made also included a new, taller steering cabin(as it is a RR tug).
Similar are available from Sylvan? I think…
Thanks again Graffen an all.
Hi, I’ve been into RC boats/ships as long as model RRing.(most of my 44years). Most boats in the model RRing world that I’ve seen sit too high. Graffen’s tug has its waterline in the perfect position. If you had a set of plans or even a picture you could measure out where the waterline should go. You could also eyeball it. I’d start by looking on Google images for tugs and find one similar to the one you have. Then use Missouri Eagles idea, should work pretty well.
Hi;
I have done several tugs of various types and sizes, and have a couple of Taurus waterline nodels still in boxes. Two of my little fleet have been waterline models by Sylvan models, resin kits; into which I have neccessitated a fair amount of fitting work but have turned out pretty good looking craft. The other is an East Coast models tug that owners Nancy and Bruce Nicholson showed me at one of the carftsman shows. They also showed me their newest (at the time) creation, which was a ferry, into which I mentally morphed into a lighter, and promptly purchased, afte they agreed to toss in a scow for good measure. This model was quite a challenge, as it meant building from the waterline up an A-frame derrick, steam powered, with winching platforms at two levels a 75-foot boom supplied by George Barrett from Sheepscot models, and a ton of both shop-built and purchased fittings from Bluejacket Models of Stockton, Maine, These are all waterline models, and do look very well on-scene.
I also havea Lindberg model of that tug I am trying to “scale up” to at least 90:1, and convert to steam power; but I want this to be sitting in a drydock scene, so the tug’s hull will stay on the tug. For wht it is worth, I would stringly recommend going with waterline models rather than cutting up a good hull and possibly giving “Ol’ Bertha” a permanent list.
BTW; how do I get pictures onto this site?
Rich
EF-3 Yellowjacket
HI Swede;
Gute Tage!
Thank you for the insight! As I mentioned in an earlier post, I also have built models, and have a Lindberg tug I am re-building. You picture is truely worth a thousand words, as I can take ideas from it and use them to advantage. If you have any more pictures of your work like this, you should post them. As for me, I would like to see them, so send them to my E-mail if you would like to.
Regards, Rich from Conncticut, USA
Error per previous post:
That was “Seacoast Models”, not East coast models.
Rich