Lights,Camera,Action !
All of the pics that I have taken over the last five years or so and published in my photobucket ,were taken for the cost of the camera alone and that I got on sale ! The rest is just stuff that I had laying around the house.No expensive tripods,special lighting or other equipment is required.The modern day camera does it all for you,the only thing that you have to do is a simple setup.Put it on “Auto” and off you go ! You can experiment to your hearts content (no more film cost to worry about) If only one pic in fifty turns out so what ! Have fun.
First the camera. I will take a pic of it in the mirror for your info.Point and shot,how simple can it be.Prior to the digital era I knew nothing about cameras and it is still that way today.
All the technical stuff leaves me cold and I haven’t even read the manual for the digital I am using now ! (some would say it shows LOL) If I can take reasonable pics anyone can do it.
The only real secret to good pic taking is using your creativity to set the scene up, in other words, arranging the stuff in a nice way (composition).This will come with experience.Just start shooting ! Here’s how I do it…
My style of photography depends on 3 things
Hand held mobile lighting
Hand held camera with a stabilizer
creative thinking, and breaking the rules
Here is the camera that I use for all my shots,very simple but it must have lens stabilizer as I move it a lot seeking different shooting angles.I use my still camera like a movie or stage director would if he were taking a one frame movie.My first digital camera didn’t have this function so a lot of my early shots were more traditional.The lens stabilizer is really the basis for my style(if you can call it that)
The camera body should be black so it doesn’t get reflected by glass or other shiny surfaces.
And that is about it camera wise !
Lighting. I use a hand held clip on with easily changeable ordinary household bulbs and experiment with different types, wattages and color.The key here is to try everything.
I also use my white ceiling and one of those cheap car maintenance lights from the garage for bouncing light off the ceiling.On occasion when I want a nice moonlight scene I will use just an overhead florescent light.I have even used candles.Experiment and have fun !
And finally use your creativity there are really no wrong ways of doing things just new ways waiting to be discovered.
Here is a pic I took and then fancied it up using photobucket.
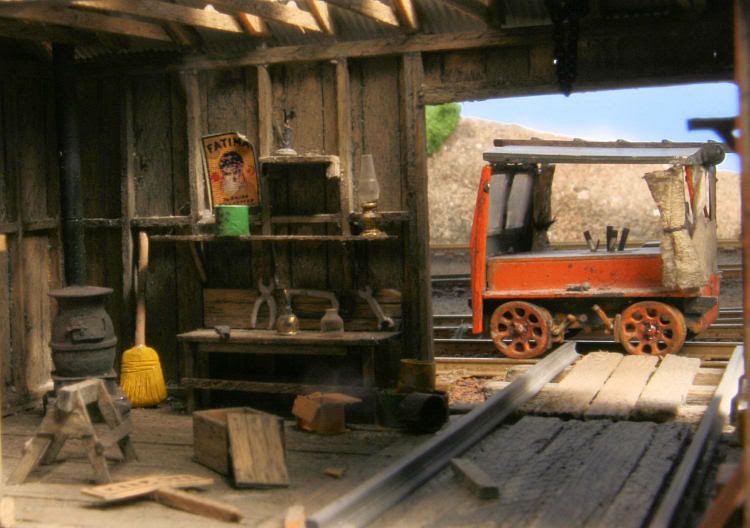
It is a pic of a 1/16th scale engine shop from the 1920’s.It could be RR ,marine,auto or whatever.Everything here is scratchbuilt except the engine which was from a highly modified kit.Most of this is built with coffee stir stiks,tongue depressors,plywood or card.The lighting is from a dollhouse and the shades are modified brass Christmas bells.The clear glass is plexiglass savaged from an old parts container.
This is a low angle shot as if your were backing up a truck to pick up a load,probably what you might see in a rear view mirror late on a summers evening.The lights reflected in the window glass adds depth to the scene.The doors act as a frame for the scene and also help to add depth as well.
I took this pic with my old digital camera that didn’t have a stabilizer,so all the lighting here is internal not hand held.
John: Great modeling and photos! Since the majority of modelers on this forum are in HO scale, your photographing of large 1/16 scale models might not translate all that well to much smaller modeling.
Taking photos of model interiors whose opened doors might only be one inch wide could be a problem for a camera like yours. I just want to suggest that followers of your thread might want to keep this in mind so as not to get their hopes too high.
I’ve used 35mm film cameras and now digital versions to do my photography, which can be fairly specialised.
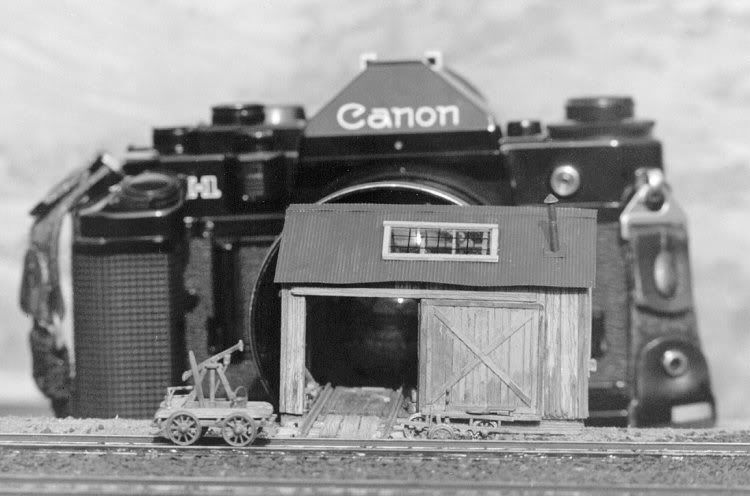
Here’s an HO scale speeder shed kit by Durango Press, its about 2-1/2" wide and 1-5/8" deep, would probably fit inside the door of your structure:
This shows the scale of the model in relation to a 35mm film camera:
This shot was taken using my hand held light and hand held camera technique.
I simply used my clip on light and shone it through the window to see what I could come up with.I am looking to set a mood with a little drama built in.Technically there are probably a thousand things wrong with the pic but I like it and I don’t try to please anyone else.
I am a great admirer of Sergio Leone the Italian movie director,who is my self appointed creative mentor and this is the way he operated too.
In this pic I have used the open door at the rear and the shadows across the floor to create a more 3D effect.
The foreground is out of focus for a reason, as it tends to put the figures in the limelight.The bar through the middle guys face was a compromise between his face (which was really not all that well painted) and the meds box over his shoulder.The box in my mind represents the great cost in injury and lives in the early days of aviation and I wanted it in.Sometimes with my hand held camera I am very restricted in movement when I am actually reaching into the diorama itself.
What does this scene tell us ? We are inside an old building made of wood,the clothing styles are from early in the last century,the flag indicates it is air force military.The airplane is a biplane although it would work just a well with a car ,truck,boat whatever.It is probably early morning with the sun low on the horizon and the environment is a little dusty with even some smoke in the air.
Here is the same group of figures under different lighting.The sun is bright and almost overhead maybe shining down through some windows high on the hangar doors.I used the same hand help camera and lights.The biplanes wings and struts help to frame the pic.By using the shadows on the floor it helps to enhance the 3D effect.
The old sheet in the carpenters shop window has been pulled back to let some light in and also allows us to see the far wall for the same reason.The windows on the back wall open into a darkened storage area.
The idea here is to get the viewer wondering about what they could be talking about.I have left a space in the grouping to allow the viewer’s imagination access to the conversion.Here again the era is around the 1920’s when smuggling booze across the border was a popular thing to do.In my mind the mobster is trying to convince the barnstormer to bring some stuff in for him while the corrupt official looks on.
Here is another pic that I played a bit with in photobucket.Originally in color I wanted to see what it would look like in B&W.
I have used the carpenter’s shop as the main source of light and a little overhead light to create shadows on the figures.Depth is achieved by the floorboards with a little added interest created by the light patterns on the floor.
The carpenter’s shop is a self-contained unit heated in winter with a wood/coal stove.The door at the far end leads to the dispatch/airmail office.
This downshot was taken when the roof was removed from the main hangar.A lot of my shots are taken while the diorama is underway as it would be impossible to take them now.
The title of this piece is “Keepers of the Flame” 1918-1927" an era when aviation was struggling to survive commercially.
It is in honor of the risk takers,entrepreneurs&barnstormers,air show men,airmail providers etc…A period in aviation not well known today to the public.
Here the emphasis is on the guy with the tie,a large imposing figure trying to get his point across in a rather intimidating way.He could be the owner,the airport manager or a mobster but he definitely is being listened to.What is he saying? Well that is left up to the viewers imagination.
You can have all the fancy equipment for cheap too! The lights I sometimes use are color corrected regular bulbs put in a salvaged floor lamp with multiple arms. White boards can be foam core held up with any number of different ways. Even the tripod can be had a thrift stores for cheap (my last one was $2.
Here I have mixed a 1/18th scale car with 1/16th figures.I took the pic at a low angle,an upshot, to help conceal the difference.I wanted to see how close I could bring the background figures to the car and still be believable.
The figures are only underpainted and I just let the shadows do the rest.By keeping it slightly out of focus helps a lot too.
The car is a diecast and the figures were only slightly modified.It could be nighttime but this garage is very well lit or it could be daytime with the windows facing a dark storage area or in wartime even blacked out.
You could build many stories into this scene but here again it is pretty much left to the viewers imagination.The title is really not necessary.
The secret here is in the composition and sometimes just a slightly cocked head on one figure gives you the impression that the other figure is saying something interesting.