(Thought I’d make this a new post. Thanks for all the tips on trimming flex ties to fit in spaces under rail joiners…lots of good ideas, and now I don’t need to buy any because I found Gandy Dancer’s suggestion so easy to follow.)
Thanks gandydancer19 and all those who gave tips.
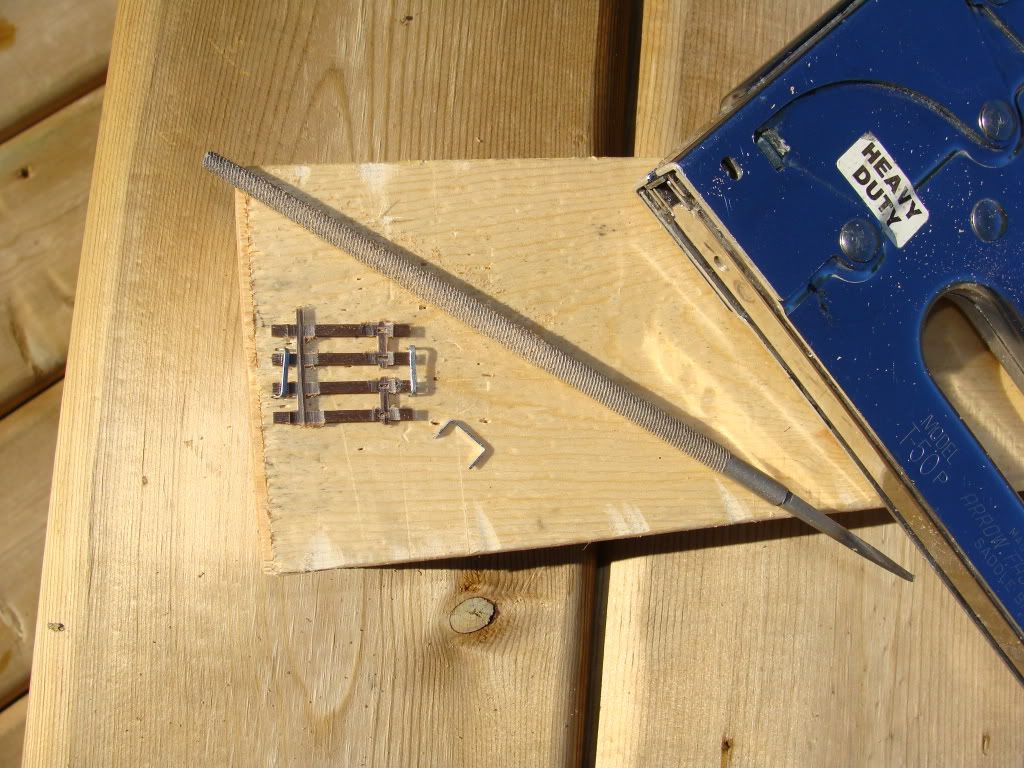
As he said, just a few strokes with a 1/4" rat tail file and the spikes and nail plate are gone, leaving a normal-sized tie showing on the ends.
I found working on four at a time stapled with a 1/4" staple to a 2x4 scrap is just dandy. The staple can sometimes just be wiggled sideways and tapped down again with the handle of my file to put another set of four in.
The 1/4" file needs to be worked back and forth laterally a bit to take off the all the spikes and nail plate and make a perfect groove.
The ties in the photo somehow came out looking like a messier job than they are in reality. They actually turn out neat, still brown enough in the groove and ready for insertion with a little cleanup of edges.
If I should happen to need more than I have, I buy wood ones. But since I NEVER throw any away when I cut them while fitting flex track, I never run out - in fact after attempting some Fast Tracks turnotus I have 2 complete 3’ sections of ties that I stripepd the rails from. My quick way of makign them fit under rail joiners and the like is to clip off the ‘spike’ parts with my rail nippers and then using a small needle file, file along the tieplate detail to make a notch. Do it right and I don;t even have to glue the ties in, they sort of snap in place and are fine until ballast is applied.
Basically the same thing as shown but I don’t bother stapling them down, and before filing I clip off the spike part so I don’t have to file as much.
I save all my cut off N scale ties in a container and take them out as needed. To get rid of the bumps, I turn them over and rub them on medium grade sandpaper. Three or four strokes is all that’s needed. No, even with the tiny N scale ties, I don’t sand down my fingertips. The bumps on N scale ties are so small that they go quickly.
Kudos to you, Randy. I do the same thing with the rail clippers as I mentioned in CK’s previous thread. A lot simpler, a lot quicker, a lot cleaner and a lot neater. Just hold the flextrack ties in your hand, no stapling required.
In fact if I think about it and am bored, I should do a bunch and just put them in a parts drawer so I have them when it’s time to go around and start filling in the spaces. But I won’t, and then when it comes time to do it, I’ll curse myself as I file them to order instead of having a ready supply to draw on.
Or maybe I could getone of my boys to do it, I finally ran out of the nut and bolt sets I had him make before. I use the same size nut/bolt/flat washer/lock washer combo to bolt my benchwork sections together as well as bolt on the legs and braces, so I had him take all the packs of hardware I bought and preassemble sets with a bolt, 2 flat washers, a lock washer, and a nut so it would be ready to use. I recently used up the last one, so I had to make another bag full myself.
Another simple solution is to use WS foam roadbed.
This afternoon I filled in 4 more vacant spots with ties from discarded track. They just needed a little triming with a sprue cutter where one tie was connected to another. There is no glue under the rail so you just push down on the tie and slide under the rails into place. Very quick and simple.
The foam levels every thing including any irregularities in the sub roadbed.
Sorry way too much work, I just hold the ties between my thumb and fore finger and use a sharp #10 exacto blade facing away form me of course and just trim off the section of the tie plate that holds the rail. a little dab of white glue on the underside and slide then into place. Even before ballasting unless you know right where to look you can’t find the tie(s)
I don’t know how you manage to pull that off successfully, but I absolutely disagree with you. I,too, use WS Foam Track-Bed under my track, and I used to rely on your method with bad results, especially under and around rail joiners. Next to impossible to keep the rails level. Better to remove the spikes with a pair of rail clippers.
You are doing something better than I, Allegheny, or else you have some sort of soft roadbed, but there is no way I can slide a tie back under the rail at the rail joiner on my cork roadbed without taking off a little more than the tie spike plate…
…I imagine the difference here, and in the experiences in the other posts is the different brands of track being used.
I use Atlas flex track. I imagine Peco or Micro Industries track, rail joiners, tie plates are micro different in sizes.
I normally wouldn’t have bothered but I felt I had to just show how easy this is. Please don’t make something as simple as this into a major project because it’s not.
I am not one of model railroading’s all time builders by no means. This is a just as simple as it sounds I too use Atlas flex track and Atlas custom line turnouts.
The tie plates are trimmed off with an exacto blade
This is getting to be a big someting out of nothing…but I am back to adding more ties these days and this last post is not correct…
Unless my eyes completely deceive me, your last photo shows what I mentioned earlier. Without cutting a notch, your tie is holding one end of your rail higher than the other because of the rail joiner which can be seen resting at an angle in the photo.
One doesn’t need to cut a notch if the ties are going to be slipped in where there are no rail joiners, but in most cases the joiners will be in the way…and if you do it as shown, I am pretty sure when you run your finger across the tracks, you will feel the lip where the replaced tie has lifted the track on one side of the junction…as is shown clearly in your photo, mock up or not. I suppose this is not going to happen if the j
BTW, another nice thing about using caulk as the adhesive for the track is that even months later it’s slightly tacky so when you slide the replacement ties in they sort of stay there. Not against any deliberate attempt to move them, but they won’t vibrate out of position until you get around to ballasting.