I’m about to lay the track for my main yard and engine terminal. The main line is partially installed on this module, and it’s on cork roadbed. My initial plan was to put the yard track directly on the plywood. (The engine terminal is more or less a 4x8 with the main and yard tracks cutting off one corner.) However, this plan has been side tracked as I don’t have a clue how to get the tracks up and down the quarter inch plus without making them look ridiculous. I suppose I have enough cork to do the entire plan, but that seems both unnecessary and also does not reflect the flat track to track area in most engine terminals and yards.
If it makes any difference we’re talking about C&O in 1944. C&O in the steam era was fastidious about manicured ballast on well-drained roadbed out on the main - many, many pictures show a knife edge to the ballast. But contemporaneous pictures in the engine terminals shows very little in the way of elevation of yard tracks, particularly in THIS yard, even though it was a primary stop on the main passenger route.
Track maintenance was much more important with steam than it is with diesels so almost all railroads had much better looking main tracks years ago. The low speed of movement in a yard did not require as much maintenance or ballast so they were (are) at a lower level than the main. Mains, even today, are constantly being raised due to replacement of ballast so they creep up a little each time it is done.
The transition between these tracks on a model would be the gentler the better which would (obviously) depend on space available to do so.
Bill,Maybe at one time but,with the heavier freight cars and locomotives a lot of older yard track had to be replace.
As a matter of fact a lot of short lines with lighter rail has restricted loaded car weight which is causing problems for some shippers/receivers that wants to use those higher capacity cars.
Hang on a bit, it’s your layout, right. There are rules true, but now and then need to be bent slightly, it’s called modellers licence. This is one, depending on room avaiable and you ain’t switching with KD’s locked open, go for it.
We went from Midwest ¼" molded to ⅛ flat in about a foot by adding a second piece of flat on top and feathering it down with a rough rasp and it don’t look out of place, one end had a slight curve to line up that needed tweeking so Co-Co’s and 4 coupled locos could use it without the crews getting sea-sick.
Me I’d put somthing between the track and the ply even just a coat of paint and thin card to stop it soacking up the ballast glue and sceinary pigment. Ain’t no prototype knowledge, just a modelling nut(acording to her who shall be obeyed, if you know what I mean).
Really? A quarter of an inch in a foot? I guess that’s a grade of 1 in 48, or a 2% grade, not the end of the world. and certainly not something that a locomotive should have any trouble handling - especially since I have 2.5% uncompensated grades elsewhere.
Is it feasible to put this type of grade under the ladder, or part of it? Since we have turnouts and crossovers elsewhere on the mains on grades, I would think so, but then again we do a lot more backing and forthing through switch ladders, so I’d guess that these would have to be laid absolutely perfectly.
Good idea about putting something non-absorbent under the yard. Paint at least seems like an almost trivial solution.
Trick I used on my previous layout was to lay yards and sidings on N scale cork, it’s not as high as HO cork, so you get the effect of the yards and sidings being at a lower level but still slightly raised off the surface. Of course if you are in N scale already, then you’ll have to think of somethign else - you can buy cork in large sheets and in sizes that are thinner than commercial N scale cork. Same for HO, really - in fact under the yard, a big cheet cut to size is much easier than layong strip after strip.
To transition down, I just used some layers of shirt coardboard under the N scale side to gently ramp up. There was no issue with the yard lead as the A/D track and yard lead were all also at the lower level, so the yard ladder was all on the same lower level, no sloping there.
I don’t especially agree with this statement. Drainage has always been important - indeed the most important implementation factor in track maintenance throughout history, at least as it’s been communicated to me. Certainly reciprocating steam locomotives pounded the rail more than modern diesels, particularly earlier high speed locomotives. But with modern cars having axle loading approaching the heaviest steam locomotives, I doubt that standards today can be lower than they were, especially given the differential in speed. Many of today’s high-profit trains run on what used to be passenger schedules, but with vastly more tonnage.
What’s your opinion of the 2% grades mentioned above in this thread? I haven’t thought too much about how to use the yard lead as the transition, it may be much better than 2% if I can work out how to do that. I’m trying for a 12-foot train so at least a 3-4 foot yard lead. I’m not sure that can be juggled enough to put all of the grade on the lead, though. I don’t think so.
In the steam era, labor was much cheaper so it was easier to have enough workers to really maintain the right-of-way. If you look at pictures before about 1960 you’ll notice the mainline ballast is much more “defined” and much less brush and weeds are near the track.
HO cork roadbed is about 1/4" thick, so I would use 1/8" sheet cork for the yard. Run the cork roadbed up to the 1/8" sheet cork and taper it with a Shurform plane. You can find rolls of 1/8" cork at home supply stores or craft stores. Leave a bit of a gap between the main line cork and yard cork to make drainage ditches.
Ye man, no sweat, we went from ¼"cork to ⅛"cork by adding top peice = down ⅛", don’t like running on just ply, too noisy. Kept away from pointwork during transition to lower level.
Pointwork on grades, loosely tacked down to try it, you never know, if it works great. Mark out for feeds and point control and go for it.
Our local DIY has a paint called Suede Effect, it has to be sturred to stop the sand dropping (tried builders sand, not the same) drys like a cover of sand paper over prepared scenary, great for staining and flocking.
I used 1/4 cork sheet for all my yard and passing siding areas. The mainlines have 1/4 inch camper tape with the cork on top of that. The transitions I cut out of 2 inch blue foam a wedge from 1/4 inch to 0 about 10-12 inchs long , and glued down with adhiesive caulk. When this is dry I use a 60 grit sandpaper block about 8 inchs long to smooth everything together. I don’t think the transitions are noticable.
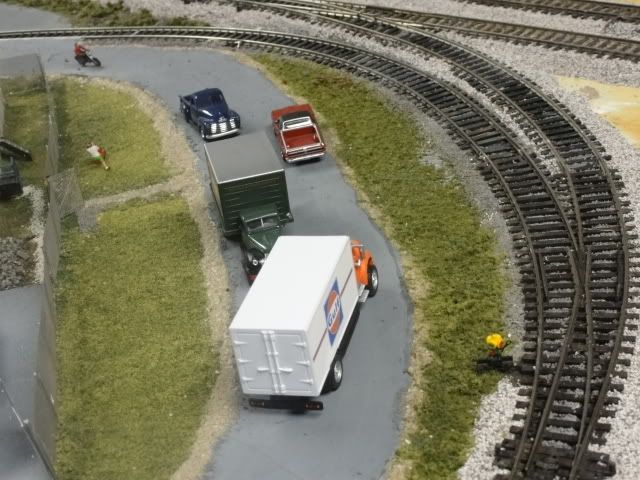
I model the N&W in 1955. Williamson yard was probably similar to what you are doing. The yards were muddy greasy looking places with little elevation changes between tracks. One reason was to make walking and working in the yards easier for the yard crews.
Track in the steam era was maintained by hand. Maintaining a neat, tide and straight edge to the main track was a matter of pride. The workers involved took such great pride in the look of their track they would even place stray ballast rock back onto the track so as to keep the edge of the track tidy, as well as pull weeds etc.
From the 1960s onward track maintenance was done by machinery and nobody gave a damn what the track looked like anymore.
I have purchased sheet cork from School Outfitters at: http://www.schooloutfitters.com a couple of times. They are very knowledgeable and will help you get exactly what you need. They have diferent thicknesses and lenghts of sheet cork, so they should be able to fix you up with exactly wht you need. I have found that their prices are reasonable.
You could put both the main and yard tracks on the same thickness cork. Then bring the terrain level up around the yard to create the illusion that the ballast height is lower. This way you dont have to worry about the grade change in the trackwork. The “grade change” is in the terrain instead, which is much easier to do. After all, the world isnt flat…
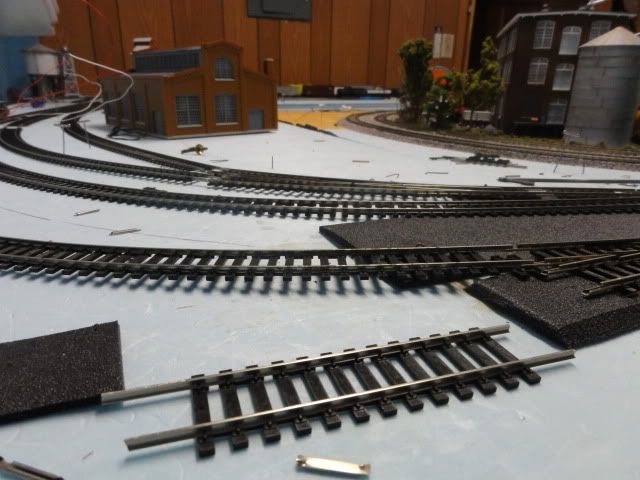
This is the way I have done it going to my yard. The yard track was attached to the turnout entering the yard. Then it (flex track) was curved as needed while laying it on the layout top. As you can see in the picture there is a gap between the track and the top…
The track is stout enough to support engines as well as cars. When ready I’ll stuff ballast under the track and glue it down.
I know this simple method works. How do I know? Because I’ve already done this on another place on the layout.
With this said I can’t lay claim to this method as I learned it on the forum.
Track maintenance was much more important with steam than it is with diesels so almost all railroads had much better looking main tracks years ago. The low speed of movement in a yard did not require as much maintenance or ballast so they were (are) at a lower level than the main. Mains, even today, are constantly being raised due to replacement of ballast so they creep up a little each time it is done.
Snip
Bill,Maybe at one time but,with the heavier freight cars and locomotives a lot of older yard track had to be replace. As a matter of fact a lot of short lines with lighter rail has restricted loaded car weight which is causing problems for some shippers/receivers that wants to use those higher capacity cars.
It’s still the same. The yard tracks are relative in size to the main, then or now. It has nothing to do with “at one time”.
Bill,As you know at one time railroads used lighter rails in their yards to save money.
The newer rebuilt yards use heavier rail due to the heavier locomotives and freight cars.
Examples
Some of the newer covered hoppers weigh in at 286,000 pounds or about 120 ton.
A SD70MAC weighs in at 415,000 pounds.
A GE AC6000CW weighs in at 423,000 pounds
Even a GP38-2 (250,000 lbs) can make light rail crack and pop.