I was told by someone at the local model railroad club that I could just buy a roll of LED lights that can be cut (3 LED per section). I realize a capacitor is needed for flicker free lighting. All of the YouTube videos I’ve looked at also discuss adding resistors & bridge rectifiers too. I was under the impression I could simply cut a length of LED from a roll of LED strip (add a capacitor for flicker-free IF I wanted to as an option).
I have used the Peell-N-Stick LED strips for a few passenger car lighting projects.
They’re OK but not quite as flexible as using individual wired LEDs or, my recent favorite, LED string lights. The Tape-type LED strips can be overwhelming in brightness if you don’t add resistors in addition to the already present resistor on the strip.
I have found that by using a length of 7 or 8 of these LEDs I can position them in the car interior and get good general lighting.
I do use a 470 µF 35V capacitor with a 100Ω resistor and 1N4148 diode then a 1K or a little more or less on the side going to the string of LEDs depending on the brightness you want.
This makes a very nice flicker free lighting source for passenger cars.
For the couple of cars that I used the flat-strip LEDs I did use a small .5 A bridge rectifier. I may not have needed it but, with only the rectifier, the LEDs were still very bright. I would have to experiment to see what value of resistor I would need in the supply-side to these strips. My DCC track voltage is about 13.6 volts.
The Diagram and parts list shown by “TheWizard” in this thread (scroll down) is a good starting place:
BTW, the passenger cars in question are Walthers. On a few of these, the contact between the screw-head truck pickups and the bowed metal wiper on the underside of the body have developed connectivity issues.
What fianlly worked for me was slot car pickup brushes, the flat, braided stuff. I bought a roll this, cut off an appropriate length, solder tinned one end, flattened the tinned end with a hammer & drilled a 1/16" through the tinned end. Bent the tinned end 90d so the braided brush swiped the bowed metal wiper plate. I installed only one on each truck on opposite sides. So far, no problems.
Thanks for the hints on the truck pickups. I have some braided material that I may get around to trying your fix with. Those metal tabs on the cars are sometimes springy, sometimes NOT.
I have occasionally found sharp burrs on the crowns of the round-head screws and a few passes with a fine mill file will level these off. A drop of CRC-26 or Deoxit helps here, too. Then, of course, you have to have just the right amount of play on the bolster screw.
I no longer rely on the contact point of the rivet and tab setup for the Walthers lighting kits, either. For most of them I have removed the GOW lamps and used the lucite “bar” to support other LED lights. Some of them I have used flat-top LEDs fit into holes that I have drilled into the light bar.
At the contacts coming out of the end wall I have found that I can shape a small code 83 rail joiner, which has been cut in half, and pressed onto the tab. Then I strip and tin a short length of 30ga. stranded wire and lay that into the joiner and solder it, quickly before the plastic melts.
One reason I like those LED strings so much is that I can place the LEDs where I want them, especially in sleeping cars with rooms and corridors. Often the Walthers light kit illuminates the center and if you have, say, a 22 roomette car all the light is in the center aisle where you can’t see it!
If you’re using a capacitor to get rid of flicker, then you must use a bridge rectifier as well. The capacitor is a DC device. A DCC voltage looks like AC to a capacitor and it won’t work. It may even burn out.
I’ve got some Rivarossi cars that I retrofitted with a Walthers lighting kit. They worked great for a while, but eventually the power pickup with the screws and metal strips became unreliable and then basically gave up working completely. I used thin wire instead to get power from the trucks to the car body.
I soldered doubled up Kadee coupler knuckle springs (those are phospher bronze) to the SMD lite bar. Used Silver bearing solder paste by Solder-It, has flux built in the paste. Put a dab of paste on the contact, stick the spring into it apply heat and you’re done. Bit the bullet and got some expensive conductive grease for the metal strip that picks up power from the truck screws. I did ten of those cars…all work great!
On a DC layout a bridge rectifyer is necessary. LEDs pass current in one direction only, thus they would be off if the train baked up. It is also very hard on the LEDs with a revers current passing through them
Now when I make signals I reverse one of the LEDs, but this is OK since the other LED is passing the current. Thus a signal can be set up to work with only one wire plus ground, very useful around switches.
I have this setup in a dozen cars or more and have seen no ill effects. The LEDs are identical SMDs (up to 8 in parallel) I may vary R2 depending on the brightness needed. If you are using individual LEDs I’d replace R2 with a single resistor on each LED.
If I have room I’ll use a larger cap. With the 470µF, a nice size in HO, I get about two-seconds of “stay-on-time” plenty enough to even out small interruptions of current.
In some locomotives, I have LEDs “hot-wired” directly to the rail pickups with only a resistor in series with the LED. I use these for number board lamps that I always have ON and don’t have a decoder lighting output available.
Maybe it shouldn’t work, but it does. LION is correct, IF I place this car on a DC layout the lights will only come on in one direction. In my case the car will only see DCC.
After looking at SO many various circuits out there I finally decided to experiment with some. I got components, mostly from Ebay and Amazon (the LED strings) and the whole enchilada runs me slightly more than a dollar a car.
I bought a bunch of the Walthers lighting kits for DC when they were being dumped at close-out prices. I rip all the guts off them and use the lucite strip to support the LEDs and in some cases drill out some of the openings where the vintage incandescent lamps were and put flat-top LEDs in their place.
Yes, the circuits above will work, but only on DCC. In DC, the circuit won’t light if you’re going the wrong direction.
The diode in this case acts as a half-wave rectifier and only lets half of the power through. A bridge rectifier is full-wave and lets all the power through. Here, it makes no difference in performance as long as you use DCC.
Even in DCC, this might not work if you are using the “Engine #0” option to run a DC locomotive on a DCC layout. But, hopefully nobody is doing that anymore.
They have a nice glow that is very close to incandescent lighting.
They are very small SMD LEDs encapsulated in some kind of tough, clear epoxy.
For passenger cars I clip them into a group of up to eight LEDs. There is a third copper wire that I unwind. I also take the twist out of the string to make them easier to work with. In a group of 7 or 8 LEDs, one 1K resistor seems to give me good brightness.
The insulation on the copper wire is tough. I use a butane flame to burn off the insulation at the end of the wire then lightly sand it with 400 grit emery.
You have to test, then mark which wire is the anode and cathode. I use a little LED tester for this but you can use any DC supply and a resistor. I mark the wire with red and black Sharpie pens.
Once untwisted, the LEDs are about 5" apart on the string. I thread these through the passenger car (I like to put one in the vestibule since this area is always lit on passenger cars) and I position the LED “blob” so it is oriented in the right direction and use a bit of Goo or sometimes plain Scotch tape to hold them in place.
Any extra wire between the LED is just wrapped or bundled and taped-off.
Thanks Ed. Maybe I’ll order a roll of those. The price is right. If you could find a picture of an install I’d appreciate it.
A friend gave me a LED strip off a roll; they seem to be daylight white. I tried a 3.9K Ohm resistor as R2 to dim the light some, but stuck with a 2200 uf Cap (free off junked circuit board):
Bachmann Passenger car, BTW. I dropped the cap into the lavatory. Can’t really see it, and stays lit for some time after removing from track. No more flicker, and the light is much better than the old Bachmann single bulb:
If I’m not mistaken he is part of the “exclusive” Preiser set that Walthers did when they released the Broadway Limited a few years ago. He may be available in other sets. I’ll have to do a search.
I WAS mistaken. He is part of the 10210 Beer Garden/Inn Keeper set.
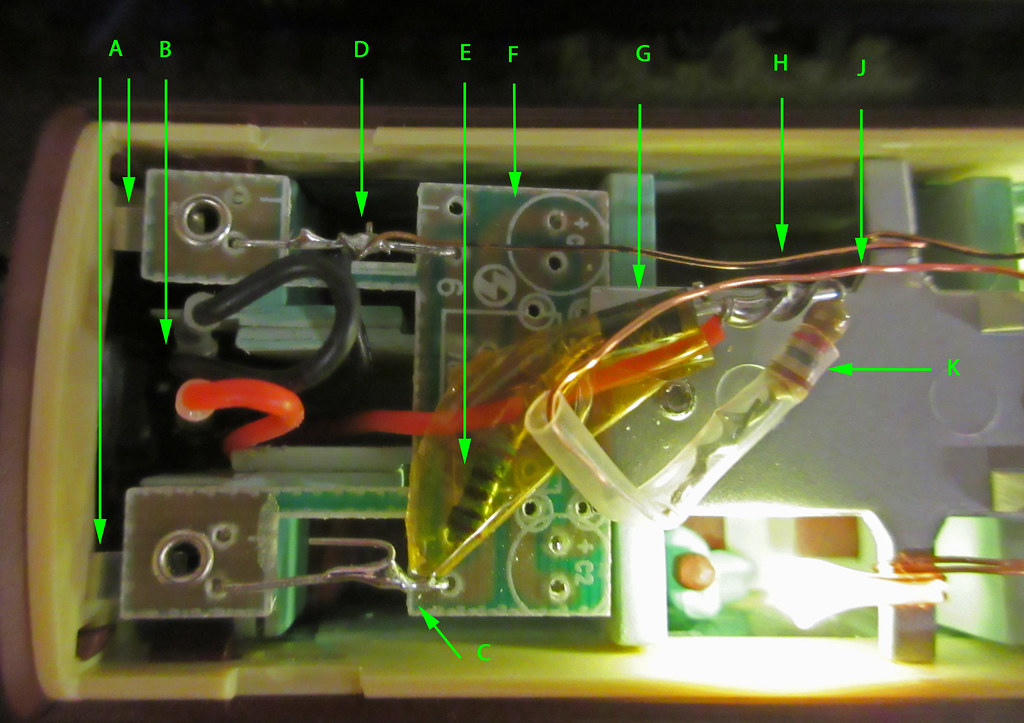
Above is one photo I found of how I use an existing Walthers lighting kit and adapted it to “flicker-free” modification.
A: Pickups from trucks
B: Bottom of capacitor
C: Left rail connection
D: Right rail connection
E: 100 Ω resistor
F: Walthers PC board, components stripped
G: Diode (this is a 1N4004)
H: Minus side to LEDs
J: Plus side to LEDs
K: 1,000 Ω resistor
Also shown in the lower-right is the last LED on the string where I wrapped the wire around the plastic tab and illuminated an occupied Roomette.
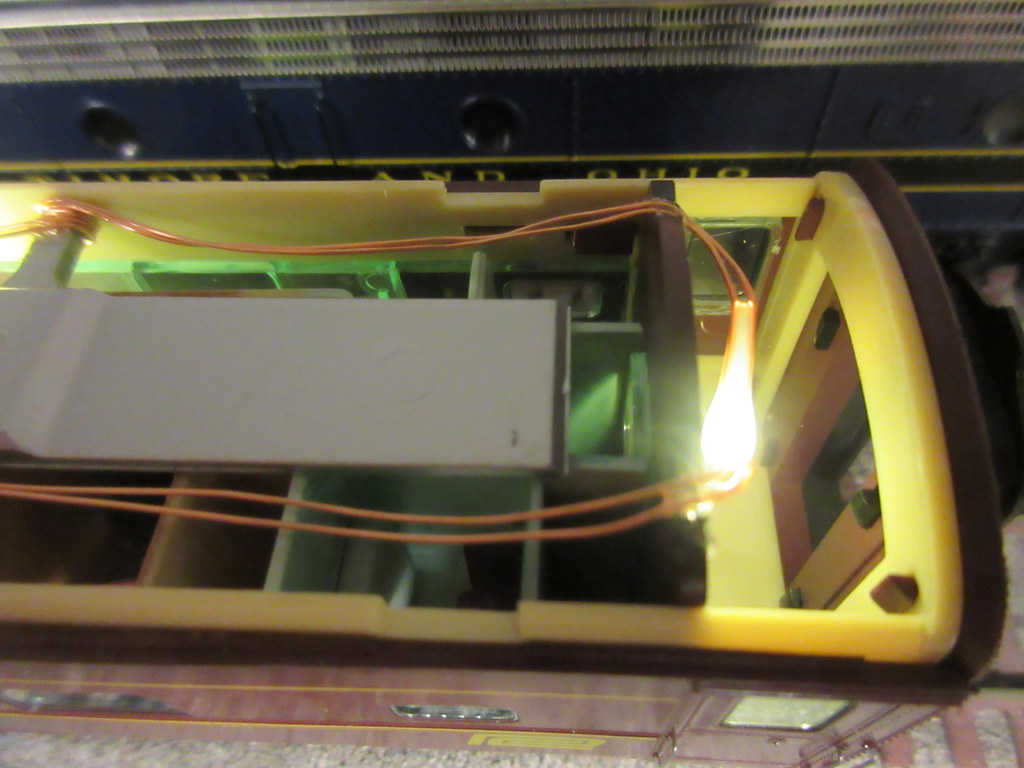
Below is the other end of the car showing how I loop the wire over the bulkhead and place an LED in the vestibule. This would be more difficult to accomplish using the tape-strip LEDs.