The simplest method of staining them adds a week and half to 2 weeks to construction time. Pre-stain them, get 3~4 different dark color stains. Pour into glass jars then drop in a handful of shingles. Use a plastic fork to fish them out and place one at a time onto paper towels. Do not allow them to overlap as they will stick together. Advantage: Due to different soaking times per shingle and grain density you will end up with several shades of each color. Disadvantage: Stain is oil, oil will not allow glue to hold until they are dry. LONG drying time.
If you have a small air brush just spray the stain on one side. Advantage; quick and easy, one side remains oil free and will glue up nicely. Disadvantage: some will warp with oil on just one side. You have just sprayed a fine mist of oil in the air and have a possible explosion hazard. Slight but possible.
Glue them ‘raw’ onto the roof, then stain. Allow a couple days for the glue to fully cure. Use small brush/Q-Tip/cotton balls to apply the different stains. Advantage: Shortens construction time. While ‘paint brush’ dries out from shingle to shingle you will have a wide variety of color shades. Disadvantage: 2 years from now you will see many shingles have shrunk or warped exposing the unstained part of the next shingle down. If you air brushed the stain as you covered the edges of the shingles some will reach under the top shingle to color the bottom one.
CAUTION: Do NOT put the stained Q-Tips/cotton balls in the trash. In confined space as the oil drys out it will generate small amounts of heat. If you have enough in confined space it will self combust. Before our first child was born (I’m granddad now) I built the baby furniture, cradle, chest of drawers, changing table and the like. We used old t-shirts & old wash cloths that had been designated as rags by HER to apply the stains. when we finished they went into a plastic bag and into
India Ink. Go to an Art Supply and pick up some inks. India Ink, black, dark brown, rustic red. Use small art brushes and wash the inks over the shingles, before or after installing. If you do not cover with a clear coat the inks will wash down and stain the building sides over time. As the ink washes out the shingles will pick up a natural patina. You will watch weathering by mother nature. Advantage: Water based inks will really pull out the grain of the wood. Noi nasty chemicals. Disadvantage: Will require touch ups more often at first but as time goes on mother nature will do the work for you.
How about Tightbond 3? It is more weatherproof, but has a little longer drying time and I have a bottle handy? Or it Tightbond 2 superior?
Could not find the green preservative at Lowes or Ace Hardware. So, for better or worse I am going without it.
I have studied historical photos (most are black and white) of my era and region as well as the exsisting loco shed at theYosemite Mountan Sugar Pine Railroad in Fish Camp. A nearly common theme for engine houses and railroad buildings is that nearly everything is wood with sometimes white trim for windows and doors. Some of the over capitalzed ($'s) logging operations that quickly went bankrupt had fancy painted buildings. So, I’m going with wood stain + white window and door trim.
I have everything stained and painted, including a metalic finish for the vents.
Question about the Thompson top coat - do I apply it to each piece now or wait and do the whole structure when it is assembled?
Thanks for the advice …
[quote user=“ttrigg”]
There are several water proof / weather proof glues out there. My two favorites are Tightbond 2 and Gorilla wood glue. TB2 is rather quick and easy to use. Gorilla will hold for much longer than any other glue, DISADVANTAGE: while setting up it will foam out the edges and that foam is a bear to clean up after setting up.
Sealing and preserving the shed.
Since your microclimate is not so different than mine I would first advise you to coat the inside half way up the wall with a copper base presevitive. It will make the wood GREEN so do not get any on the outside of the structure. It will take 4~5 days for the preservitive to cure, other wise stains, paints, glues and whatever will NOT adheare. Using the copper base preservitive will add at least a dozen years to the life time of this project. The biggest problem of wood and dirt is dry rot and wood eating bugs, and we h
Searching online at the Lowes website, I was able to find 1-gallon “Copper-Green” in about 10 seconds. Advantage internet over wandering the big box stores. Can I put it still put it over stain?
If you put copper based preservative over strain: 1. The dry stain will block some penetration of the preservative. 2. The walls will be green for 3~5 years until the sun turns it to ‘barn wood grey’. That is why I said to put it on the inside only.
Look some more. Smaller container. You will need abot two and one half ounces. A gallon is more than you will need in this hobby over the next five life times.
I hope I have read this wrong. If you glue a painted surface to another painted surface you are just glueing paint to paint, not wood to wood. When the paint seperates from the wood, and it will, the building will fall apart. Stains have oils, oils prevent any glue from properly bonding.
I don’t have any important glue joints with painted surfaces, but I do have a lot of glue joints between stained surfaces. Those aren’t going to hold? I assumed that once I applied sealer to the parts that the glue joints would not be very effective, but I was assuming the stained surface glue joints would be OK …
No painted joints, good. Stained joints, use a Q-Tip dipped in rubbing alcohol and gently rub it on all the surfaces to be joined. If the Q-Tip picks up any of the stain color then the stain has not yet cured in place. Set the project aside in a warm place with as much direct sun light as possible. Repeat daily until the Q-Tip is free of color. That’s one q-tip dipped in alcohol one time and rubbed on all surfaces. Most likely only two or three times will work. Since rubbing alcohol is 90% water you need to give the water another day to dry. Now glue it up. As for the glue, TB2 vs TB3, both a very good. Use the one you have the most experience with. You said you have some TB3, since it has a longer curing time it will penetrate farther into the wood. After everything is glued up you will want to clean off any glue that was squeezed out of the joint by scraping or sanding.
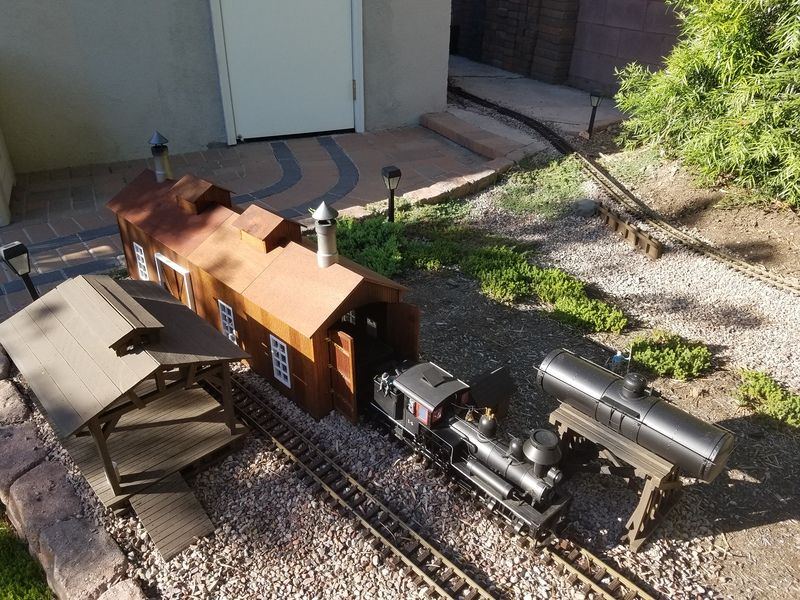
Almost done. Just have to glue on about 1000 shingles! It was fun and took about a week of staining and gluing (so far). Thanks for all of the discussion and suggestions!
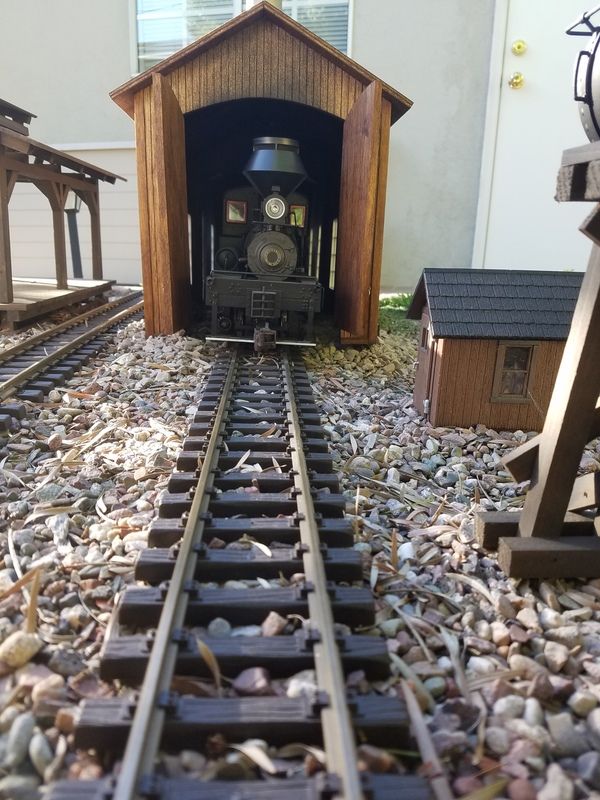
Obviously there is some distortion in the first pic causing everything to look narrower at the bottom than the top. This is caused by lens size and aperture. Not much can be done with phone camera or the smaller digital cameras, DSLR can adjust the focal length, aperture and shutter speed. Quick fix would be to take this type of pic in landscape as opposed to portrait.
Question; Is there a sill under the rails to span the door opening? A few years from now you may see some warpage and the door gap narrow or widen at the bottom. At that time (not now) you may want to add the sill to keep the door opening even. If and when you add the sill keep it narrow enough to fit between the ties so that you do not have to remove any ties.
You are right, just some distortion in the image. The opening is “square” and the doors fit just right.
No sill, but I see what you mean. I will watch for that, as well as glue joint failures. There are nails in the key wall joints, but not the roof attachment.
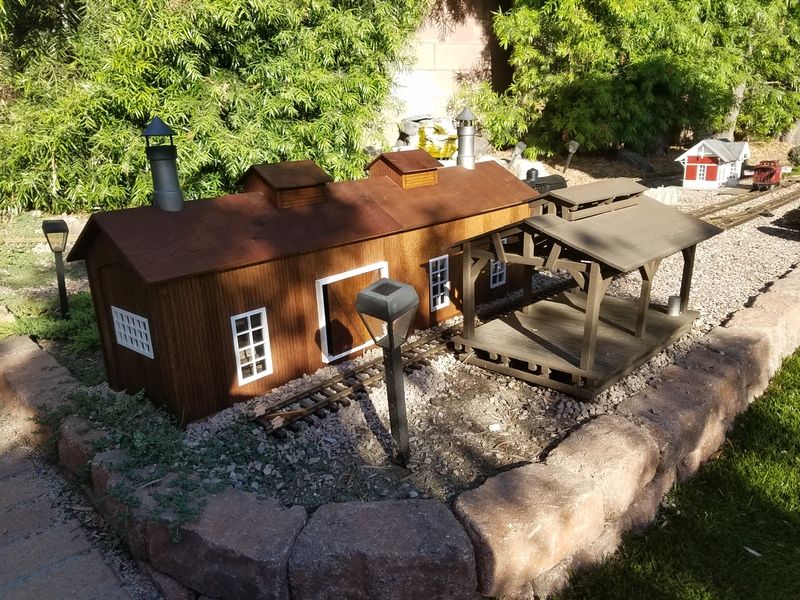
Looks good, nice job. I have a quick question. From this view I see the arc of a doorway. Does the kit come with the option of “door or wall”? If it has a door option I might go for one myself.
Thanks for the info. I hate to be a pest, but could you give me the base width of the shed. What I’m thinking about is my ‘display track’. I have a length of track atop the fireplace mantel which I rotate different engines. From looking at your ‘front view’ pic I can see that I would have to trim off the roof eve on the backside of the building. I know that for stability I would need to run several ‘floor stringers’ under the rails between the ties. My house shakes a bit more than most. The bedrock of the artillery firing range at Camp Pendleton resurfaces just below my house. The ‘sounds of freedom’ deliver a 1.1~1.5 earthquake quite regularly. I can live with a small bit of overhang, just not too much.