Who has a Lionel G-Scale Wood Single Stall Engine House 8-82105? Any chance I can park a Bachmann Shay in there? How big is the door opening? Will it fit through the door?
Thanks,
Marty
Who has a Lionel G-Scale Wood Single Stall Engine House 8-82105? Any chance I can park a Bachmann Shay in there? How big is the door opening? Will it fit through the door?
Thanks,
Marty
http://i112.photobucket.com/albums/n183/mkbradley_photos/_57_zpswlcsmelq.jpg
Here is a picture of the engine house I am talking about.
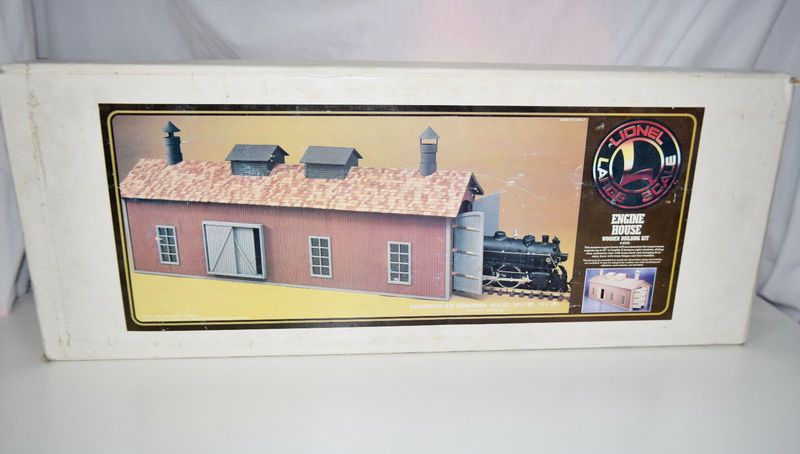
I do not have this item, nor have I seen one. I have attempted to locate scale drawings with no luck what-so-ever. Based upon Linoel garden scale trains generally have a size ratio of 1:32, and Bachmann runs aroud 1:20.9, I’m going to speculate the answer to your question is no, it will not fit without some serious modifications.
If anyone else has info contrary to my speculation, please post.
I agree with Tom. So in the picture, you see a locomotive, that is the Lionel Atlantic, not a huge locomotive, your 1:20.3 will be significantly taller. Looking at the picture there MIGHT be enough vertical clearance for a loco to fit,
BUT
The most common clearance problems running 1:20.3 on 1:29 or in this case 1:32 “environments” is the width… looking at the relative width of the door opening, I’m pretty sure you would have issues… besides the fact it would just look out of scale.
Greg
Considering all the negativity I’ve started I must say that I like the looks of this shed. I think it would do well as a work shed for a H-L-W (Heartland Locomotive works) Goose or Birney (trolly), maybe even a rail truck. From looking at the photo I can see that the doors are slightly wider than the rail ties. Since H-L-W equipment is narrower than the ties it should work well. The Birney and Goose might be a bit tall but a well constructed ‘tall concrete foundation’ would fix that problem. The Birney and Goose have fairly wide flat tops that might impact the upper door curvature. After researching your question I’m thinking about getting one for my rail trucks. If I do get one it will need some serious ageing.
It seems clear that this is not the right engine house for me and my 1:20 3T Shay.
So, how about your suggestions for a kit for similar single stall engine house? Wood (real or plastic simulated wood) construction with non-modern U.S. style.
Thanks,
Marty
Ozark Models has a nice ‘sectional’ engine shed. Plastic with a ‘cinder block’ look. My B-mann 3 truck shay clearly fits with ease. When I say sectional, I mean SECTIONAL! You select the parts and pieces to build your shed to fit your needs and desires. You can build a single shed, double or tripple shed or roundhouse. For a single shed you would need a pair of ‘end sections’ with doors, and a slection of side wall sections with or without windows and a section with people door and window. The only thing I did not like was the building was designed as a flat roof. I took a couple of non-window sections and carefully cut it into a triangle to fit a pitched roof line. They have two roof sections, flat roof (ribbed) and shingled roof, each the length of 3 wall sections. As I went for a 5 section side wall it took some pain in the tail-feathers fidgeting to get a clean looking roof line. I also ‘hung’ one half of their ‘Cascade Summit Dispatch Office’ ($20) on the side as office space for the shed.
Look here for the shed components.
http://www.coloradomodel.com/babmain11.htm#BAB
and here for the front door to the website.
http://www.coloradomodel.com/bldgg.htm
As far as cost goes, you should be able to build a shed for just over half the price of the Lionel shed.
Construction hint: Since all their parts are covered in mold release agent you will need to take over the kitchen sink for half an hour. Wash with warn water and liquid dish soap and rinse well with running warm water. Other wise paint and glue will NOT stick.
Tom, you have not generated any negativity, you (and I) have answered the question “will this work” to the best of our ability. If he bought the shed and the loco did not fit it would not be good.
I agree, height can be fixed, but accomodating more width would really require radical surgery that would not be worth the time.
Greg
Greg: When I used the word “negative” I had in mind that this is the first time I can remember saying “NO”. I always try to suggest other ways to modify things to give a possible solution.
Marty: Having nothing better to do in my hospital room I’ve spent nearly 40 hours searching for an answer to your question about other ideas. (Shattered lower left leg in an accident on my Segway. Segway is fine and I should go home on Monday.) Your requirements, wood, single stall, non modern US style, make for a nearly impossible search. Mostly due to the length of a B-mann 3 truck shay. There are a number of ready to use pre-builts that are designed for something on the line of an 0-4-0 to 2-6-4. Pola has a German design (the Shonenburg) which would require 2 expansion units, but this fails on multiple levels, brick, european design, 2 stalls.
If you truly want a wood structure I would suggest stopping by a doll house shop. Look for the availabity of supplies in the ‘1/2 inch’ section, that’s 1:24 in our terms. I’ve acquired ‘lap siding’, people doors and oversized windows for some of my own designs. Unless you have wood working skills you might want to stay with retangular bay doors rather that the round tops. The only other option I could suggest would be to go to a scale train show. Every show I’ve been to has atleast one vendor of wooden structures. They tend to do special orders so you can specify the length you need. A few weeks later UPS or FedEx will drop a box at your house. You can select (from most of them) kit form, assembled ready to paint, or prepainted ready to use. The thing I like most about these guys is most can do milled signage for the yard name etc.
I agree with Tom, to get the desired “logging railroad” look with an engine shed of that length, building it with wood is the only way forward. Construction style of that period would be similar to farm barns. A logging railroad made do with what they could make on site in thier sawmill. Rough cut main timbers and simple siding. Remember to put ventelation at the top for whatever end you park the Shay’s smokestack under. If its going outdoors, remember to use water proof glue, I prefer Titebond myself, and waterproof the whole thing with something as well. Mike
The subject of logging company engine sheds has gotten me interested. After six days of surfing the web for photos, sketches and site plans I’ve come to the conclusion there is no such thing as a standard shed plan. In the North-East where logging operations seemed to be bigger as they supported the shipbuilding companies the engine sheds seemed to be mostly wood structures with lap siding. (I’m guessing a snow thing.) Most were 2 or 3 stalls wide. Across the south it seems as if a ‘pole shed’ was rather common with some form of office/parts/tool storage structure. Just a roof, no walls, and the ‘structures’ were mostly retired standard gauge box cars. In the Southwest tended to be vertical planking with air gaps between the planks. Office and storage space seems to have been simple wooden sheds attached to the engine shed. Board and batten siding seemed to prevail in Colorado and the west coast.
Smoke ventilation seemed to run the entire gamut from, clearstory, short chimneys, vented skylights, to eave vents above the front and back engine doors.
As Mike said the shed type depended upon what the logging operation had on site and how long they intended to work that area. The only thing that seemed to be common to all logging operations was a turning device in or near the yards. Most common was a simple loop so the engine was pointed uphill for the next day’s run. A smattering of turning wye’s were represented and when space was at a premium in tight valley’s, or multi stall sheds you can find a turntable.
I think I have found next years rainy season project.
Ted sent me this photo. It looks a lot bigger in this picture taken at the Fern Creek and Western.

… and I messaged Trevor and he verified that the Bachmann 3-Truck Shay will fit. So I ordered one and it is on the way!
It sure is bigger! That’s a Bachmann ~1:22 loco… nothing like a picture taken at the right angle.
I’ll bet your 1:20.3 loco will look even better, as that building definitely is not 1:32 scale like the rest of their “g” stuff.
Greg
I do not have my kit yet, but a friend has bought one and reports the door is 7 1/8 inch wide and 10 inches tall and the unit is 39 inches long.
If thoise dimentions are correct, and I have no reason to doubt, then you have a great find. To copy Greg a photo from the wrong angle can be deceptive.
Congrats on the find. I would ask that you post a pic or two when you can. I would love to see one with the smoke stack just at the doors taken from track level.
The kit has arrived and I can verify that the opening is 7" x 10" which will work just fine. The kit box says that the overall dimensions are 40.5"(L) x 10.5" (W) x 13.25" (H) and that will also be fine.
This will be my first wooden outdoor structure build. There are about 50 wood parts + about 1000 wood shingles. Now, I need your recommendations.
What is the best outdoor all weather glue to use?
I could stain the siding. Stain + sealer? What products and brands? I will probably go to Lowes or Home Depot. I am in California, so some products may not be available.
I will paint the trim. I could also paint the siding. What do you recommend for to outdoor use? A favorite primer + best UV resistant paint? or something else? Recommendations?
And yes, I will post pictures when completed!
Thanks,
Marty
First I would caution about using the word ‘best’ around here. There have been more than a few ‘heated discussions’.
There are several water proof / weather proof glues out there. My two favorites are Tightbond 2 and Gorilla wood glue. TB2 is rather quick and easy to use. Gorilla will hold for much longer than any other glue, DISADVANTAGE: while setting up it will foam out the edges and that foam is a bear to clean up after setting up.
Sealing and preserving the shed.
Since your microclimate is not so different than mine I would first advise you to coat the inside half way up the wall with a copper base presevitive. It will make the wood GREEN so do not get any on the outside of the structure. It will take 4~5 days for the preservitive to cure, other wise stains, paints, glues and whatever will NOT adheare. Using the copper base preservitive will add at least a dozen years to the life time of this project. The biggest problem of wood and dirt is dry rot and wood eating bugs, and we have more than our fair share here in CA. The copper based preservitive will keep the bugs away for years.
Sealer? I’m going to say no. You want what ever coating you use to soak into the wood. As top coats soak into the wood they will raise the grain for some nice texture. Stains, too much too fast will not be pleasing. If your stain uses a thinner, get some. Start with 2 part thinner 1 part stain and wait at least a day between coats. Use extra coats along the bottom sill and 6~10 scale inches up each corner. Use a toothpick to put some extra stain under the eves. Varying the color thickness of your stain will make it look more life like. A good top coat readily available here in Calif, wooden deck finish. Add a bit of thiner to allow the deck finish to seep into the wood and leave a textured surface. I use the Thompson brand (both on layout buildings and the patio), it seems to last about 5~6 years before needin
Before anyone questions the blacksmith comment. How are the logs brought to trackside for loading? Horses of course, so you find blacksmiths on staff. A nice blacksmith shop alongside the egine shed would be nice for the horses and tools and spare parts for the engines.
Additional comments:
Paint brushes; stay with the small ones like we used on plastic car and plane model kits. Q-Tips work well for stains in and around corners and sills, toothpicks to put fine lines of stain under the window sills. toothpicks with the end chewed up to brush stains under the eves.
Stains; find the color you like then purchase three or four shades lighter. Looking at the color chart uner the flouresent lights of the store is very deceptive. A color that looks natural at a scale of 1:1 will look exceptionally dark at 1:20 etc. outside in sun light.
Paints: Looking at an enlarged copy of your second pic I can see the seams between the planks forming the walls. A $40 per gallon exterior paint will be so thick it will fill in these joints and they will disappear. The cheap stuff (1 part paint 1 part water) will not fill in those joints and give the color you want.
Disstressing the wood: Most wood will have knot holes and other non clear wood in the planks. Remember these logging companies will sell their good clear planks for a high price. They tend to use the poor grades of wood for their own structures. If you go with no paint natural wood look. Knot Holes; use a 1/32 or smaller drill bit and twist by finger to drill small holes in most of the planks. Take a small piece of redwood or walnut and use your elec sander to create a bunch of fine wood dust. Mix with Elmer’s wood glue and fill these holes. When the mix dries these color spots will look natural especially when stained. For color veins in the plank, use a fine and sharp razor knife (X-Acto) to cut fine and shallow “V’s” in some of the planks and carefully fill with more of the sawdust paste with a bit of deeper color stain (maybe a red color), use the X-Acto blade as a putty knife to smooth out the fill. A lite sanding with 500~1,000 grit paper may be needed. Some of the planks will have uneven edges that do not fit tight against the next plank. Use a sharp nife blade to carve away
Thanks for the advice. I will “soak it all up”.
What about the shingles? There are literally a thousand of them and they are light colored wood. They should be much darker. The shakes on my actual (full size) roof are nearly black (or at least faded black - dark grey).