I am looking for ideas on simplified benchwork for my new HO layout. I am no carpenter and don’t have a wood shop nor a lot of money at my disposal. Unfortunately, my layout must be free-standing, so wall brackets are out. I want a high 52" rail height for the mainline. With the exception of one area where the mainline passes over another railroad, it will be all level. I don’t have a track plan uploaded yet (I’m at work, it’s at home). Basically, it is a “C” 10’ by 12’.
|- 10’ -------------|
| |
| 12’
| |
Hope my ASCII art was understandable.
the top and botton of the “C” are 4’ x 10’ and the joining back of the “C” is 2’ x 4’.
This leaves a walkway completely around the layout which is neccesary for other reasons. I am currently leaning towards 24" wide hollow-core doors with 2" thick extruded foam on top. The problem with that is the legs which would need to be 48" high. Not sure how to construct them. L-girder would give me more flexibility and let me round the corners, but I cringe at the thought of all that carpentry. Any ideas on how to do it easier?
You could buy folding table legs which you could attach to the bottom of the doors. Just make sure to use a piece of 1 X 4 or similar attached across the doors as your anchor point for the legs - otherwise the screws will bite into the “hollow” of the doors.
You could buy folding plastic banquet tables and lay the doors on the tables. Slide the table legs into pipes or use shims to raise the height. Not sure how the price would compare to commercial benchwork like Sievers but I see banquet tables on sale at Menards frequently.
My carpentry skills are limited, to be polite. For my N scale layout I made a series of boxes, 2’ X 4’ or 2’ X 8’ or a different length to fill in an odd length and an irregularly shaped corner piece. I just made a basic 4 sided box from 1X4 lumber, butt-joined the corners, glued and screwed them and put a short piece of 2X2 in each corner for reinforcement, squared the box up and let the glue set. I put additional 2’ pieces of 1X4 across the middle, every 2’ for additional reinforcement. I drilled large holes in these to pass wires through. I topped it with 1/2" plywood, glued and nailed to the 1X4s all around the edge and the interior braces. I got the lumberyard to cut the sheets down the middle to give me 2’ X 8’ pieces. I cut them shorter as needed. For legs, I’m using 2X2s, one in each corner, bolted to the 2X2 corner braces. I installed T-nuts and bolts in the bottom of each leg to level each section. To join the sections, I simply aligned them, then drilled holes and bolted them together.
As you’ve figured, I’ve got a 2’ wide layout. Some of it is along the wall, but some of it is freestanding in the middle of the floor. Even the 8’ long sections are light enough that I can pick them up and move them around without help. I got the idea for the sections first from the NTrak modules (www.ntrak.org) and from an article in Model Railroader some time ago about domino modules (I forget the issue and the author). It works well for me, and like I said, I’m no carpenter by any stretch of the imagination. The lumber yard does the worst part of cutting the plywood in half and I can easily cut a 2’ wide piece of plywood. You will want some kind of bracing on the legs. 1X2 lumber in an X across the ends and a diagonal going up to the 1X4 on the sides will work.
Carpentry is not my strong point either. What I did was build squares, rectangles and triangles. Once they were built out of 1 X 4 I added 2 X 4 legs. Lastly plywood top screwed to the frame. I did not use any supports and after 18 months have not had a problem.
I was able to borrow a friends power miter saw which made cutting the wood easy. You could rent one or buy a miter box/hand saw and do it by hand.
None of the frames are larger than 4 foot square to make them easy to move from outside where I cut and assembled to the spare bedroom where they were all assembled.
I then glued foam insulation purchased from Lowe’s.
Here is my layout. You can envision the center island consisting of two 4 X 4 frames bolted together with a triangle at either end making the center line length 12 feet.
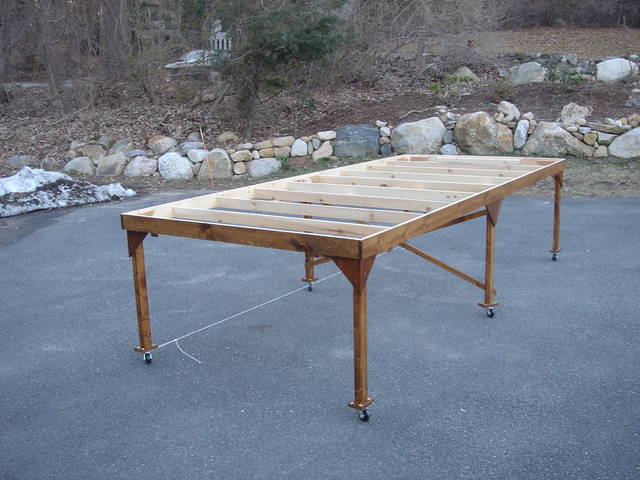
Here is an old picture of my original benchwork. It’s a 5x12 foot table, and it’s mounted on wheels so I can roll it around. It is low, only about 38 inches, so it can tuck under the 45-degree roofline without sticking too far out into the room.
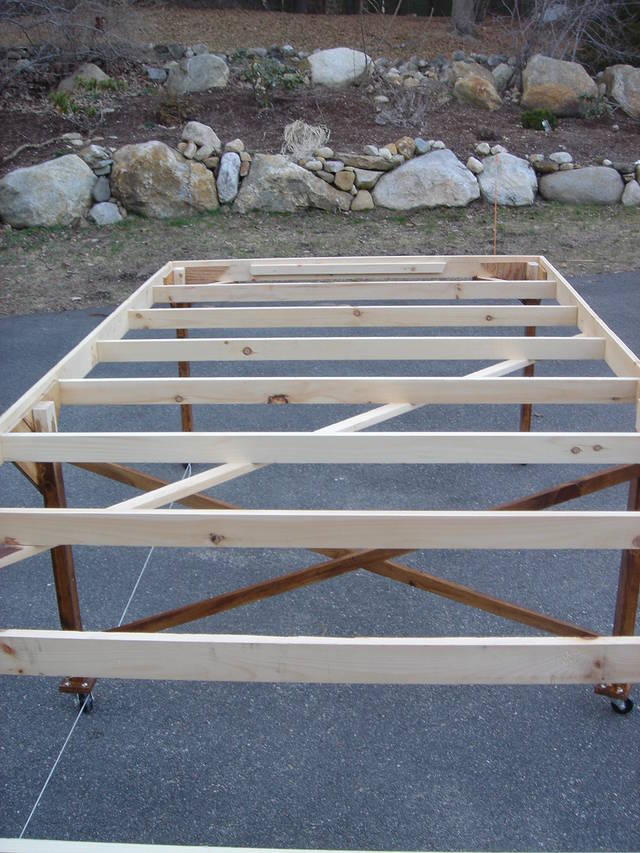
The outer frame is 1x4, the legs are 2x3 and the cross-rafters are 1x3. I mounted the rafters an inch below the top of the frame, so that the foam could sit inside the frame and be protected. I think the key thing here is the triangular gussets (made of 3/4 inch plywood) that hold the legs to the frame. The legs are very solid this way. There are also some 1x2 cross-bracing pieces to keep the center legs steady and keep the whole thing square:
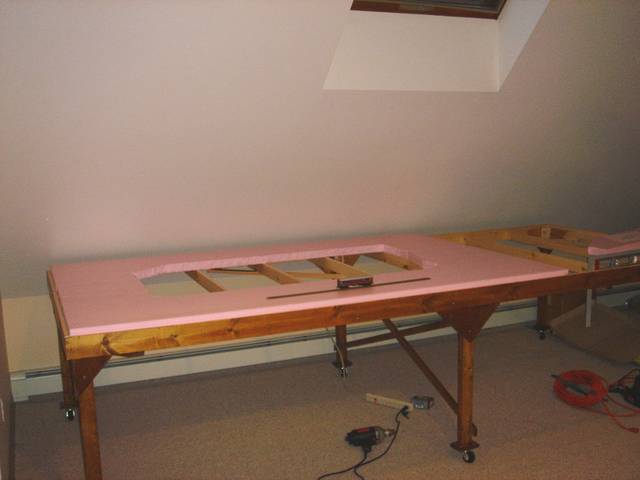
This is what it looked like with the foam installed:
With cross-rafters like this, 2-inch foam has plenty of rigidity all by itself. It doesn’t need plywood or a hollow-core door to support it. That makes the whole thing much lighter and cheaper, too.
Mister Beasley, I like your idea of the corner gussets. The 1X2 end X’s and side diagonals don’t turn me on as they restrict movement under the layout and I don’t think they look that good. It’s a little hard to tell from your photos but it looks like you fasten the triangles to the tops of the legs first, then fit that into the corners and fasten them in. How big are the triangles? Do you just cut a square out of plywood and then cut it in half diagonally? It just occurred to me that I won’t be able to retro-fit my existing sections because of the 2X2’s in the corners but future expansions are planned and I’d like to try your triangles for them.
First, you want to think hard about how far you can reach into the layout from the edge to rerail cars, lay track, install scenery, paint, etc. Most of us find two feet is about it. You are planning on four foot wide bench sections. That’s twice as wide as you can reach. I recommend rethinking that part of the plan. Your track plan will want a main line loop to permit continuous running. Think about 24 inch radius curves to allow long equipment, and you need 48 inches or four feet of width to turn the main line 180 degrees. But you only need a very short section, a bubble, at the end of the table to hold the turn around loops. The rest of the layout can be narrower and more reachable.
Second, think about a backdrop. The layout looks better if the eye sees track and structures in the foreground and a backdrop behind that. Being able to see the far edge of the table makes the whole layout look like toy trains running on a table rather than a miniature scene. Most of us push the layout up against the wall and place a backdrop on the wall. If you are going for a completely freestanding layout, think about a backdrop fastened to the “back” side of the table. Backdrops can be pretty lightweight, 1/8" masonite is plenty strong enough.
Third, hollow core doors are little or no stronger than 2 inch foamboard. The foamboard is plenty strong enough to support track, trains, scenery, everything EXCEPT the model railroader himself. Hollow core doors are so hollow that there is little solid anything inside them to accept fasteners, legs, switch machines or whatever. Skip the doors and go with just the foam.
Foam wants something to hold it up and protect the edges from getting leaned upon. You can make a frame of 1 * 4 inch lumber going all around the layout. Then run 1*2 joists every couple of feet so you have something for the foam to rest on.
I agree, to a point. Sievers benchwork is like getting something at Ikea – you get a couple of boxes filled with pre-cut and predrilled pieces of wood (hardwood, in this case), and all you need is a couple of simple tools to put it together. It’s modular, so you can add pieces later if you choose. And you can put it together in an evening with no mess.
The problem – and this is a big one for a lot of us – is that it’s a budget buster. I planned out the benchwork I would need for my 10x15 layout (similar in size to what you’re looking at) was about $1100, not including shipping and handling.
I didn’t think my carpentry skills were very good either. But I had some good tools inherited from my father, so I dug out an old MR article on benchwork, made a planning sketch on graph paper, and got to work. A trip to the local building supply store and $170 investment in lumber and hardware, and a long Saturday work session and presto – servicable benchwork. It ain’t pretty in some spots, and there was a fair bit of swearing, and a couple of re-do’s, but there it was. It’s still there, 8 years later, solid as ever.
I used 2x2 lumber for the legs (12 of them), 1x4 lumber for the framing, 1x2 lumber for the joists, and 1/4" plywood for gussets at the corners. While you can do it with a cirular saw and a couple of sawhorses, I’d recommend renting a table saw (the kind with the saw blade on an arm that comes down and cuts your lumber) if you don’t have access to one. A cordless drill and screwdriver is also very useful (with a couple of powerpacks so one is charging while you’re using the other).
Do all your cutting at once, measure everything twice, use a speed square (availab
My layout, too is in the middle of the basement floor (all the typical basement-type stuff is around the walls and requires access), but I do have a backdrop on my layout, It’s 1/4 foam core (available at any art supply store) glued to small dowels, which fit into brackets on the back of the layout so they can be removed to fix scenery or derailments.
It does add immeasurably to the visual aesthetics of the layout.
So don’t let the fact that your layout is in the middle of the room keep you from putting in a backdrop.
Here’s how I made my benchwork out of 1x4 with 48" 2x2 legs. Each table is 48" high and made to fit what I needed. Everything’s about 16" on center. This was built for elevated track, but you could put your plywood or foam directly on top. Each took less than an hour to build with not much headach and their super strong once screwed together. Good luck - Mark
Well, the benchwork might cost a bit, but if you do like I did and get a little at a time when your budget allows, it works out.
For me, Sievers was the perfect solution. I had no carpentry experience in terms of doing anything like building benchwork for a layout. Also, I didn’t have the proper equipment for making accurate cuts to lots of wood, which would have cost me even more money, as well as buying extra lumber for any mistakes I would surely make. Since I rent, the layout needs to be portable, which means a lot of cuts to make each layout section. Plus, living in a townhouse with neighbors on either side of me in my building, I knew that they wouldn’t want to be hearing power tools running in my basement.