I currently have an N Scale layout in progress, and I’m having some issues regarding ballasting. First, it looks to me like I have applied too much ballast. Exhibit A:
I’m concerned about the track with gray ballast. It looks over-ballasted to me. The problem is that I find it hard not to over-ballast as such. So if it is over-ballasted, my next question is this: do you think it would help to cut off the flanges of roadbed that stick out beyond the sides of the track? I’m using Woodland Scenics Trak Bed, so that wouldn’t be hard. And without those flanges on the side, I think I might find it easier to make the ballast stay close to the track.
Second, in an effort to keep my N Scale turnouts from getting stuck with glue/ballast that’s similar in size to sand grains, I’m tempted to cut out the roadbed entirely under my turnouts and “float” them on top of some ballast only. Has anyone tried that? Or is it essential to have roadbed under the moving parts of my switches?
The basic rule I always use when ballasting is, ballast should not cover the tops of crossties because real railroads try to not cover the tops of crossties.
For turnouts, use roadbed under them but don’t use glue under the moving parts. Ballast can be applied to them except where there are moving parts.
If that’s an issue, try to apply only a small amount at a time, and add more on subsequent passes. Use a paint brush with soft bristles to shape the ballast before gluing. Don’t even think of adding glue if there’s too much ballast present; brush the excess away and get the ballast somewhat below tie level. Sooner or later you’ll get used to the process and be able to add the right amount.
If you think you’re having problems now, wait until you try that. Keep the roadbed solid as possible, especially under critical trackwork like turnouts. Again, it’s a matter of getting used to how much ballast to apply and where. Use small brushes and remove ballast from around the moving parts of turnouts before gluing. Test before gluing to ensure no ballast got where it doesn’t belong.
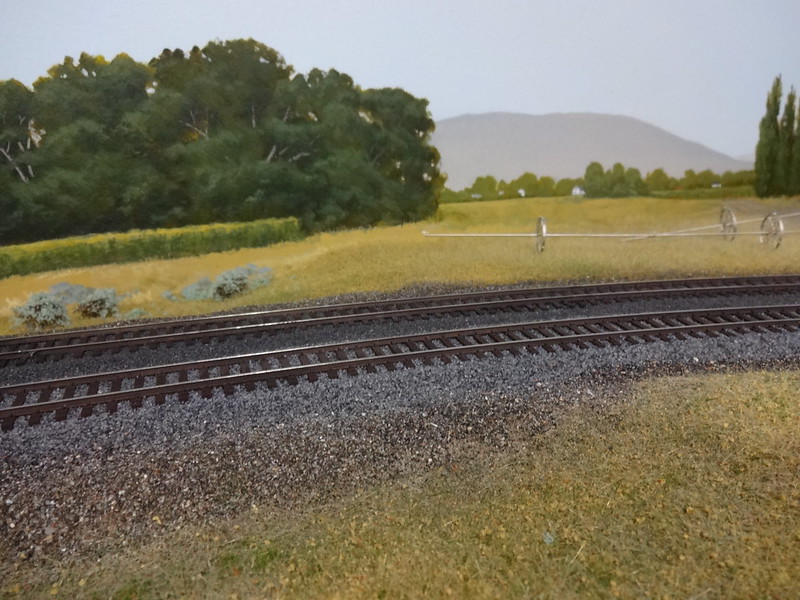
Here’s some ballast I completed recently. I use a plastic spoon as an applicator, and normally don’t have it anywhere near full before pouring ballast onto the track. Apply a little, brush, fill as needed, test turnouts, wet and glue. It took some time to get everything brushed into place, and glue was applied slowly as well.
Note here how the area beneath the turnout points received less ballast than everywhere else. Careful brushing removed ballast from around moving parts.&
In time you will develope your own prefences, likes/dislikes about ballasting, let me share a couple of mine: 1) I find that asmall soldering brush (normally used to apply flux to joints being soldered) works very well for "herding " stray bits of ballast into the desired places. To avoid over ballasting in and around turnouts, I will use a pair of long handled tweezers to place ballast eactly where desired. This is slower than slow at times, but the turnouts keep working and I get the appearance that I prefer.
Ballasting is as much art as science and most of us get better with practice. As for myself, I have redone some areas several times , as skill levels and preferences improved.
Hey Rob - If you don’t mind me butting in here and asking, what ballast did you use for the lower track in the first picture? It looks like to be the same for the middle track in the lower picture? I haven’t done well with buying ballast colors more or less blind from websites, and that stuff looks to be about what I’m looking for. BTW, always enjoy the pics of your work. Very inspiring stuff!
I paint my roadbed gray and use as little ballast as I can get away with. I mix a little of the finer stuff with the right size ballast so it settles in better. Other than that, I use Pelle Soeeborg’s methods…
When ballasting, after applying the loose ballast with a spoon I use a sort of “bulldozer” of an old piece of cork roadbed that I run repeatedly between the rails (and the bulldozer touches both rails as it spreads) so that the ballast reaches only up to the tops of the ties, and no higher. I do the same to the ends of the ties beyond the rails and also try to shape the ballast so that it is falling away from the end of the tie as per the prototype.
I do my best to make myself totally satisfied with the appearance of the ballast before applying the alcohol spray (soaking the ballast so that there is no surface tension to prevent the cement from soaking in too) followed by WS Scenic Cement. Once the ballast is hardened I repeat the process with the bulldozer of cork roadbed because it can loosen the bits of ballast that somehow end up on the tops of the ties, or the sides of the rail. A quick pass with a vacuum cleaner takes care of the stray particles of ballast. I have used this method successfully in HO but I know it works in N because I went through the entire process as part of a clinic at this summer’s N Scale Enthusiast Convention here in Milwaukee.