Making better loads for open hoppers

Hi Gang,

I think I’ve come up with a real neat way to improve loads for hoppers. The example I’m going to describe below is for upgrading “stone” loads, in this case, for my hoppers coming in from an interchange track, filled with stone from a distant quarry. While I started with an existing commercial load that I bought years ago, you could probably use my approach by cutting a piece of Masonite cut to the size of the inside dimensions of the hopper. I’ve done that myself for making “scrap” loads for my gondolas.

The first photo shows my “empty” hopper. Note that there is some gravel in the bottom. It’s there to hide the lead shot I use to weight the hoppers because as we all know, manufacturers don’t provide enough weight to meet NMRA standards when the cars are running empty, without loads.

The second photo shows how I place the commercial load into the hopper with plastic wrap under it. I simply cut a piece of wrap larger than the opening and set the load down into it, being careful not to make any holes in the plastic. The plastic wrap leaves just enough of a gap along the edge of the completed load so that it will slip in and out of the hopper easily.

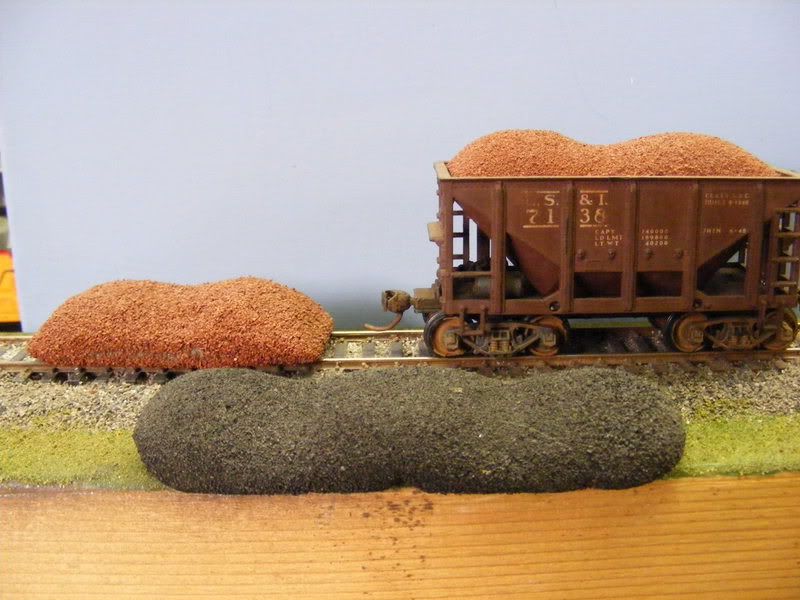
Now, I spread diluted Elmer’s glue over the whole installed load and sprinkle on my crushed stone (I used “Woodland Scenic’s” Medium Gray Talus, Item No. C1279) which I think looks like stone that would be coming from a quarry. After I’m happy with the amount of stone and have pushed it carefully along the edges of the hopper, I then drip more diluted white glue all over the “stone”, being careful not to “flood” it too much.

It takes around 30 hours for the glue to dry enough for me to remove the load. I simply pull the plastic wrap up carefully, removing the load. Photo 3 shows the complet

Mondo,

Thanks for some useful techniques and tips on making custom loads.

I do have a suggestion. Loads of stone traveling in hopper cars typically aren’t filled to full cubic capacity, as this would exceed the weight capacity of the car. Sometimes hoppers are even marked with a line on the side indicating the limit line for stone that is within the car’s capacity. You might want to build your stone loads so that don’t fill the car so near the top as it would be with coal, which is considerably lighter than stone.

Other than that, it looks great!

Thanks for the prototype info but it’s a little too late…I already built 4 hoppers with the stone at that level. I guess I’ll just have to hope the excessive weight doesn’t get me fined or cause my cars to “crash”. I forgot to mention that the stone is from a limestone quarry and is therefore fairly light.

Mondo

I cut out blocks of floral foam the size of the car. Sand and shape it to the desired load. Brush on a coat of white glue and add ore or coal.(or stones and ballast) You can add BB’s under the load to achieve the proper car weight.

Nice tip, Mondo. Our hobby is all about fooling the eye and brain…sort of…so handy dandy tips like yours, easy things to do, sure make that aspect of our hobby easy on the pocket book and doable by all except those with three thumbs. [:D]

Loathar,

Thanks for not making one comment about my method and sharing YOURS. However, your thing about the weights fails to consider the fact that I add the BB’s so the car will run “empty”. Adding weight under the load will only help when the car is “full”.

It would have been nice, if you’re going to take the time to reply to my posting and share YOUR method, if you would have at least commented positively or negatively on mine. Even a negative comment would have been appreciated. I guess as a poster, we always run the risk of taking the time to take photos and write up a tutorial, just so someone will ONLY USE IT AS AN OPPORTUNITY TO SHARE THEIR IDEA.

Mondo

Mondo:

You read my mind. I’ve been thinking about ways to make some realistic loads for a couple of dump cars. Your idea is just what I needed. Thanks for posting it. I just hope that my work turns out as nice and realistic as yours.

Joe

Sorry.

OK. I’ll comment. You may want to consider using smaller stones. Those look a little large. [2c] Have you tried using plaster or hydrocal instead of glue? It would cut down on the drying time.

The stones are the right size, considering they are chunks of limestone mined from a quarry. Using an HO scale ruler, the stones are anywhere from 5" to 9" in size and that’s about what comes out of a quarry, before it is broken down. Even ballast starts out in large chunks and gets crushed down to size. By the way, I guess I didn’t make it clear when I said that I was upgrading existing loads. My approach is to take EXISTING loads that I had bought and had been using and make them look more realistic than they did with the molded-on stones. And no, I didn’t consider plaster or hydrocal because the commercial loads I have are cast out of resin and I don’t think plaster or hydrocal would stick very well.

Mondo

Hi Joe,

Thanks for the note. Your comments made the time I spent taking the photos and writing the tutorial worth while. If even one person can use my idea, I’m glad.

Thanks again,

Mondo

Mondo,

Nice job! Two things I would add:

  1. Put a small finishing nail either under or on top of the base platform. Then you can “unload” with a magnet (Kadee track magnet or other.)
  2. Mark the underside of the load with the specific car it belongs to. Not all cars are identical, especially if they have been kitbashed.

When I start ‘loading’ my unit trains, I’ll be using your system. Thanks for the details.

Chuck (modeling Central Japan in September, 1964)

Okay there, mondotrains, you want a comment about your method; you got a very good piece of advice from mlehman, Your rock load is too big for your car!!! I don’t care whether you are talking about limestone or limeade, its still heavier than coal which is carbon which is why it burns. And besides, I wasn’t aware that stone was carried in hoppers; I thought it was carried in gondolas but, then, what do I know!!!

Mondo, thanks for the idea. I have 3 CP Rail Ballast cars and a dozen Intermountail CP Rail Bathtub coal gondolas that need loads. I was going to purchase the ready made ones that Motrak Models produce but your method seems very simple and very easy to do. The first rainy day we get I’ll be in the basement working on them. I’ll post a few pics of my finished loads when I get them done.

Mondo

Build a track scale and have the overload cars on a sideing with another empty to trim the loads. I built my stone hopper loads using styrene painted sandy colored and covered with scale size 4 inch minus and scale size 1&1/2 inch minus and also silt from the retention pond that scales out close to washed sand. My gravel plant only deals in three sizes of product that only serves rail. Sometimes it pays to model what you work. I have access to sieves from work that screens to the proper size stone.

Washed sand is only filled about half way up the slope sheats on a GLa hopper.

Washed 1 & 1/2 inch stone about 2/3 up the slope sheats on an H21

Washed 4 inch is about 3/4 up the slope sheats on an H21.

Hope this helps
Pete

Looks good to me, a lot better than the originals.

You never see a pile of loose stone so compressed that there’s no nooks and crannies leading down ito the pile, but that’s how the commercial loads are.

That gravel nmight be a little rounded to be fresh from a quarry, blasting tends to leave jaggeder rocks, but you have to be within an inch or so to notice that, at normal viewing distance it looks great.

You should be aware…nobody EVER overloads trains cars…or trucks…or bridges…or levees…and they never EVER fail and come crashing down in the river, or let the ocean in, or get fined $1500 bucks, and there’s never even been ONE SINGLE case where a rock from an overloaded gravel truck or train car came smashing into a car’s windshiled, that just doesn’t happen, uh-uh, no way, not a chance.

Anyways…

If you do something like this for coal, here’s a tip. Either use real coal, or if you use ballast and paint like I do, paint it all dead flat black first, the blackest black you can find, spray works good, and then, use a tiny brush and daub little highlights of the shiniest, glossiest black you can find, because from just the right angle, real coal is shiny. In a carfull, at least some of the pieces will almost always be at just the right angle and the sparkles coming off as the train moves look pretty nice, worth the extra step in painting.

Like the idea of using the car itself for a mold, efficient, but I’d have never though of plastic wrap to protect the car from the glue.

Nice work!

Wow! those hopper loads look great!

Thanks for sharing…