I am building a hon3 colorado narrow gauge layout. I see layouts using “real dirt” that looks dry and dusty. I am using ,baked in the oven, sifted top soil and it is to dark. I have gotten it a lighter color by using Durhams water putty but still think it needs help. What do you folks use to get that colorado “dirt” color?
You could mix in some acrylic paints and stir it through the dirt. Probably powdered acrylic paint would even be better. Then, once you wet it to glue it down, it would be mixed in real well. Using wet paint may cause your dirt to dry in clumps, unless your spread it out on waxed paper on your table to let it dry.
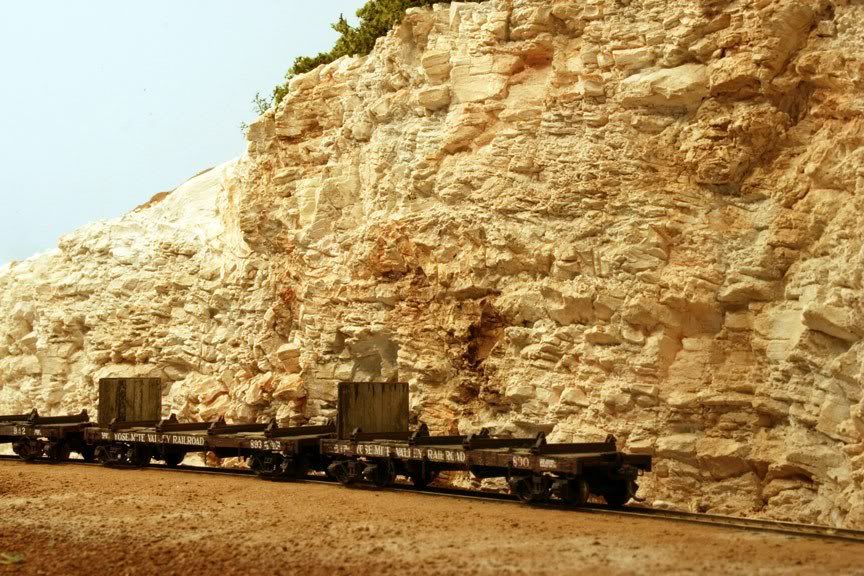
Most of Colorado is dry and dusty.
JB
For Colorado dirt, I just walk outside and find it. There’s different colors of dirt I have found, some is darker, and some is lighter more sandy. Are you in Colorado? If so, just go exploring a little.
In scales smaller than O, it will be most difficult to do what you want to do. But, an option to try is to use plaster of Paris and mix it with tempera powders or with masonry dye, also in powdered form. For texture, I would find very fine grit or sift roadside or garden soil to get stuff about 3-5 thousandths of an inch. Close to a camera lens, it will look quite coarse, but that’s the way she goes.
The important step will be in rolling it flat before you mist it with an alcohol and water mist, and then overspray with as fine a glue mist as you can get.
Crandell
I use mine tailings. When I go exploring in the desert or when I visit Virginia City I always bring a bucket or two with me. Old mine tailings are dry, fine and come in a variety of colors. They have less organic materials than other natural dirts. It was something that Dale Darney taught me when I was a young modeler. - Nevin
I use a multi-step process:
I sift all my dirt through a very fine screen to get a powder. I use a shade of almost white dirt and plaster to lighten the color of the original dirt because the glue will darken it several shades.
I make the first application putting the dirt down and getting it as perfect as possible by rolling it etc. I then mist and glue it down.
The second coat is applied to wet glue over the first coat after the first coat has dried. It is carefully sifted/dusted from 10" or more above the surface into the wet glue. It is a light coat. I vacuum up the loose dirt after this application and I get a nice dusty look.
I have resorted to sanding the surface and other more aggressive techniques to get surface level and looking “right”. A little practice and you will get the look you want.
Here is some dirt after the first stage:
Here is some dirt afer the second stage:
Have fun,
Guy
Over the years skiing in Colorado, I found several places where real Colorado dirt can be found in usable form after sifting. About 2 miles up from Glenwood Springs toward Aspen there is a bank of red dirt where I gathered some. There is a rest stop about 10 miles west of Green River, Utah, on US 80 where 5 different colors can be found in sandy soil within a 50 foot radius. The scenery on the road between Richfield, Utah and Green River is awe-inspiring and a source of scenery ideas as well as different dirt colors. I gathered several bags on my way home to California every year, and I also found several colors in Arizona, at Goldfield in Nevada, and California.
I sift it through metal window-screen to remove the weeds, twigs and rocks, (which I save to use as ground details). On level surfaces I sift it onto the surface, mist it with water containing a little detergent, and drop white glue thinned with plain water (I found some areas where use of detergent in the water made the adhesive dry white) to hold it. For mountainsides, I paint them with regular white glue and blow dirt onto it. When the first coat is dry, I mist it with a sprayer and add more dirt and thinned white glue. One advantage of using real dirt is the low cost.
Another source of different color dirt would be the banks of streams, steam-beds in dry season, or beach sands.
I first sift soil to a small size then use a coffee bean grinder to get the really fine soils. All of the soil on my N-Scale layout is real dirt and the rocks are real rocks.
I do the following:
-
Spread out the dirt and fix it (and ground foam “vegetation” if desired) with white glue/water (and a little dish detergent).
-
After the glue/water is dry, dip a soft brush (larger works better than smaller) into my container of dry dirt and brush it over the scenery. I use only sifted, fine dirt. I don’t brush much on, just enough to give the “soil” a lighter appearance. I presume that, in time, an accululation of household dust would accomplish the same thing. The key is to use as LITTLE as possible.
If you want to view the results, there are photos in the June 2009 entry on my blog, allaboard09.blogspot.com
I have gone to different locations to collect dirt of different colors. Obviously, heading out to Colorado, although fun, may be a little expensive. Using acrylic paints is probably the next best idea.[:S]
The problem is when you bring in dirt from outside, it wont have the same natural look inside because of the light source from the lighting in the room. The technique Selector posted above is the same style technique I was told works as well.