I recently added onto my layout and now have two DC trains running and two DCC trains running.I have twqo bridges and they go over a small creek.I was wondering what you guys have tried to use to make water look real.Is there a home recipe or should a person get it from the LHS?
Hi froggy: There are many products you could use to make realistic water. I believe most modelers use some form of commercial product. This is an example of one of them, Magic Water.

I’m still new at this myself, but the key is not the material, but rather the preparation and painting of the “stream bed” before you pour the fake water. This is my only on-layout experiment with water. It’s a small piece of flat styrene, with the surface painted using cheap acrylics to simulate a variation of depth, using light-to-dark coloration. There is a single thin coat of Envirotex on this.
Envirotex is a 2-part epoxy, which you can buy at art supply stores and maybe home-improvement or hardware places, too. It’s designed for bars and counter tops where you want a shiny, hard, clear surface. Like I said, though, I’m new at this.
The posts I’ve read recently about the Woodland Scenics water product have not been very positive, by the way. I guess I would avoid that. They also make a “water effects” product for waterfalls and rapids that seems to produce good results from the pictures I’ve seen.
Check out Joe Fugate’s Scenery Clinic. Go to page four and scroll to the last post, that’s where the making water starts.
Also do a search for “water” in the layout building forum and in General Discussion, you will find lots of information.
I’ve had good success using a flat surface and acrylic paint and acrylic gloss finish. I usually first paint the stream area a dark color like black or dark blue. Then after that dries I make the stream area a little wet with water, then sort of put “leopard spot” splotches of different shades of blue (and/or green or brown, depending on the area you’re modelling) paint on the dark surface. Then before it’s dried I take a larger brush (1" or larger) and gently pull it along the area in the direction of the flow of water of the stream. That blends things together and makes it look more like water. After that’s dried, I cover it all with a coat or two of acrylic gloss medium. Gloss medium is firm enough you can brush in small ripples in the water for nice effects.
I like it because it’s all water-based acrylics, no nasty odors or fumes to worry about. [xx(]
I had not looked at Joe Fugate’s Scenery Clinic before today but let me say this: Joe, you and I may have some exceptions regarding operations but your modeling techniques are second to none!
I have used acrylic gloss medium as well as Envirotex for creating water; if I am modeling (relatively) still water I use acrylic gloss medium–I use Envirotex if modeling moving water. I don’t really recommend it but I have tried casting resin but, believe me, you had better make sure that things are sealed up properly or your watercourse will transfer itself to your floor.
The essential thing for good water is to insure that you have adequately prepared your beneath-the-surface details prior to pouring your water making material. If you get everything done and don’t like the way things look it can be a monster to tear out and start all over again. BEEN THERE! DONE THAT! BOUGHT A T-SHIRT!
Grampy and MisterB, nice looking water effects. [;)]
Check HERE for an alternative method - all of the pictures show my first efforts, so the process is pretty simple. You’ll need to scroll down a bit for an explanation of the procedure.
Wayne
Hi Froggy For excellent help with creating realistic water go to “woodlandscenics.com” Click on the Woodland Scenics (blue ad to the right). Click on woodland scenics “How to Videos”. Then click on “Using Realistic Water” This is an excellent sound video. Also, go to Joe Fugate’s Video series. I use Magic Water for my cascading rivers. which applied in thin layers along with Woodland Scenics “Water Effects” produces realistic fast moving water models. You never make the water actually 2 inches deep. Most rivers are made only 1/8" to 1/4" deep. The bottom color preparation gives the illusion of depth. For large harbors, I have used transluscent plastic ceiling light panels (with a raised random relief pattern). I painted the smooth bottom side with the usual blending of sand colored edges to nearly blue-green-black center. These sheets can be cut to shape and fit tightly together on their edges. Bob Hahn
I like all the pictures and the ways to do it.My river is about 2" deep, do you think it should had been more shallow and then finish the surface with fake water?I could build it up with plaster.I think I built a great layout but I do need help with certain scenery.
When it comes to water, we’re all in the same boat. We all need to get our feet wet the first time, so I’m glad you asked this. I’m at almost the same point - putting in my first significant water effect, and I don’t feel any more confident than you do.
As for the deep river, check out the Joe Fugate link above. He’s got quite a deep river there, right up to the edge of his layout. It came out very well. You should be OK with that depth, as long as you do a big number of thin pours rather than a small number of thick ones. Yeah, it will take time, but since when has doing anything fast ever payed off in this hobby?
The only thing I’d give some thought to is: how much river do you have? Envirotex isn’t cheap stuff, so you might want to figure out what it will take to fill that 2-inch deep river. A small stretch might be fine, but if your river is 5 inches wide and extends for several feet, it’s going to take a lot to fill it.
My river as I see it is about 8" long and it’s on the back edge of the layout with two bridges going across it.It shouldn’t take alot of stuff to make the water.Anyone have any ideas for a road that would go across the river from one side to the other for vehicle traffic?
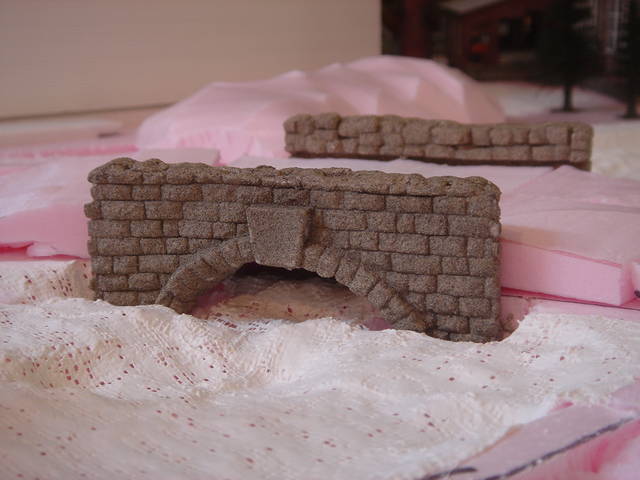
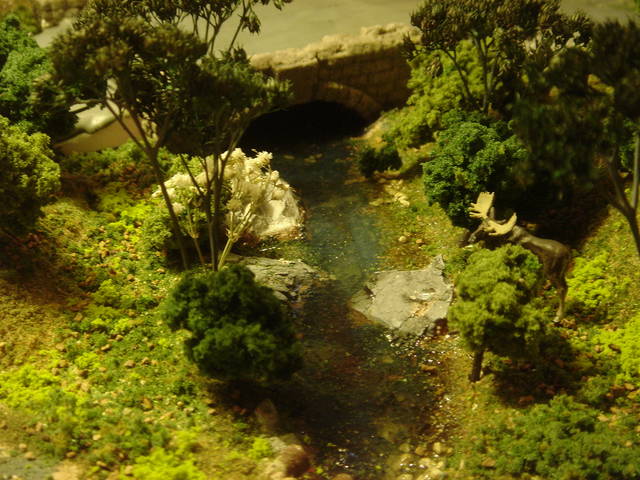
That’s actually what I’m doing right now. This is the small road bridge over the stream which feeds the Mill Pond:
That was a few days ago. Yesterday I coated the plaster cloth with Gypsolite, and today I painted the surface. I tinted the Gypsolite brown before I applied it, so that was the starting point. I made progressive washes of black, blue-black, and blue-green, finally finishing with an olive green wash for the above-water stuff. I also added some small rock castings, talus and real sand. Here’s what it looks like right now:
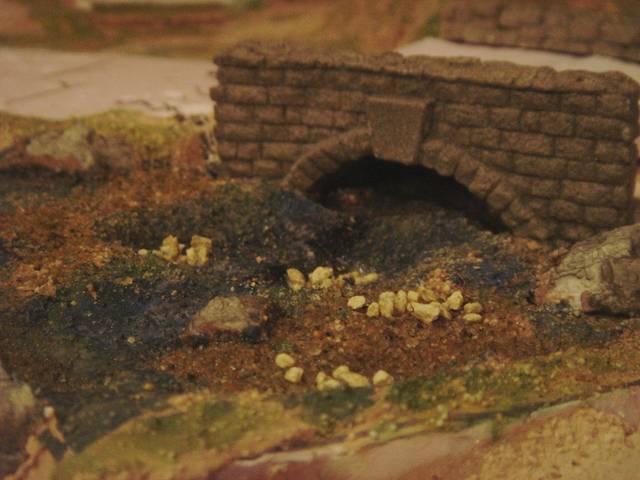
I made the bridge last week. I have a Woodland Scenics tunnel portal, but I found it was too thick for most places I wanted to use it, and too tall for my subway portals. So, a couple of years ago I made a mold from latex rubber of just the front face. Since I already had the mold, it was quick work to make up a couple more portal faces from Hydrocal, which became the outside edges of the bridge. I used another rock wall casting, this one from Dave Frary, for the inner edges of the walls, facing the roadway. The road comes up a bit on foam scraps. Once the water is all poured, I’ll use Durhams Water Putty for the road surface.
Thought you’d like to see the finished product. This is a bit more close-up, but I liked the “artiness” of this photo:
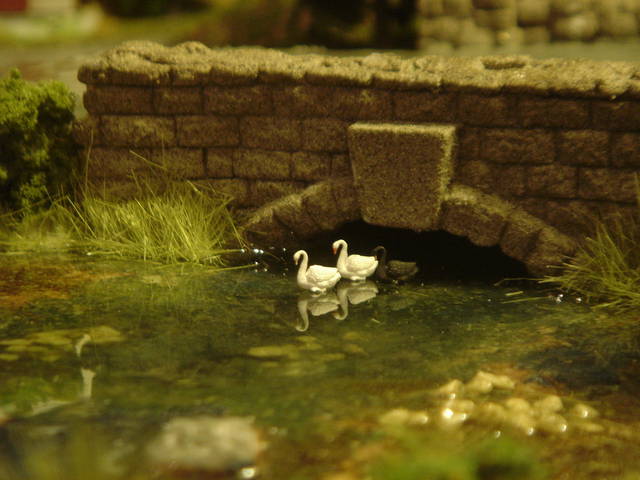
This is a view from the other side:
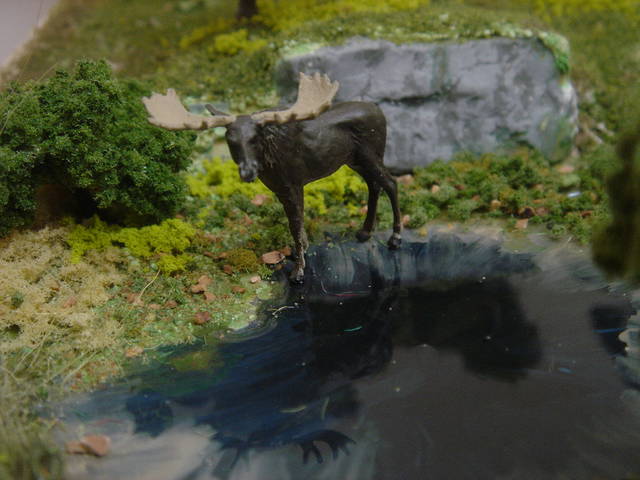
After I painted the bottom of the stream and pond, I did 4 pours of Envirotex. With thanks to Joe Fugate for his clinic, I tinted each batch just slightly. The first was with blue and black, the second blue, and the third and fourth used a light olive green called “Foliage.” Each of these was done with just a drop or so of cheap acrylic craft paint. This little bit of paint was not really visible, but it kept the Envirotex from having that “clear as glass” look, so that the bottom of the stream/pond got less and less distinct the deeper you look.
After the pours were complete and the Envirotex set up hard, I did notice the “edge creep” that people talked about. I got rid of most of it with turf and ground foam around the edges. The stone bridge was a problem, because the Hydrocal seemed to wick up some of the Envirotex, and the wet look extended quite a ways up. So, I added the tall grass to hide it.
The swans are from Preiser. There are some ducks and geese in the package too.
Looks great, MisterB. [swg]
Wayne
Mr B you seem to have misunderstood the thread topic - it’s how to MAKE real looking water, not how to use real water! [;)] [tup]
Mike
Nice finished product, Mr. B. [:)] I would be very proud of that.
-Crandell
Looks terrific Mr. B. How deep did you pour each layer?
- Harry
The bottom layer was about a quarter-inch. The rest of them were an eighth of an inch or less. I think the big thing was the Joe Fugate tutorial’s suggestion about coloring the mix. For the bottom layer, I used a bit of blue and a bit of black, just a pinhead of each in a couple of ounces of Envirotex. The next layer was blue and green, and the upper layers were just green, and less of it. I think this adds just enough opacity to each layer that the “clear as glass” look goes away, and as you get deeper and deeper, the image is fuzzier and fuzzier, like real water would be.
Before I did this, I played around with some test pours. First, I found that if you put an inch of Envirotex into a “pond” all at once, it will end up full of bubbles. I also discovered that I don’t have the skill to paint a very shallow pond base so that it looks like it’s deep. I had much better luck using real depth, and painting that to enhance the effect, rather than trying to create it entirely with paint.
Good info, Mr. B. Thanks.
Froggy,
I believe I had the web address spelled incorrectly. Check out Lance Mindheims “Voodoo and Palmettos” East Rail Layout. Lance does an excellent job modeling water in a canal that is only 1/8" deep.
Larry