This will be my first attempt at making decals, any decals… much less one with white letters. I’m using Photoshop Elements to make it so I have easy control over type and color. It is to go on a styrene ‘brick’ background structure I have a pack of Testors white decal paper and am using an inkjet printer. In trying to read up on this subject I see that one person advised NOT to cut into the printed area of the decal, in my case the black color because of ink bleed, but to trim as close as possible.
I have a bottle of Micoscale’s ‘MicroSol’ and also ‘Liquid Decal Film’
My understanding of how to do this is, print out the decal, making a couple of spares, and trim as close as possible. I also have a can of Krylon Crystal Clear Gloss spray to seal the decals, this step done over a day or so putting on at least two layers of spray. I should also use this spray to ‘prime’ the area the decal is to be placed.
After all is prepped comes applying the decal. I should soak the decal for 10 seconds or up to a minute in water and (this is where I get a bit confused) place a little MicroSol in the target area to aid in ‘floating’ the decal into the desired position. Remove the decal from the water and using a soft brush gently slide the decal off it’s paper backing onto the model. I can use the tip of the brush to move the decal into position, carefully. Once in position gently blot some of the liquid away with a soft cloth or paper towel, or do you use the edge of a paper towel to syphon off the liquid? Let it completely dry and they coat with… what?.. the Liquid Decal Film or an overspray of the Krylon clear gloss spray. I’d rather not spray the entire front of my building with gloss spray, or even dullcote because of all the windows but if I have to… I have to.
Sounds like you got the general steps down (including a gloss finish for the area of your building the decal will go on). Definitely cutting too close to the ink-image will cause bleeding, as I have experienced first hand (decals with some “buffer” decal seem to work OK).
Caution, Testor’s film is a bit thick (OK, a lot thick), difficult to make it disappear like Microscale decals).
Hmm, big area of color - maybe it will be OK, but I saw some graduation (aka blotchiness) in my attempts.
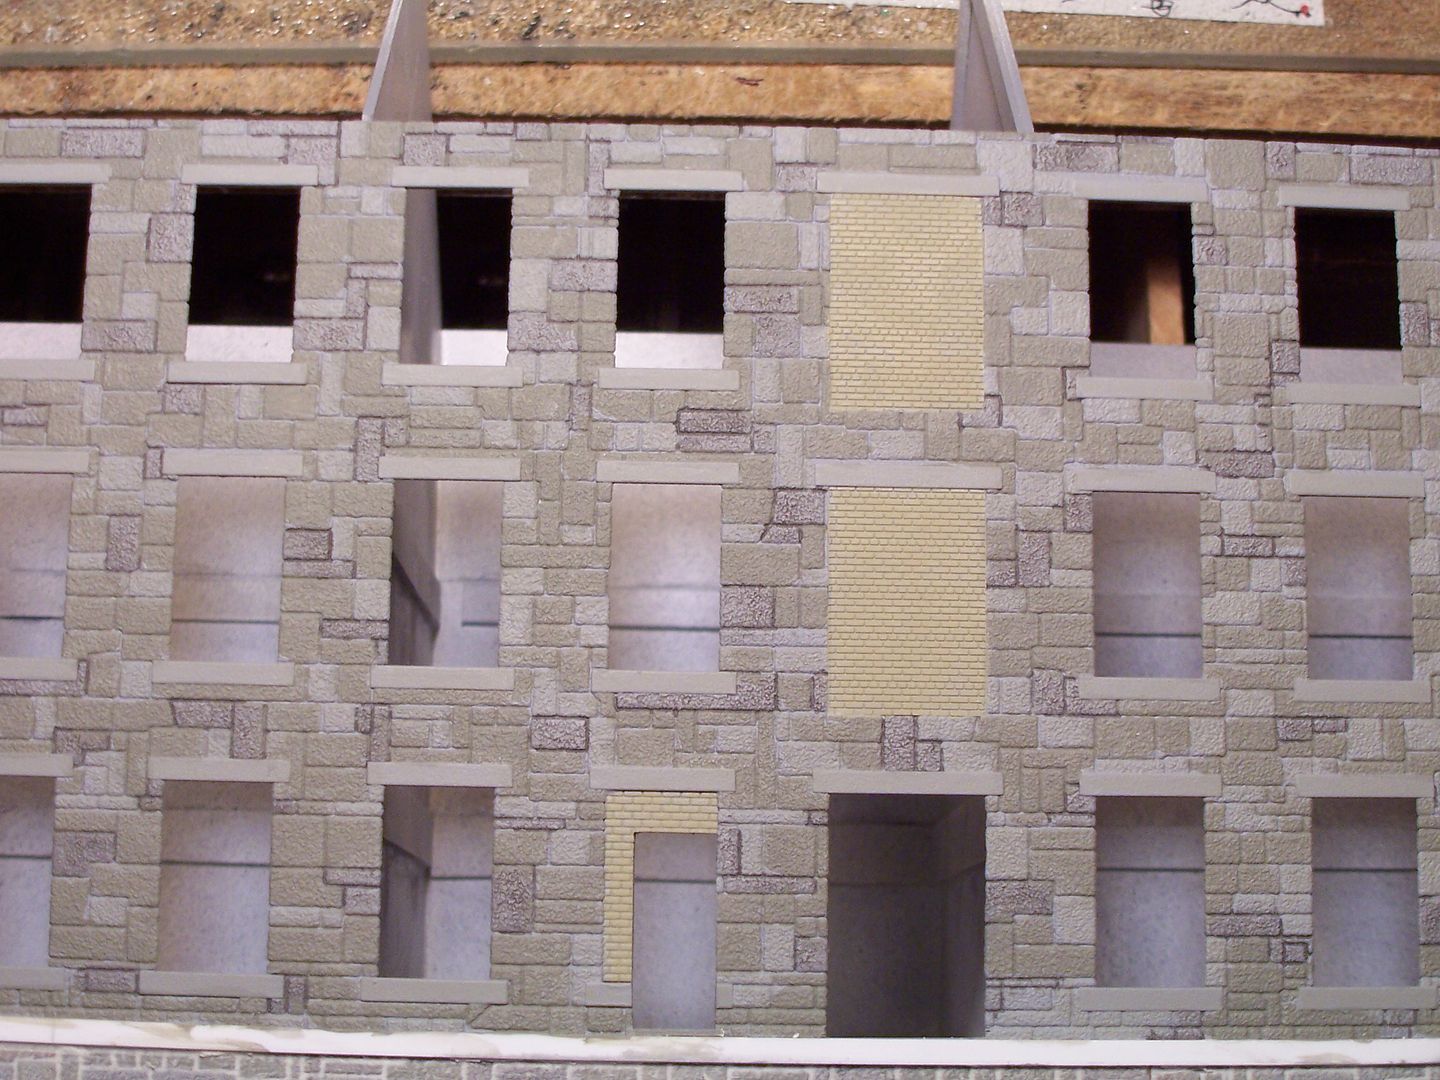
My brother printed a decal sign for me to use on the stone building shown below. It was printed on clear decal paper, then applied over a painted white strip on the wall. Due to the length needed, it was printed in three sections, with a little overage on each to allow lapping for the best fit.
I first pre-painted the individual stones:
…then applied pre-mixed drywall mud as mortar:
After wiping away the excess, I sprayed the walls with Dulcote:
…then used washes to pre-weather the walls:
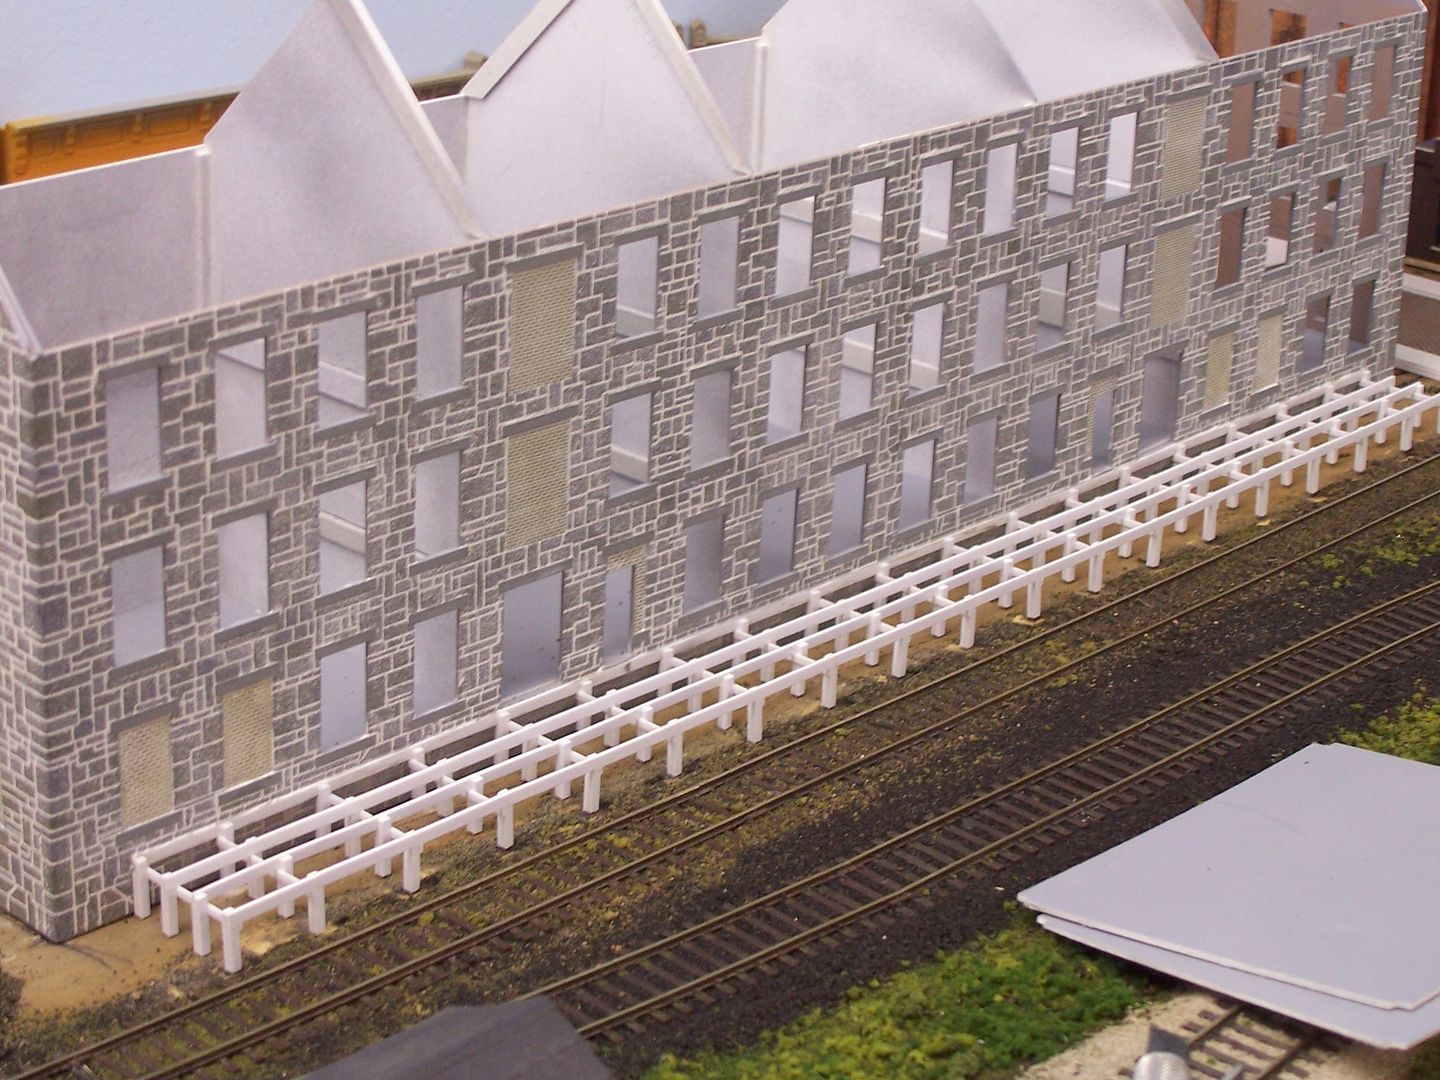
I sprayed the decal with Dullcote before cutting it from the sheet, then soaked the pieces until they almost floated free from the backing paper.
Because the stone work was so rough, I used water to aid in aligning the decal, then blotted up the excess with a clean, lint-free cloth. After the decal was properly positioned, I applied the setting solution (Solvaset), and did end-up slicing several areas to release trapped air, and allow application of the Solvaset. They were easily touched-up using black paint.
After the decal was completely dry, more Dullcote was applied to even-out the touched-up areas, then the final weathering was applied - a light wash or two, and a little powdered pastels
You have two issues here. First printing a decal in white when printers don’t print white. Printers assume the paper is white, and they make white by not laying down any ink at all. I have nothing to tell you about how to print white. As far as I know it cannot be done.
The other issue, how to successfully apply the decal after you have printed it on decal paper. That’s fairly straight forward. First trim the finished decal closely so the decal film doesn’t show as much. Round all the corners, 'cause a sharp right angle corner is more apt to lift up than a round corner. Soak the trimmed decal in water just long enough to soften the adhesive and let it slide off the paper backing. Long enough means until you can feel the decal begin to slide over the paper backing.
Place the wet decal and backing on the model in the proper place, and carefully slide the paper out from under the decal. Do not allow the decal to twist, tear, or tangle. Once the paper backing is out of the way, steer the decal to its true location with a small paint brush, or a hand held pin. Be careful, the wet decal film is soft and weak. Once positioned, blot up excess water by touching the water drops with the edge of a paper towel. Don’t touch the decal itself, it will grab onto the towel and then you have a nicely decaled paper towel. You want to dry things up so the decal doesn’t move out of position.
Once the decal is kinda dry (10 minutes or less) apply decal setting solution. I use Solvaset from Walthers. I have never used the Microsol two solution system. I ain’t planning to learn it either. Solvaset softens the decal film even more and lets it suck down around surface details like rivets or wood plank seams. Never try to move a decal after hitting it with Solvaset, it will tear every time. The Solvaset will loosen the bond between the
Jared all good advice - The printer that most use to make their own white lettered decals is an ALPs printer that does print white. They are long OOP but can be had on Ebay. Or find a buddy whi has one and beg, barter or steal some decals from him.
I presume in your example you are painting the building surface white and doing a reverse on the artwork to make clear letters on black to come out white when applied over the painted surface…
Do not do this! MicroSol is a decal softener and is designed to be used to soften the decal and allow it to snuggle around details after the decal is in place, (just Like Solvaset from Walthers). If you attempt to move a decal that has had MicroSol applied it will distort. MicroSet is the solution that you use to position a decal. It slightly softens the decal but you are able to move it around. You can also just use water to position your decal.
Thank you all for the suggestions, instructions and advice, especially those that took your time to go into the process indepth. I see I have misunderstood ‘white’ decal paper. I thought it was to somehow let you make white letters on a decal with an inkjet printer and that’s not the case. It’s for when you’re printing a decal where you need a white background. That’s not the first mistake I’ve made in model railroading and it won’t be the last… [;)]
I also have some clear decal paper, don’t have it at hand right now but think it’s the Micoscale brand, so it’s back to the drawing board and design the decal differently, probably just the letters in black. That should show up ok on the ‘brick’ wall. Or I may try what Wayne is showing, since his looks so good… paint the area black and do the lettters on that.
As shown in the photos of the industrial buildings, white background decal paper can indeed be used to print white letter decals. I do it all the time using the Evan Designs brand decal paper (only offered in white background) and an Epson inkjet printer. As previously stated, most printers cannot print white so the printer does not print anything where the white lettering is to go allowing the opaque white background to show through. What you actually print is the background color surrounding the white lettering. Selecting and printing the background color is easy when you don’t need it to match the paint of the model (as on the industrial building photo examples). However, with a little trial and error, it is entirely possible to “match” your decal background color to that of the model. I do this by laying out small square color swatches along one edge of the decal page selecting a background color as close as I can eyeball estimate from my computer screen and assigning that color in the middle square. I then select successively darker shades of the first color assigning each darker shade to the square to the left of the previous square. I then select successively lighter shades and assign them to the right of the middle swatch. Be subtle in the color shade changes so your model color doesn’t fall between two swatches although you’ll know how close you are if this happens. You must print your color swatches on the actual decal paper as it will take colors differently from regular bond paper. Let the inkjet ink dry for at least a couple hours (preferably overnight) before comparing the swatches to the model. When you find a good color match for a particular railroad color, name and save it for use on future decals. Now that you have a matching background color, design your decal, print it out and apply it to your model. One trick I learned that helps hide the edges of the decal is to make the b
Gidday Jarrell, I’m speaking as a very novice decal maker and like you I’ve got both the Testors clear and white decal paper, and am printing on an oldish Epson Ink Jet Printer. Following the Testors instructions I’m using Testor 9200 Decal Bonder and soak the decal for no longer than five seconds as per their instructions. This is where it goes all pear shaped for me and I’m very reluctant to blame the product.
I’m finding that while I fumble around removing the backing, drop the decal, loose the decal, drop my glasses, poke myself in the eye while repositioning my specs cos I’ve still got the toothpick that I use to position the decal in my hand, then reposition it because I’ve got it upside down or simply crooked, so by that time the decal has lost it’s stickability.[sigh] (By this time I have to bite my tongue as Her-in–doors is giving me a steely gaze regarding my bad language.)[:$]
I’ve used the Micro Sol to soften the decal around rivets but will not do any more decaling until I purchase some Micro Set, which I presume should help with most of the problems I’ve related.
Here’s a car with my home made decals, the herald being printed on the white paper.
Jarrell, the Microscale clear decal paper probably will not work with an inkjet printer. You need inkjet decal paper. It may work with a laser printer.
Jarrell,I like your decal signs . However I like your use of several of the Railway Design Associates plastic kits even more. I am working on some variations of that kit right now
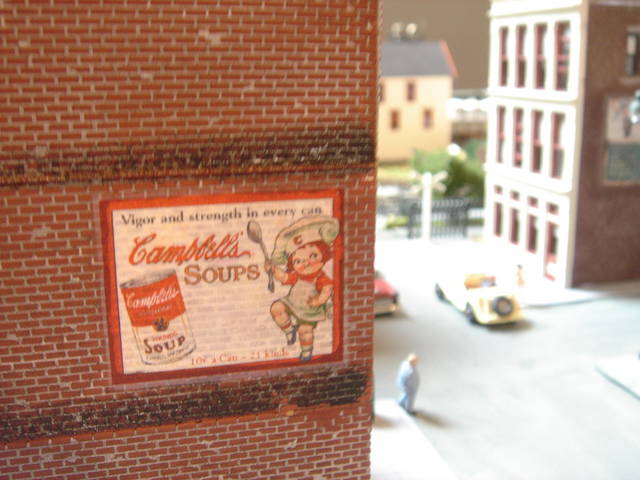
I use clear decal paper, but I paint a white background on the model before applying it. This provides the correct color balance of the image, and light colors show up properly.
I did this one on a brick model. The image was downloaded. Here, I was careful to paint the white rectangle just a bit smaller than the image, and I added a red border around the edge of the decal to hide any uneven lines.
I made this fence from coffee stirrers, painted it gray and then added the white rectangles to back up the decals. This was an earlier attempt, and you can see the sloppy and uneven paint job. I’m much more careful now.
Because I wanted a weathered look, I did not provide a nice smooth surface. Instead, I used the brick and wood as they were. The brick even had some Dull-Coat on it. After the decal was applied, I added Dull-Coat. If you’re worried about window glazing or other “collateral damage” from your Dull-Coat spray, use blue painters’ tape to mask off the surrounding area.
Hornblower, thank you for taking the time to answer with your excellently written piece. I had seen a youtube video on the Evans Design paper a while back but had forgotten about it, but remembered it when you mentioned the oddity of the lighter fluid. I’ve taken notes from your answer.
Jarrell
[quote user=“hornblower”]
Jarrell,
As shown in the photos of the industrial buildings, white background decal paper can indeed be used to print white letter decals. I do it all the time using the Evan Designs brand decal paper (only offered in white background) and an Epson inkjet printer. As previously stated, most printers cannot print white so the printer does not print anything where the white lettering is to go allowing the opaque white background to show through. What you actually print is the background color surrounding the white lettering. Selecting and printing the background color is easy when you don’t need it to match the paint of the model (as on the industrial building photo examples). However, with a little trial and error, it is entirely possible to “match” your decal background color to that of the model. I do this by laying out small square color swatches along one edge of the decal page selecting a background color as close as I can eyeball estimate from my computer screen and assigning that color in the middle square. I then select successively darker shades of the first color assigning each darker shade to the square to the left of the previous square. I then select successively lighter shades and assign them to the right of the middle swatch. Be subtle in the color shade changes so your model color doesn’t fall between two swatches although you’ll know how close you are if this happens. You must print your color swatches on the actual decal paper as it will take colors differently from regular bond paper. Let the inkjet ink dry for at least a co
thanks Mr. B for the reply. I kinda like the fence being uneven toned like that… looks natural. I’ll keep the tip of painting the background before applying the clear decal in mind.
I have posted several times regarding my experiences with Decalpapers.com clear decal paper, and this discussion of the use of white decal paper for “white letter or design” decals is very interesting. As I am planning to re-order a new supply of decal paper this next week, it might be worthwhile to select a mix of clear and white decal paper this time, so as to experiment with the concepts described.
Some questions:
assuming an inkjet printer (I use an HP all-in-one with 5 colors+black cartridges), is the white decal process somewhat “ink-use-intensive”?
when I print my clear backround decals, I usually choose settings as follows: HP (or other) premium photo paper and best or max dpi (resolution). In doing so, the printer prints more slowly as it’s software requires. What effect does a solid colored backround printing (for white lettering) have on clarity and uniformity (even-ness) of color saturation for the backround?
there are a number of fonts that have “outline black (or other color chosen by the user)” as a characteristic, so that the interior of each letter is empty of color (or white when you print normally on copy paper and (also) with the white decal paper. Have you experimented with these outline fonts- and with what results, if so?