I’m near deciding between linoleum and masonite/harboard for my back drop. I would like to know if
anyone has used a method for sealing seams between 4X8 sheets without having to mud and tape like drywall.
I’ve seen latex painter’s caulk mentioned. Has anyone used it or other materials for say…5 years or so
and had no seam cracking or showing over that time, due to humidity changes, temperature changes?
Does vinyl spackle meet this criteria without having to use drywall tape too?
All of the masonite will be nailed or screwed directly to the wall except for coved corners. I’m thinking that 1/8" masonite will keep it’s curve without corner framing underneath. (To about 10" radius?)
I’d also like to hear what wetting methods people have used to curve their masonite around inside and outside corners. (I will need one “S” curve to go around a 4.5" outside corner and one 1.5" “S” curve to go around another. How long must it dry before painting and not having to worry about humidity changes?
Follow up linoleum question: How many inches apart should vertical rows of nails be to hold linoleum up
against a wall without any chance of future sagging? I figure I have 16" ctr. to ctr. stud spacing in one half of this room and 24" in the other (from very old construction). Will 24" be close enough to avoid sag?
Hi Capt: I used linoleum runner. I used furring strips nailed horizontally to 2x4s. One row at the top, one row just above bench height, and one row in the middle. I stapled the runner to the furring strips. It’s been up about 5 yrs. in my basement. One of those years, there was no heat and no dehumidifier running, (Pa.) I’ve found it’s very stable. I used mesh tape and vinyl spackling for the three joints I had. Good luck with whatever you choose!
Thanks Grampy.
I just got off the phone (again) and haven’t been able to find linoleum/vinyl in 60’ rolls (for no seams)
at a price that I wouldn’t have to mortgage the home for! Anywhere from 2-3 times the price of masonite
to 5 times! I know it isn’t too likely to find a 60’ blemished/remnant situation but If I have to go with seams I think masonite is going to win out for one man installation ease and buy a little at a time factors…
$250 and 800 are linoleum prices I’ve been coming across and $300 to $400 is average before sale tax.
Masonite would be about $120-150 total at Home Depot.
Argh!
So, I’d like to find out how hard it is to wet and bend “S” curves in 1/8" Masonite and how long it would take to dry out enough to safely paint without expansion/contraction issues as my next “step” in weighing
which way to go.
Here are my 1/8" masonite backdrops. I bent them to a very tight radius in the corners without wetting them. I cut out a 3 1/2" piece on the bottom where it bends over the bench and it is attached to the 1x4s with “T” nuts and machine screws. I don’t think I would wet masonite as it bends very well dry. I laminated a 6" wide piece of masonite on the back over the joints to hold them together and used tape and spackle to hide the seam on the front. The seams are invisible
Wow talk about timing–I just got home from The Home Depot where I was checking out the fiberglass drywall tape for doing the seams on my Masonite backdrops! After doing a bit of research, I have decided I am going to do my seams just like I would if I were finishing drywall. An initial coat with drywall tape imbedded in the joint compound, followed by two additional coats of joint compound that are progressively wider and feathered out at the edges. Then I will sand, prime and paint. This may be overkill, but fortunately (or unfortunately ) I have developed a pretty good touch when it comes to finishing drywall and I know this will result in a backdrop with no visible seams, holes or future cracking.
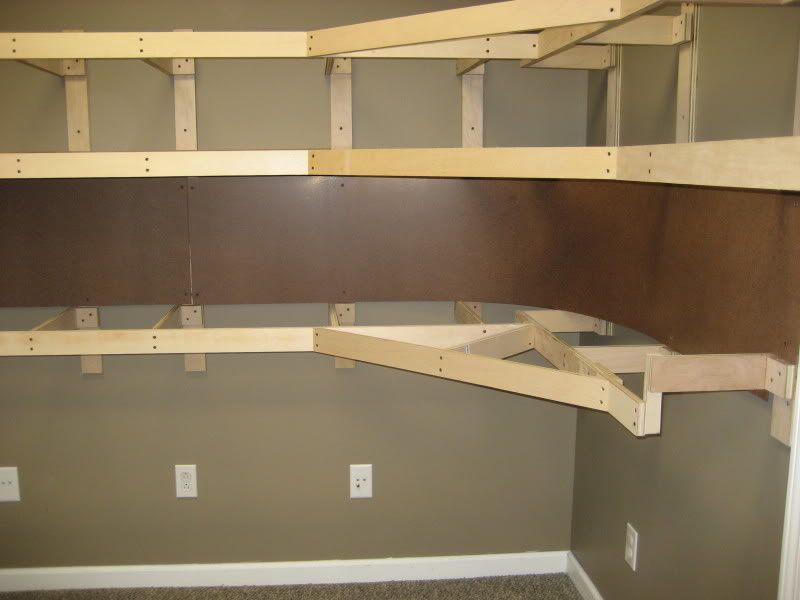
I have all of my 1/8" Masonite backdrops installed and just started finishing the first section (three 8’ Masonite panels, so two seams). I did not use any tape on the seams, instead just using DAP brand vinyl spackling compound. Bad choice! My backdrops are installed on 1x3 wall brackets as you can see in this photo (taken before I started finishing the seams and screw holes):
You can see a seam where two panels meet at the left side of the photo. If you look how my backdrop is mounted, if anything pushes on the panel to the left or right of that bracket, it will cause the panel to flex back towards the wall and flex forward a bit at the seam (it will basically pivot along where the drywall screws hold the panel to the bracket). When I finished the seam with the spackling compound, the boards flexed and I had a hairline crack along the seam. This will be eliminated when I redo the seam with the tape & joint compound, although I will be very careful to avoid flexing these panels during construction.
If your hardboard is actually screwed directly to the wall and you have a solid backing behind the panels on either side of the seam, the pan
I don’t think you would need to wet your Masonite panels to get them to bend. I have a few places where mine are bent into about a 12" radius without any difficulty. One thing, when the Masonite starts to get flexed “too much” you will see a stress fracture start to form. The only time I had this happen to me was when I accidently bent the panel too tight when trying to move it into position on the benchwork. The fracture (which looked like a wrinkle straight across the panel) was only about 6" from the end so I juts trimmed off the bad end and used the remaining “good” 7+ feet of the panel. Jamie
Hi Capt.: I understand, completely. I was very lucky to have a friend who worked at Armstrong. He was an inspector and conveniently found a whole roll of “bad” linoleum. I haven’t priced it lately, and didn’t realize it was so expensive. Good luck with the affordable Masonite!
I hear you Lothar. After a summer of dry walling dust (contractors) I wanted to avoid any more and I’ve never mudded and taped myself.
Pasedena Sub, Is the painted side the only side of the masonite that’s taped and sanded or should I do both?
I wondered if sanding made the “sky” smoother or shinier than the crosshatched/painted back of the masonite. In other words does it show at all in the finished project?
I’m negotiating with dry wall experienced friends but they have their own projects at the moment…
I used the 1/8" Tempored Masoninte Backdrop on my fairly large home layout (25’ x 75’) and all of the seams have a 1x2 backer with the screws countersunk (which is quite a feat in itself) and then I use the paper tape to cover the seam.
Now where my method differs from everyone elses is I use Latex paint to paint the paper tape right into the backdrop.
I paint my Masonite with a base coat of cheap mismatched paint I get at the big box stores. It is way cheaper than primer. I just give the masonite a good coating of the cheap paint and let it dry. The next base coat then goes on as usual and it covers completely.
I roll the paint on as much as I can as it covers much better than brushing (Now this is only for the base coat of paint).
Now for the seams I just slop a lot of paint into the seam and also paint the back side of the paper tape. It goes real quick and I then just press the paper tape into the seam (just as you would have to do with the drywall mud).
I use a paint brush to smooth out any wrinkles and then put a good coat of paint over the surface of the paper tape.
I usually wait a few days to let the paint really dry both in the seam and the masonite as the paint really soaks into the Masonite hardboard.
Once the paint is good and dry I then use regular drywall mud to smoothe out the seam a little and give the area another coat of the base paint to be sure that the seam is blended into the backdrop.
I find that sanding drywall mud over a painted surface is much easier as I can see where I am sanding next to the backdrop material.
So far the seams are holding up well as they have been done for over 3 years now and have had no cracks show up yet!
In one place I had a double sided backdrop consisting of the 1/8" hardboard and 2 pieces were just butted together. I used panel glue on the edges of the seam to help hold the 2 sheets and then used the painted paper tape process to cover both side
Thanks everyone! Great pics.
I was wondering if tempered would be my best choice for tight radii in coved corners and the “S” curve required. I still think with the 8th inch
masonite, I’d have to wet for the s curve. The corners look easy with the piece I’m experimenting with. Do I NEED backing plates at the seams if the masonite is being screwed directly to the wall without framework?
What is used to “key” the tempered shiny surface for painting? Just a palm sander and say 60 grit sandpaper? Is it easier or harder to paint tempered or untempered? Dave Frary used to paint the crosshatched/rough side and just load it with paint. Is that what most people do now or do most use the smooth side to paint on?
Finally, which gives a smoother joint seam? Fiberglass tape or paper?
I have a buddy who seems willing to help with the project if I go with masonite over linoleum.
I am actually going to use both fiberglass joint tape and paper tape. Probably overkill, but it is just an extra $6 and two minutes or so and I want to make sure I have plenty of strength in those joints that are prone to flex. I am going to put the fiberglass tape down right onto the joint, then finish the joint with joint compound and paper tape just as if it was a drywall joint.
As for painting, I am using a good color blocking primer right on the shiny surface and I have had no problems with gripping. I don’t believe I have ever heard of anyone having to scuff the surface of the masonite to prepare it for priming/painting. I do believe a couple of coats of a good blocking primer are needed to allow true color and even coverage in the paint topcoat. But then again, I am overdoing everything on this layout that can’t easily be redone.
If it’s feasible, an additional backing block a few inches to either side of each masonite joint will eliminate any potential flexing. Attach the blocks as you would the supports, running the full height of the backdrop, and screw the masonite to these blocks.
A few extra holes to fill, but guaranteed not to flex at the point where the panels are joined. Any flexing will be limited to the other side of the support blocks, which anchor the joint area securely.
Untempered hardboard has a grainier surface than tempered, so takes paint better, where the hard surface of the tempered masonite will let the paint scratch off easier. A good primer should take care of that for the most part.
Good priming and prep is the key to any good paint job, as Jamie already stated. Ask any pro painter and that’s the thing they’ll stress the most: don’t skimp or cut corners while prepping!
Overdoing these things at the outset is probably wise. An ounce of prevention, as they say. If it’s worth doing, it’s worth doing right, and spending a few extra dollars and some extra time to make the backdrop come out really nice is worth the effort, and you’ll be glad you did every time you look at it later, rather than regret skipping a step.
As for drywalling, I hate it, but if you own a house and can’t afford to pay someone to do it for you, it’s a skill you need to learn. Learning the right way to do it makes it less of a pain, and it goes faster and provides a much better finished product.
I used vinyl spackle and it has worked well. I also used it on the seams of my facia and valence.
My basement is kept very dry and I have only had the spackle on for a few months, so I cannot speak to longevity or extreme humidity. This winter will be telling since it gets pretty cold and dry down there. Sorry I can’t give you the info you really wanted… the five year feedback. However, its what Joe Fugate uses in his Scenery Video and it has apparently worked for him for quite some time… it was because of his video I chose vinyl spackle in particular. Lowes had it, Home Depot did not. You can download the video on backdrop construction for a few bucks from his “model-trains-video” website.
I would use construction adhesive or contract cement with the vinyl rather then nails. If you must use a fastener rather then an adhesive, you can countersink screws in and then it can be removed later.
Chris
Edit - I saw in another thread you plan to attach the stuff directly to the wall. I would not use construction adhesive with vinyl floor in that case… i would screw 1x3 boards to the wall using drywall screws and glue the vinyl floor to that…
I concur… I used to sand… now I use a wet sponge. Much better. Leaves a bit of a film. I clean with a damp paper towel and whats left can be painted over easy enough.
Yep and right behind me is the crew lounge in the same room. Now if only I can get the layout to the point of running some trains I’ll be in heaven… I’m spoiled I know.