I’m getting ready to install four Miller Engineering (Light Works USA) animated signs using their onverter Module rather than batteries. The signs come with the circuit board attached to two leads from the battery holder. I am assuming that you cut off the leads at the battery box and then connect the circuit board to output leads of the converter module and then I plan to connect the four signs in series to each other. I’m going to use an old MRC 200 power pack as the A/C power source. Anybody see a problem with this?
Also, I’d appreciate any tips on how to conceal the circuit boards so the on-off switch can still be used.
I have a number of the signs installed on buildings. You can do two things. Obviously you’ll going to install the circuit board either inside the buildings or under the layout. If inside the building make it so that you can lift up the building to access the circuit board and use the slide switch. The other option is to install a second switch on a control panel. Use this one to turn the sign on and off. Leave the circuit board on/off switch set to on. The new switch will then control power to the sign. Also, you’ll need to set the light sequence before installing, especially if the building is in a difficult to reach area. Changing the sequence is another topic and another reason to maintain access to the circuit board.
Good luck. I’m sure you’ll like the sign and its effect. They were a real attention grabber on the module during the show. What sign did you get?
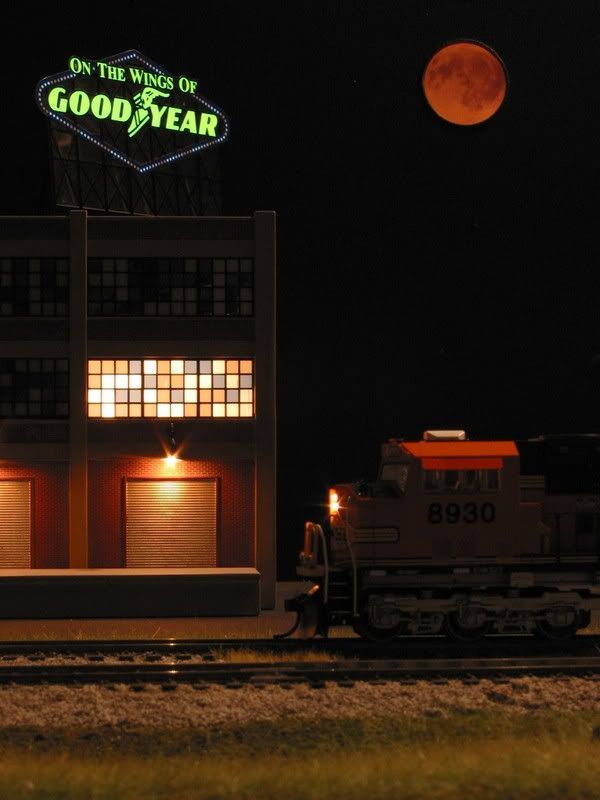
I’m going to put in Stan’s Drive In, Sherwin Williams, Patriot Flag, and Western Auto (A Kansas City landmark) on my 50’s layout. I think they should look great.
If you’re going to use a separate power supply, why do you need the converter module? I took a look at their web site, and it seems to be nothing more than a voltage regulator which accepts a wide range of inputs.
The signs want 4.5 volts DC. If you’ve got a power pack, it should already put out 4.5 volts DC at the right setting. An old transformer will put out AC, but a simple diode bridge will fix that. Since they run on batteries, the signs are probably a fairly high impedance input, so a couple of properly-chosen resistors should get you down to the right voltage.
Another option is a wall wart. If you can’t find one in your personal I’ll-find-a-use-for-this-someday box, just buy theirs. It will run 3 of them for 7 bucks, and doesn’t require bringing an old power pack into the picture.
I won’t simply use an old power pack. To much chance of destroying the circuit board. I went the wall wart path and they worked just fine. Go to RS and get a 4.5 volt transformer that puts out as high an amperage as you can get. That should do the trick.
Thanks for the help - I’m going to use a wall wart and run a bus wire connecting each sign to it and put a switch in between the power supply and bus wire. Miller Engineering suggested using a 14 gauge bus so as not to lose any brightness of the sign but that seems like a really big wire for this application and I’m not running a great distance (maybe 12-15’ from the power supply to the last sign)- I think I’ll use 16 or 18 gauge.
Coming from the world of automotive emergency equipment installtion, we usually stay away from anything that’s smaller then 14 guage for a run over 8-10 feet. Granted, we’re working with things that need a higher amperage capacity, but the principal is still the same.
According to their web site, these things only draw 180 milliamps. I really think 14 gauge is overkill for something like this.
If you’ve never seen these in person, by the way, they’re really nice. I’m going to pick up the White Fuel sign this week. It was a Boston landmark when I lived across the river in Cambridge many years ago, so I’d love to have it on my layout when the old gang comes over.
The reference on the website for drawing 180 milliamps is for their billboard signs. These signs are animated in a sequence. While I don’t have one of these specific signs, I would not be surprised if the larger, multi graphic signs MKT has draw a bit more current. These are usually larger signs than the one’s referenced for 180 ma.
I have a number of these signs on my “O” layout…Breyers, Stan’s, H&C Coffee, City Light, Plumming, Galaxy Drive-In, and a side-of-building sign with the Rexall Drug graphics.
I would advise not to “cheap-out” with the converter. The Miller one is only about $12. Most signs have 36 choices on the sequence of the lights. It’s best to keep notes as you look at them all (no, maybe, yes…if you are lucky, you’ll only find 2 or 3 “yes’s”).
Miller is a great company to deal with, especially in the rare case that something is not working as it should be. Joe
I don’t see any reason to use the on-off switch, unless you are using battery power. When I turn the main layout switch on, the signs are on. Hiding the “electronics” in a building that has interior detailing is another matter. On one roof I made a air exhaust/conditiong “shed” to contain it…on another, I have one room with closed window blinds. Joe
Even if the signs draw 1 full amp, over a 15’ run of #18 wire there will be less that 0.2V drop. #14 is overkill for the low current draw. Even a DCC power district with a breaker set for 2.5 amsps, there’d be less than 1/2 volt drop with that #18 wire.
Need Miller Engineering Help. I have two lighted signs, powered by individual Miller 4.5v power units. Both signs worked last time I operated the train set – some months ago. Today Chattanooga Choo Choo works when plugged into either socket. The Lionel Trains sign does not work when plugged into either power source. The non functional sign contacts looked corroded. I burnished them lightly with a pencil eraser. Still doesn’t work. What else might I attempt? To my knowlege, neither sign has been abused, dropped or hydrated either by chlidren or adults?
UPDATE: Contacted Miller Engineering asking what additional steps I might take.
Ver fast response even on the weekend, was to send the sign back to them, if defective they would replace it.
I’ve never tried it, but the WD-40 people make a spray contact cleaner you can buy at Home Depot. That would let you get to both the inside and outside parts of the contacts.
Did you clean the socket that the contacts plug into as well? I just had a look at one of the sockets and I could slide a #17 X-acto chisel blade in and out without damaging the contacts. I know that one of your signs worked in both power supplies but there still might be some corrosion in the socket. Disconnect the power before attempting to clean the sockets.
Also, you might try some very fine emory paper on the male contact surfaces. I’m not sure that a pencil eraser would be aggressive enough to remove visible corrosion.
I have several Miller Engineering signs and contact cleaner works on the 7 conductor connectors. If you have more than one processor swap the plugs around to figure out where the problem is. The processors are pretty tough, I think the one I had a problem with was corrosion. I hit it with a pencil eraser then contact cleaner and that was the end of the problem.
Years ago I had a processor fail, I called Miller and they sent me a new one very quickly.
Mel
Modeling the early to mid 1950s SP in HO scale since 1951
I have a 12 VDC bus running the length of my layout for structure lighting and street lights, powered by a 4-amp supply. I use this for my Miller signs by first measuring the sign’s current draw with a battery and then figuring out what resistor to use to bring the 12 volts down to 4.5. I do this individually for each sign, but as I recall I use about a 220 ohm resistor.