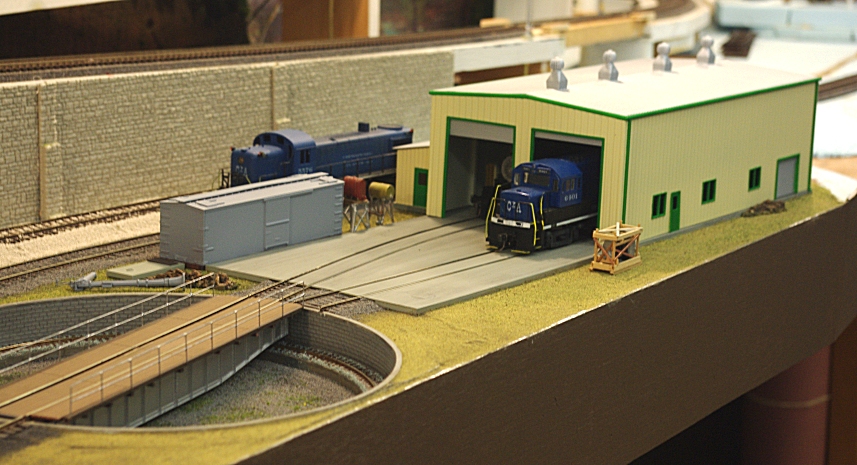
I will be adding the Walthers Diesel Shop to my layout and my plan is to use some plater of paris or the woodland scenics road kit to make a concrete area around the diesel house and the fueling platforms that I will have as well. I have seen this technique done in videos on youtube and thought it a very good idea. However, i noticed in the October 2007 issue of model railroader when they were modeling the diesel shop, they used styrene to lay as the concrete surface. I never thought about this before. They used N scale cork between the tracks and layed the styrene on top of the cork.
I guess I want to know what your opinions are on either of the two methods of modeling concrete surfaces; using plaster/ woodland scenic road kit or using styrene as the surface. Is one considered better than the other. Now I do realize this was the 2007 issue and this technique could be outdated but am not sure.
I have only done the plaster between the rails and leading up to a grade crossing, but from that experience I think that I would try the styrene method next time. The first problem I had was that when I pulled the strips out that gave me the flangeway, I had some breakage of the edges. If the flangeway isn’t wide enough, wheels (esp on steam locos) bind in the narrow gaps. Though scraping the gap wider was not too difficult, it was dusty. I think you could just tack the styrene in place, then running a train through, would let you know if you needed to change the size. Remove it, trim and recheck before perminantly affixing. Also, my center was a bit high and, with the tools available, it was difficult to sand the height down without scratching the track. I preferred the wooden grade crossing I made for another location. That would be more like using styrene between and beside the rails for level concrete areas.
I use Concrete Patch mixed with 50% Hydrocal. The Hydrocal makes the concrete stronger and lightens up the color of the concrete patch, as it cures a little on the darker side than regular concrete. I have built loading docks using this method and liked the results. http://lariverrailroads.com/concrete_loading_dock
I’ve used styrene, joint compound, hydrocal, woodland scenics, etc. For me it depends on what I’m doing. For example if doing concrete/pavement going up and down hills and around curves, I prefer something I can form easily such as hydrocal. You can also feather or square up the edges. If doing a simple parking lot the styrene can be easier and less mess–put the expansion lines in before laying the styrene. Painting/weathering can also be done on the bench which can be easier.
As far as rail interface I’ve not had too much trouble with either one as long as when Iay the compound I trowl it down well. For the flangeways, just using a small screwdriver can be plenty, careful to to make them too big. For crossings I’ve added styrene to simulate the rubber. Going around curves is probably easier using a compound.
I use 0.030 styrene. A digital caliper also helps when measuring the depth so you can get the support strips the correct thickness. I support the outside edges and the center of larger areas.
To get the styrene to the correct shape around the track, I press a sheet of paper on the track to make a paper pattern, then transfer it to the plastic.
I think plaster or other spreadable material to be too messy for my tastes.
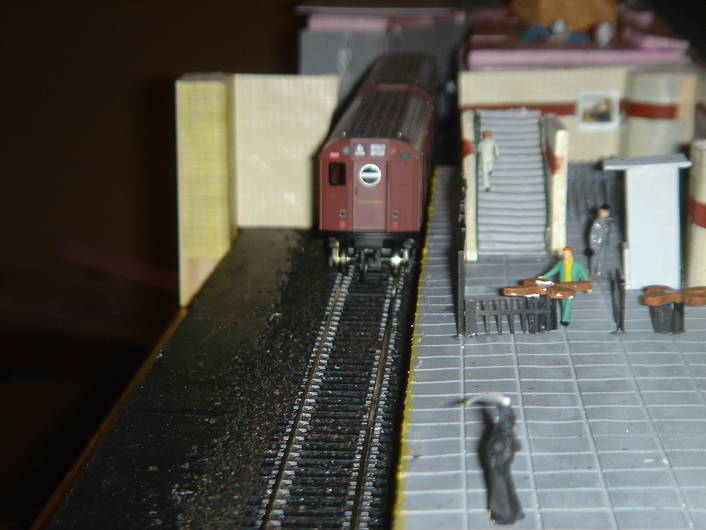
I like Hydrocal, personally. It has a fine grain surface when it sets up. This reflects and disperses light much the way concrete does. Styrene, on the other hand, has a very flat surface and will reflect light more in a “specular” fashion, with the nice mathematics of angle of incidence equals angle of reflection, much more like a mirror. I cast this subway platform with Hydrocal:
For some things, sheet styrene works well, though, The thin, flat nature is ideal for sidewalks. I painted these with gray acrylic craft paint, just applied with a brush. I scribed the sidewalk lines with a #2 pencil.