Using PC board seems a bit excessive to me, could likely get away with some thin plywood, but you might want to ask them directly why they opted for PC board.
As far as a source of Tortoises shipped to Sweden, we have them available on our website at very good prices, with volume discounts. We regularly ship overseas and are well familiar with the process.
Btw: You must be the Tim Warris that are building the incredible Port Kelsey, right? Just wanted to tell that I really love it. Can’t really explain, it just looks incredible.
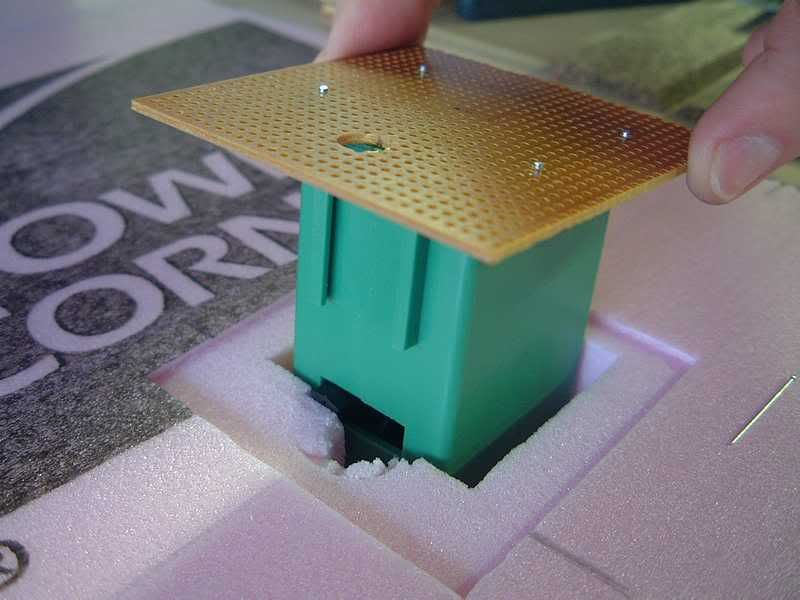
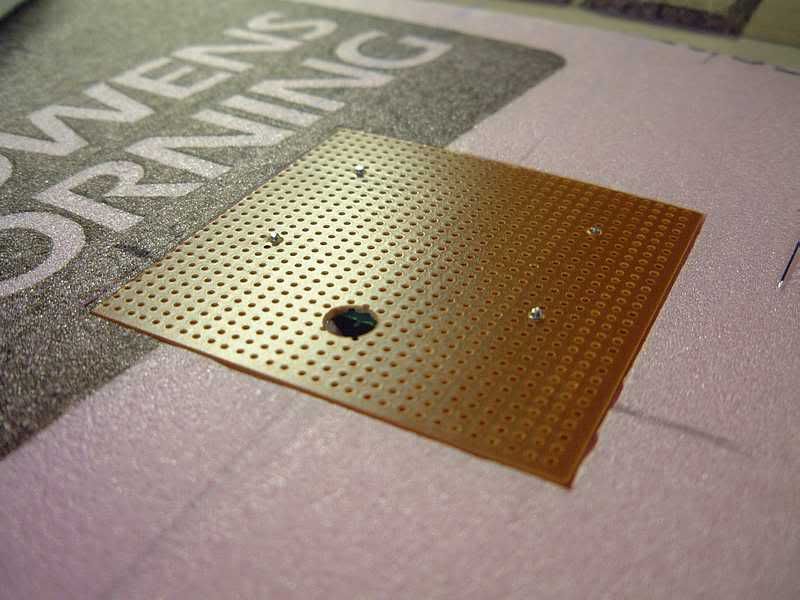
I did mine the exact same way except instead of PC bard i used plain perf board from Radio Shack. The 6x8 size yields 6 mounting squares plus a little leftover that I end up using as terminal strips in the control panel. Copper clad board is more expensive and MUCH harder to cut - the perf board, I make a little nick with a cutter at the edge where I want to snap it off, and then just slowly fold, it naturally snaps off along a row of holes. The perf board is nice because I then screw the Tortoise on with self-tapping 2-56 screws.
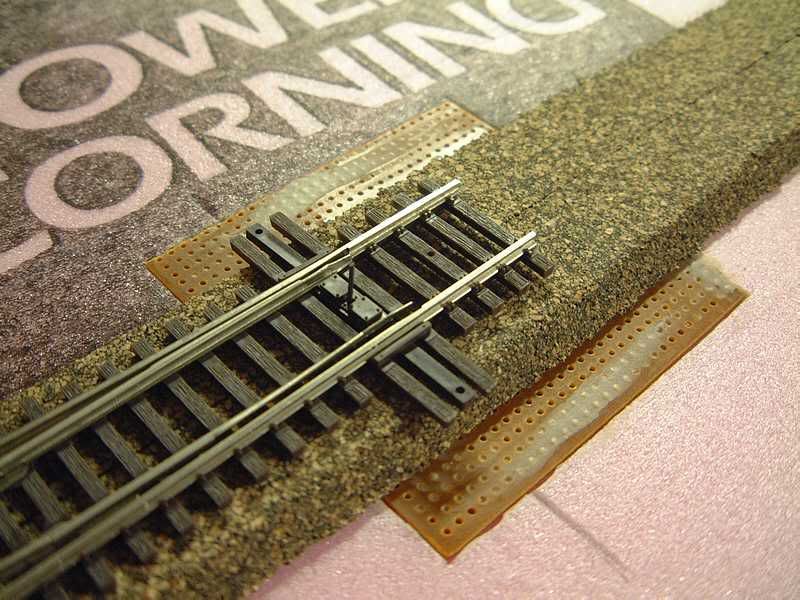
Since it mounts directly under the turnout, the stock wire is plenty strong for the linkage. And removal is easy from the top - I do NOT solder rail joiners to turnouts, so all I have to do is slide the joners back and lift the turnout out from the top. I’ve had to take one out so far when I changed my mind about a siding, pulled the whole works out and put in a fresh piece of roadbed and cut in flex to replace the turnout.
It must be possible to replace the tortoise from below as well if you make a little extra space around the screws so you can reach them or what do you think? The reason I ask is because once you have the turnout ballasted you don’t want to move the turnout. It seems to me that it will be possible, but I’m not sure because I have no tortoise yet to test it on.
I used to be the Tim Warris that is building the Port Kelsey, but lately I’m just the Tim Warris who is working all the time…[%-)] But I still manage to squeeze in a bit of train time now and then.
I suppose I could - I try to make the opening as small as posisble for the most support for the Tortoise. I guess I could stick a long scredriver up thee and unscrew it if I had to. But then I’ve never seen a Tortoise fail, my personal ones OR any of the 100 or so at the club I used to belong to. And I have one I’ve abused purposely - and sometimes just because I was bored. It’s been taken apart numerous times (it’s over 10 years old, so I don’t care about the warranty anymore), and I’ve slammed it back and forth by hand many many times, yet it still ticks over just like a brand new one.
I mounted all my switch machines from underneth. I remove 4 screws and it’s out. Mounting from the top seems like too much work to me. You remove it, you have to rip up the track and track bed. However, I agree with Randy, you’re more likely to replace the switch than the machine.
p.s.,
how did they make such perfected square recesses? nice.
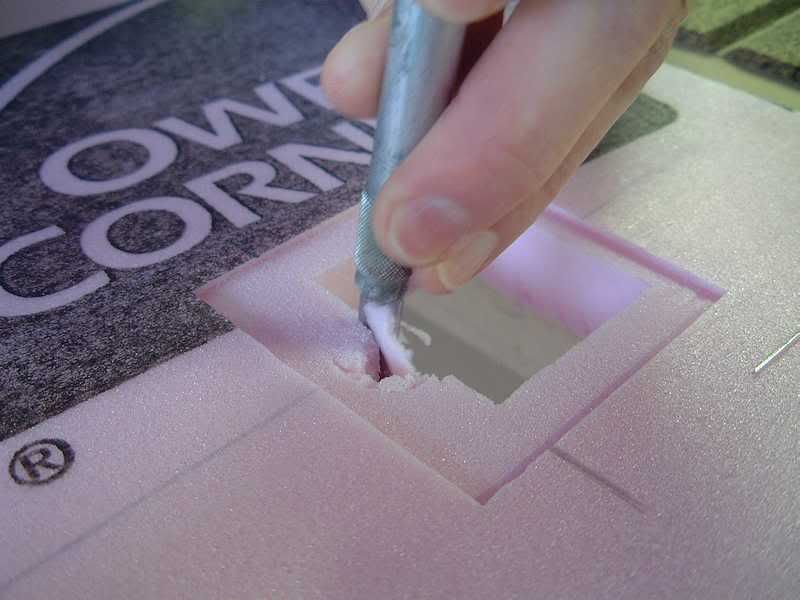
I’m gonna guess they use a template. I can get mine PRETTY square whent here’s no adjacent track, but tracing around the outline of the perf board square and then using a router bit in the Dremel. I have another attachment that makes the Dremel into a sort of Roto-Zip, it’s a smaller nose than the router attachment, yet still allows depth setting. I set it for the thickness of the PC board and hold the nozzle of the shop-vac close while digging out the square. I then use a knife to cut out the middle - that never comes out super clean and square - maybe they use a hot knife. But I’ve found it doesn’t have to be uber-neat, either. Most of it is covered by roadbed, and you can fill in the edges with caulk (since I use caulk to glue down the roadbed and track) and then it gets covered with ballast and other scenery so you don’t see the non-square holes anyway.
I used plain old 1/4 inch plywood instead of PC board. The actuator arm is long enough to handle even thicker stock if you don’t have something thinner.
I guess I’m just lazy or maybe it’s just as simple as this. I drill my 3/8" inch hole through the cork and foam, (some of the foam is 2-1/2 inches thick). I found a thicker piece of wire from Michaels to use as the spring wire…18 gauge stem wire worked for me. The only drawback to the thicker wire is that you have to drill the hole in the tortise (where the screw goes) to accommodate the new wire. I use shinohara switches and the wire slips right in to the hole. I take some DAP acrylic latex caulk plus silicone and glue it to the foam overnight. It works!!! If you ever need to replace it, a putty knife works just fine. Hope this helps.
If you mount them from below with foam any thicker than 1", do do experience any problem with not enough pressure/ spring to keep the points against the stock rail?
Does anyone know what the max distance/ drop that the Tortoise can be from the throwbar and still be reliable (even after changing to a larger music wire)?
Bob K.
With heavier music wire than the stock, you can go REAL far. Especially with the typical easy pivot action of commercial turnouts. All-rail types, with no hinge, that actually have to deflect the rail, take more force and will run into a limit sooner than commercial turnouts, but you can still easily work through a couple of inches of roadbed.
The stock music wire is good for maybe about an inch total of benchwork and roadbed.
The limiting factor is probably goign to be more with how big a hole you can drill and not have it show up under the turnout - the further away from the Tortoise you go, the more throw distance there is. If the wire hits the side of the hole, it won’t be pressing the turnout’s throwbar.
My main reason for top-mounting them is I will be storing stuff under the layout - we have a LOT of stuff, mostly containerized in those plastic bins. If I mount the Tortoise UNDER the benchwork, it will stick down further than the sides. Mounting them on top, they still stick down below the foam surface, but they do not protrude below the 1x4 gridwork.