That’s gotta be frustrating! I don’t have any live steamers so I can’t help you out, but from what I’ve read they can sometimes be pretty finicky. If there are any live steam users here they can either help you or tell you where to go for help. If not, try to find one of the live steam forums.
I am not familiar with the Ruby kit -but having assembled my own steam locomotive from a kit -let me run you through a few diagnostics first.
Put the loco on some track and GENTLY push it -does it move freely?
Turn the wheels until ONE of the pistons is at full stroke -where is the other at this position?
Turn the regulator valve from full in to full out and then back again -does the valve seat in the same place as when you began?
If all of the above is correct then oil up your loco and try moving it manually up and down a length of track until you feel it move smoothly, this may take a couple of hours or so -spread over several days. Take it all apart again, clean out any “break in” grit/filing etc and then try re-steaming.
The wheels do not move freely. When I was assembling the locomotive, I had a very difficult time inserting the axle into the axle hole. I had to sand the axle hole in order for it to fit.
Which one is the regulator valve? The gas or throttle?
Also, the flame in the boiler tank goes out every few minutes. I always have to re-light the flame. Turning up the gas flow does not help at all. Why is this so?
I have limited experience with live steam, but what I know is that it is finicky at first until you learn the ins-n-outs of the process.
Your first step is to ensure that mechanically everything is running true. A binding anywhere in the mechanism is bad, and yes, it could take some time and machining to get it perfect. Trouble with the axle hole? I would start there.
How is your boiler? Are the connections clean and tight? As a reminder there is a real life union of boilermakers dedicated to more or less that one function, your miniature boiler works on the exact same principles as full sized ones.
Check the gear timing according to the instructions. If it’s off even a slight amount then it won’t work well or not at all.
If your flame is going out I would think that you have an air leak into the line somewhere. Recheck all fittings.
As was stated this is not a “light it and go” aspect of the hobby. Live steam is somewhat like trying to get a kick start Triumph with and AMAL carb started on a cold morning. You’ve got to have a little voodoo.
There are a lot of resources available on line, one of our forum contributors manufactures and sells steam models, maybe he can help. Don’t give up yet! There are great rewards in the world of live steam, so hang in there!
I can’t believe it only took 5 hours to assemble! My Ruby parts were really hard to fit together and I broke most of them. I finally got it together and it ran a few feet. i’m having someone tune it now, as I have trouble getting the valves to go right; it’s finicky and more black magic than simply doing such and such
also, I’m wondering if i wasn’t penny wise and pound foolish. the price of butane is so high i’m thinking should have spent a few hundred dollars more on a propane burner and would have saved $$$ in long run; also, one already built would have been better
No one already built would not have been better look at what you have learned about steam that I have not because I bought ready to run.
Sure you had difficulties but once its right and needs some attention later you will have some idea as to what’s going on without resorting to the spell book.
If you had bought the propane burner you would have had to replace the gas tank and Possibly the gas pipe work as well something to do with the way the two different gasses behave
Love the description you and TJ put to steam power its pretty well right some times EGR No 5 behaves sometimes she don’t, may be I am not pronouncing the incantation right[:D] I am still learning to get the best out of her she is a Roundhouse Millie.
A Red one just like all good steam loco’s are[swg]
When you say “I had to sand the axle hole” -are you SURE you got all the corundumn grit out of the bearing? I think you are going to have to take your Ruby apart and GENTLY lap the bearings into place, (I used fine Valve grinding paste and then Cerium Oxide “dust” in paraffin jelly). Once you have THOROUGHLY degreased and cleaned your bearings wash them with boiling water from a kettle. Then re-assemble with light steam oil (at least REL 500).
The REGULATOR valve is ALWAYS the one from the boiler. This often need “bedding in” as it is a screw fit. The needle “eventually” wears into the seat…
As to your gas problems, This could be due to you driving out all the oxygen with Butane Gas -thus producing an incombustable mixture. I don’t know where you are in the US -but here in the UK Butane is semi gaseous at our temperatures. Filling the tank takes some time and the only real way I can tell is if it spurts out of the “Ronson valve”. Messy -but it works!!!
Fill the tank and SMELL (carefully) the exhaust fumes from the stack. There should be NO acridity -just the smell of hot fumes. If there is ANY sense of “eyewatering” or “wanting to cough” then turn off straight away. There is normally an adjustment on the air to fuel mix. Moving the jet TOWARDS the air hole increases the amount of air drawn in -to much and you will get “strike back” and the flame will burn THERE not at the boiler!!!
I think that is enough for a next series of tests -let us know how you are progressing.
I had the same problem with my ruby kit, and its apparently quite common, especially with the kit-built rubys, because there are lots of opportunities, while building the kit, for small particles to get in the works and clog the jet.
the fix for a clogged jet is to remove the jet/nozzle, stick the end of the jet on the butane can nozzle, and blow butane gas through the nozzle backwards…(in the opposite direction the gas would flow during normal operation) this will clear out anything blocking the hole.
Amtrak,
I know its frustrating…I built the ruby kit too! but the problem isnt your kit…the kit is fine…it sounds to me like you have rushed things too much and havent done the slow, meticulous, very precise and carefull build that live steamers require. they are precision machines! they require precision in building…
you have to test it on air before you can run it on gas. if the wheels dont turn freely, that has to be fixed before you can even think of lighting the burner.
live steam is not an “instant gratification” hobby!
if you dont like to tinker and fine-tune little mechanical parts, then its not the hobby for you!
It can be done! you can get a great running little engine from your Ruby kit! but you dont have the right mindset yet…you are getting mad at it, that wont work…it wont fix itself…you have to take the time to figure out what is wrong, then make several small adjustments until the whole system works together…
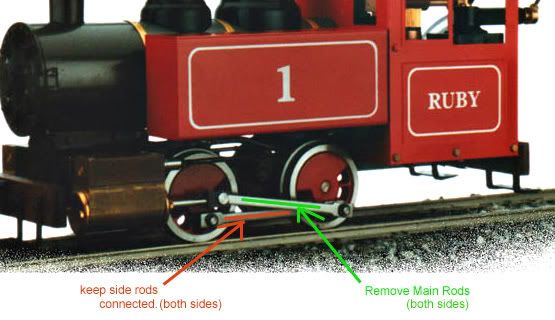
first step…remove the mainrod connecting the drivers to the cylinders, but leave the side rods connecting the drivers to each other.
To give you some example of the time scale that live steam locos take…
I have been building my second live steam loco -which is a Heilmann Steam electric. In that system a simple steam motor turns a dynamo and the electricity produced I use to turn the bogie drive motors. After 8 months of assembly I got the boiler certified and the motor turning. I have tested the motor and dynamo coupled together TWICE in 11 months of construction. My most successful run so far has been the second power run test at which I got 20 seconds of power out of my dynamo.
The are no valve timing events to get wrong -these are simple oscillators. Even these are proving to be sensitive to spring pressures, (I am counting “flats” as I adjust the tension on the spring nuts), and increasing the smoothness of the face lapping means that it is out with the glass plate and Cerium Oxide dust again…
I KNOW that I am going to have to tear everything down to pieces -clean and re-assemble. The time before test run three will be about 4 weeks. BUT, now I know (roughly) where the path is leading. It is a slow business of tinkering and mind numbing frustration.
I assure you that moment the phut phut phut of steam comes out of your cylinders -makes it all worth while…
A whole 5 hours wasted assembling the kit? I spent more time than that reading the instructions, downloading additiional information from various live steam forums, and studying everything I could find about the Ruby before I even considered purchasing one.
Since you didn’t fill out your user profile data, we have no idea where you are or how old you are, but you obviously are in too much of a rush and expect instant gratification. Sorry, but it sounds to me like live steam isn’t for you. You must take you time and test every aspect of assembly several times before moving on to the next step.
This is the reason why Accucraft stopped making the Ruby Kits. Too many people bought them and got in over their head. I spent over 80 hours rebuilding my ruby not including the work to reverse the eccentrics and to retime. It was worth every hour.
By the child like response he knew nothing about what a live steam kit takes and that it goes to show that yes anyone can buy one but no anyone cant own one. Thank god he didn’t buy a Aster kit, 5 hours HAH Try 150 or more to build the Berkshire for a newbie.
Anyway with bubbles coming from the steam lines that seems to be overfilled and as far as nothing moving it was probally hydrolocked. On top of all that the timing is probally way off since it was never air tested.
I also wonder if he did not see that the bushings are keyed to they do not spin.
Did I just completely and totally miss the fact that you painted your Ruby, or was that done just recently? (Or am I just forgetful? Any one of the three is a distinct possibility…)
Anyway, that paint looks fantastic. If you’ve got more photos, can you post a link to them?
Too bad about Accucraft not producing any more kits, but I can definitely see the logic. Guess I can forget about getting their mogul as a kit, now.