I have absolutely no experience hand-laying track. Now that I’ve gotten that out of the way I would like your advice/opinion about this. I was planning on using Atlas and Peco code 55 track for my N scale layout but I really like the look of the lighter rail on sidings and spurs and I would like to achieve this look using code 40. However I have a few questions on whether this is practical, and if it is, how in the world do I go about doing this.
Micro engineering sells code 40 flex track but no turnouts, so I will have to hand lay my own right?
I only need #5 turnouts and a #5 wye, what jigs or gauges will I need to make this work, and where do I get them?
Is all of this worth it for just 7 turnouts? (I don’t want to spend more than $16 per turnout)
I’ve heard standard N scale wheel sets will not work well on code 40, is this true? (if so I’ll just forget the whole idea)
On my last layout I used Micro Engineering code 70 for the mains and Atlas code 55 for the branch and sidings. Micro Engineering also makes bridge track in code 70 & 55, so that combination worked out well. I looked at code 40, but it was more hassle then it was worth. I could lay the whole layout in the time it took to lay a quarter of it by hand.
Micro Engineering turnouts only come in a #6, so that’s a drawback. The Atlas code 55 stuff has #5’s, #7’s and the brand new #10’s (that look AWESOME!), so there’s some flexability there.
The Atlas code 55 must have low profile wheelsets, loco’s and all, so Atlas code 55 vs. code 40 is kind of moot. I imagine that the code 40 is quite fragile and unforgiving though, but this is just a guess.
Something you may want to consider is that some railroads lay switches in a larger rail so that they will not need to be replaced/are less likely to have trouble with them.
This would also prevent a slight dip in the main that might foul up your otherwise smoot running. Atlas 55 looks great on our layout, i have no idea how easy something as small as a 40 would handle, and as you pointed out it might be rather unforgiving!
Thanks for the replies. I will be using only code 55 turnouts on the mains for smoother running and to prevent any dipping. I was looking at fast track jigs this morning and while they do look nice, $150 for seven turnouts is a little much, and I won’t be able to make wyes and #5s in code 40. I’ll just stick to the ME flex track and atlas code 55 turnouts.
Does anyone have pics of a transition from a heavy rail to a lighter one (model or prototype)? I really want to see what this will look like before I make any final decisions.
Good question, I’ve wondered that myself. I’m also building a layout with ME flex and Atlas turnouts.
but my ME flex has the conrete ties. I don’t know if it’s a characteristic of ME or the concrete ties, but when connecting them to the Atlas track, the ME ties are thicker and the Atlas ties are much thinner and as a result the Atlas track “hangs” above the roadbed! How do I fix that?
As to model railraods, I just found transition joiners in N scale. I never knew they existed. I always slip the joiner on the larger rail and smash the end sticking out with some needle nose pliers. Then I just lay the smaller rail on top of the smashed part, adjust the height by bending the joiner, then solder it in place. But check this out!
Hi, I can only speak from my experience with Peco. Peco’s track whilst not American when you transfer from code 80 to 55 or vice versa you don’t need any transition joiner or packing as its the same rail height for both types of rail, the code 55 track rail is code 80 just sunk in to the plastic sleepering tricking the eye in to thinking you have 2 different rail sizes.
I’m using PECO Code 55 on my current layout. It looks better than the Code 80 but works just as well (i.e. very sturdy stuff.) On my last layout I did the main line in Atlas Code 80 w/ PECO Code 80 turnouts and I had a branch ine in Atlas Code 55. The transition was easy enough, just smooshing the loiners & soldering the gaps. But some of my wheel sets (including thoses on lots of my older Loco’s) HATED the Atlas Code 55. They would bump along the ties and eventually derail. I suspect that the same is true for Code 40. I’m sticking with the PECO code 55 for everything on my current layout.
I would go with code 80 mains and then code 55 sidings but to me code 80 looks HUGE (although it would be a whole lot easier). I want to keep all the track the same brand but I need to use some Peco curved turnouts and now it looks like some code 40 ME flex. I don’t think derailments will be a problem with the smaller codes because I will be using newer models and will probably be switching out the wheelsets on most of them anyway.
My only concern is that it will look funny having a long stretch of code 40 rail and then having a code 55 turnout followed by more code 40. I’m also worried about how I will make the transition smooth without a raise in the track. I will have to find a way to burry the atlas code 55 a little to meet up with the ME flex. I’ve heard Peco track looks very strange next to Atlas’s because of the wider tie spacing used in Peco track. Is this true? Does anyone have some reassuring words that my layout won’t look weird with all the different types of track?
One more question, code 80, 55, and 40 track all have the same railhead width right?
it doesn’t look huge. it IS huge for N scale! and it looks awful (at least to my eyes)
if you can, use 55 and 40. the extra work is definately worthwhile! try to see if Aspen Models’s code 40 turnouts fit your need. and yes, atlas flex next to peco look awful, too. the tie spacing is A LOT different. IMHO the best result would be using code 55 atlas turnouts together with code 55 and 40 ME flex.
don’t know about code 55 turnouts breaking a code 40 straight section, does this happen in prototype?
Note the tie spacing in this pic as the rail switches from one weight of rail to another. Also note that even the ballast changes. This could be used to hide some of the trasition from one weight (or brand) of rail to another. Use slightly bigger ballast on the track that has the ties spaced further.
Also, ME makes code 70 rail that looks a lot better then the code 80 stuff. My last layout was ME code 70 for the mains and code 55 for the branch and sidings.
To go from one rail code to another see my post in this same thread that has all the pictures. Towards the bottom of that post I describe two ways to do this.
You can get some very realistic looking track with code 40, esp. if you handlay it with wood ties. Here is some sample track that uses preproduction Twist Ties from Fast Tracks. The code 40 is hand-spiked with Proto:87 spikes, but you could also use Pliobond to secure the rails. The Twist Ties are really nice because they are laser-cut and come on a strip about 2’ long, so you don’t have to sand them and you don’t have to mess with individual ties. You also don’t have any PCB ties to disguise. They have laser-cut guide lines which help to position the rails and really speed up the process. You could also use these with code 55 rail, but to me the code 40 looks so much better.


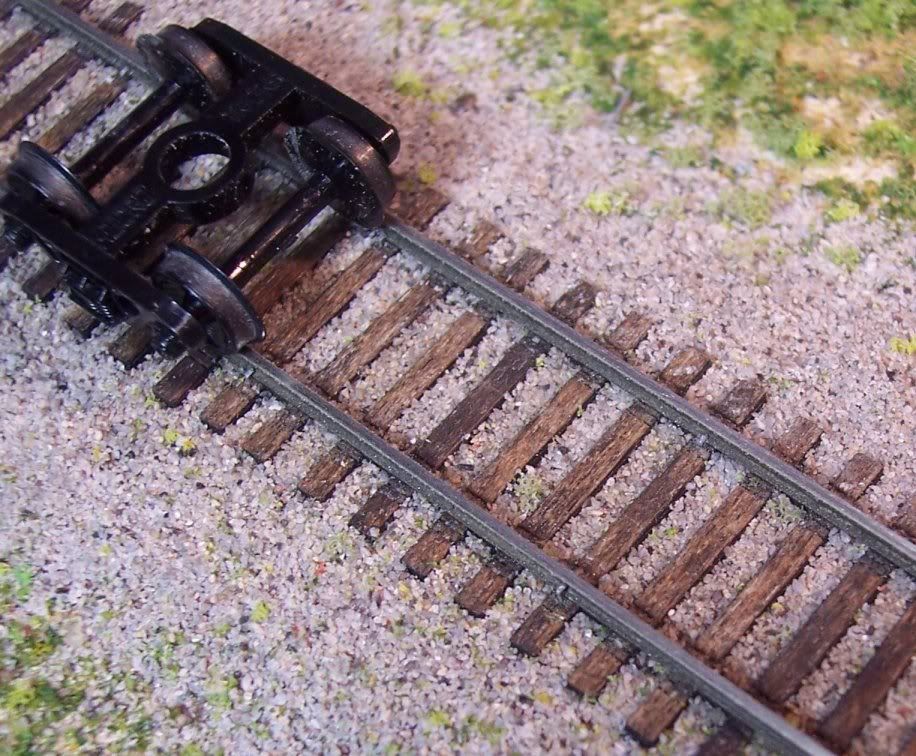 You could also use these with code 55 rail, but to me the code 40 looks so much better.