After being away from the hobby for nearly twenty years I have come back to it about a month ago. I have been reading up on the changes in the hobby and am looking at a small space N-scale layout laid on a 32" wide by no more than 6 ft. long area. I have an option for an L at one end of the layout about 1 foot or so wide but am learning toward not adding that as of now unless inspiration strikes me.
I was never good at track planning and still am not so I tend to “borrow” ideas. One such borrowing is from a nice thread contributed to by steinjr at this thread .
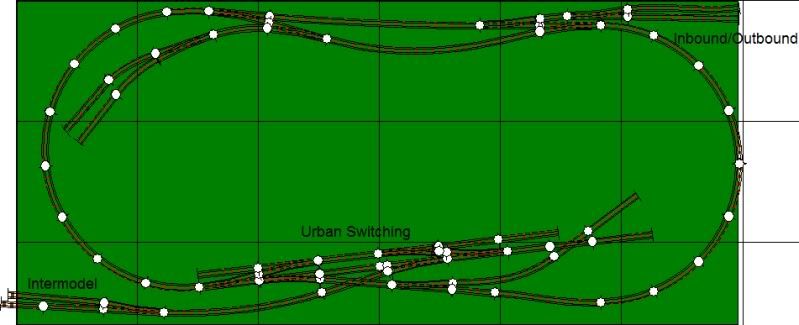
I’ve decided to go with a very close version to the final version suggested by Shortliner and modified by flue there, but with extensions into the middle of the layout with additional industry service. I enjoy industrial switching but like an occasional continuous running time.
Givens and Druther:
N-Scale standard gauge
Urban and Industrial switching area designed for FUN operation along with a basic continuous running track that looks nice and has room for scenery.
Era: 80’s to modern
Prototype: BNSF or Missouri Pacific (UP) Southwest or Missouri area.
I’m not going to be running too many different consists and engines at one time but will definitely be going with DCC.
Would anyone have suggestions on what might be an appealing layout for this small space and someone who will essentially be building his own layout for the first time?I want a fun, layout that I can learn on and make mistakes on as I gain experience in the hobby again but that will hold my operating interests while doing so.
Thanks in advance and thanks for all of the interesting threads on layout planning the past month or so as I have been lurking.
[2] 102 Realistic Track Plans covers a lot of ground including how to convert from HO Scale track plans to N Scale. You may find certain portions of different track plans that may appeal to you that can be incorporated into your own layout.
[3] Spookshow’s Model Railroading provides a detailed and frank discussion of an N Scale model railroader’s experience. Start at the Layouts section.
Thank you for the link to Dave Vollmer’s site. I’ve actually seen the layout plans but not the pages of information on it. I will also check out the N scale site. It should make some good reading tonight.
I actually own…and kept for 20 years…the 101 track plans by Kalmbach. They have served for inspiration but so many do not seem to offer “operational switching” layouts. I agree that its a good place to start though.
I’ve worked up a basic sketch (in Atlas RR) of what I’m working on and will post it once I make a couple of final adjustments and figure out how to insert pictures on this forum.
I second the idea of getting a copy of “102 Realistic Track Plans”. It’s quite good IMO and under $10.
You might also check some back issues of the annual “Model Railroad Planning” series. Lots of good stuff in those too.
I’m now working on my first HCD N-scale layout (previous ones were on 2-in foam). It will be an oval with a divider down the middle with a passing / staging track on the backside (with one industry spur, should I decide to put something there) and a small double-ended yard with an interchange track and one or two industrial spurs on the “front” side, somewhat like the “Dallas on a Door” layout. This will be my “roundy-round” to complement my current HO shelf switching layout which is L-shaped on HCDs (and the N-scale one is also where my significant other can go nuts with her PRR steamer, once she finds one…)
I would start with a description of the room you will have your layout in, and description of how much space you will have. In your text you write 32" x “no more than 6 feet long”.
Yet your track plan seems to shows a layout that seems to be about 30" wide x 7 feet long. How come?
One fairly central question is whether the layout be located with one long end up against a wall or be put into a corner (so it only can be accessed from the front), or whether it be free standing in a room with access to both long sides (so it can have a central viewblock down the spine of the layout, splitting it into a front scene and a rear scene)?
If it only can be accessed from one side, it might be little tough to carry off at the same time both having an urban industrial switching area scene, a running through the landscape scene, and having room for functional staging where whole trains can wait to make their appearance on the layout.
If it is accessible from both sides, with a central viewblock, it is fairly easy to do two very different scenes on the two sides of the central viewblock.Or to make one larger scene on 2/3rds or so of the table, and use 1/3 strip at the back (behind the divider) for staging.
Anyways - start by describing your room and how the layout can fit into the room. Then it will be possible to see if a two sided layout is possible or not.
If you can get to the two long sides of your plan, I would second the idea of a view block in the center. I would suggest that it be at a slight angle. To disguise the ends you can either go behind a building, duck into some heavy trees, go through a rock cut or go into tunnel enterance. I think I would add at least a short siding at the top of the plan, to serve a small industry or be a team track, Just adds a little more switching in that side.
The layout I am currently working on is a 4x6 in HO. It was originally designed to travel, but the mode of transportation died. It is a loop with a passing siding on each side of the divider. One side has a two track yard, haven’t decided whether to add one on the other side or not. Idea was to have two trains running in opposite directions, so the “viewers” are never sure which direction the next train will come from. Could also add or remove cars while the train is out of site to add variety, Deep rock cut at one end, will put some large trees to screen the other end. The view block comes quite close to the edge of the table.
If you fancy continuous running and a switching, this might be a layout idea for you:
It is based on MR 2009 project layout “Build the Beer Line”, which I adapted to N scale, using Atlas code 55 track and turnouts.
Other than MR´s HO scale layout, it cannot be build in segments, but is meant to be build on a 2´ by 6´ board, covered with 2" Styrofoam (the pink or blue stuff).
It is a nice track plan, Ulrich. It certainly fills the continuous running + switching part of the OP(original poster)'s wishes, but it does not provide for scenic running or staging, which he also wanted.
Of course - one could always say that running through a city is scenic running - it certainly appeals to me. But when people talk about “room for scenery”, they usually mean rural scenery, not urban scenery.
And staging is not necessarily a given for a small layout - it is certainly possible to start an operating session with a train “having just arrived” and end it with the train “about to depart”, rather than to have trains arriving and/or departing during the operating session.
But it also presupposes that we will have access to both long sides of the layout - you can reach 30" over open terrain, but a reach of 30" over and between multi-story buildings to reach tracks behind the buildings might be a wee bit on the optimistic side.
I think we will just have to wait for the OP to come back and describe a little better the room he wants to have his layout in.
But a 2´by 6´ footprint is not big enough to have all what the OP wants. The trick is to adapt one´s druthers to the givens and when space is at a premium, you have to make that dreadful either/or decision. If the OP has some space left, which he may occupy even only temporarily, he can add two cassettes for staging to the left of the layout - just as MR did in their project.
First, thank you everyone for the response. It is helping with the ideas.
Second…Ugh. I did do mockup for 7 foot wide run the width. Talk about being noob. I’ll rework something this morning. I hope it doesn’t force me to abandon the switching yard as planned. I have #7 turnouts throughout…I may have to shrink to #5’s to make this work…
Let me clarify some things for steinjr, cowman, others. It is in a spare room along a wall and corner. Basically accessible from the main yard side and the staging yard side. The 32" is something I cannot fudge…I really tried for the 3 ft in there but it just isn’t a possibility for now. The possible extension would be on the intermodal side of the layout. I prefer not to, but would be willing to do a 1 x2 or 3 foot extension there if it added a lot to the layout fun.
As to scenic running, I am quite happy with a city scene for the “scenery.” The continuous running would be more for my wife and kids. I’m most interested in switching and making deliveries. It was the role I enjoyed twenty years ago on a large hobby shop layout and the one that will most keep my interest now. Switching needs to be at the heart of the layout…I just don’t want to overfill the space with track for aesthetic and scenic purposes.
I’ve looked on Google Maps/Streetview alot in Albuquerque NM and there is a nice section there with furniture, intermodal,lumber, and gas areas being serviced which could offer some prototypical basis to my layout with some compression and alteration.
I’m not “married” to anything, but really loved the industrial plan linked to on my original post.
Back to the drawing board…thank you everyone for the input and links. I’ll add a revised plan later…
Oh and stein…for the staging area I’m not looking for engine spotting etc. I’m looking more for an inbound and outbound section that suggests cars arriving and leaving for other parts of the world. I felt it would add some value to the plan.
I should also let you know that I anticipate adding this layout to a much larger one when we purchase a home over the next year or two.
Okay - so you are not actually looking for staging.
In the context of model railoading, the word “staging” is usually used to mean a place where you can hold an entire train, before the whole train arrives during your running session, or after it departs from your area during your running session.
It represents “the rest of the world” in model railroading terms - the destinations that is off somewhere further down that track after it disappears from view behind a building or into a tunnel or around a curve.
What you are describing is just a set-out track or an interchange track or a siding - a place where you can do block swaps between trains or interchanges between railroads. One train leaves cars there, another will be along later to pick it up. Can be done even for very small switching layouts. No problem.
Okay…this is iteration 2. Done the correct size this time. Stein I will attach a quick room sketch for you in this message down the road. The layout pretty much MUST go in this location but it will show you why the extra L-shape extension is problematic. Any other arrangements just don’t seem to open up space without sacrificing even more room for guests etc.
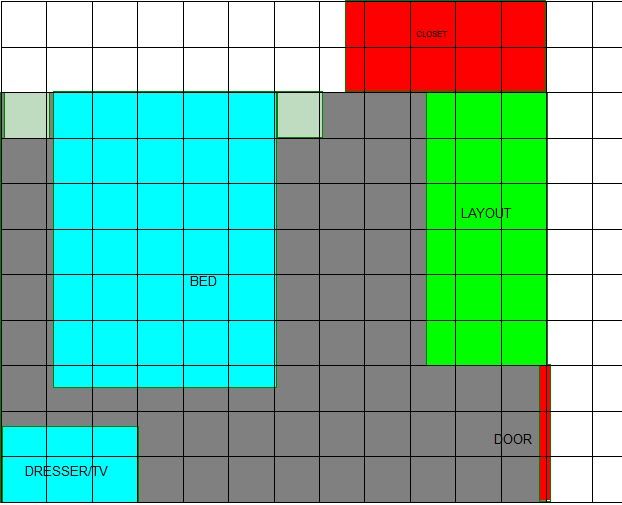
Okay. As requested, here is the room. It is a spare bedroom that can be rearranged to a certain extent. As you can see I am partially blocking the closet. It isn’t used too much, so my wife would live with my blocking it if needed. It would be nice for storage and other reasons not to block.
Thanks for looking.
edit: Oh and the layout is to be built over a long dresser that would need to be moved elsewhere. It measures 5’ 6" long by 24" deep.
Looks like a room where it in principle is possible to make a long and narrow switching layout around three walls. On shelves above the dressers. Possibly with a continuous run liftout across the door.
Conceptually something like this:
I expect there probably are windows in the room, too, which should need to be crossed on removable shelves, as to not permanently block the windows.
And your wife might have a few things to say about “taking over the whole room” for a layout vs “having a small table in a corner”.
And she would have a point. Long and narrow shelves fairly high up on the wall (say 50+ inches off the floor) often are better room mates than low rectangular tables when the goal is to maximize usable space for other purposes in the room, since not too deep shelves can run over things - dressers, beds or whatever. The space below and above the shelf will normally be available for other things.
But visually such layouts of course dominate the room in a way a small table tucked into a corner does not.
So it is not a given that something like this will a sensible plan for your circumstances. It is just an
I actually did consider a complete rearrangement and look at a 1’ to 1’6" along the wall layout over two sections. Since we anticipate being in a different home in a year or so my wife and I decided not to do this. Thats where the 32" by 6 foot plan came about. I like the vision of the other extensions and it would certainly be a good basis for the extension when I get a dedicated room in our next home.
I suppose what I am wanting to know most at this point is what improvements could be made to my current plans, keeping in mind that I will be learning as I go. I don’t want an incredibly difficult layout to build but want one that will provide enjoyment and learning opportunities for me. Any specific suggestions to make on my current build? Any obvious design mistakes inviting a derailment etc that you experienced model railroad experts can see?
Again, thank you everyone for the suggestions and links.
The original layout from the thread on the other forum that you referenced is not the best choice for a shelf layout, IMHO, and certainly seems sub-optimal for a larger layout, again in my view.
The tracks you have marked as “Inbound/Outbound” seem very short for staging, if that’s the intent, and the “Intermodal” tracks are likewise very short.
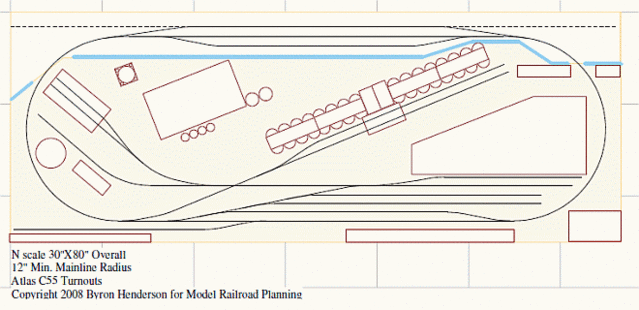
With a bit of planning, it’s easy to make better use of the center of a rectangular space, as seen in this example from my “Dallas on a Door” article in Model Railroad Planning 2010 magazine.
While this has a couple of elements (the crossing, for example) that were compromises to suggest the real-life locale, perhaps there are some general ideas from which you could draw inspiration. It is 80" long, but the same principles would apply in a slightly shorter space.
If your layout is going to be set against a wall, using that side for staging, as in the example above, can be very useful.
In my opinion, moving to track planning CAD too soon stunts layout design creativity by focusing on precision before developing a concept and building a better understanding of real-life and good model design practices. In my opinion, if you are committed to designing a layout a better way to begin is to spend some time with a resource such as John Armstrong’s