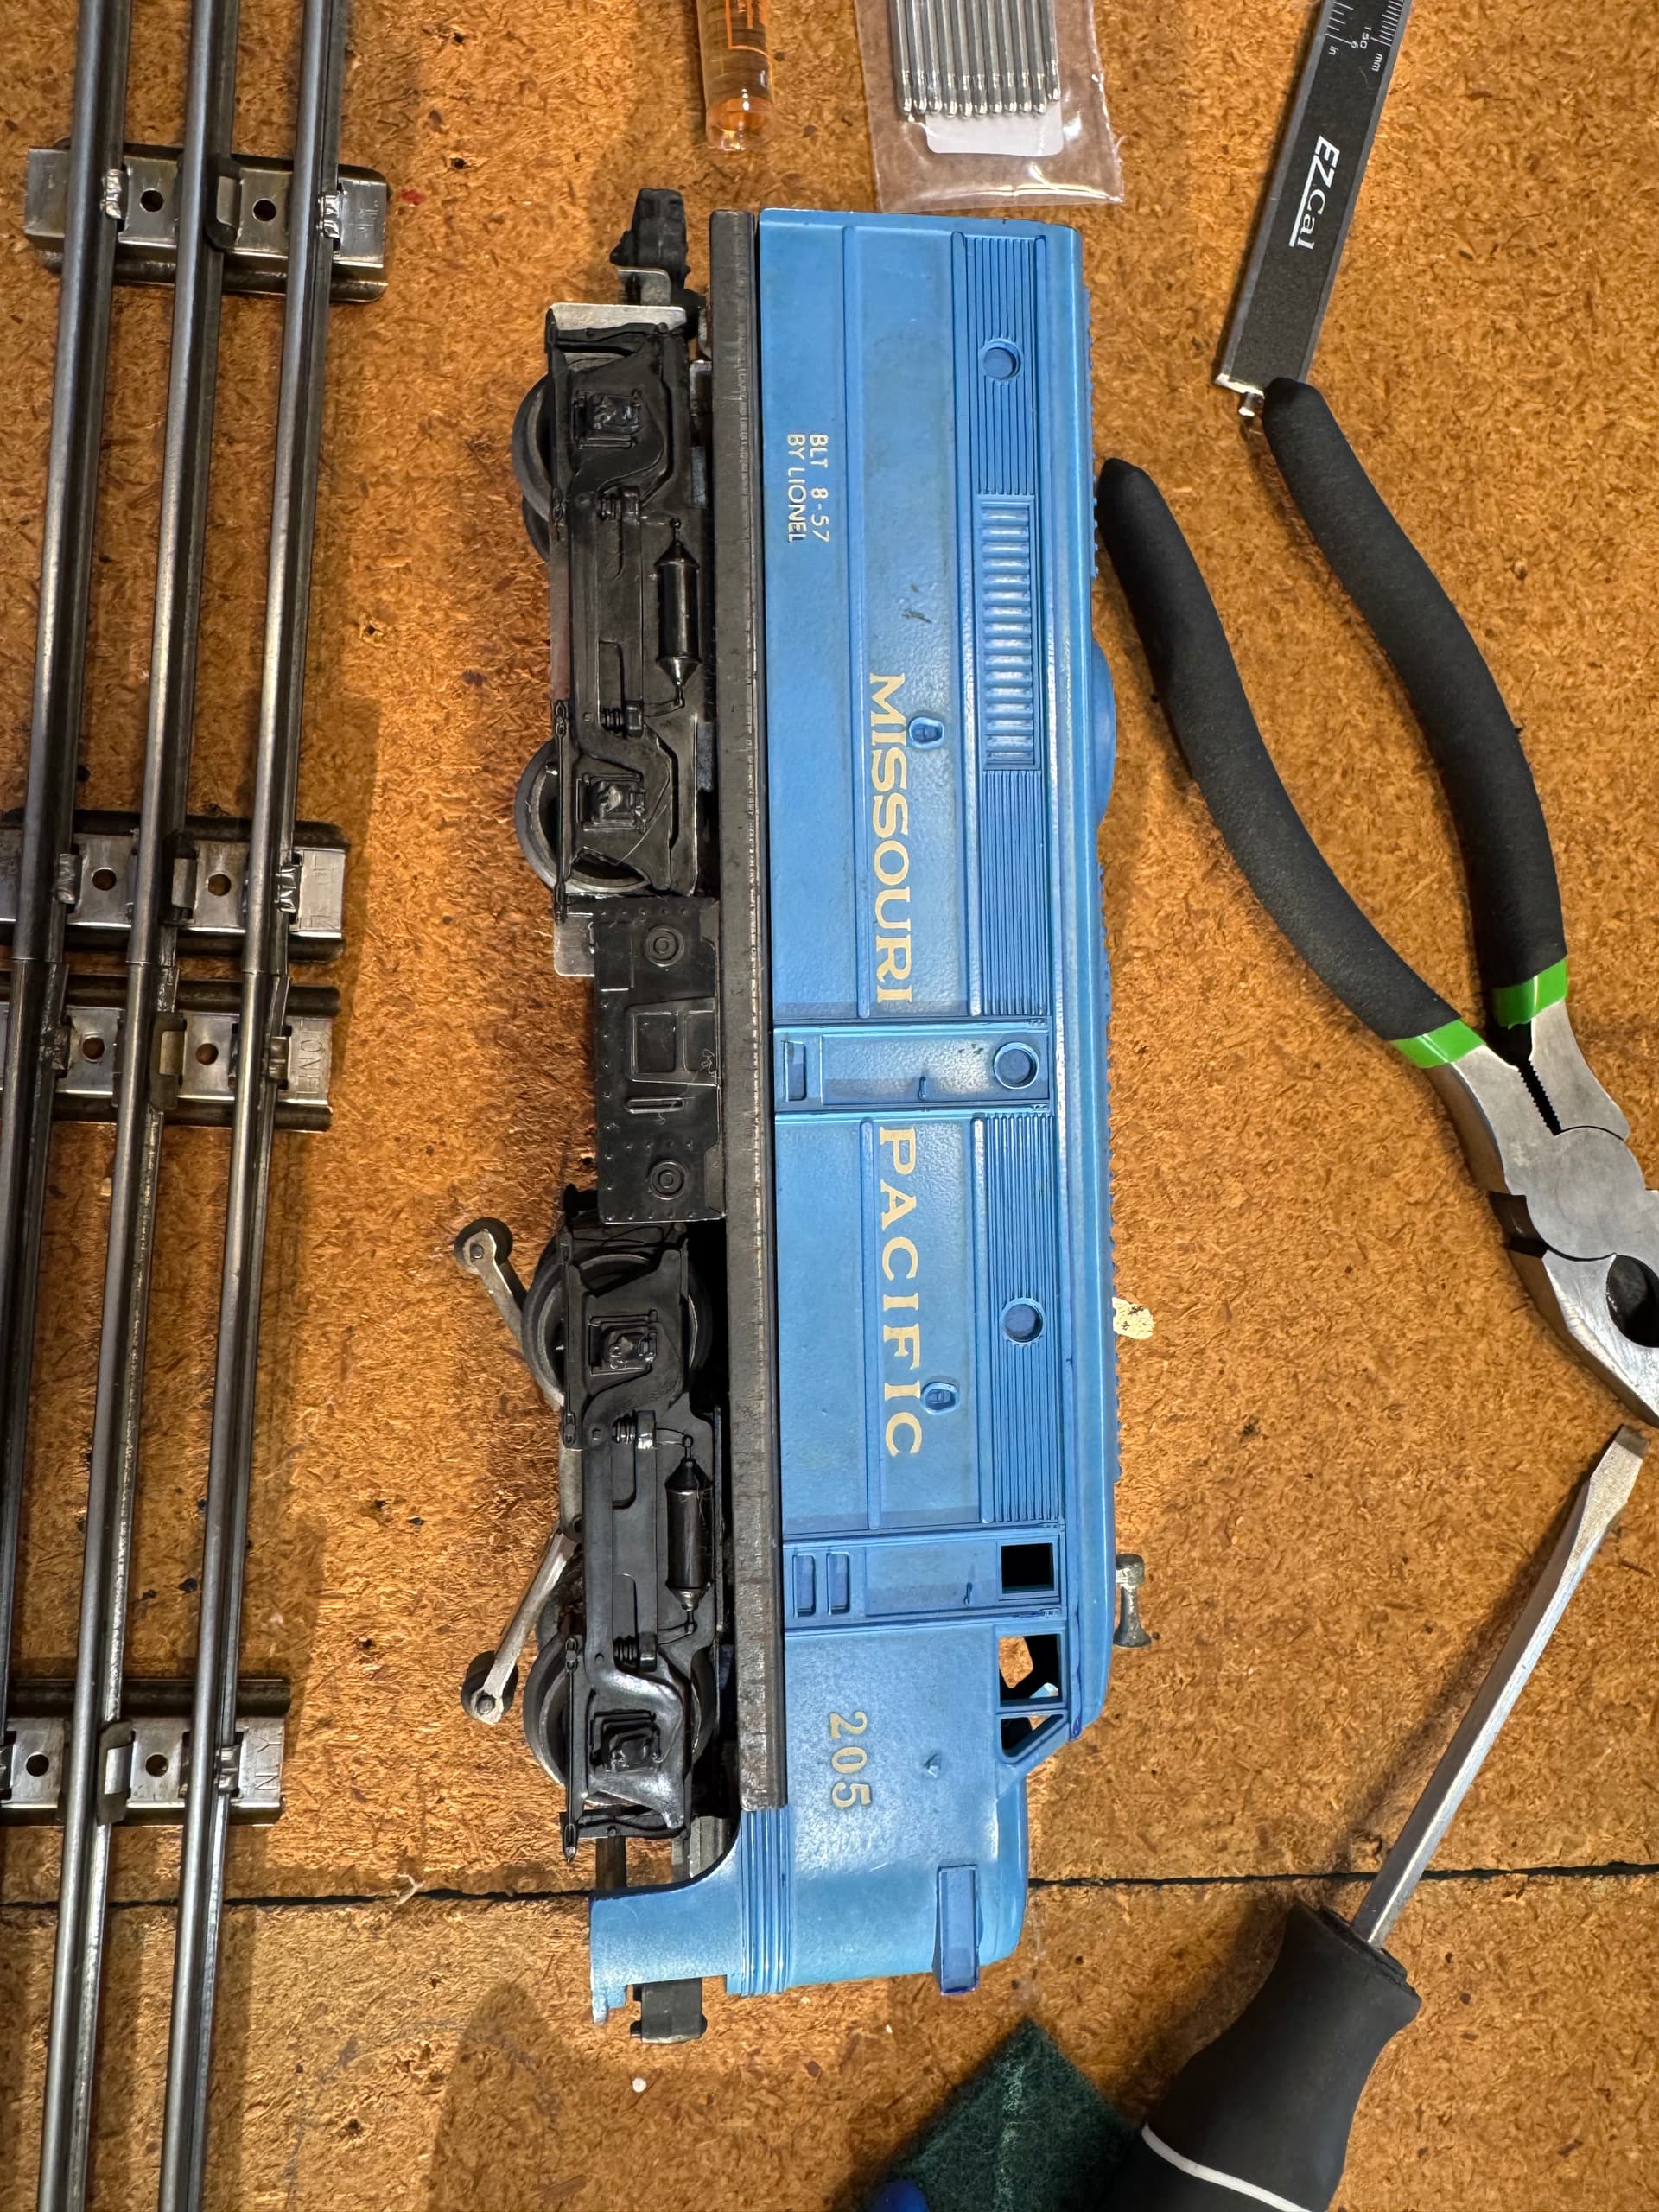
In the process of trying to get my grandfathers train set back up and running and would like to know from others if there is an online resource like a service manual for this 1957 Lionel Missouri Pacific 205 Loco. What do you guys think I should do before trying to run her around the track, she has been in a box for about 25 years? Pictures below. If there is a good video on this please let me know.

1 Like
Oil and grease. Anything that moves. You may have to remove the motor top cover, armature and brushes to grease the worm and worm gear. Clean what you can, especially the worm grooves. Armature shaft the wick on top (and the shaft) and the bottom bearing in the plastic cover.
Then decide what it needs when you run it.
TOC
1 Like
I say pretty much the same as Curmudgeon. Also, make sure you don’t get any lubricant on the commutator. I’ve learned that the hard way. Finally, if the reverse unit is sticking or otherwise causing issues, douse the reverser in plenty of electrical contact cleaner. Then wait a good long while till it’s dry before powering it up. If you don’t wait until it’s dry, then BOOM!!! Yeah, I’ve also learned that the hard way. Oh–just one more thing. Be sure to wipe the brushes on a napkin a tiny bit. Those things get pretty grubby–but do note that the typical theory of “clean it till it leaves no mess” won’t work because the copper-graphite brushes mark up the napkin even when clean.
1 Like
If I need to replace a wire do you guys know what gauge wire gauge I should replace it with and does it matter if its stranded versus solid?
1 Like
I don’t know what gauge for sure, but one that’s reasonably close to the original–it doesn’t need to be exact–should be good. As for wire type, I’d recommend stranded. For cases like the connections to the truck, it’s much more flexible. Solid has less use cases where it’s specifically needed, plus the original looks to be all stranded anyway. Actually, now that I think of it, it may not be all original wiring. Some of it looks like the wires were changed at some point. Maybe not, though. It doesn’t really matter.
2 Likes
Where does it go? Is it not long enough to repair? A lot of Postwar stuff is stranded, especially if it moves, like a diseasemal truck.
I’ve got e-units that have solid wires, some with stranded. Strip the old wire back and see what gauge. I keep spools of 24 here.
Which wire?
1 Like
I have restored a number of locomotive motors over the years. Simple advice I follow.
For the Body Parts: Reference your Photo #1. Remove the Body carefully from the Metal Chassis. It looks like there is a single screw at one end and a tab at the other end that holds the Body to the Chassis. Mild detergent and warm water, gently applied is usually all you need to do to clean the Plastic Body. However, don’t rub; gently dab. Rubbing will likely damage the paint or surface. The idea is use enough soap and water to clean the dirt and grime (from handling the Locomotive) off but not enough to damage the finish, painting or decals. Gentle is better.
For the Motors: I use a Q-tip dipped in rubbing alcohol to clean the accumulated grease found around the motors and on the metal parts. The nice thing with the rubbing alcohol is it will evaporate over time but is a pretty nice de-greaser. However, be very careful around any plastic parts such as the locomotive bodies. The alcohol can damage those parts, especially the decals or painted areas.
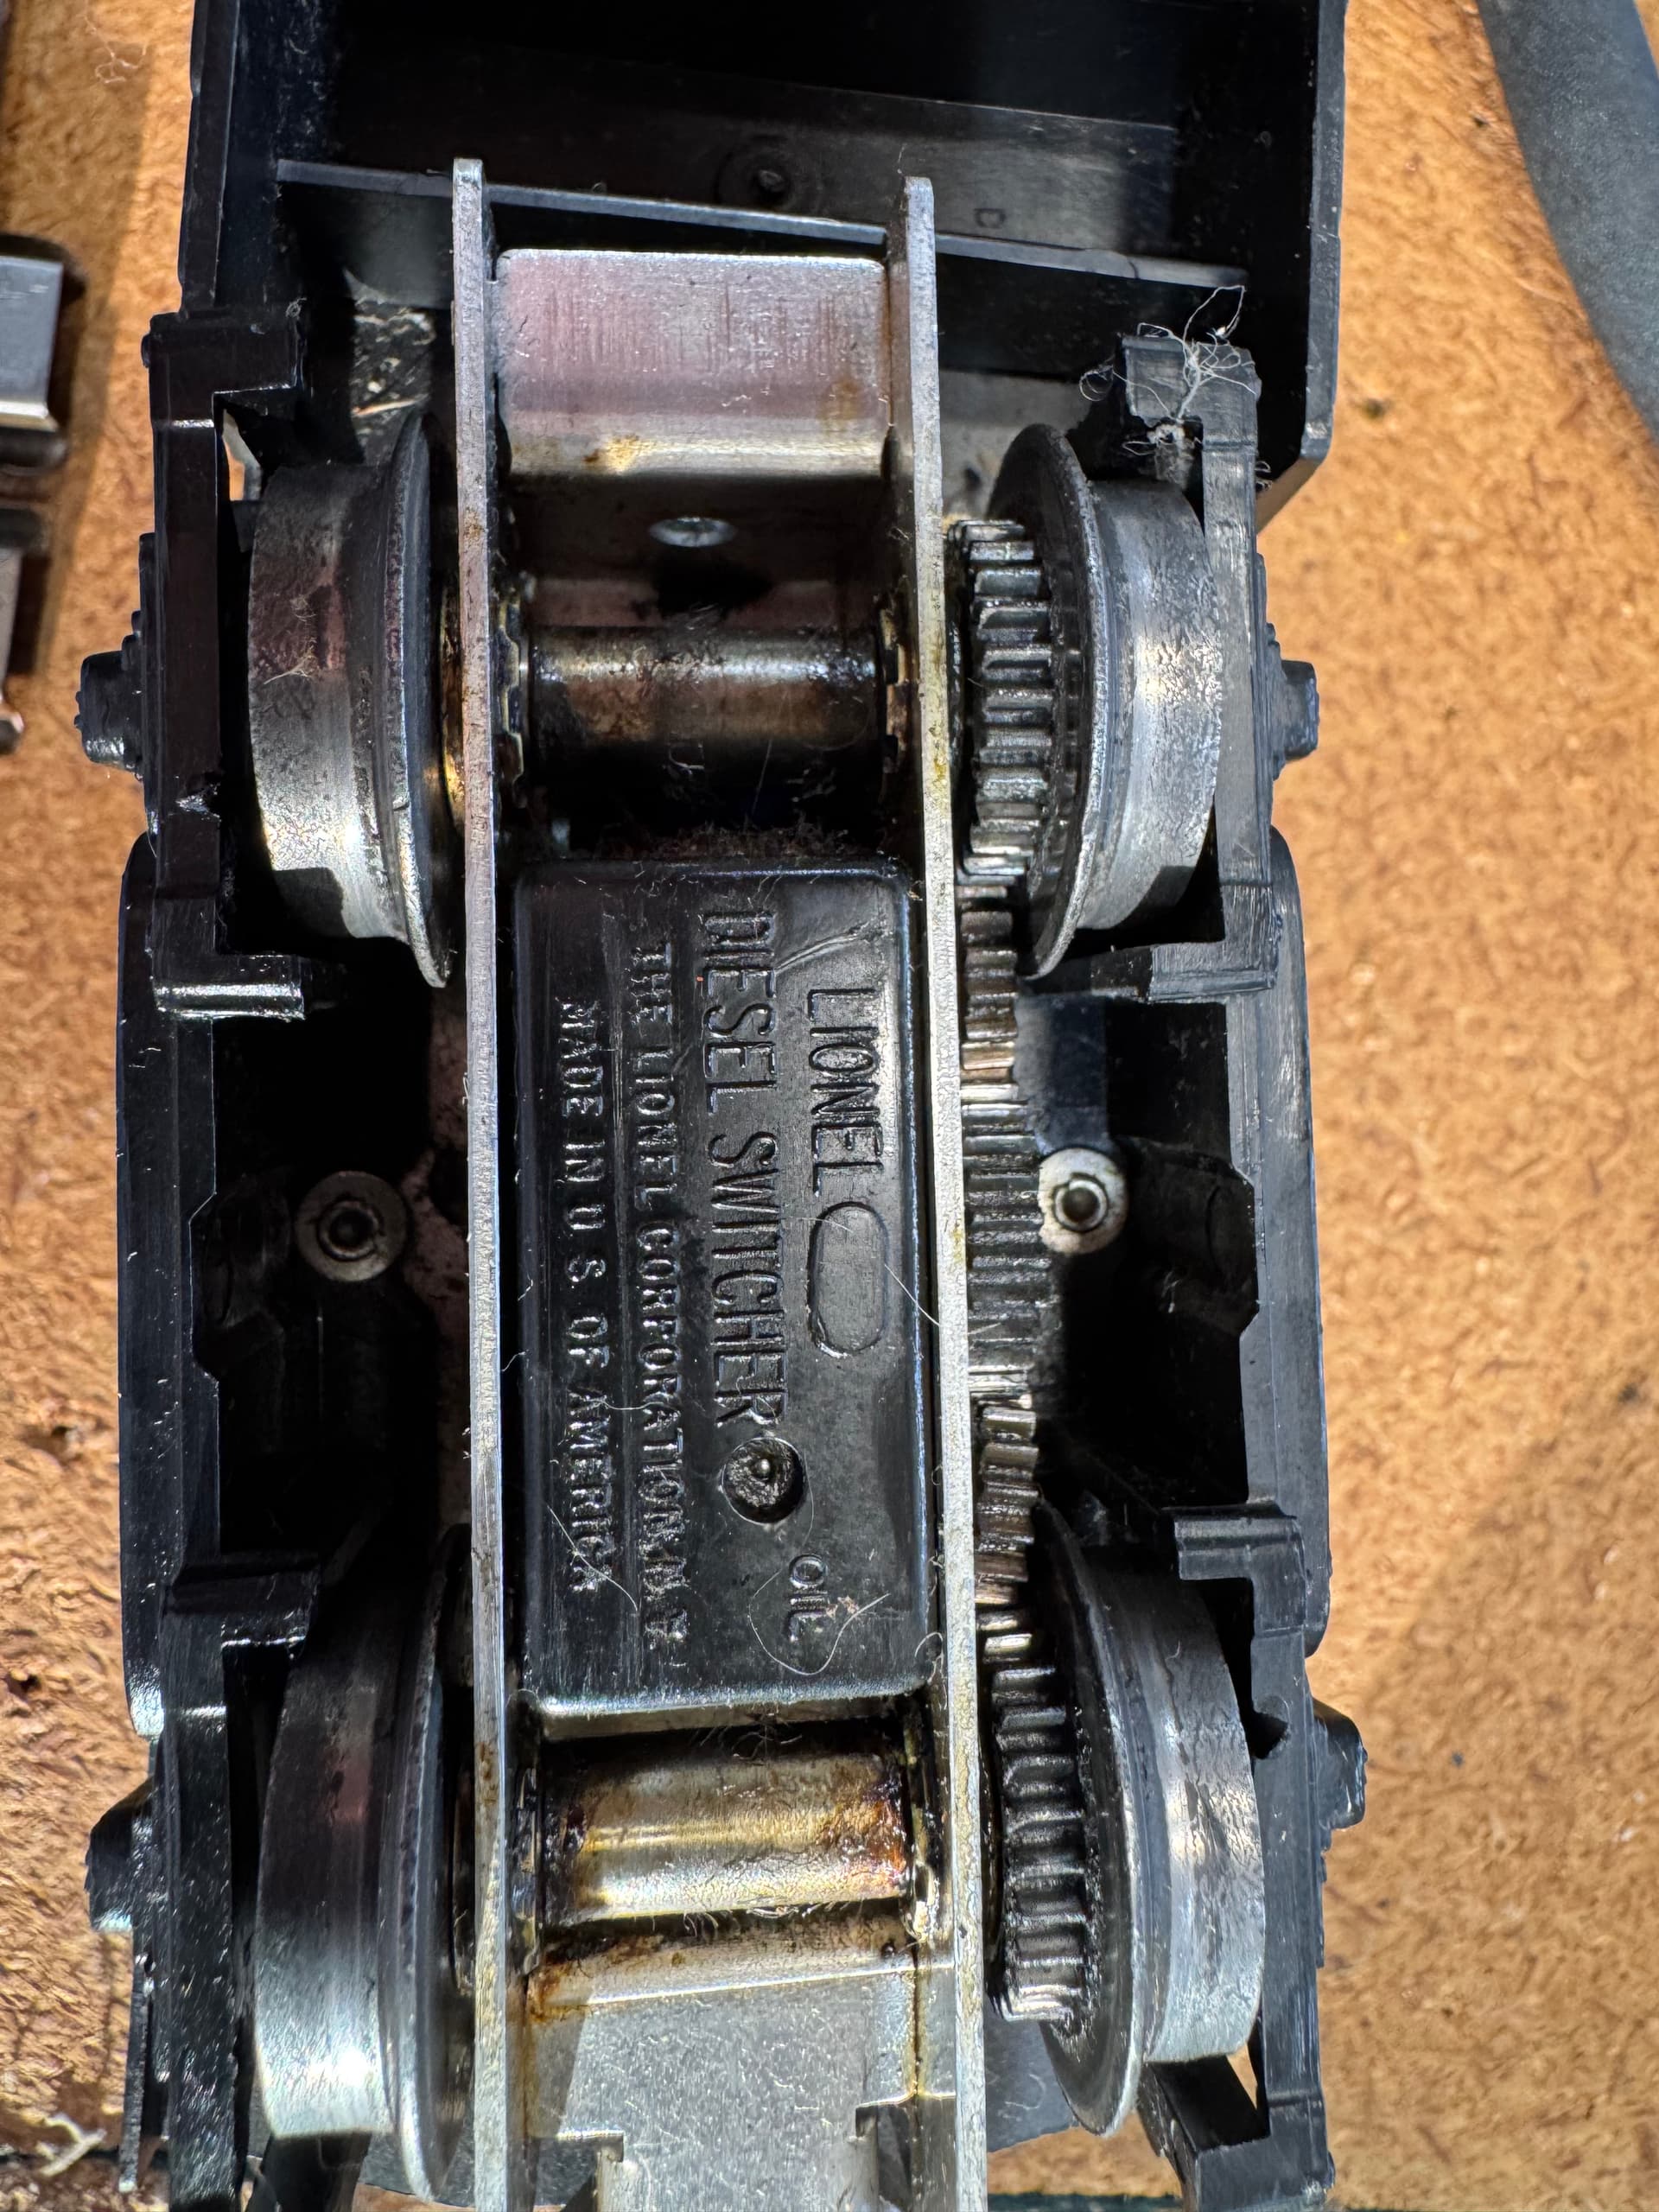
Specific to the Motor Truck Assembly, reference your Photo #2, carefully clean all the axles where they pass thru the chassis. This area is prime for dirt and debris. When they are clean, a drop of light machine oil where the axle passes thru the chassis. The gears are a bit more challenging to clean if you see dried, caked grease. Usually the Q-Tip soaked in Alcohol will soften and remove the dried grease but I have occasionally needed to use and Xacto-Blade to carefully remove chunks of dried grease. Again, patience and care is needed. Once the gears are clean, a small amount of light machine grease is all you need to replace what you have cleaned and removed. Again, sparingly amount is needed. The idea is to grease to make the gears inter-mesh easily.
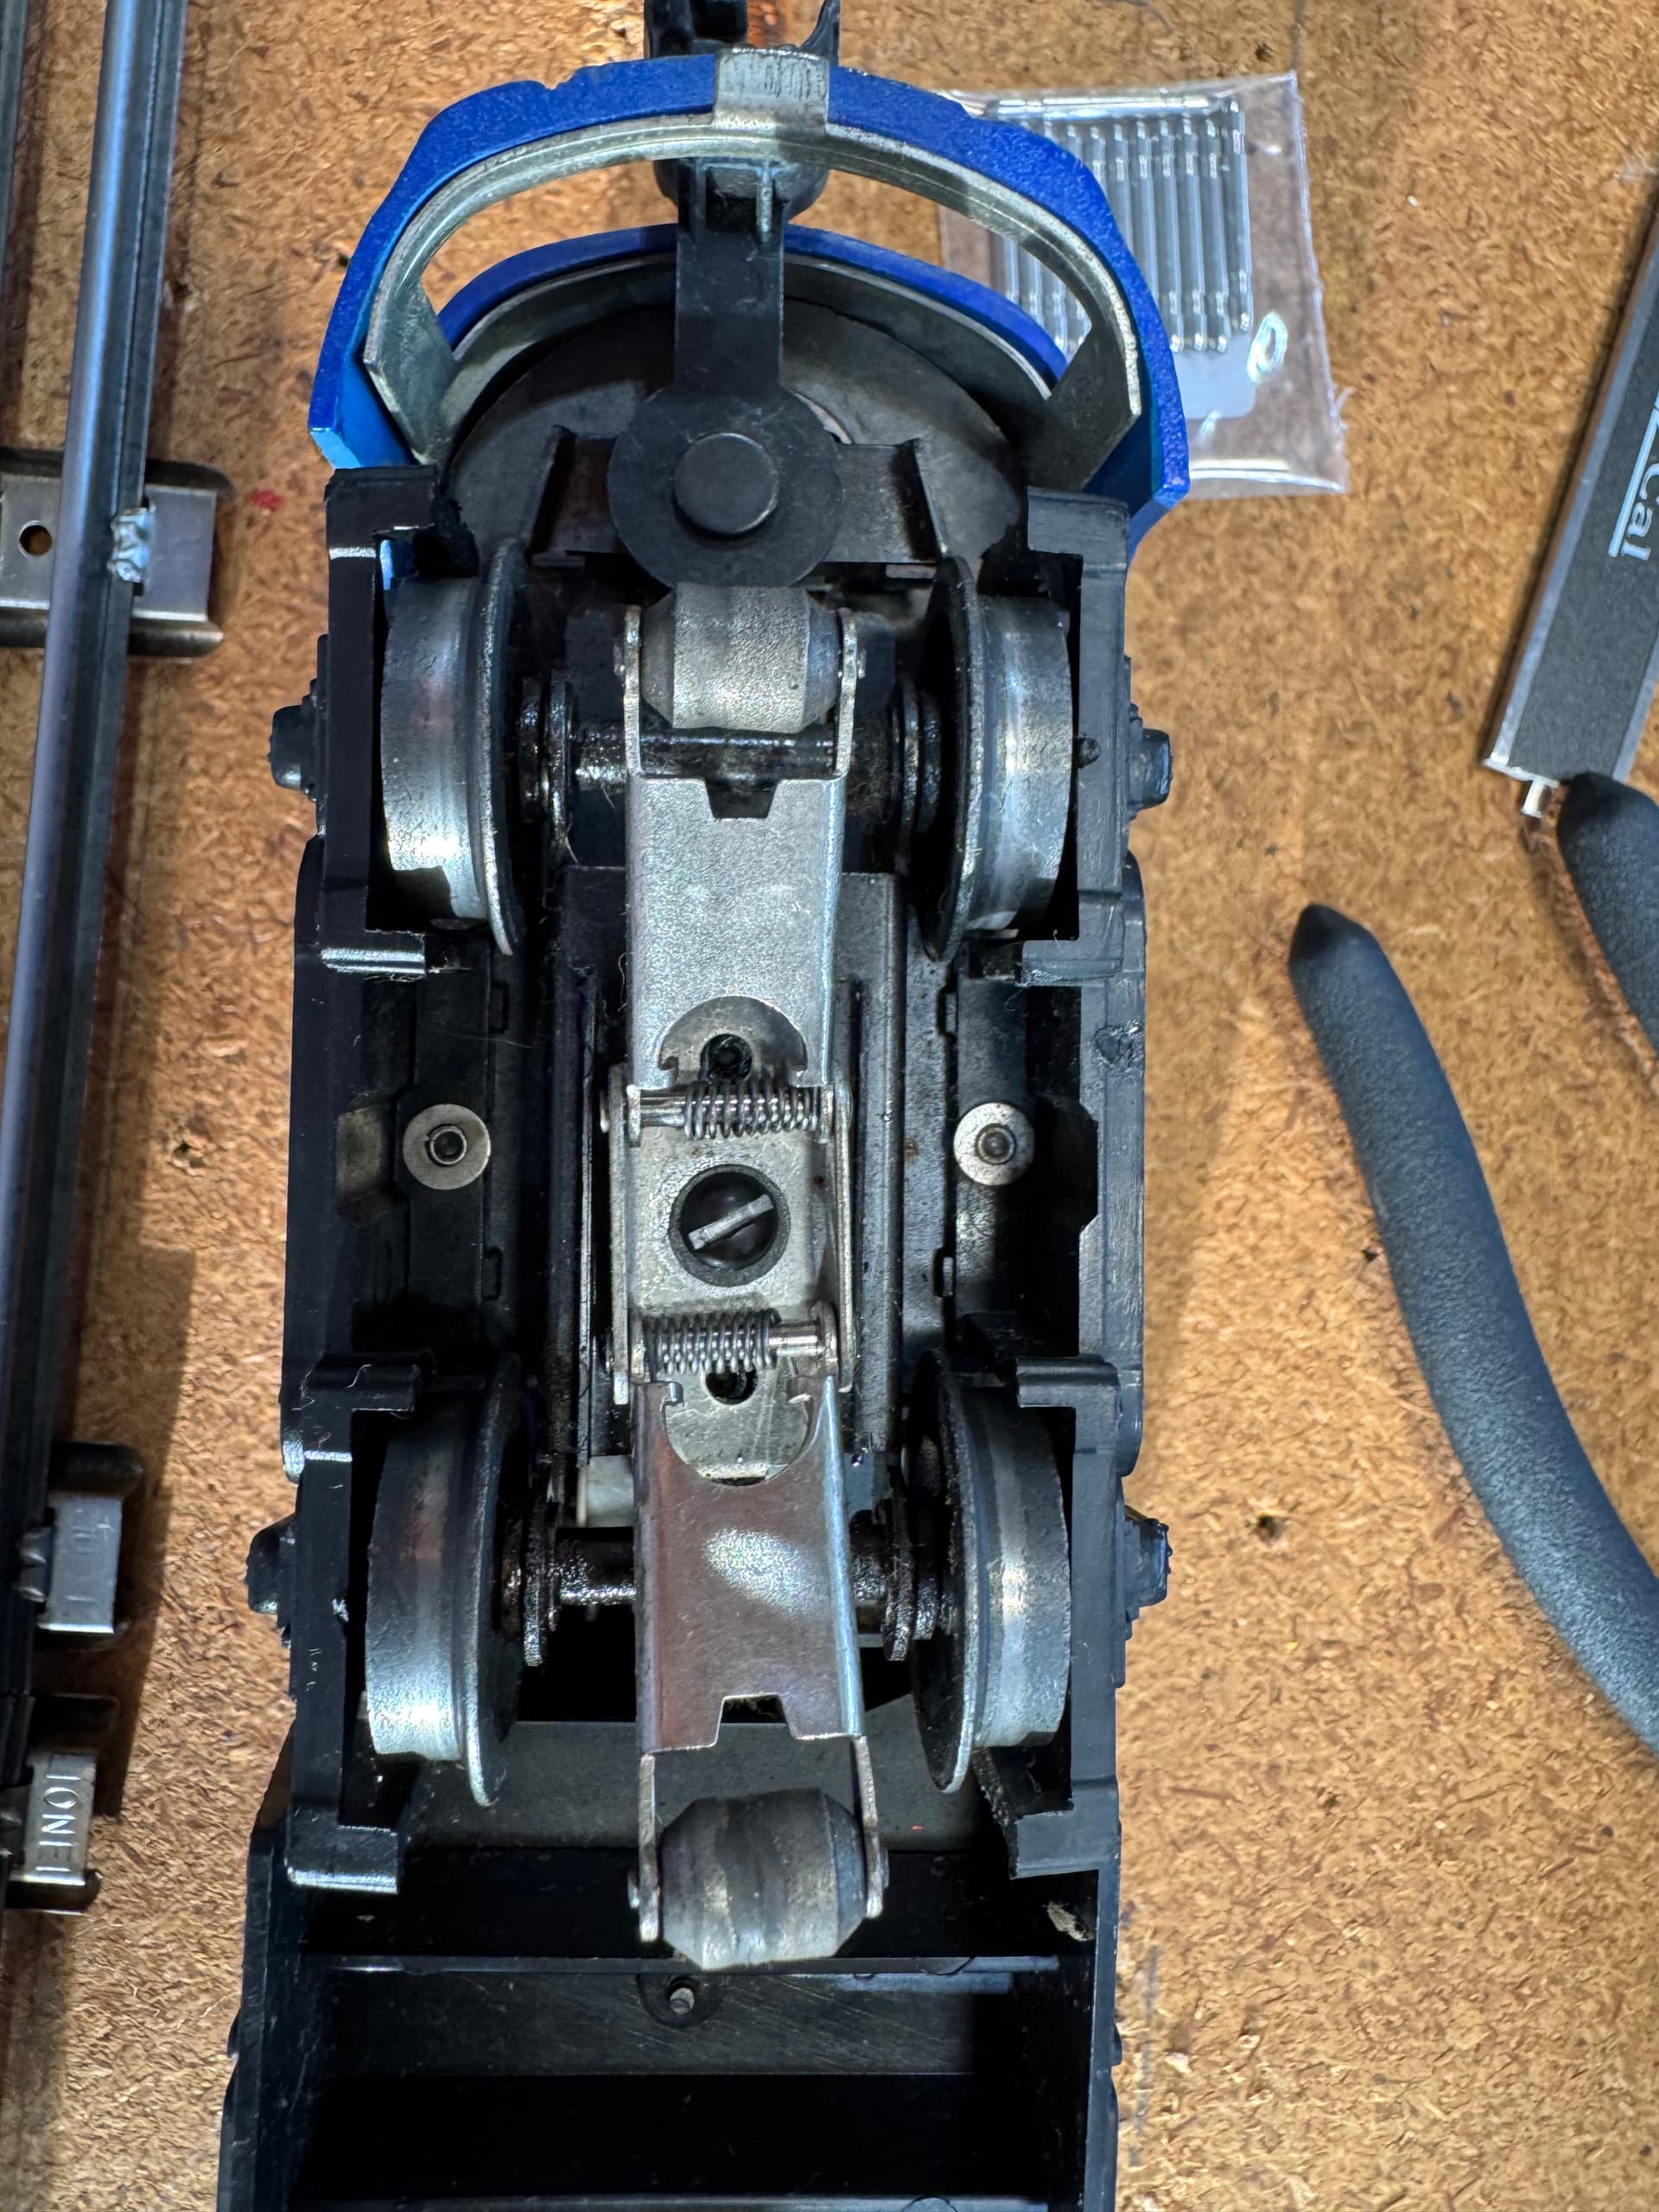
Specific to the Truck Assembly with the Electrical Pick-ups, reference your 3rd Photo, gently clean the area around the wheel axles and where the axles pass thru the wheel chassis. This area usually will pick up dust and fibers with the Q-Tip soaked in the Alcohol. Once this area is clean of grease, dirt and debris, a drop of light machine oil on each of the points where the axle passes thru the Truck Assembly does the trick. I also wipe the wheels themselves with a cotton ball or Q-Tip soaked in Alcohol to clean the wheels surfaces where the ride on the rails. It amazes me how much dirt and grease can adhere to the Wheel surfaces, and this has a direct effect on how well the Locomotive will run on the track. Spin the wheels and you are good to go. Specific to the Electrical Pickups, same approach as above but you can also use a paper towel or cotton ball soaked in Rubbing Alcohol to clean the Pickup Rollers. Again, minimal amount of alcohol is all you need, the idea is just remove the grime and grease the rollers have picked up. And then a tiny drop of oil on the ends of the rollers where the touch the pickup arms. You want the pickup rollers to spin freely but you don’t want the oil on the rollers; just where the roller is touching the pickup arms at the shaft connection.
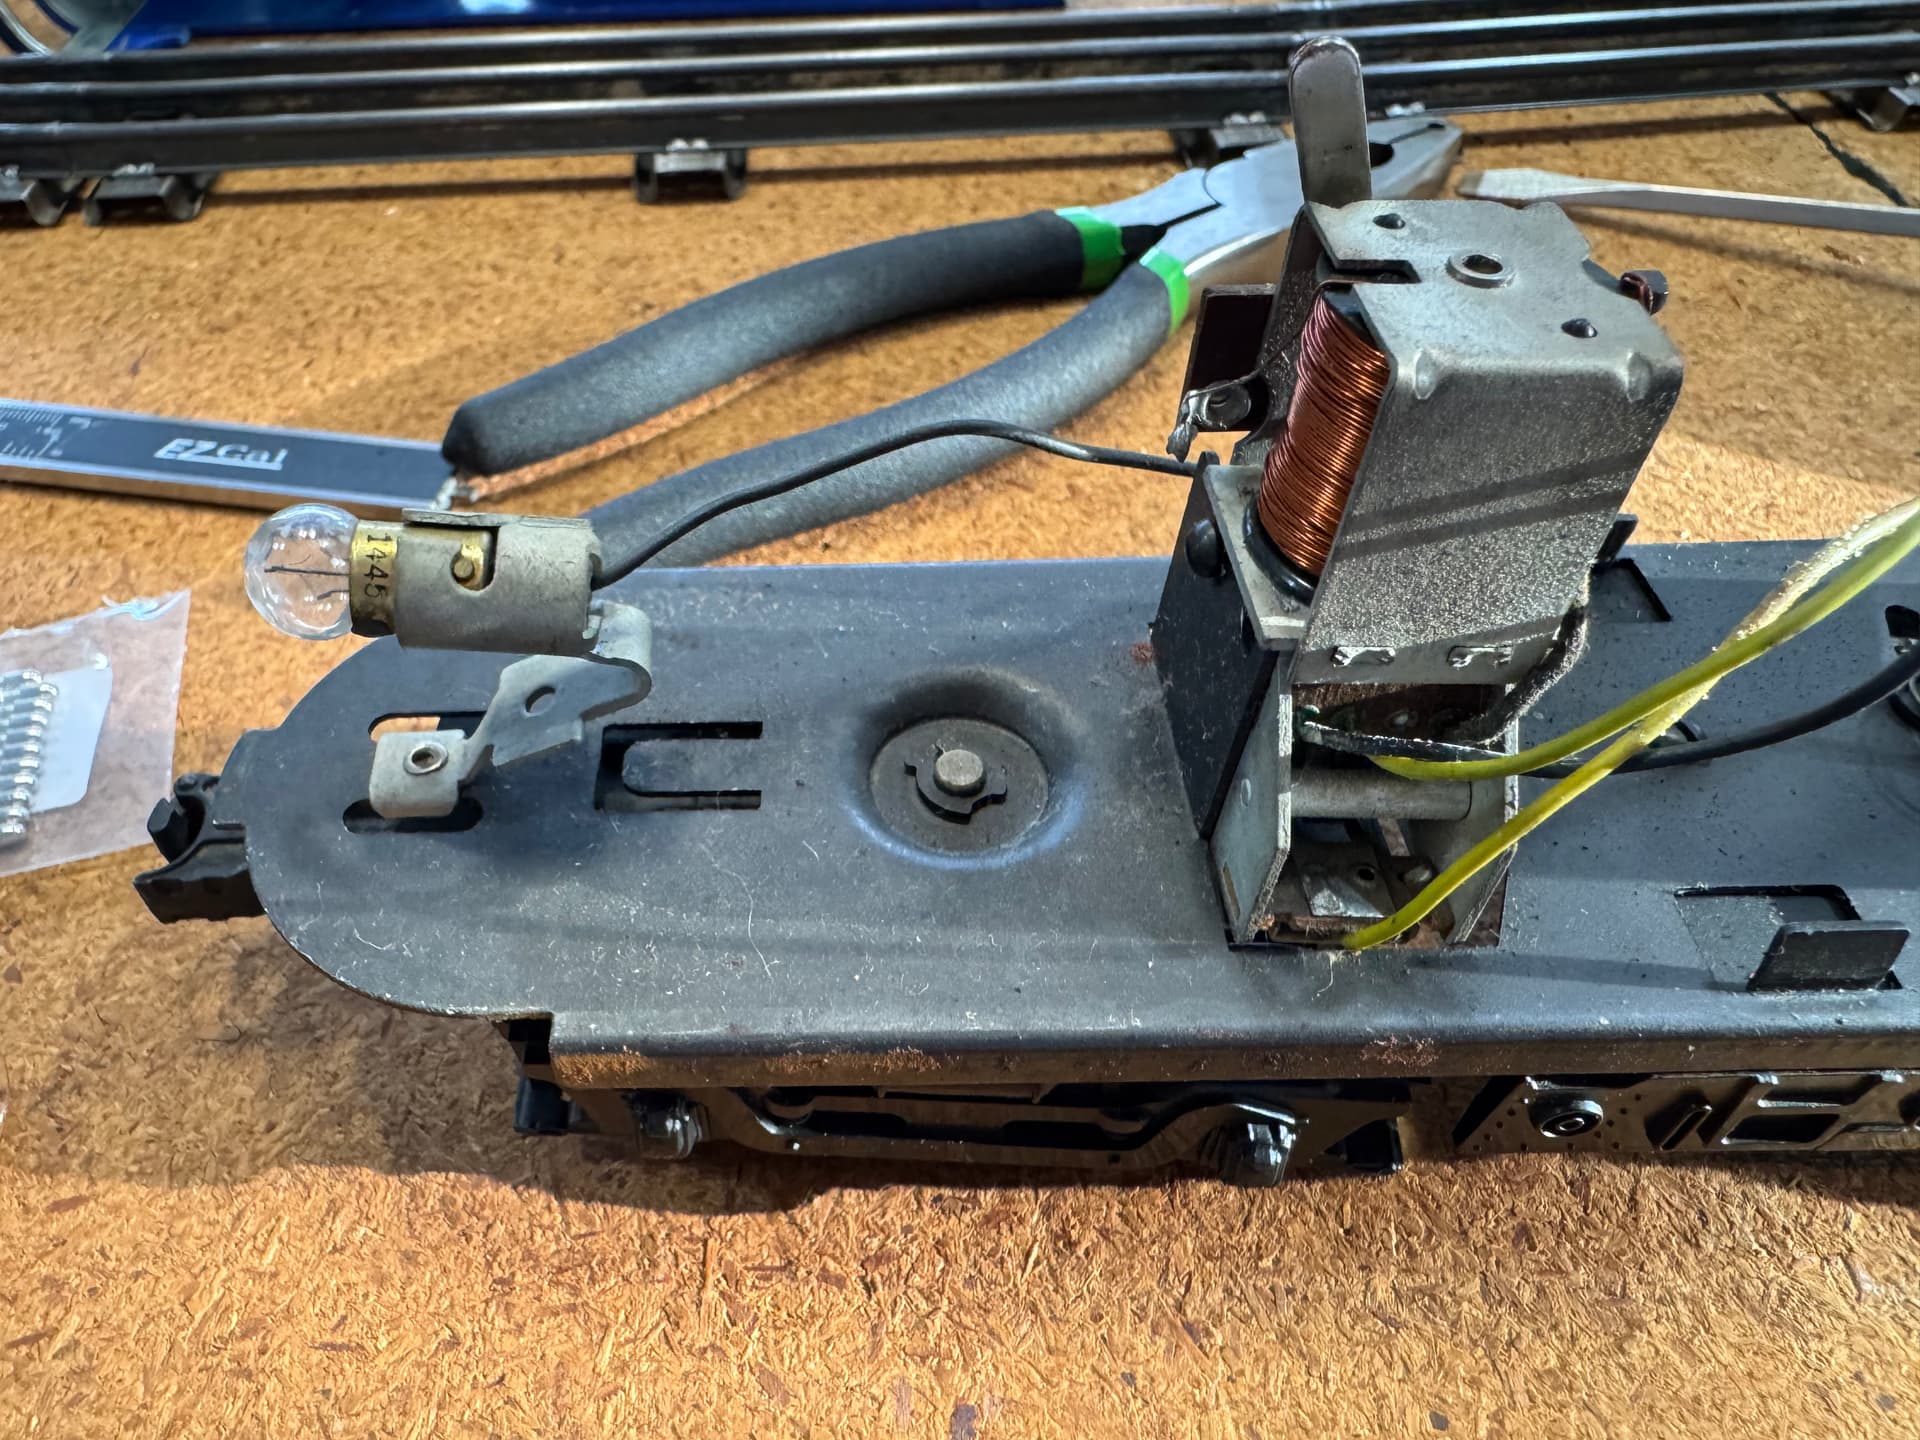
Your Photo #4 is the reversing unit or E-Unit. Usually this operates, however it may chatter if it gets dirty. This is the one area I will use Contact Cleaner if needed. It is a simple electrical magnetic coil that opens and closes.
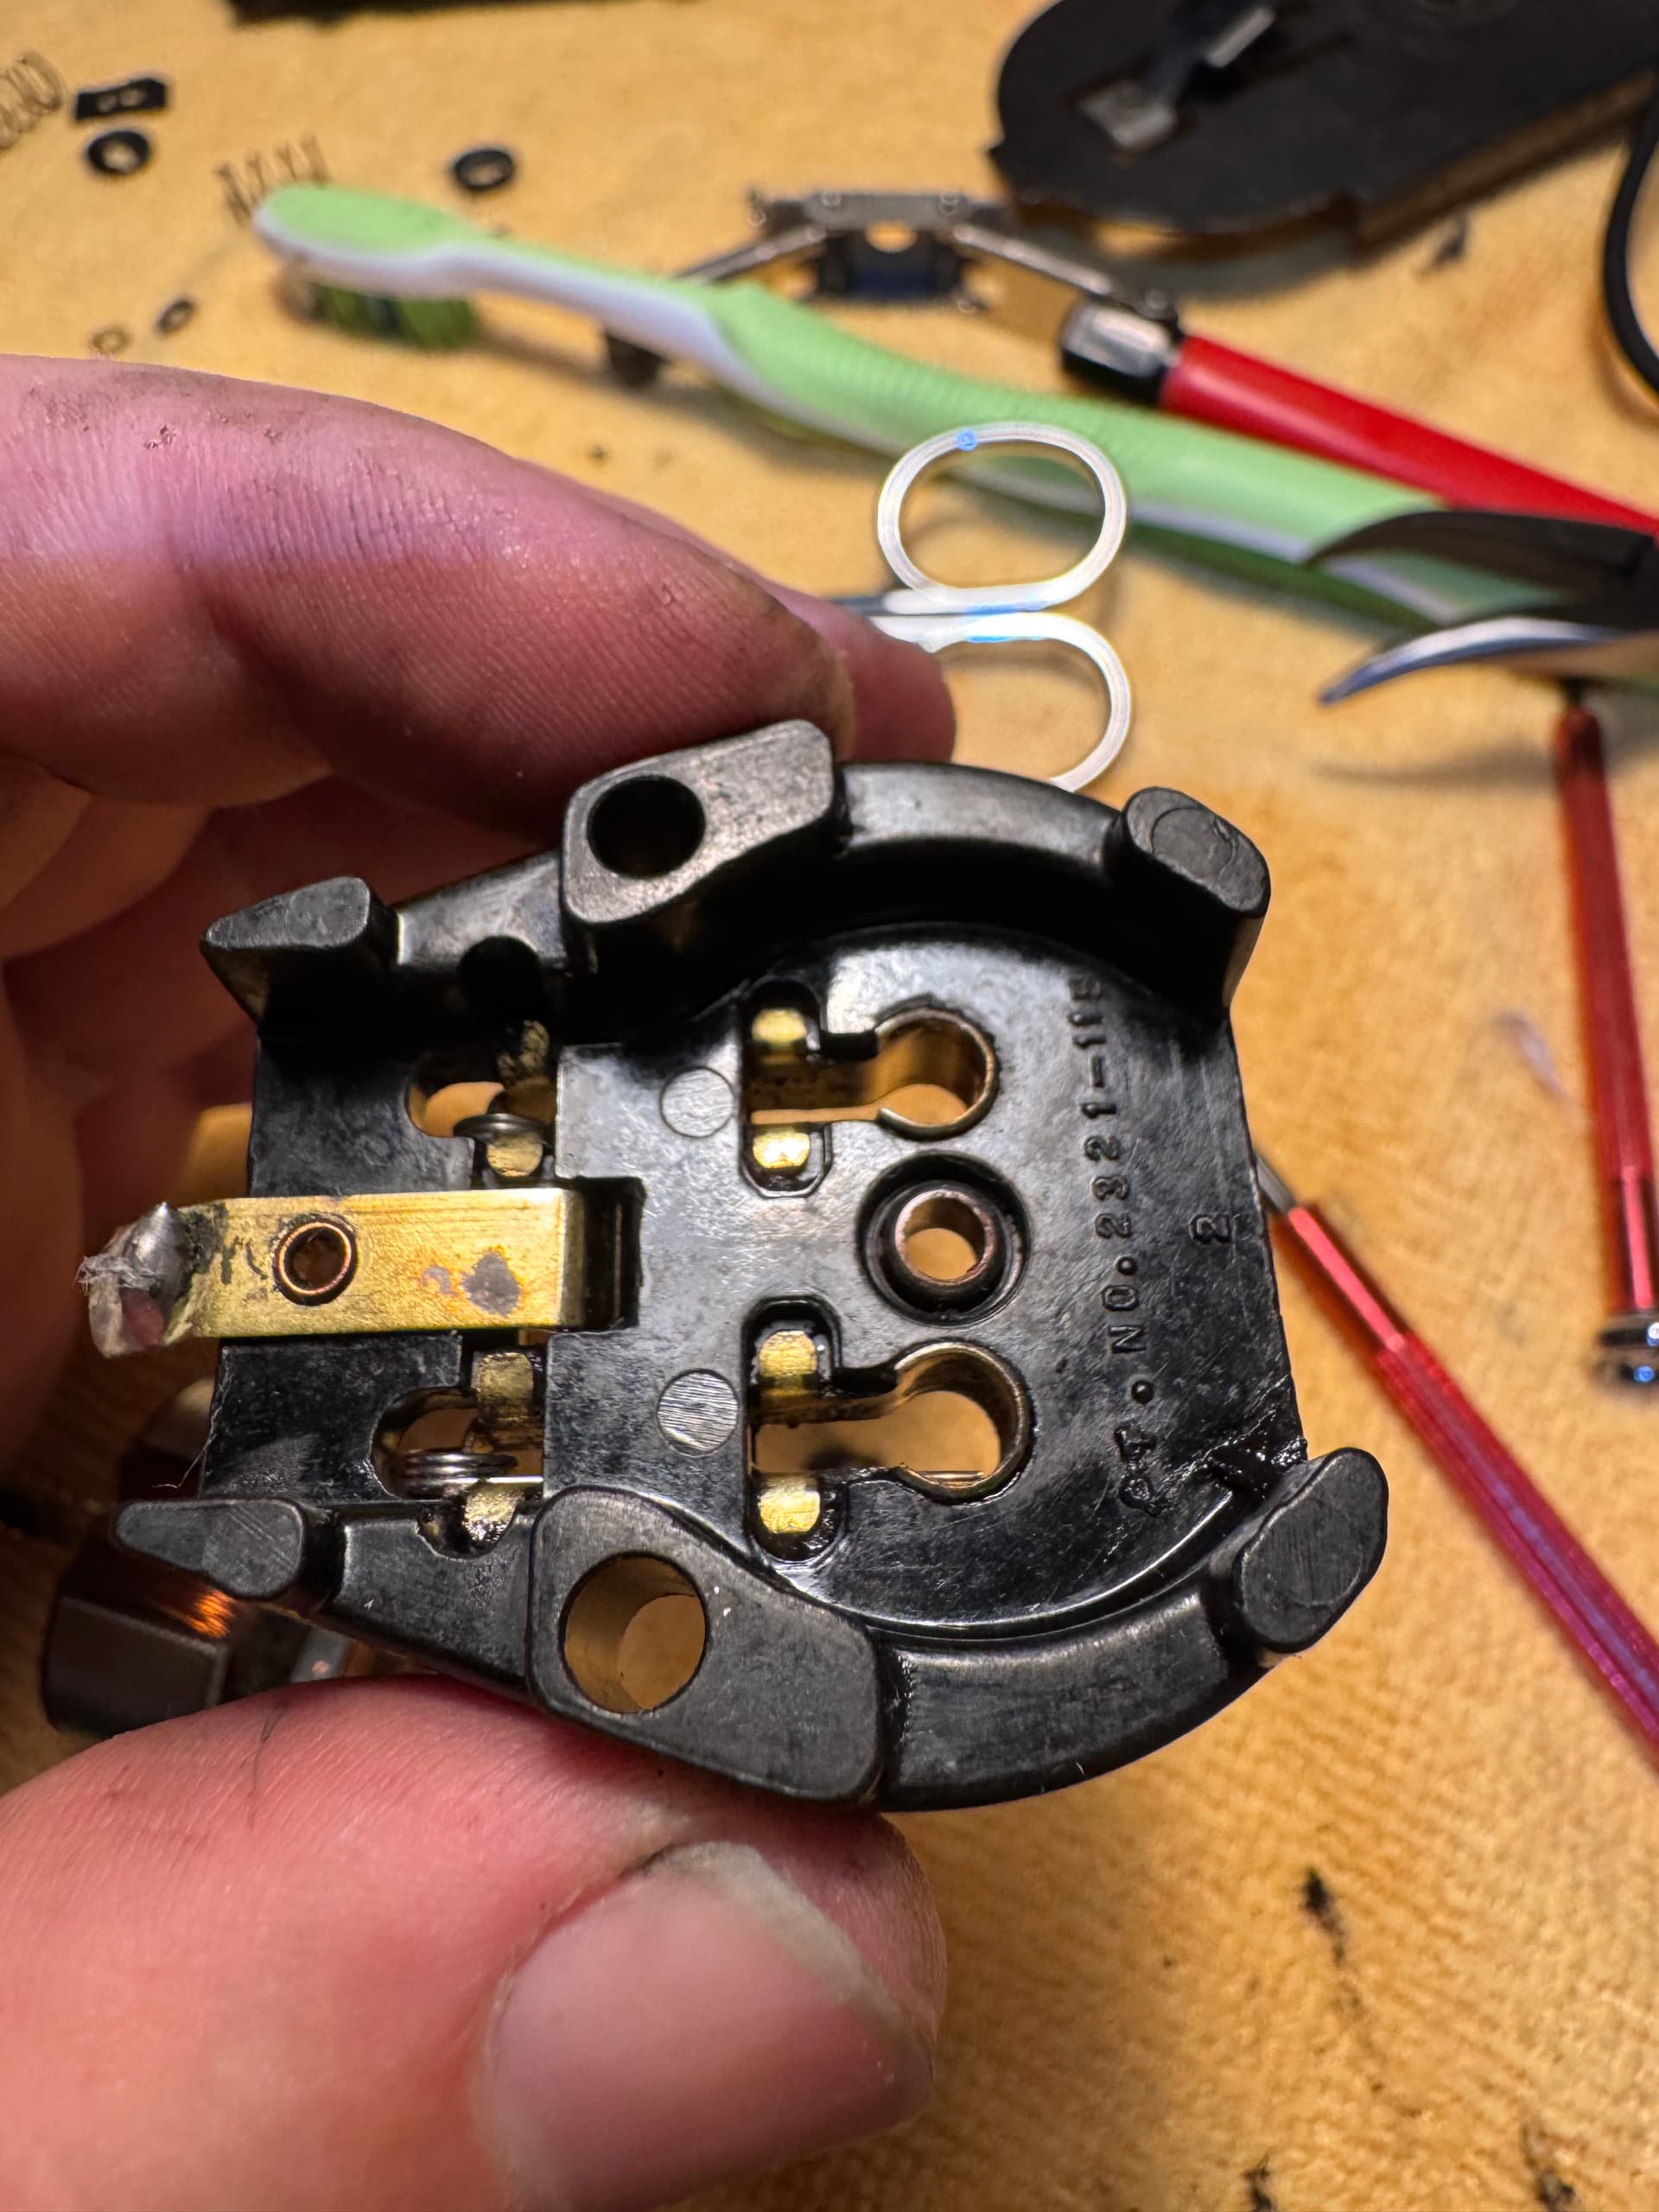
Your Photo #5 is the Top of the Motor. Understand, this is a simple system to work with. It is what is enjoying to me too. A simple system, not much to go wrong, works well when cared for; you don’t need to be an electronic genius to figure this out.
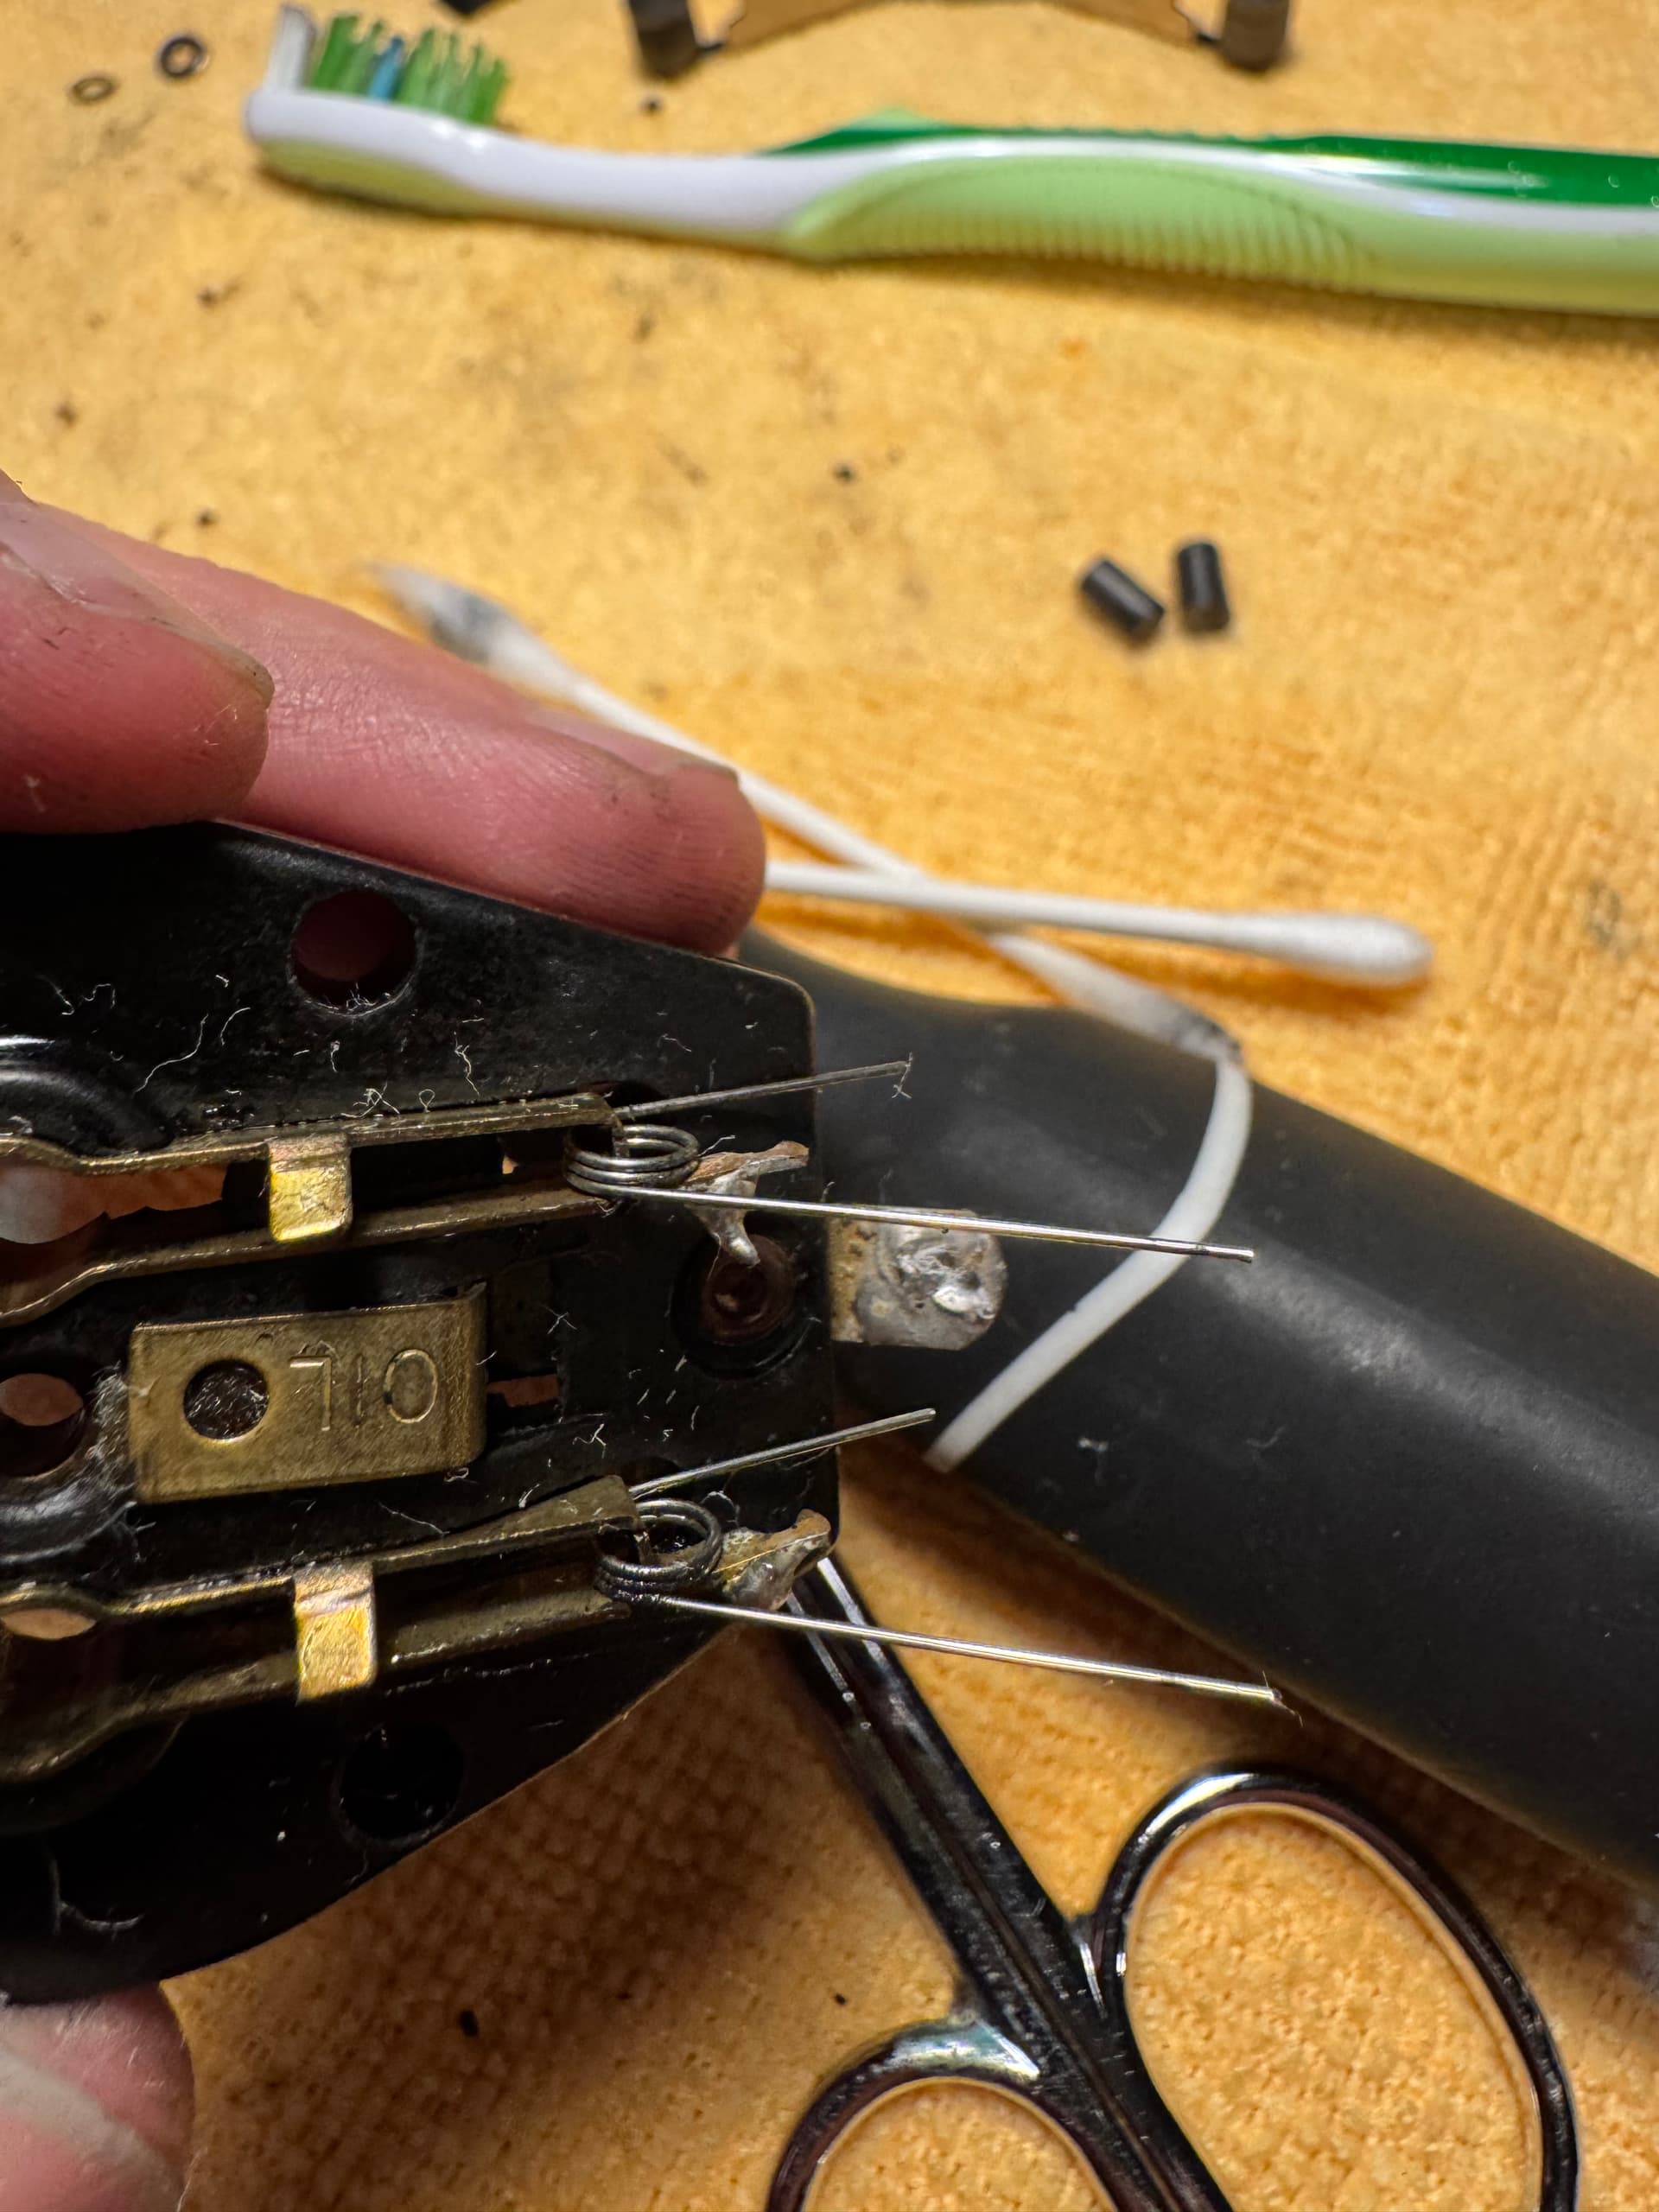
Note the top of the Motor Housing and understand what is going on. The the little hole in the Center Brass Rectangle piece is a wick for the adjacent silver armature shaft. One drop of light machine oil is all you need here. Either side of the Center Armature Shaft under the two little springs are the Armature Brushes. These are what carry the electricity to the armature. Carefully remove the 2 screws located on the top of the motor housing and slowly lift the plastic piece off the top of the armature. Set the two screws aside. Usually, the two brushes will stay in their little Brass Brush tubes as you lift the Top. However, they may drop out and land on the top of the armature. Make sure you locate them both, set them aside for now. Set the Motor Top aside, careful not to break the wires. Then, carefully pull the armature out of the bottom motor bearing, it should lift out pretty easily. Set it aside. Now, look down into the space where the armature was, and carefully clean out any grease or dirt that may have become entrained in this area. The Armature sits inside the magnets that drive the armature. Make sure you clean the area around the lower armature bearing too. Again, Q-Tip, Alcohol.
Specific to the Armature: Use a soft eraser to clean the three armature plates. You will see three plates on the top of the Armature that the Carbon Brushes contact when everything is assembled. You may need to use some alcohol here as well, but usually the soft eraser works fine. Also, make sure the little groove between the plates is clean too. A wooden toothpick works fine for cleaning the groove of accumulated dirt or grease. Set the clean Armature aside.
Specific to the two Carbon Brushes, if they have stayed in the little Brush Tubes located in the Motor Top Cover, I use a wooden tooth pick to carefully push them out. Use a Q-Tip soaked in Alcohol to clean the Brass Brush Tubes. You may need a couple too, these tubes can get pretty dirty. To clean the bottom face of the Carbon Brush (not the one with the groove in it, that is the top face); carefully rub the bottom of the Carbon Brush on a clean piece of printer paper. What you will see is a dark line that looks like a pencil line that will turn grayer as it is cleaned. Then set the two brushes aside.
Once you have every thing cleaned, and you have inspected all the parts, it is time to reassemble the motor. Carefully place the Armature back into the Motor Housing making sure the Armature Plates are on the top, facing up. Then Place the Plastic Motor Housing Top back on the top of the Motor Assembly, replacing the two machine screws and tighten.
Once you have this done, carefully lift the two Springs that hold the Carbon Brushes in place and place them so they hook on to the top of the Cover Plate aside of the little Brass Tube. Then carefuly drop the Carbon Brush into the tube making sure the groove on the Brush is facing up. Once the Brush in back in its tube, carefully let the spring back into the tube so the spring is in the groove of the Carbon Brush and is holding the Carbon Brush against the Armature Plate. Repeat this sequence for the other Carbon Brush.
Before we get to testing everything, make sure you clean the remaining parts of the chassis. Remove any visual dirt or grease you see, the idea is make every thing clean.
To test your rebuilt and clean assembly, I typically use a Lionel 1033 Transformer. Connect a pick up wire to the U post, a pick up wire to the A post. One wire is attached to the chassis as the ground wire, the other wire is attached to the pick up roller arm. Connection wire with alligator clips works outstanding in making these connections from transformer to Locomotive.
After the connections are made, I will the hold the locomotive up in the air with one hand and slowly increase the output of the transformer with the other hand; the motor will energize and start to work if everything was correctly reassembled. If the motor doesn’t work but the light works, check the E-unit to make sure its lever arm is in the correct position.
I hope this helps.
Dougwood1954
4 Likes
Thank you, this is very helpful.
1 Like
Dougwood.
Started with Lionel in 52, been repairing, even professionally, since 58 or 59.
Nowhere did OP ask about cosmetics.
We can wax long on our dissertation, which may be totally correct, but for someone who has never done this, far too confusing.
We tried to get him running. Ignore e-unit until we test. I don’t know where you found rubbing alcohol was a good idea. An ingredient, often not listed, is glycerine. Non-conductive. I use Naptha, also called Lighter Fluid, evaporates cleanly.
If it doesn’t work after cleaning and lubing, and replacing a wire, we go deeper. Last thing you want to do in a situation like this is everything at once.
If it doesn’t work, and you’ve got a dozen things you did, where does your logical step-by-step troubleshooting start?
DeOxit5 works great for e-units, if we need to go there, won’t hurt plastics.
But I wasn’t going to confuse the issue.
TOC
2 Likes
I don’t mind getting into the weeds of things, engineer by trade so I love learning about these things and am starting to get a handle on how the e-unit works along with the armature and commutator. I recently ran across Clint Jeffries website which has a wealth of knowledge and is not behind a pay wall, also found a that if you sign up for the internet archive you will have access to a digital copy of the Greenberg Lionel Service Manual. Really appreciate everyone’s feedback. I think my plan is to break everything down, clean as best I can with isopropyl, inspect the brushes, clean up the commutator, replace anything that looks damaged, put it all together, and then use labelle oil and super lube where necessary.
1 Like
Have fun with isopropyl!
1 Like
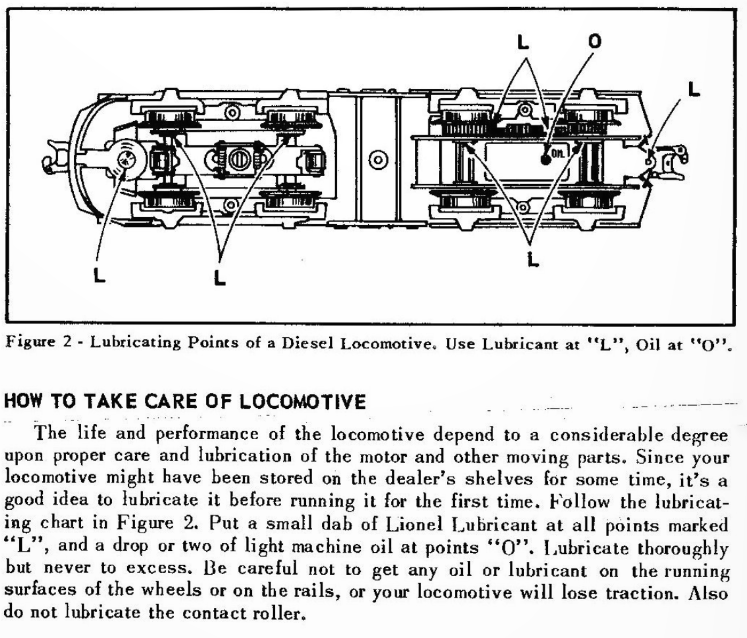
Wanted to share these for anyone else who has a 205, this is from the “Instructions for Operating Lionel Twin Diesel Locomotives with Magne-Traction” from 1957, can be found at Instructions
Lionel Recommendations for Oil and Lubrication:

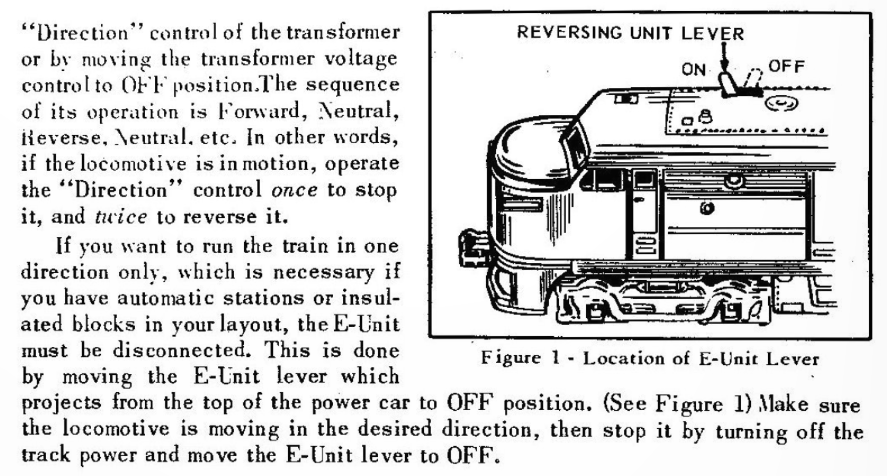
Here is info on the Reversing Selector:
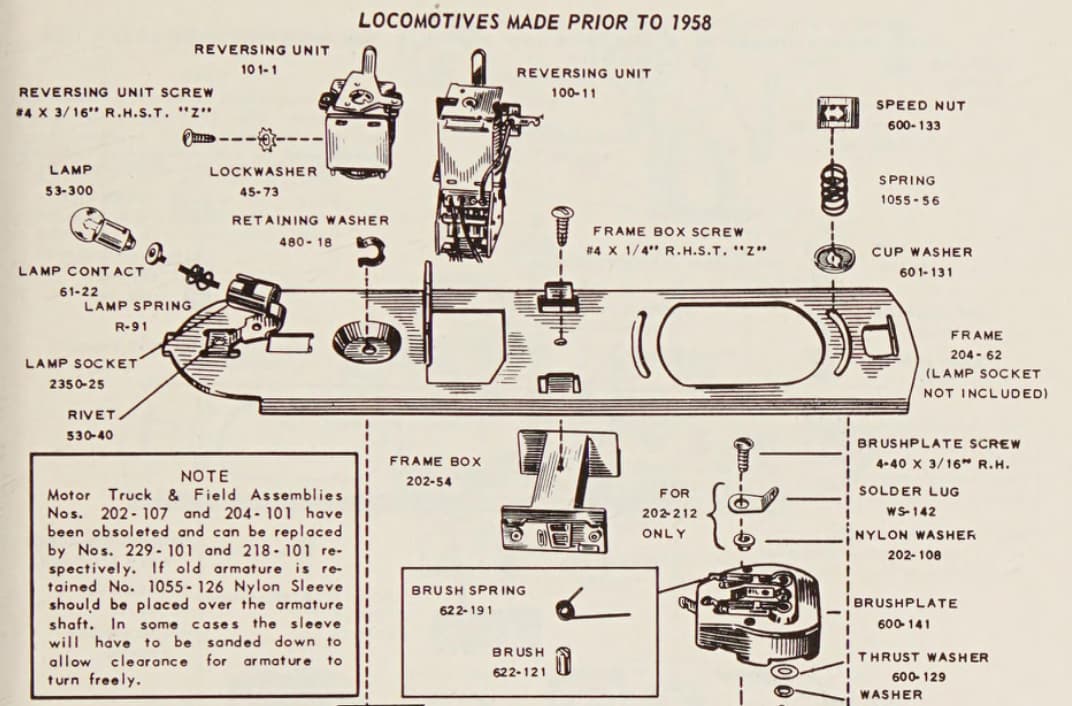
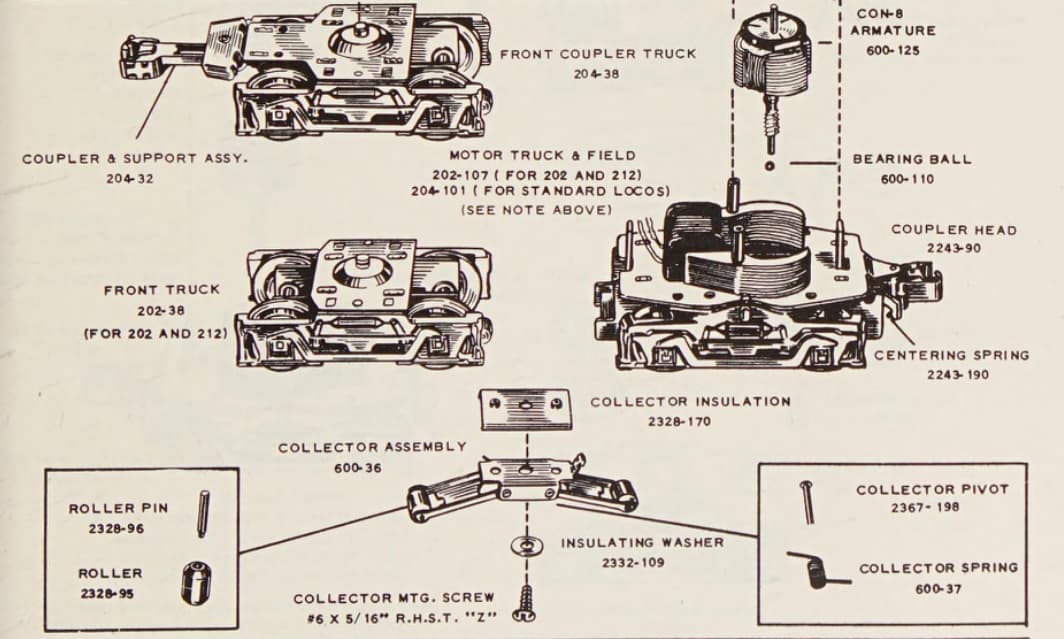
Exploded Parts Diagram:
yeah, I have that. The issue is not lube initially. The big issue is the original grease on worms and worm gear can turn to concrete after 60+ years.
I and others were hoping you’d open it up and post a picture or two so any further advice could be given.
I give up.
2 Likes
I’ll post some more pictures as it gets torn down.
1 Like
Mr. Ford:
I am glad you were able to locate the Operating Sheet for your #205. Your task is now much easier for maintaining the Locomotive. Your exploded parts diagram will help immensely as well as you can see how everything fits together before you take anything apart. Again, a great find that will make this task much easier the first time you take the motor apart.
Another hint I have found that has saved me, use an old dish towel to spread your parts on, I have found that parts don’t migrate around as much when they sit on a dish towel verses directly on a hard surface such as a work bench, a desk or a kitchen counter. The last thing you want to do is try and find the one little part that rolled off your work surface and then fell to the floor. You will be amazed at how far that one little part will travel when it hits the floor and finds it’s legs. The other thing I like is a good work / desk lamp that lights up your working area well but doesn’t blind you in the process. A good set of small screw drivers, needle nose pliers, and regular pliers also will be handy.
And lastly, finding / replacing missing, damaged or broken parts has become much easier due to the Internet. Classic Toy Trains just published a fairly comprehensive list of parts suppliers in the current Fall 2025 edition. Knowing who has the missing part makes life much nicer.
I also subscribe to Classic Toy Trains and have found their Question and Answer column helpful over the years. I have pulled out many an article on a specific piece I have that has saved me when something hasn’t worked correctly. These articles live in a 3-Ring Binder on my work bench.
As I said before, I enjoy the challenge of getting a 60+ year old motor and assembly working correctly more than I enjoy letting the locomotive make lots of noise running on my little layout after it was repaired. The technology of the 1930’s, 40’s, 50’s and 1960’s was build them simple but robust.
Enjoy.
Dougwood
1 Like
I’m curious what you guys recommend on the truck disassembly as they appear to be held together by two rivets, do people drill these out and replace with nuts and bolts or re-rivet them. Or maybe I should not disassemble further. Here are some of the shots so far, things are pretty dirty and gummed up.
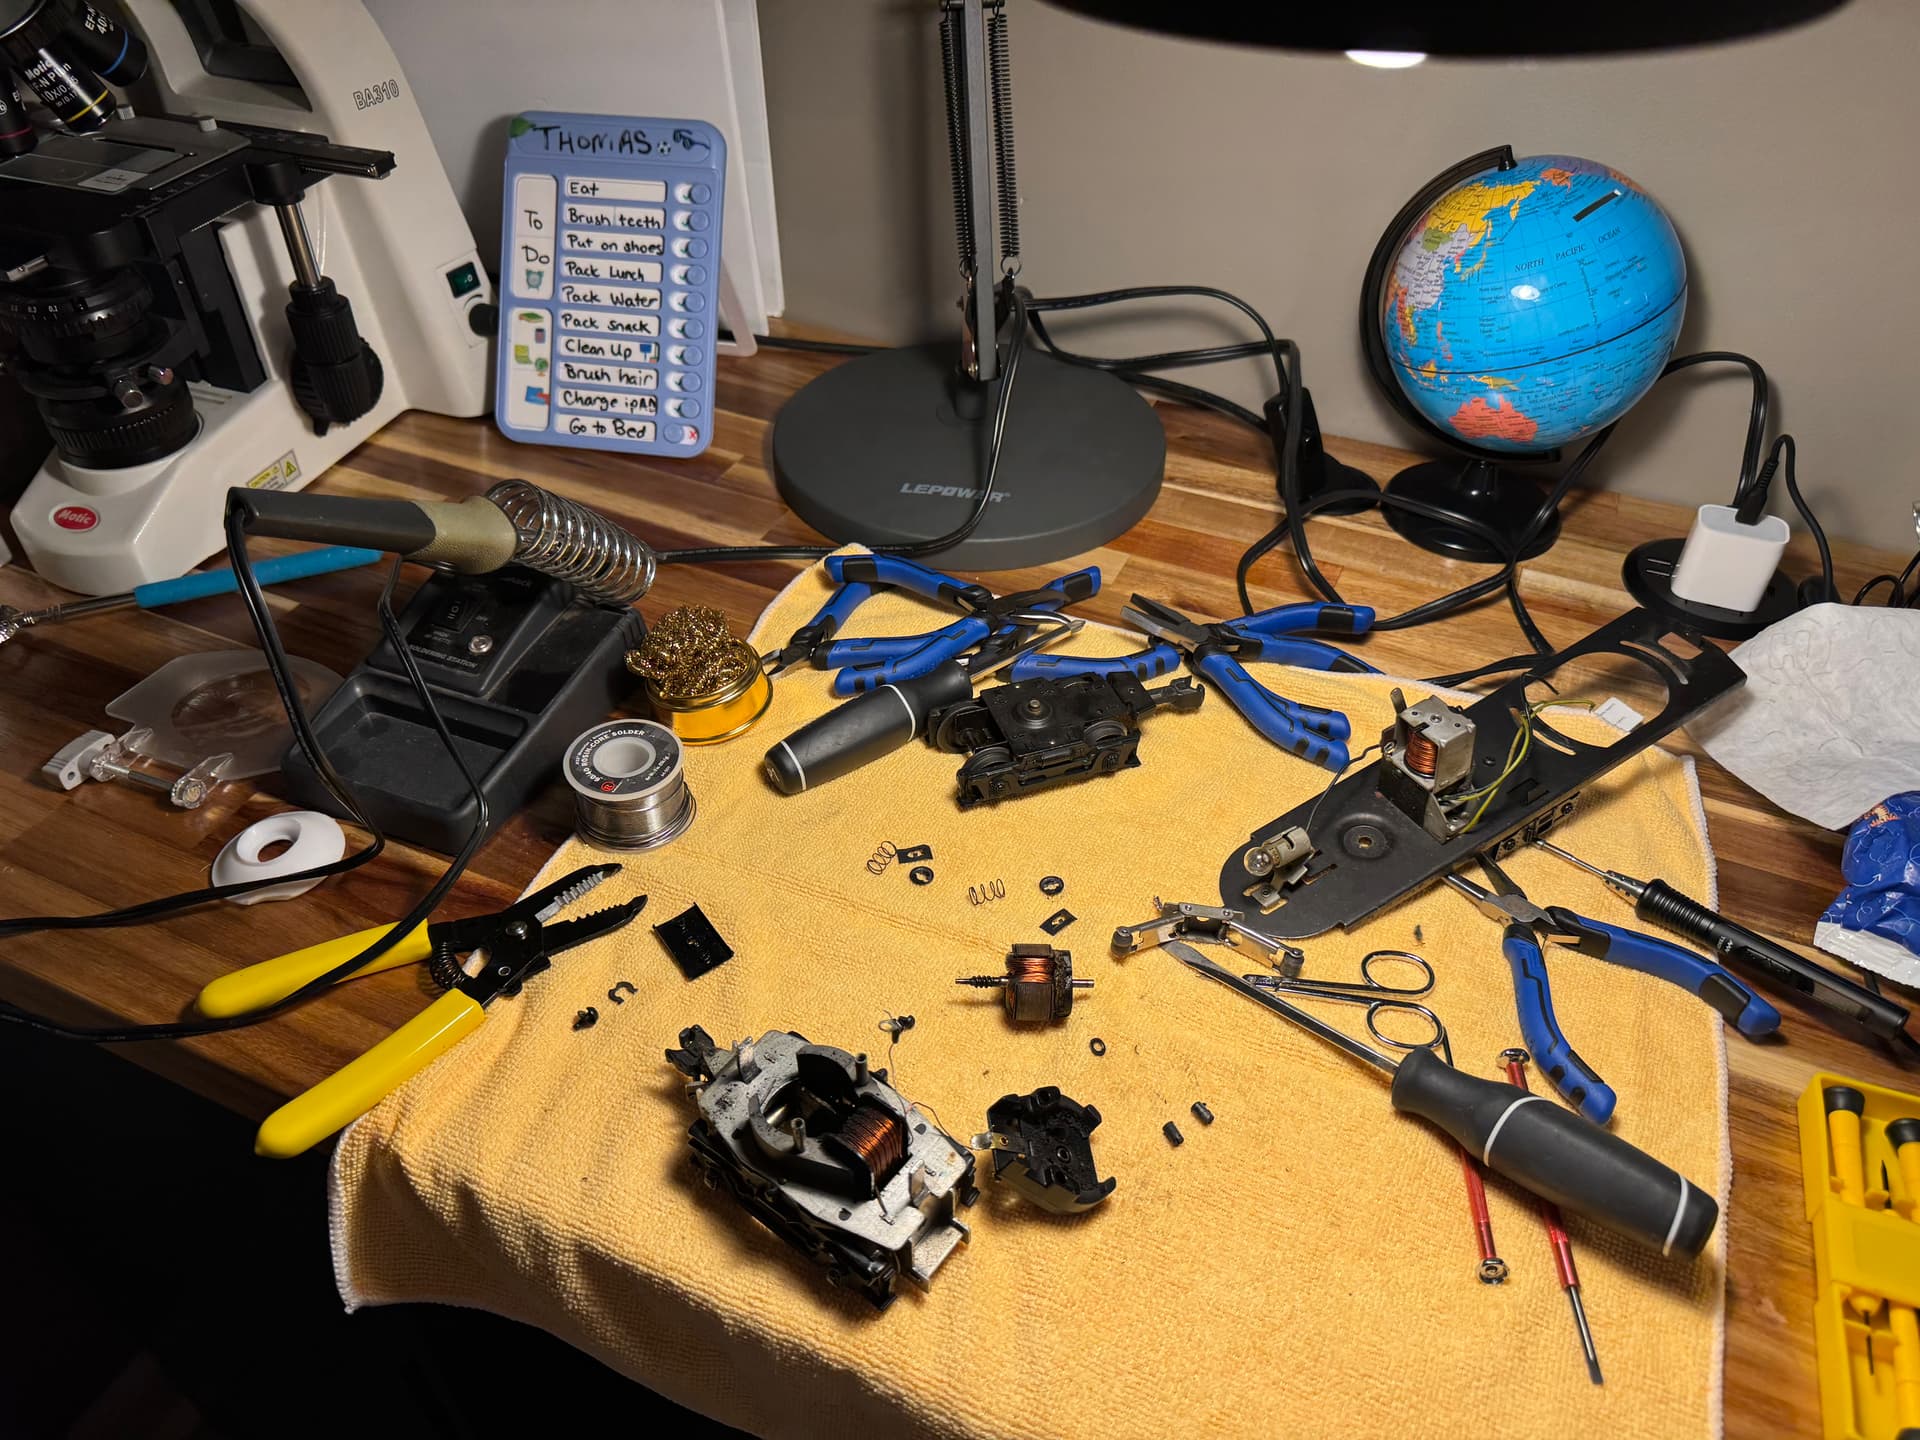
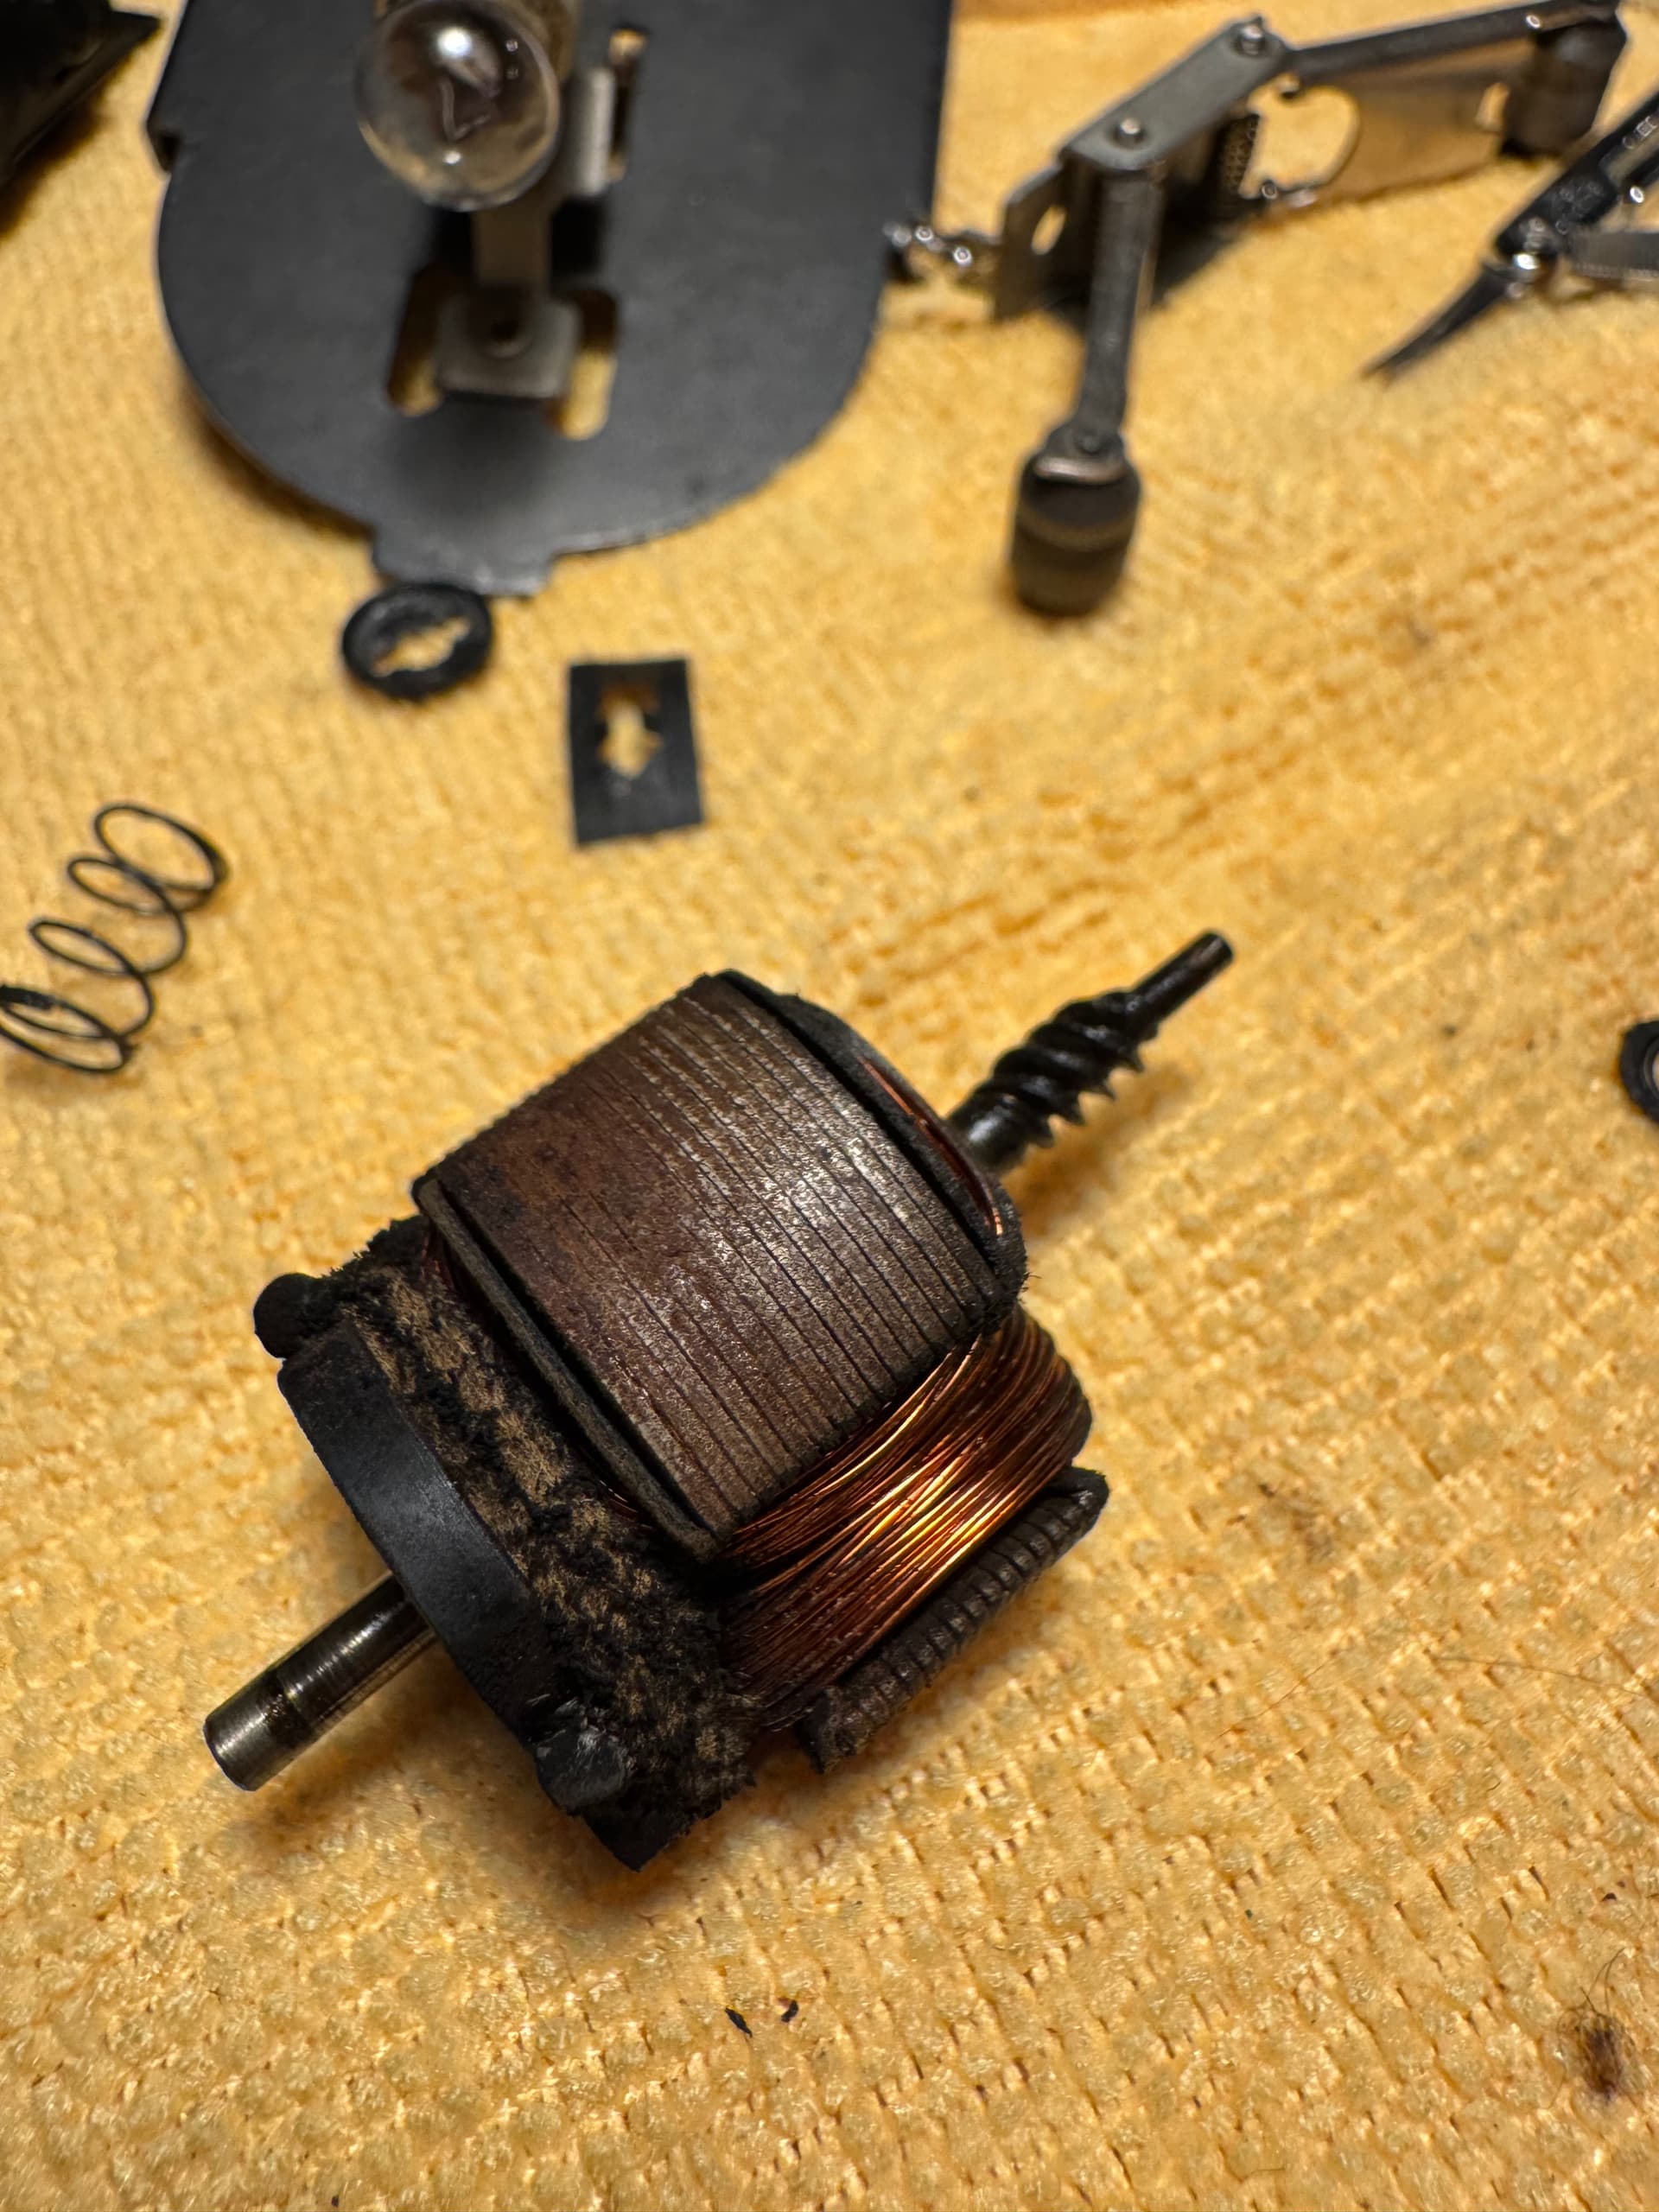

2 Likes
I’d say that, unless it’s been really trashed (and that does not appear to be the case)–you’ve gone far enough.
1 Like
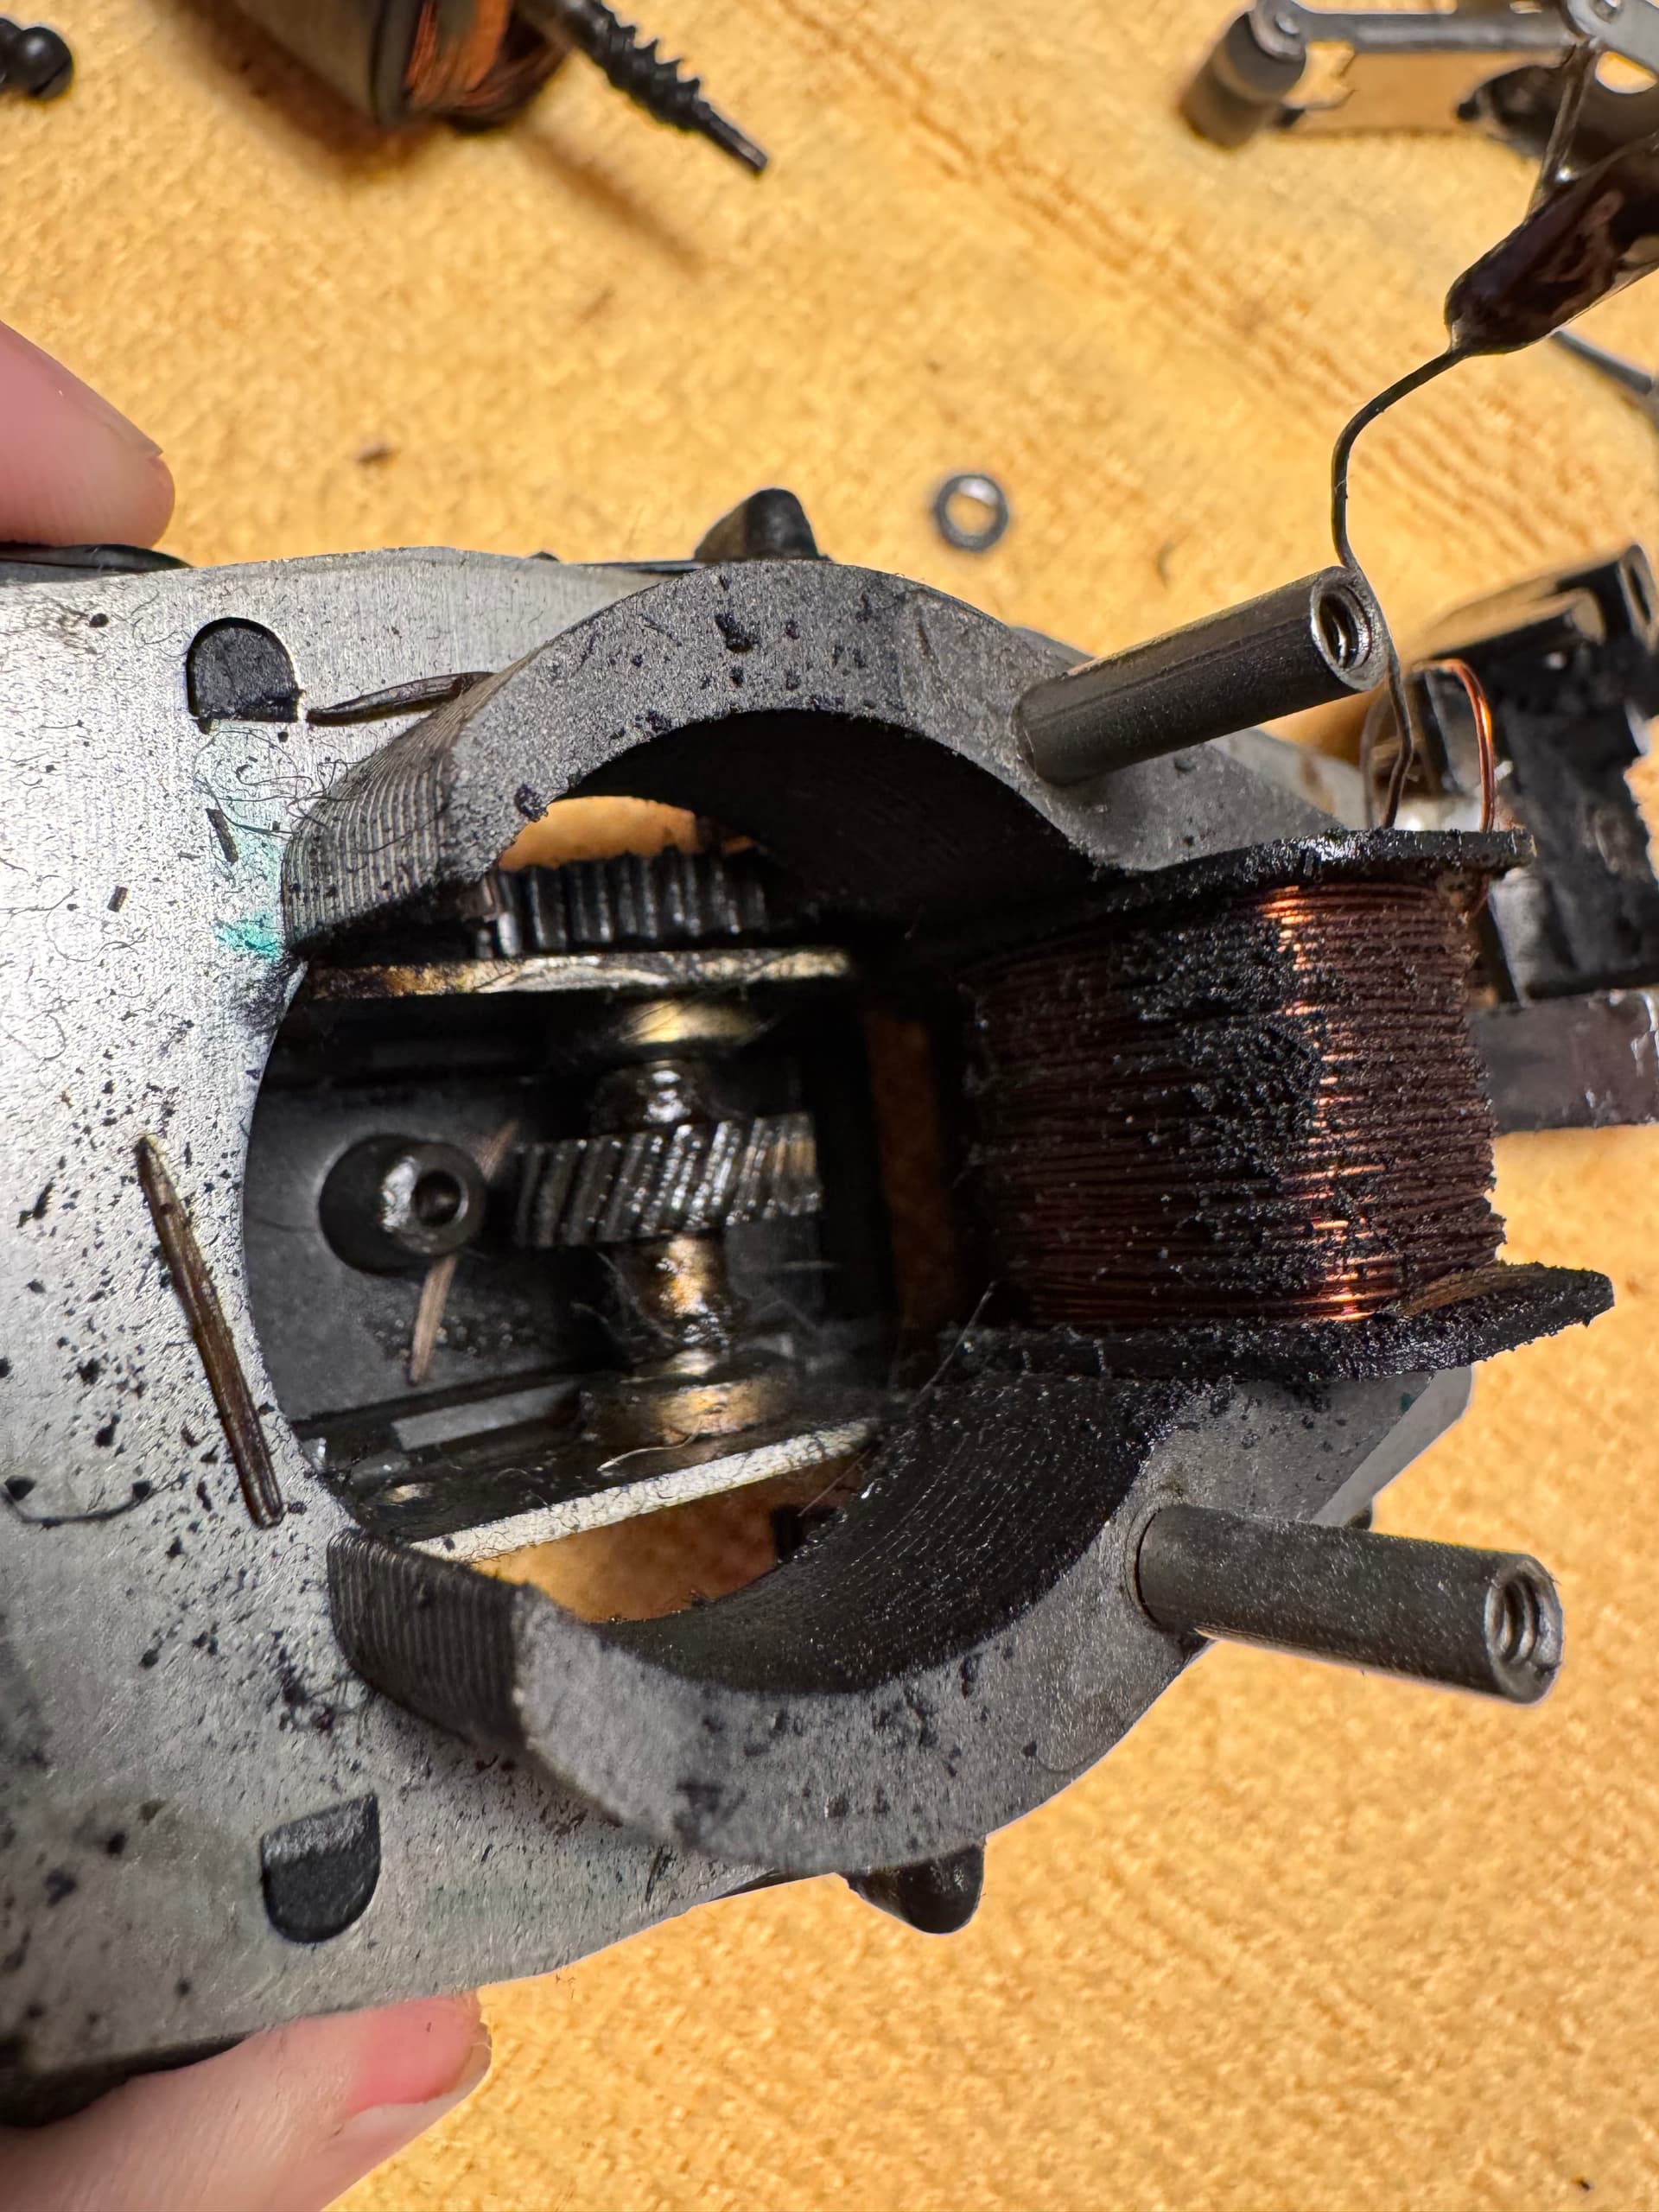
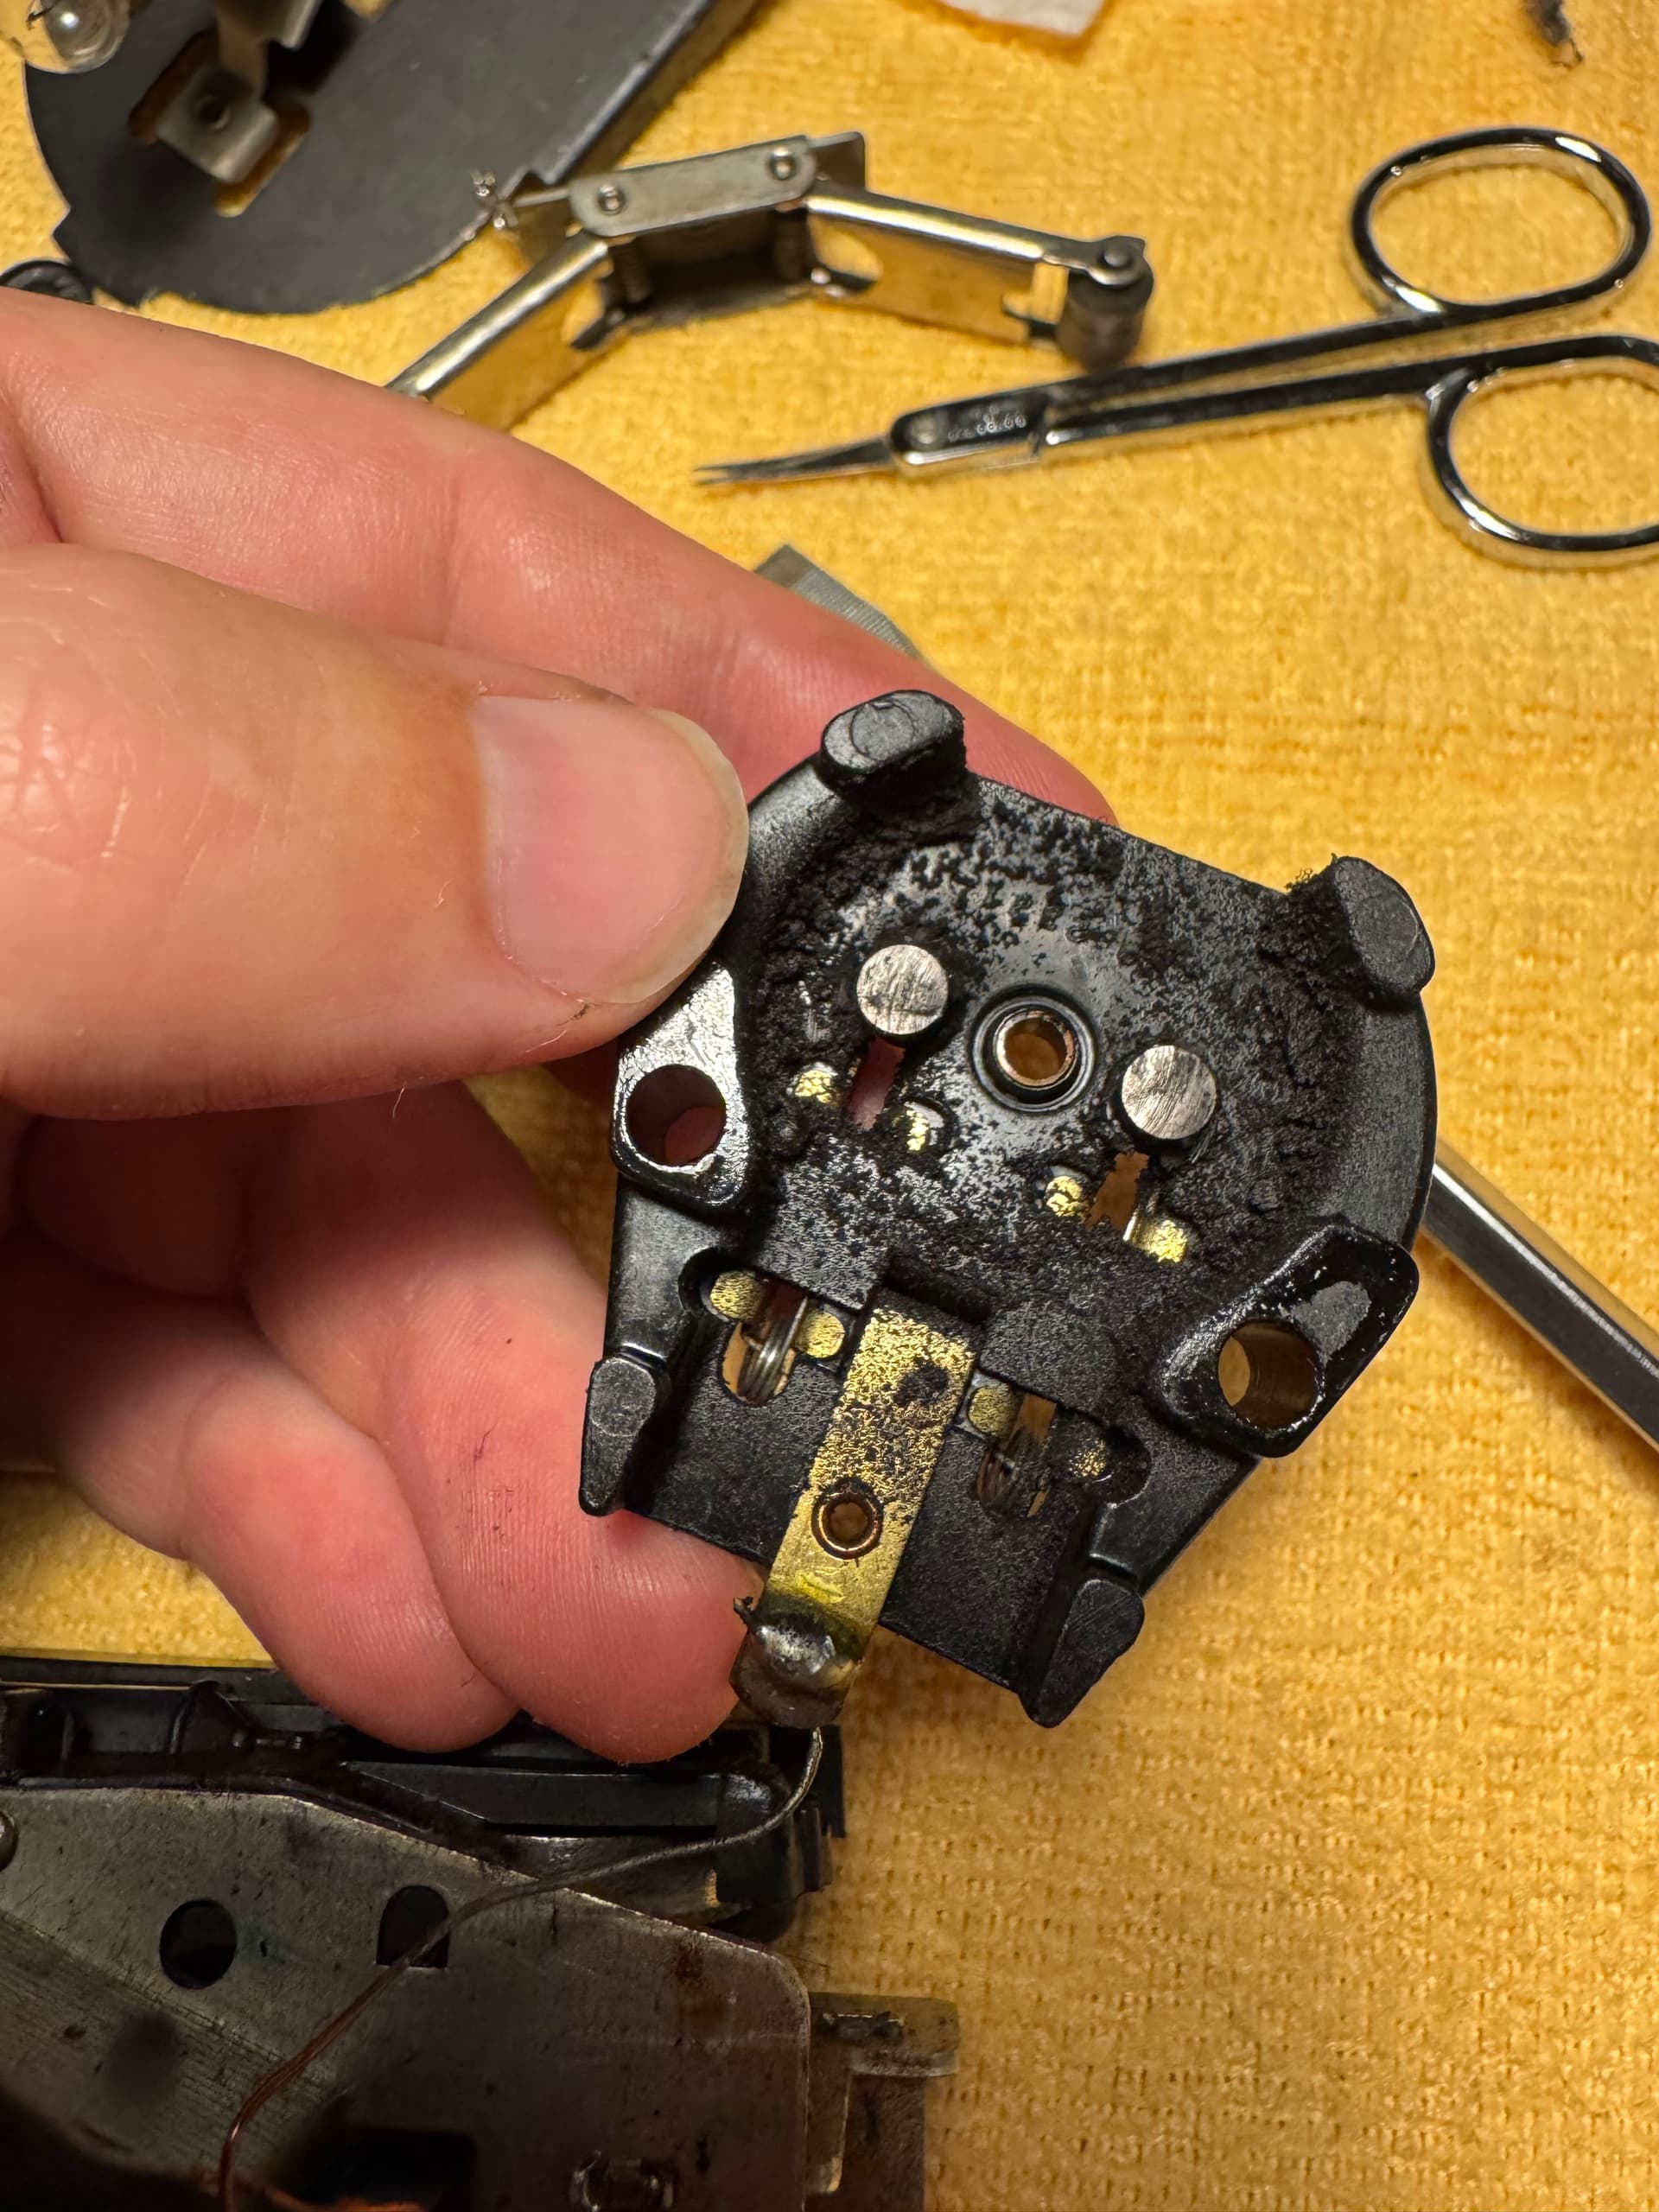
Here is what she looks like after a little Cleaning, there was a lot of carpet in between the gears.


2 Likes
Use a toothpick or wood skewer or similar with a little solvent dabbed on the end to get the gook out of the fillets of the gear teeth. The pressure faces are the things that have to be clean, but contamination elsewhere might transfer with the new grease.
I am interested in seeing what the ‘wisdom’ on refurbishing the commutator is. I would carefully face or stone it level, then use a toothpick to carefully clean any schmutz in the commutator slots. As mentioned in a previous post, gently lap the brushes until they have a clean surface – no more: as noted, they are graphite-loaded. You will break in the brushes against the comm surface, for proper conduction, by test-running the motor, so don’t get carried away lapping or burnishing the comm to a shiny finish.
Did you listen to TOC about the presence of glycerin or lanolin in some types of ‘rubbing’ alcohol?
1 Like
Methinks that that loco has a good chance at life!
1 Like