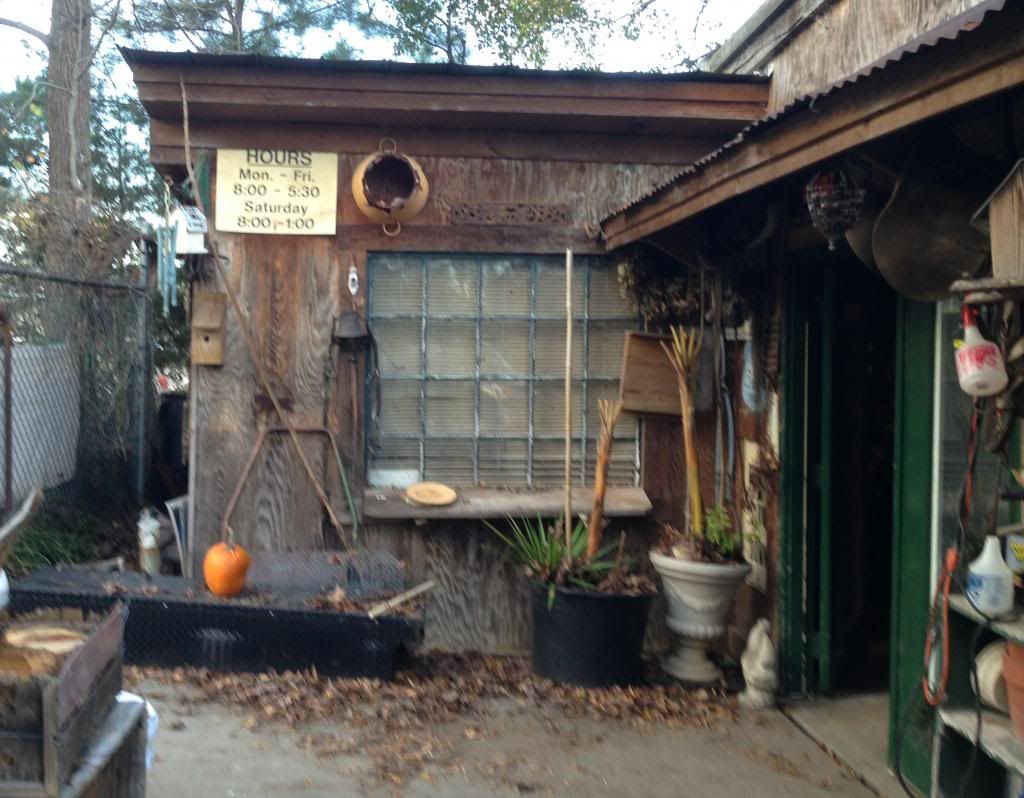
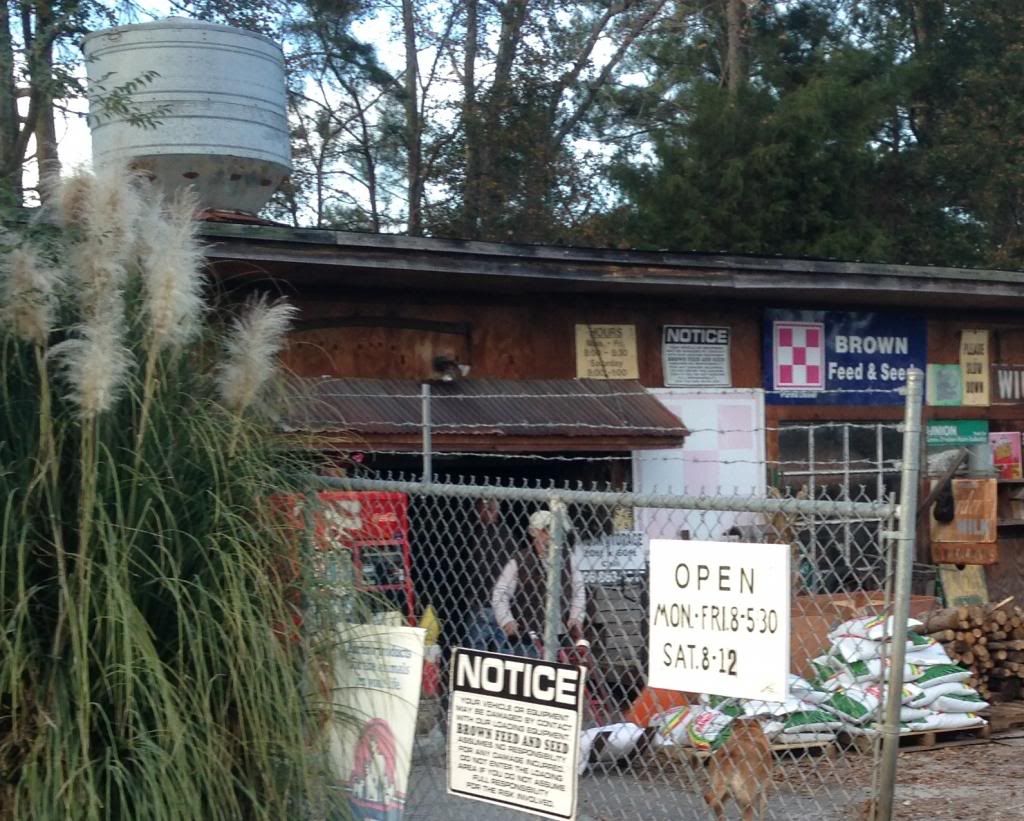
Now that I have methods worked out for neatly painting laser kits with acrylics, the next new challenge is finishing a structure that is not so neat. This is a local feed & seed store that we have done business with for over 20 years. Its been there forever and the “ambiance” probably hasn’t changed much since it first opened. I have a Blair Line Green’s Feed & Seed kit and I want to do a bit of customizing to capture the essence and give it the same name of the local store.
I’ve been playing with washes and dyes and can get the faded redwood stain and bleached wood effect fairly close using india ink in alcohol followed by lightly wiping/brushing with MinnWax sedona red. Is there a better way?
Since the layout room is on the house heating and AC system humidity is pretty stable. But since the ink wash and stain will not seal the wood should I follow up with some sort of sealer on the finished model to keep it from warping in the future? Brush on Model Master Laquer, or spray an acrylic sealer (or something else) inside and out? Or maybe warping is not likely to be a problem, and if it warps a bit it would not really be an issue for this model?
Last question- anyone know what the big bulbous thing is on the roof (last pic) and where I can get one? I already have the tin for the roof on order.
Seems like you have found a good way to reproduce the weathered wood. I would recommend that you seal it with dullcote afterwards. As it will warp without it. And, don’t forget to seal both sides… The bin on the roof looks like some kind of dust separator…
That round item looks like a feeder for pigs to me. But pig farming ran in the family[;)]
Very similar in shape to a duct separator, though. My guess it’s up on the roof to advertise the feed store’s presence, although maybe there just wasn’t room inside to store it?
One way to color wood while retaining the basic look of wood itself is to use colored chalks which are thoroughly brushed into the wood using an old toothbrush, or, for a lighter application, an old mascara or similarly soft brush. Most chalks are used for weathering and thus the actual primary and secondary type colors colors in the chalk collections tend to go unused, but they can be effective to suggest paint or stain that is not much there anymore. Best of all chalk applied to wood tends to hold up to Dullcoat or other fixitives better than chalks on plastic.
The thing on the roof looks a little like the thing you see on very old refrigerators.
But I also suspect it is a dust collector or separator, not a bad idea if that place rebags feeds or pesticides.
I have some chalks Dave but haven’t tried them on un-sealed wood. I’ll play around with them a bit to see what they do. And sounds like I should pick up some Dullcoat.
Seems that the thing on the roof is attacting some attention. Actually there are two of them, one on either end and yes definitely attached to the roof. And they’ve been there as long as I can remember. Knowing the owner and his idea of decor they could be just about anything. I thought about walking in and asking but figured someone here would know, and he certainly wouldn’t know where to get an HO casting for one.
I have no idea what it is either, but I am voting pig feeder (so far). I’ll ask him and I might get a straight answer. But maybe someone out there has another idea what it could be?
Follow-up question- it seems like it would be easiest to use the Dullcoat that comes in a spray can and spray the whole building after it is complete. But What does Dullcoat do to the plastic windows? The alternative is to buy it in a bottle, thin and use my airbrush but that would take a lot longer.
Dullcoat as well as any other flat finish will dull the gloss of the clear styrene making them somewhat translucent. Is great to do for old filthy glass but not a structure that is kept in some form of mormal use (clear glass).
Bull’s Eye sanding sealer or white shellac thinned w/ denatured alcohol applied first would be the only sealing that the kit would need. No need to apply final coat of sealer even if weathering powders/ chalks are used. Thinned shellac still needs to be brushed or sprayed lightly and not “wet” to any extreme as the thin panels can still warp and not completly return to a flat position for assy. Waterbsed sealers or thinned paint on untreated panels will warp like crazy. If panels look to begin to warp, weighting down until dry may be needed.
I use the Bullseye shellac/ alcohol for wood finishing and stain matching of woodwork and cabinetry. The ratio of shellac to “thinner” will comtrol the stain color penetration and the amount of graining wanted.
Those rooftop details may be found in some of the commercial detail factory sets, or you can kitbash them, they appear to be about 6’ diam. 1/2 to 5’8" Nylon bushing w/ cut down golf tee and washer may work.
For this project dirty glass would not be a problem and there are only a few windows that I could probably just tape off anyway.
But the sanding sealer idea is interesting- you mentioned it before. I looked up the bullseye sanding sealer and Lowes lists it, but it is not a stock item anywhere near me. Home Depot doesn’t carry it. We have a big Ace store nearby and I might get lucky there but its a long shot. Searching for white shellac on the big box stores hasn’t turned up anything.
If Ace doesn’t carry it I’ll order a can on-line. I want to give it a try before actually beginning construction. This kit is bigger than the company houses I just finished, but it is a much simpler build without all of the tiny pieces. So its all about getting the finish and detailing right.
I forgot about the windows and Dullcoat. They can I suppose be masked. But chalks really get into the wood, and not just on its surface as with plastics, so it might be that NO fixitive or Dullcoat is needed, particularly for a structure which unlike rolling stock is unlikely to be handled much. I think you’ll find it interesting how the chalks stain and color the wood but the wood still looks like wood. If you have built many laser wood kits and saved the leftover “stuff” you’ll have something to practice with.
Bull’s Eye Shellac and the sanding sealer are usually found at Home Depot. Any paint store will have it. The sanding sealer is already diluted/ thinned w/ the denatured alcohol (not sur exactly, but about 50/50) The qt can of Bull’s Eye white shellac may be easier to find and will last you many years for hobby use. I find a longer shelf life over the sanding sealer. I will usually thin to at least 1:3 to 1:5 ratio (shellac/ alcohol) for most sealing work. It all depends on if you want to seal for an opaque final painting or still want to show some wood graining for staining the parts. Experiment w/ the product on a scrap piece or the backside.
That link to the Bull’s eye" is it, just make sure it is white shellac not the orange.
It will be quite watery once thinned, I would just just brush on. Small foam brushes work as well. You can "play’ w/ just how much you can “wet” the panel, even though the produck drys quickly, to wet could affect the panel and may stay a bit warped.
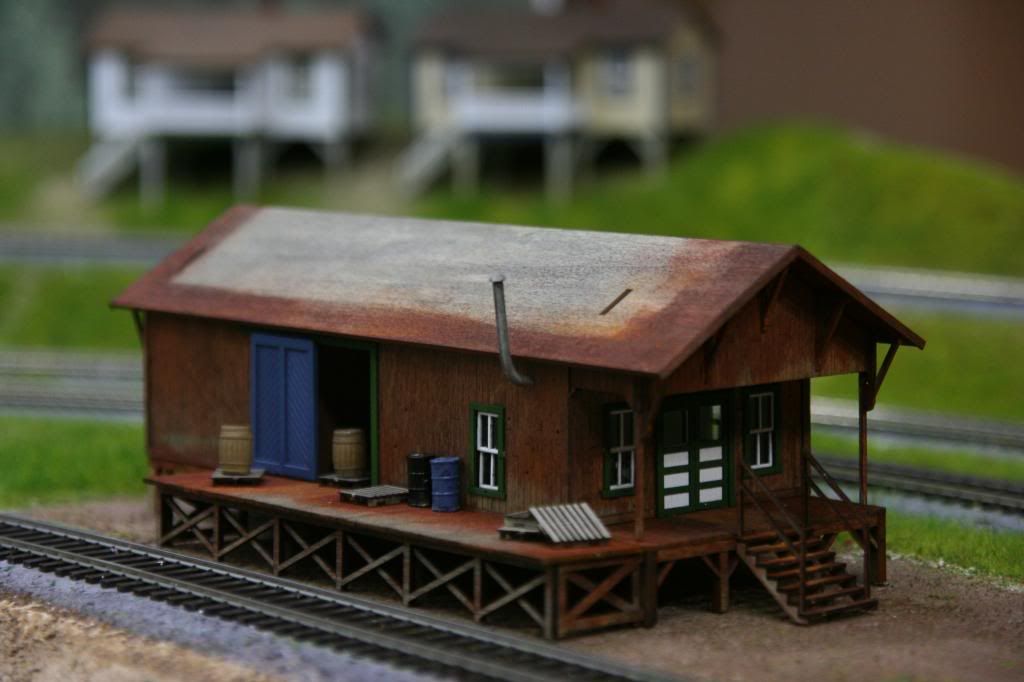
Here is where I ended up with the kit. I brushed a 1:3 shellac-alcohol mix on the bare wood and treated with india ink in alcohol before starting construction. Then stained the finished structure with Minn-Wax, highlighted with weathering powder to get some orange into it, and then installed the doors and windows. The shellac did not seam to seal quite as well as the primer-sealer and I had to weigh down the sheets until it dried to keep them flat. But the alcohol flashed off very quickly and the resulting finish took stain and paint nicely. The hardest part was controlling the stain- just a tiny bit goes a long way.
Now that I have the footprint defined I will concentrate on landscaping and gardening in the area for a bit. I still need to figure out out to make the “pig feeders” and install the tin roofing. Lots of signs to make too.
I think you did a great job of capturing the colour of the prototype. Well done.
One thing that has not been mentioned in this thread is the use of internal bracing to prevent the walls from warping. With a little planning it can be installed so it doesn’t show when the model is finished, but it does keep the wood walls straight. If the kit didn’t mention using it I’m a bit suprised. Something to consider for the next one.
And yes, I love building them too!
As for what’s on the roof, my first impression was a water tank. Why not go in and ask them?
Thanks Dave. I think it is close enough, and once detailed with roofing, signs and debris I think it should look pretty good. The kit came with some internal bracing and not knowing what to expect I added more but it probably didn’t need it.
I haven’t talked with the owner but did go by there to take more pictures, concentrating on signs and the parking area which is quite an amazing patchwork of broken concrete, blacktop and dirt/gravel so quite a modeling challenge in itself. I also took some close-ups of the roof “tanks”. There is no doubt they are Brower pig feeders- backing up a bit I could see the flared out part on the bottom where the feed is exposed, and even the support ridges/banding around them is exactly the same as the photo that Mike posted. Not likely that anyone is supplying Brower pig feeders in HO scale but I might be able to 'bash some up. [:)]
For the “pig feeders”, could you use a Rix Product roof vent as a starting point? You get 2 of each type in the package, and IIRC come in several pieces to make kit-bashing easy enough.
Looks great, if you are having trouble w/ the stain too dark (penetration), thin the stain or increase the shellac ratio upon sealing. You can always add more stain, but heavy or lap marking is quite difficult for control. This is why I will test on similar wood or a sample/ scrap from kit. Some of the “true” oil stains are easier to control than the quite thinned Minwax.
I’ve thought about trying to build pig feeders starting with roof vents, but these suckers are big. Maybe O scale? Not in a rush to finish, so thinking I will wait until my next trip to Atlanta to visit my Dad. There is a very nicely stocked railroad-only hobby store close by with a long aisle full of detail “stuff”, and I might find something there that would be a good starting point.
Bob I think I spent more time testing finishing techniques than I did actually building. I had the whole kit done in a day once I decided how to attack it. A bit thicker might have been better, but then again the stain may have turned out too light. [:D]
You gotta go in to the store and ask them why on earth do they have pig feeders on the roof? This is going to keep me awake at night! Somebody had to go to a lot of effort to put those things up there. Maybe they planned of keeping pigs on the roof[:o)]. Don’t laugh - I saw a general store in British Columbia (a long time ago) that had a sod roof and goats on it to keep the grass from growing too tall!
I love the “texture” of the prototype. Nothing is too neat and tidy and they are obviously making do with what they have. I’m sure you will create a model that will be interesting to study for more than a few minutes. Thanks for sharing!