Order of Construction

Dear Friends

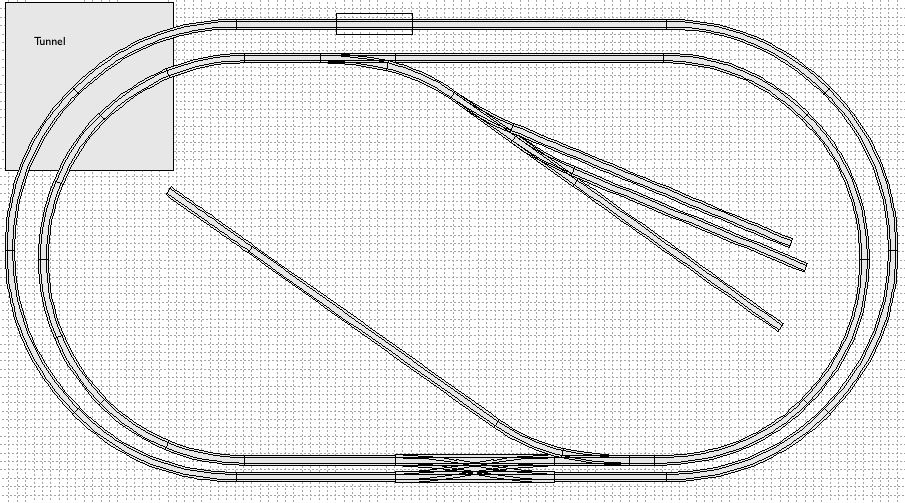
I’m finally getting around to building an HO layout for my four-year-old son. Its base is a 9’ x 5’ ping-pong table. The track is going to be simple: two concentric loops with a yard and one or two spurs. The outer loop will use a three-precent foam incline from Woodland Scenics. The layout is going to feature an 18" truss bridge and a small mountain tunnel. It will use the Shinohara double-crossover, which I’ve already purchased.

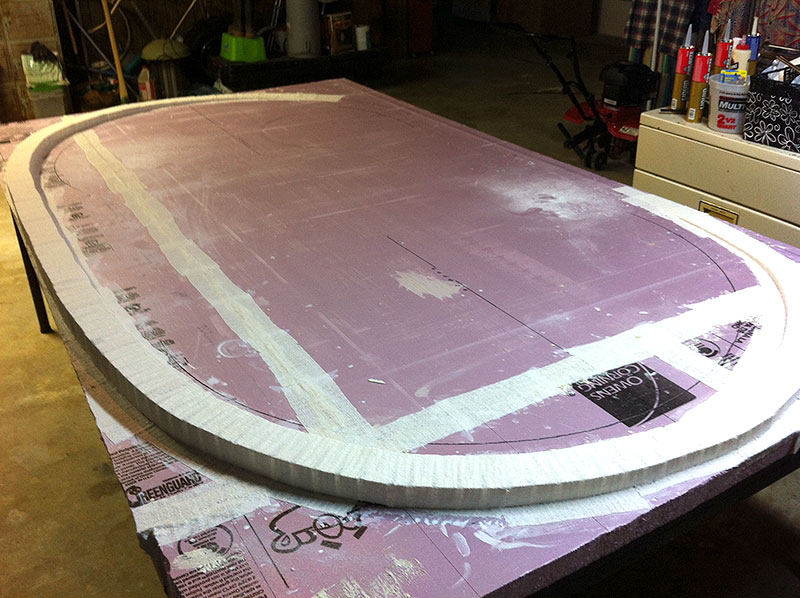
Here’s where I am now:

And here’s my general plan for finishing this project:

  1. Cut out space for bridge
  2. Paint
  3. Lay down cork roadbed
  4. Lay track
  5. Wire track
  6. Install tortoises (4 on double-crossover, 1 on other mainline switches)
  7. Ballast track
  8. Tunnel/Mountain
    1. cardboard strips
    2. plaster cloth
    3. joint compound
    4. paint
  9. Apply ground cover, trees, and structures

Is this the general order I should follow, or am I missing something? I’m not used to doing hands-on work like this and I’ve put off this project for more than a year. I’m accustomed to working with computer-based tools and being able to fix my mistakes easily.

Thank you very much for educating me about model railroading.

Sincerely,

Jaddie

It’s a reasonable plan. I prefer to ballast last, but more on that later.

I started with a 5x12 foot layout in HO scale. I had trains when I was younger, but this is my first “grown-up” layout. So, I had some idea of what I was doing, and I’d done a reasonable amount of research on line and at train shows and open houses.

The big assumption that I got completely wrong was how long it would take. Starting in April, I figured I’d have something pretty presentable by Christmas time. Instead, it took me 5 years to essentially complete that part of the layout. Doing the math, it came out to 1 month per square foot.

Now, I’ll admit that I can’t work full-time on my layout, and I’m also a very detail-oriented guy. I build all my structures from kits, or from scratch, and I put lighting and interiors in most of them. Still, though, I think it’s fair to say that you shouldn’t expect to get this all done quickly.

I didn’t build my layout task-by-task, but instead concentrated on building a section of the layout, starting in one corner and working my way across. I did put down all the roadbed, and I glued some track while pinning most of it in place. This gave me time to run the trains everywhere while working on the scenery slowly. I thus had a chance to find bad spots in the track and fix them, and even to make a few changes when I found I didn’t like the track plan for one reason or another. After I was happy with the track and scenery, my last step was ballasting. Once you ballast, it’s very difficult to lift the track and re-use it.

As we all like to say, though, “It’s your railroad.” The techniques that work for me might now work for you, so take your time, enjoy the process and keep us informed, OK?

Jaddie - Welcome!

That is generally the order I think most people tend to follow. But nowhere in your list though is testing. By that I mean checking and testing every wire and trackwork connection as you go, running cars through turnouts once they are installed, and even running engines on sections of track as they get completed. Someone else can probably come up with better language, but for me testing as I go is essential. You don’t want to get yourself in the position of completing even a small layout then powering everything up only to find there is a problem somewhere and you end up undoing some really hard work.

Also, if you don’t have an NMRA gauge, go get one. You will use this to check wheel sets, turnouts and other clearances. Every piece of rolling stock needs to be check against this gauge.

Like I said, someone else can probably more helpful. But since you are just getting started nothing can be more discouraging than doing a ton of work only to find that little problems which could be have been detected and corrected during construction become major operational headaches.

Sounds like you have about right. My personal preference is to ballast after the groundcover and mountain building is completed.

Dear Friends

Thank you all for responding.

I’ll test the track as thoroughly as I can with engines and rolling stock before proceeding to the next step. My son knows one speed–wide open–and I don’t want his pieces derailing onto the cement floor. He has a bunch of Thomas & Friends engines, all of which were converted to DCC, and he has an MTH SD70M-2 in Norfolk Southern livery. We use a Digitrax Zephyr to control his equipment. Believe it or not, he can select his locomotives and run them.

My goal is for him and a friend to be able to run trains together. If his interest in trains continues (it’s been extremely high since he was about eighteen months old), we’ll develop a larger layout.

Thanks again for responding. I appreciate your help.

Sincerely,

Jaddie

I agree, test as you go. Makes corrections easy. Plus it’s fun to run some trains even if it’s only back and forth.

Good luck

Paul

Good for him!

You might want to adjust the Max Voltage CV for your engines. That way, he can’t crank them up to Warp Speed, and they will likely live longer.

Another thing I forgot to mention - the generally accepted “maximum reach distance” across a layout is 30 inches, so your 5-foot wide layout has its center about as far as you should expect to be able to reach from the edge. So, you should work on the track and scenery in the center stripe of the layout first, so that you’re not knocking over buildings and trees on the layout edge while you try to get to the center.

Order? We don need no stinkin’ ORDER!

Well, certain things are dependent on others - it’s a little hard to put the track down AFTER ballasting the track… but in general, there really is no ‘order’ to ‘finish’ things. I couldn;t work like that, I guess I have a touch of ADD, so I like to work on differnet thigns at different times, whatever I happen to feel like doing. At present I don;t even have the last section of my benchwork up, but I have roadbed all around, MOST of the track down, about 1/4 of the track painted, a little bit ballasted, and most of it wired. ANd one piece of fascia up.

There is a downside to free-form building like this - once you are able to run trains, construction progress slows to a crawl. If runnign tains is actually a downside…since that’s the whole point in the end anyway.

Notice I didn;t say anythign about scenery - I leave that for last, because I’m not very good at it. I did paint over all my pink foam with an earth brown color so at least the trains are running over a browish landscape instead of some bright pink mystery planet. When I help others it’s always electrical or mechanical things, never scenery. I have plenty of ideas, but they never seem to come out quite the way I visualize - I’m definitely lackign even the slightest bit of artistic sense. I can;t even tell you what colors go together - so bad that I even buy only clothes that will match because outside og really glaring color mismatches I couldn;t tell you what two shades go together. And I’m not even slightly colorblind, so go figure.

–Randy

IMO testing is not as simple as it seems.

I’m on my first layout and I tested mine also but with 4 axle diesels. When I got a 6 axle one I found a problem or two. I then noticed that from one angle the track connection from turnouts looked good but when seen from “the back side” there was a tiny kink.

Then when I thought I had it perfect I bought a steamer. Steamers are really picky and each one can be more so that the other.

Now with the rest of my track laying I am super particular and have a test car that will find the slightest problem.

Good luck and has been said don’t rush, it will take time and building turns out to be an enjoyable part of model railroading.

Bob

I usually agree with Randy, but on this point I will differ. Before my re-incarnation as an adult model railroader, I would have said the same about myself. But, I needed a bunch of tile walls and platforms for my subways, so I began by getting into Hydrocal casting. “Hey,” I said, “this is fun. And it’s coming out much better than I thought it would, too.”

It’s in there, Randy. You just have to find it.

Hi! Nice project for your son!!!

Your sequence looks good, but I do have some advice. Before you ballast, test, test, test, and test again. Use your longest and shortest locos and cars, forward and backward, fast and slow, with trains and without.

Accept nothing short of “no derailments”.

In fact, I would leave the ballast to last. That way if you have any adjustments or changes to make, its not such a big deal (to move unballasted track).

ENJOY !!!

Great project for father and son. Did the same thing about 16 years ago and both my sons and I still enjoy the hobby to this day. I have spent some real quality time with both of them together and individually in the layout room(s) over the years. It was well worth the time, cost and effort.

Getting the trains running reliably is the of the utmost importance in my book. Everything else is secondary.

Have fun, enjoy this time together and post some photos of the progress.

John R

Dear John & Friends

I was going to try a more adventurous track design than the boring pair of concentric loops, but I figured it’d present less trouble, especially with 27" and 24" radii, in getting Max’s trains running smoothly.

Believe it or not, I created nearly 400 files in RailModeller (Mac track design application) before settling for concentric ovals.

I’m tired of putting this off. After I get this project under my belt, I’ll be in a better position to evaluate taking things to another level in the future or hiring someone to do it for us.

Thanks again for all of your responses.

As I write this Max is watching a Thomas & Friends video projected onto the wall with a projector and playing with his wooden railway. The boy is nuts about trains.

Sincerely,

Jaddie

Glad to hear of a young one interested in trains. I was, but mine weren’t and there’s aren’t either, that leaves Gramp pretty much on his own.

I agree with the above posters, don’t ballast until your trackwork is well tested. The exception would be tunnel enterances and other places that will be difficult to reach later.

I would remove step 2, painting and wait until 8d. Get a can of earth colored paint, tan or a light brown work well though some folks prefer to use a green. Look for something close on the oops shelf at a paint supplier. Often it is at a conciderable discount and exact color isn’t terribly important, as most of it will be covered with ground cover. This is one place where “close” is usually “good enough.”

When you are ready to paint, do not paint a large area at one time. I usually do a square foot or two, then sprinkle on your first layer of ground cover. Don’t put so much on it looks like a lawn, you can even use a couple different shades and leave some of the paint showing through. Also, don’t put the ground cover right to the edges of the painted area. That way when you do the next area you can overlap the paint and not paint over your new ground cover. You can acutally do a lot of area at one time, just paint a small area, add ground cover, paint and add ground cover. The thing is to get the ground cover on the paint before it dries too much. Saves gluing the first layer of ground cover on after the paint has dried, it’s already there.

Edit add: While still in the planning stages, if you are thinking of expanding, make sure you leave a place for a turnout to join the addition. This is often done by leaving a siding close to the edge that can be extended. It is often called an interchange track on some plans and made to operate as a location where your railroad interchang

I agree with the others that your last step should be to ballast. You really have to test your track work first - - - and thoroughly.

It would also be useful if you post a drawing of your track plan. I am doubtful that a double crossover is going to fit well on a 5’ x p’ table top with concentric loops, but that all depends upon where you plan to install the double crossover. A double crossover is at least 20 inches long and that requires a lot of space not only for the double crossover but also the track leading to and from the double crossover.

Also, judging from your photo, putting the track at the edge of the layout, particularly the elevated portions, is precarious at best. With a 4-year old operator, that is an accident waiting to happen. You might want to consider a plexiglas shield surrounding the outer perimeter of the track.

Rich

Dear Rich

Here you go:

I don’t like having the tracks that close together, but I’ve spent US$85 on that double crossover, so I hope it’ll work. The track is going to be home to more than a dozen Thomas & Friends engines and a couple of SD70s. He wants to pull all kinds of cars, including passenger coaches. I know passenger coaches beg for wide-radius curves, but I think I saw some that require just 22".

Sincerely,

Jaddie

Have you considered a turntable and roundhouse for all those Thomas engines? It’s normally a big investment in both dollars and real estate, but with those very small engines and your very small engineer, an inexpensive Atlas manual turntable would work fine if you have it close enough to the edge of the layout that he can work the handwheel, and even motorizing it doesn’t cost that much more. I’m not sure if the SD70’s would fit (it’s 9 inches across) but the turntable would also give you the ability to reverse direction of an engine, something your track plan doesn’t otherwise have.

Jaddie, that double crossover will work fine where you plan to place it. That right hand turnout just before it could pose a problem unless it is aligned perfectly so spend some time to get that right. I never like end to end turnouts, but I do have some. I have two of the Walthers Shinohara double crossovers on my layout, and they are wonderful pieces of track.

Don’t forget to consider a plexiglas shield around the perimeter of the layout to prevent trains falling to the ground.

Regarding passenger cars, there are a lot of “shorties” that will negotiate 22" radius curves quite nicely.

Rich